How to adjust telescopic slides on drawers
The most popular today, as before, remain telescopic (ball) full extension guides.
They look like this:
Their advantages include:
- Relatively inexpensive price
- Smooth and quiet running throughout its entire service life
- Able to withstand certain loads
- Wear resistance and strength
- Ease of installation
These mechanisms are very often used for drawers of chests of drawers, kitchen sections, wardrobes and other similar mechanisms, with the operation of which they do not want to have problems in the future.
Types of repairs
Chest restoration operations are divided into three classes:
- adjustment;
- redecorating;
- complete renovation.
Products need adjustment after purchase and after complete restoration of the old one. And here we mean adjusting mechanisms, hinges, setting levels, securing loose handles. It happens that you want to repair a chest of drawers, simply updating a boring design or one that has lost its freshness. Then they resort to cosmetic restoration, based on the current condition and the desired result. A complete renovation implies the return of functionality to furniture parts and the replacement of elements that cannot be restored.
Calculation of drawer dimensions
To install the ball slides correctly, let's check that you have detailed the drawer itself correctly.
Width
According to the technological dimensions of furniture design, an assembled box without a front in width (between it and the side of the product) should have gaps of 13 mm on each side . This is exactly how much the thickness of the “telescope” will take on.
See the diagram for box dimensions:
Length
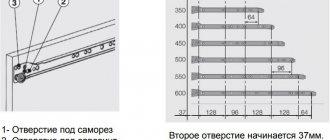
Dimensions of telescopic guides for retractable structures from 250 to 800 mm in increments of 50 mm: 250 mm, 300 mm, 350 mm, 400 mm, 450 mm, 500 mm, 550 mm, etc.
However, there are situations when it is necessary to deviate from this condition. For example, if the internal depth of a cabinet, cabinet or chest of drawers is not 500 mm, but slightly less, let’s say 495 mm. In this case, if we take a 500 mm box, it won’t fit, but if we make it smaller, 450 mm long, the arm won’t rise, because at the same time we lose 35 mm of usable space:
- 35 mm (loss) = 485 mm - 450 mm (rail length)
- 485 mm = 495 mm - 10 mm (distance between the back wall of the drawer and the chest itself)
In such situations, it is worth considering the option of a 495mm drawer with 450mm slides. Of course, it won't go all the way out due to the shorter guides, but that's not a big deal. But the capacity has become larger; during use, the housewives will appreciate this!
Height
The height is usually made based on the needs of the person who will use it. The height is usually 80-250 mm.
Installation instructions for roller guides for drawers
Now let's talk about installing the roller guides. When installing roller guides for drawers, the kit must be divided into right and left sides, and then into inner and outer parts. The left outer part has a U-shaped profile, the right outer part has a G-shaped profile, and the inner part has an L-shaped profile.
All parts of the guides have holes for their fixation and adjustment on the parts using self-tapping screws. Along the marking lines, the corresponding parts of the guides are screwed onto the racks of the product body. It is necessary to make sure that the rollers on them are closer to the front end of the part. L-shaped parts of the guides are attached to the already assembled box. In this case, the rollers should be located at the rear end of the box.
The product is assembled, drawers are inserted, fronts and handles are hung. The installation is completed.
Installation of ball telescopic guides
On the side of the drawer, horizontally, strictly in the center, mark a line and screw one half of the guide along it.
Now we need to mark a similar horizontal line on the inside wall of the chest of drawers.
I took the exact distances and dimensions from the drawing of my chest of drawers; you can use the drawing of your furniture product, approximately as shown in the figure:
That is, we mark 417 mm from the floor on the sidewall and mount the telescope at this height.
This completes the hardest part of the work; now we screw the two halves of the guides strictly along the line to the drawer and to the side and move it into place.
Installation, calculation and installation of guides for drawers
It’s not enough to know what types of drawer guides there are, but the question arises of how to calculate and install the guides
.
There are a large number of methods and approaches to calculating and installing guides on the Internet. I use a simple program from Blum called DYNALOG with a clear interface; for design we use the DYNAPLAN module.
Special furniture programs are expensive, there is no point in mastering them, much less buying them, if you want to make products for your home yourself.
As an example of a basic product, I will give a cabinet 616 mm high, 600 mm wide, 500 mm deep with overhead facades 200 mm high, chipboard drawers 150 mm high, gaps between the facades 4 mm.
If we want to calculate the installation of drawers in a sliding wardrobe, then keep in mind that with a cabinet depth of 600 mm and an internal partition of 500 mm, we carry out the calculation for inset facades, the facades will be inside between the side wall and the partition, as well as between the horizontal walls. It is better to make side gaps of 4 mm in the version of inset facades.
When assembling new furniture, it can be very difficult to adjust several drawers stacked on top of each other so that they do not interfere with each other. It is important to install the guides correctly here. It will only take a few minutes.
Video: installing guides on drawers
Modern furniture is often made with drawers, since such systems save space, which is especially important in small rooms (kitchen, bathroom, etc.), and increase comfort during use and maintenance. With a large selection of drawer systems, telescopic guides for drawers are popular.
Fittings for mounting a drawer
What is this type of fittings? What are its advantages and disadvantages? Read on to learn how to choose and install telescopic guides correctly.
Peninsula kitchen layout
This modern and unconventional method of arranging furniture in the kitchen is becoming increasingly popular, especially among owners of the notorious “Khrushchev” apartments.
In an effort to create more comfortable conditions, the owners combine the kitchen with the living room. And such planning allows you to successfully zone the room with the help of kitchen cabinets, shelving and a bar counter, separating the work area from the dining area.
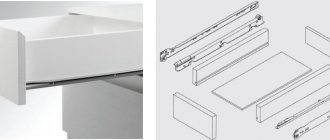
The device of telescopic guides
The telescopic furniture guide consists of the following elements:
- a metal base, usually made in the shape of the letter “P”;
- metal strip included in the base;
- driving mechanism;
- locking element.
At the user's request, the guide can be supplemented with:
- closer Retractable systems with a closer eliminate the possibility of damage to the facade when closing abruptly, as they allow the drawer to move smoothly and slowly;
- return spring, facilitating the process of closing the drawer;
- Push-to-open system (opening the drawer by pressing the front), increasing the level of comfort during use.
Retractable system with soft closing function
Selecting telescopic guides
To choose the right telescopic guides, you need to consider:
- type of system;
- technical specifications;
- manufacturer.
Types of telescopic guides
Telescopic type guides can be classified according to the following criteria:
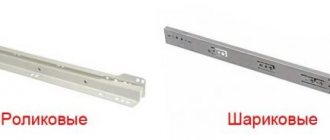
- according to the type of driving mechanism. The guides can be on rollers or balls. Roller systems are distinguished by their ability to withstand less load, shorter service life, but also lower cost. When the rollers move, extraneous noise may appear;
- according to the degree of extension. Telescopic guides can be fully or partially extended. When installing a system with partial extension, the back of the drawer will not be accessible to view the contents, but such guides cost significantly less;
Differences between the guides according to the degree of drawer extension
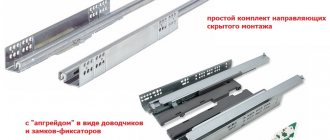
- installation location. How to install telescope guides? Telescopic guides are produced, the installation of which is carried out on the side surface of the drawer and the bottom surface (hidden installation). In the first case, the working space of the chest of drawers (cabinet, cabinet or other piece of furniture) will be significantly reduced.
Concealed telescopic guide kit
Determination of technical parameters
When choosing retractable systems, it is recommended to consider:
All parameters are indicated in the technical documentation.
Manufacturers
The most popular manufacturer of retractable systems is the company Blum (Austria). Each set of guides comes with detailed instructions, which indicate how to properly install the systems, how to remove a drawer without dismantling the guides, and how to care for the fittings.
You can also pay attention to the following companies:
How to arrange kitchen cabinets 2021. TOP best ergonomic ideas
Modern multivariate kitchens allow you to play with space, arranging kitchen cabinets and shelves at your discretion. However, how to arrange kitchen cabinets to make the room cozy, comfortable, and functional?
The kitchen is the “heart” of any apartment or house. In order for the housewife and all household members to feel comfortable here, it is necessary to carefully consider the layout of the arrangement of floor and wall modules (cabinets).
When developing the interior design of a kitchen and its layout, a number of important factors are taken into account, including the area and architectural features of the room. When choosing a furniture arrangement, you need to choose an option in which the “work triangle” “sink-refrigerator-stove” will be the most ergonomic. It is important that the owner does not have to spend a lot of time moving between these important strategic objects.
eliminate errors and inaccuracies, sketch out on paper a plan for the future location of all equipment and furniture. Transfer the kitchen to scale on paper or in a special application. The second option is more preferable, because it will allow you to create a 3D model. On the plan, mark the location of windows and doors, communications. Now think about the location of all areas in the kitchen and each item separately.
Let's look at the main types of layouts into which you can bring something of your own.
Installation of telescopic guides
How to install a drawer? The installation diagram of the guides depends on the type of retractable system.
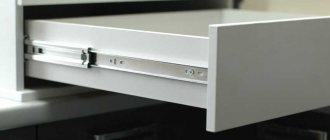
Installation of side guides
Installation of telescopic drawer systems on the side surface of the drawer is carried out in the following order:
- guide disassembly. How to remove components? To disassemble, you need to loosen the lock and remove the guide bar from the base;
Preparing the guide for installation
- use self-tapping screws to secure the strip to the drawer;
- secure the base of the guide to the furniture frame;
- connect the parts of the retractable system. How to insert a box? The guide bar is inserted into the base and retracted. If a click is heard while the work is being done, then everything is done correctly;
Guide installation diagram
- adjust the gaps between the box and the frame. Adjustment is carried out using special screws located on the guide.
Location of screws for adjusting the guide
Installation of hidden guides
To install concealed mounting guides on a drawer you must:
- Before performing work, read the attached instructions in order to correctly set the installation dimensions and prevent distortion and incorrect operation of the retractable system;
Installation dimensions as recommended by the manufacturer
- At the bottom of the box, in accordance with the attached diagram, secure the clamps and drill mounting holes;
Attaching the clamps to the bottom of the drawer
- install guide strips;
- attach the bases for the planks to the furniture frame;
- insert box;
- make adjustments.
For more information on how to independently select and install telescopic guides, watch the video.
How to remove a drawer on hidden guides, for example, for repairs. To remove it, just loosen the latches on the clamps and pull out the strips.
Hello, friends!
Any business has its own nuances and subtleties. And often, they relate to fairly simple (and obvious) things. However, they can play quite an important role...
Today I want to talk to you about the widely used retractable fittings used to make any furniture.
These are telescopic guides.
Their widespread use is due not only to reliability and practicality, but also to some technological conveniences.
For example, in the installed position, such guides can be adjusted in two planes.
When making modules that contain drawers, adjusting one front is often indispensable.
You can, for example, set equal gaps on all sides in the frontal plane.
But they can “come out”, for example, between the front edge of the side and the facade.
In this case, you need to adjust the position of the drawer itself. And this can only be done with the help of its guides.
But having done this, you will need to adjust the facade again, since the original dimensions of the indentations will naturally change.
In order not to engage in such “monkey gymnastics”, you first need to correctly set the position of the box in the box.
It is necessary that it be installed strictly in three planes. To do this, of course, the box itself must have the correct geometry.
Process:
1. We take out all the drawers to expose the guides (the same “slides” along which the drawers move back and forth). 2. We place a level on all the guides one by one to find the culprit of the problem - the crooked “sled”. 3. Unscrew the screws that hold the guide we are interested in. We leave the rear screw in place (if you decide to move the guide to another place, then the rear screw needs to be screwed to a new height). 4. Holding the guide, place a level on it again and straighten the “sled” until it is strictly perpendicular to the floor. 5. Mark with an awl in the wall the place for the outermost screw. 6. Screw the screw into a new place - first the outermost one, and then all the others. 7. Put the box in place and check the result. These steps may need to be repeated with other guides until they are all straightened as they should be. 8. Enjoy the results of your work!
Hello dear friends.
Today we will talk to you about the operation that completes any installation of a kitchen unit.
So, the set is installed, all the kitchen appliances are built-in, in a word, everything is almost ready. You can start hanging the facades...
What nuances do you need to know to make this process go quickly and efficiently?
How should facades be hung on kitchen boxes and adjusted?
When designing a kitchen, certain gaps are given for the upper and lower doors (relative to their frames).
As a rule, the lower doors (on the lower modules) should be installed flush with the lower horizon, and at the top (between them and the countertop) there should be a certain gap (which usually ranges from 4 to 5 millimeters).
The upper doors should evenly overlap the boxes, and to adjust them, gaps of 1 to 2 millimeters are given on each side (meaning, top and bottom).
So, all these facades should be on the same upper (or lower) level.
Moreover, the corresponding gaps between them must be the same (of course, they will not be absolutely the same, but you need to try to make them visually the same).
This, I think, is clear to everyone.
Well, now let's figure out how to display facades in practice? What to start from and what to be guided by?
When the kitchen set is still at the assembly stage (and it is assembled in separate modules), then the facades are hung, naturally, according to their design parameters, the way they should be attached to the installed set.
But during installation, in any case, some module will “drive”, and excess voltage will appear somewhere...
In a word, when it comes to hanging facades (before installation, all facades are naturally removed from the boxes so as not to be damaged during the installation process), they almost always need to be adjusted.
Well, in order for this adjustment not to cause trouble, you need to try to install (or hang) the modules so that they are all at the same (horizontal or vertical) level.
This is the most important condition.
If this is not done, then many problems may arise when hanging facades.
Let's describe the most common of them:
Kitchen base modules are not level
In this case (when some boxes are located above and others below the common horizontal), a problem arises with vertical gaps (top and bottom) between the door and the outer edge of the module.
In the case of lower modules, when the facades are placed at the same level, an uneven upper gap will be visible (and, at the bottom, naturally, some of them will protrude beyond their boxes).
In the case of upper modules, on one side the modules will extend beyond the dimensions of the facades, and on the other hand (we are talking about the top and bottom) the facades will extend beyond the dimensions of the modules.
The solution to this problem is to place the base at one horizontal level.
The boxes do not correspond to the vertical level (in corner kitchen units)
If, for example, the kitchen top (or bottom) is straight, then even if it is a little “overwhelmed” vertically, there will be no problems. The main thing is that it is not “twisted by the propeller.”
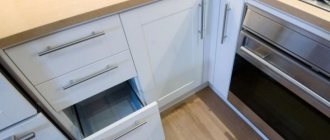
Installation and use of telescopic drawer slides
Modern furniture is often made with drawers, since such systems save space, which is especially important in small rooms (kitchen, bathroom, etc.), and increase comfort during use and maintenance. With a large selection of drawer systems, telescopic guides for drawers are popular.
Fittings for mounting a drawer
What is this type of fittings? What are its advantages and disadvantages? Read on to learn how to choose and install telescopic guides correctly.
Installation of mechanisms
Recently, the use of roller mechanisms has become widespread. This is due to the presence of computers in apartments and houses, which are installed on special computer tables. Such tables have a sliding shelf to allow installation of a keyboard on it. Also, similar mechanisms can be on various drawers, shelves and shelves. You can assemble such furniture elements yourself. The main thing is to approach this matter responsibly.
For installation you will need the following tools:
- drill;
- ruler;
- pencil;
- self-tapping screws
The installation diagram itself has a fairly simple sequence and is very easy to perform. To begin installation, you need to make markings on the walls of the box. This must be done accurately to prevent further distortions that may occur in moving parts.
Next, you need to drill holes using a drill, and they should not be through. Their depth should be 12-14 mm - this is caused by the length of the screws and the thickness of the chipboard sheet. Similar holes must be made on the body of the box (they must exactly match the previous ones).
High-quality fittings are a prerequisite for the manufacture of high-quality cabinet furniture. The strength, durability and comfort level of kitchens, chests of drawers, cabinets, cabinets and wardrobes depend on the technical characteristics of the components.
There are several types of retractable systems, differing in design complexity, cost and ease of use:
- roller guides;
- ball guides;
- metaboxes;
- tandems;
- tandemboxes;
- Legraboxes.
Typically, installing drawer slides is a simple process that even a non-professional can handle. Installing drawer guides with your own hands will require careful study of the instructions, a little time and skills in working with a screwdriver.
The device of telescopic guides
The telescopic furniture guide consists of the following elements:
- a metal base, usually made in the shape of the letter “P”;
- metal strip included in the base;
- driving mechanism;
- locking element.
At the user's request, the guide can be supplemented with:
- closer Retractable systems with a closer eliminate the possibility of damage to the facade when closing abruptly, as they allow the drawer to move smoothly and slowly;
- return spring, facilitating the process of closing the drawer;
- Push-to-open system (opening the drawer by pressing the front), increasing the level of comfort during use.
Retractable system with soft closing function
The advantages of telescopic guides compared to other types of retractable systems are:
- variety of model range;
- no noise during operation;
- Possibility of installation on boxes with varying degrees of load;
- Wear resistance and long period of use.
Among the disadvantages is the cost of the systems, which is several times higher than conventional roller or ball guides.
Selecting telescopic guides
To choose the right telescopic guides, you need to consider:
- type of system;
- technical specifications;
- manufacturer.
Types of telescopic guides
Telescopic type guides can be classified according to the following criteria:
- according to the type of driving mechanism. The guides can be on rollers or balls. Roller systems are distinguished by their ability to withstand less load, shorter service life, but also lower cost. When the rollers move, extraneous noise may appear;
Types of telescopic guides
- according to the degree of extension. Telescopic guides can be fully or partially extended. When installing a system with partial extension, the back of the drawer will not be accessible to view the contents, but such guides cost significantly less;
Differences between the guides according to the degree of drawer extension
- installation location. How to install telescope guides? Telescopic guides are produced, the installation of which is carried out on the side surface of the drawer and the bottom surface (hidden installation). In the first case, the working space of the chest of drawers (cabinet, cabinet or other piece of furniture) will be significantly reduced.
Concealed telescopic guide kit
Determination of technical parameters
When choosing retractable systems, it is recommended to consider:
All parameters are indicated in the technical documentation.
Manufacturers
The most popular manufacturer of retractable systems is the company Blum (Austria). Each set of guides comes with detailed instructions, which indicate how to properly install the systems, how to remove a drawer without dismantling the guides, and how to care for the fittings.
You can also pay attention to the following companies:
Frame repair
Since the chest of drawers itself is a load-bearing structure, it is subject to increased requirements for strength and stability. Ideally, it is advised to remove the drawers from the chest of drawers on runners, disassemble the parts, and replace panels that have dried out or cracked. Before screwing furniture bolts, it is important to thoroughly lubricate the joints with PVA glue so that they do not come apart later. After the glue has dried, restoration begins. And to do this, remove the old coating by using a solvent with methylene chloride (allowing it to act for a maximum of half an hour), or by peeling it off with a spatula, knife, or sandpaper. Then the defects are puttied, the surface of the chest of drawers is sanded, thoroughly cleaned and degreased, after which a new selected coating is applied (stain with varnish, tint varnish, paint with varnish, decorative film).
Installation of telescopic guides
How to install a drawer? The installation diagram of the guides depends on the type of retractable system.
Installation of side guides
Installation of telescopic drawer systems on the side surface of the drawer is carried out in the following order:
- guide disassembly. How to remove components? To disassemble, you need to loosen the lock and remove the guide bar from the base;
Preparing the guide for installation
- use self-tapping screws to secure the strip to the drawer;
- secure the base of the guide to the furniture frame;
- connect the parts of the retractable system. How to insert a box? The guide bar is inserted into the base and retracted. If a click is heard while the work is being done, then everything is done correctly;
Legrabox boxes
The most modern and expensive systems of guides for drawers, occupying a high position in the list of all furniture components. The reinforced design stably withstands loads of up to 60 kg. The matte stainless steel surface emphasizes the rigor and sophistication of the stylish design of the legrabox.
Installation of this type of system requires pinpoint precision in drilling facades and side walls, and absolutely verified calculations in the manufacture of chipboard parts. It is also necessary to correctly and accurately mill the bottom.
Manufacturers of furniture fittings offer other ways to use guides. For example, fastening retractable baskets, nets, containers for various purposes.
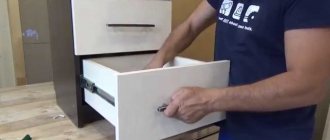
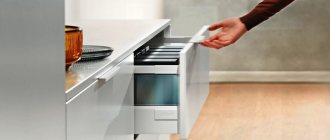
Installing telescopic (ball) guides on a drawer
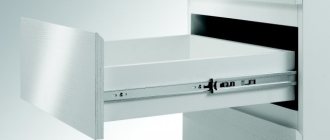
The most popular today, as before, remain telescopic (ball) full extension guides.
They look like this:
Their advantages include:
- Relatively inexpensive price
- Smooth and quiet running throughout its entire service life
- Able to withstand certain loads
- Wear resistance and strength
- Ease of installation
These mechanisms are very often used for drawers of chests of drawers, kitchen sections, wardrobes and other similar mechanisms, with the operation of which they do not want to have problems in the future.
How to attach fronts to drawers
Now we need to set (adjust) the facades. But first, we need to figure out how exactly we will attach these facades to the drawer. The most popular and widespread method of fastening facades is to fix them with 3-4 screws measuring 3.5x30mm. Or as furniture makers say: “Put it in the thirties.” Which in translation means: “Fix with screws 30mm long.” Why exactly “thirty”? Well, everything is simple here too. Our chipboard thickness is 16mm. “Thirty” goes right through the front wall - this is already 16mm for us and crashes into the facade, which has the same thickness, and stops 2mm from its front side. As a result, we have a rigid fixation of the facade, as well as an aesthetic appearance of the product. However, I want to warn you that facades are different. For example, facades made of milled MDF panels are not 16mm thick over their entire area. Here you need to carefully calculate the places where the facades are attached and make sure that it is in these places that your screw will not get into the thin area of the facade and will not come out from its front side. Well, if your drawer fronts have a uniform thickness over the entire area, then don’t bother too much with calculating where to fix the front. Because no matter where you screw them, you still have no risk of ruining the facade by screwing it through with a screw.
In general, having decided on the places to drill holes for the “thirty”, we take a drill in our hands, load a drill with a diameter of 2 mm into it and drill through holes for 3.5x30 mm screws in the front wall of the drawer. Then we take a screwdriver and screw in the screws so that their tips do not stick out from behind the front wall and do not interfere with further installation of the drawer fronts.
Calculation of drawer dimensions
To install the ball slides correctly, let's check that you have detailed the drawer itself correctly.
Width
According to the technological dimensions of furniture design, an assembled box without a front in width (between it and the side of the product) should have gaps of 13 mm on each side . This is exactly how much the thickness of the “telescope” will take on.
See the diagram for box dimensions:
Length
Dimensions of telescopic guides for retractable structures from 250 to 800 mm in increments of 50 mm: 250 mm, 300 mm, 350 mm, 400 mm, 450 mm, 500 mm, 550 mm, etc.
However, there are situations when it is necessary to deviate from this condition. For example, if the internal depth of a cabinet, cabinet or chest of drawers is not 500 mm, but slightly less, let’s say 495 mm. In this case, if we take a 500 mm box, it won’t fit, but if we make it smaller, 450 mm long, the arm won’t rise, because at the same time we lose 35 mm of usable space:
- 35 mm (loss) = 485 mm - 450 mm (rail length)
- 485 mm = 495 mm - 10 mm (distance between the back wall of the drawer and the chest itself)
In such situations, it is worth considering the option of a 495mm drawer with 450mm slides. Of course, it won't go all the way out due to the shorter guides, but that's not a big deal. But the capacity has become larger; during use, the housewives will appreciate this!
Height
The height is usually made based on the needs of the person who will use it. The height is usually 80-250 mm.
Roller guides
Roller guides
The guides are the simplest in terms of design and installation; by the way, you can also find the following names for these guides, such as runners for drawers or runners. Their price is small, on average 50-100 rubles. for a couple. The roller guides look like the photo below, you've probably seen them more than once.
The roller guides are covered with durable epoxy enamel; guides are available in different colors, the most common guides being cream. You can find roller guides for drawers with a depth of 250 to 800 mm, that is, for almost all cases.
Roller guides can withstand dynamic loads of up to 25 kg; you are unlikely to store anything heavier in a chest of drawers or in a drawer in a closet. The disadvantages of roller guides are the noise with which they extend and close; the extension is partial. But the low price eliminates these shortcomings.
According to the installation diagram, the gap between the outer part of the side wall of the box and the side wall of the product body should be 12.5 mm or 25 mm on both sides, usually 26 mm is taken in calculations. This means that the width of the box should be 25-26 mm less than the internal space of the cabinet.
Marking the mounting points for the guides
The principle of installing guides is much simpler than it might seem at first glance.
The telescopes (if you pinch the black antennae and pull out one half) can be disassembled into two parts, one of which is attached to the side of the drawer, and the second to the inner side of the chest of drawers.
Our main task is to determine the exact locations of these fastenings, screw each half with three screws and insert the drawer into the chest of drawers, thereby connecting the guide into one whole.
Installation of ball telescopic guides
On the side of the drawer, horizontally, strictly in the center, mark a line and screw one half of the guide along it.
Now we need to mark a similar horizontal line on the inside wall of the chest of drawers.
I took the exact distances and dimensions from the drawing of my chest of drawers; you can use the drawing of your furniture product, approximately as shown in the figure:
That is, we mark 417 mm from the floor on the sidewall and mount the telescope at this height.
This completes the hardest part of the work; now we screw the two halves of the guides strictly along the line to the drawer and to the side and move it into place.
How to install a door closer yourself
Installation of complex, expensive shock absorption systems such as electric lifts should be done by professionals. Any home craftsman can handle the installation of simpler and more common structures.
The easiest way is to attach special loop closers to furniture hinges .
The arm or bowl of the hinge must have special grooves , the closer is placed on top and snaps into place.
If the hinges are not suitable for fastening shock-absorbing devices , use cabinet or mortise closers.
Installation of a cabinet closer
The cabinet closer is installed in close proximity to the furniture hinge . Placement in the middle, between the loops, is allowed.
How to install:
- For convenience, remove wall cabinets from the wall. Place the piece of furniture on the floor or table.
- Mark where the device will be fixed, put dots in the places of the proposed holes.
- Drill holes for the mounting bolts. For self-tapping screws, puncture the surface with an awl.
- Screw the base of the closer with self-tapping screws or bolts.
- Check if there is any interference when opening and closing the doors.
- Hang the cabinet in place.
Surface-mounted body closers can be equipped with a limiter . It is applied to the edge of the part and the device is immediately secured with self-tapping screws without preliminary marking.
Mortise devices
Mortise closers are mounted at the end of the side part of the cabinet opposite the door .
For wall cabinets, choose the top or middle part of the part, for floor cabinets - the bottom. Installation proceeds as follows :
- Mark the installation point of the closer at the end of the part. Make a small hole with an awl.
- Using a drill corresponding to the length and thickness of the closer rod, drill a hole to the appropriate depth.
- Insert the mechanism into the hole.
It is better not to use glue or sealant for fixation . They will create difficulties during dismantling in case of breakdown. The closer will not move or fall out without additional means of fastening.
Gas lift installation
Operating procedure:
- Mark with a pencil the installation locations for equipment fastenings.
- Pre-drill holes for mounting bolts. If you use self-tapping screws, you don't need to do this.
- Having attached the fasteners to the intended places, secure them with screws or bolts.
- Insert the closer mechanism into the fastening holes and click into place.