What are Ball Drawer Slides
Before calculating a box for ball guides, you need to find out the features of their design, find out the standard sizes and types. Their main purpose is to direct movement and ensure smooth, silent operation of the mechanism. Until recently, furniture drawers moved along wooden grooves when they were pulled out. This process was quite noisy and required some effort.
They provide the best stability of retractable systems and ease of use.
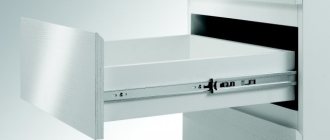
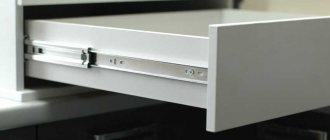
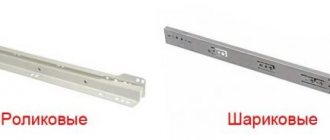
With the advent of retractable devices, the situation has changed radically. Structurally, they are made in two varieties - with rollers and with ball bearings. The advantage of the ball mechanism is that it operates more silently, smoothly and allows the drawer to be fully extended. Compared to roller ones, they require somewhat greater effort during operation. They are attached to the side surface of the box.
The action of this fitting is based on the mutual movement of durable steel tracks that make up the tire.
The dimensions of the drawer guides are as follows:
- the reinforced structure differs in height, which is 45 mm, while the base height is 35 mm;
- the thickness of the device is 13 mm;
- The length of the ball guides is always a multiple of 50 mm and usually varies from 25 to 60 cm for basic ones, reinforced ones - from 30 to 55 cm.
Since the tracks are nested inside each other, such systems are called telescopic.
Types of furniture guides
There are two types of designs of retractable mechanisms for furniture drawers:
- Roller - an economical option. Wheels are used as a moving element. Furniture makers install them on economy class furniture. The main drawback is the small power reserve; almost a third of the drawer remains inside the furniture body when pulled out. But they have an attractive price and a large margin of safety.
- Ball guides (telescopic). Provide full extension and smooth movement. There are options of reinforced construction and equipped with a closer. Balls are used as a moving element; they are silent when moving.
Depending on the intended use, ball guides can take different shapes and have a unique set of functions.
In addition, retractable devices have a number of other design features.
Roller
Such mechanisms appeared about fifteen years ago and instantly became popular among furniture makers and furniture consumers. Today it is difficult to imagine drawers in a closet without guides.
Drawer extension in this type of guides is only possible incompletely, but their cost is several times lower than that of ball-type ones.
The main advantages of this type of fittings are:
- work without lubricants;
- simple installation;
- smoothness and ease of movement.
The extension mechanism consists of two parts, one of which is attached to the side of the box during assembly, the second is inside the body of the product where the box is placed. There are no restrictions on the dimensions of the furniture; the roller mechanism has a length of 26-60 cm.
Roller guides create noise when opening the drawer; to eliminate this effect, rubber-coated rollers should be used.
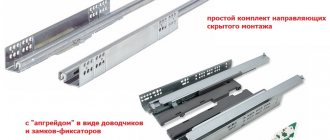
With door closer
Extension mechanisms equipped with a closer and a damper are more popular than other systems. They are more reliable in operation, durable and can withstand higher loads.
They are similar in design to the previous version, the only difference is that these elements are equipped with a closer and dampers.
Mechanisms equipped with damping devices open and close silently and smoothly. The damper itself works as a shock absorber. It is effective when excessive force is applied when closing.
The closer picks up the box when closing, when it is almost in its extreme position and gently returns it to its original state.
The damper ensures that the drawer closes smoothly and silently.
Ball
Guides on ball bearings or telescopic mechanisms for opening furniture drawers differ in their shape and some design features. Taking into account these features, three groups of ball guides are distinguished:
- Number of levels – one or more.
- Number of sections – one or more.
- Possibility of disassembling the mechanism - non-separable and collapsible.
Installation can be carried out on the side surfaces of the drawers or in the grooves of the side surfaces.
Non-separable guides have a lower cost due to the complexity of producing a collapsible design. The cost increases with increasing levels and sections. The balls in the bearing of a rail mechanism can be steel or plastic, and the latter are quieter, but less wear-resistant.
As a rule, the final cost of non-separable mechanisms is somewhat lower than their fragmented counterparts.
Hidden mounting
The rail mechanism for sliding elements of cabinet furniture with hidden installation is becoming quite popular among furniture makers. Such devices can be equipped with a closer and a reverse-action system. The main advantage is hidden installation; during assembly, it is installed on the bottom of the box. During operation. the retractable slats are not visible and the box appears weightless. Fittings of this design are highly reliable, providing soft and silent closing of retractable furniture elements.
Installation of guides of this type is considered the most difficult and time-consuming. But this fittings are becoming more and more in demand, as they are convenient to use.
Reverse action
Reverse-acting systems operate on the principle of a closer. A distinctive feature of such fittings is that the mechanism operates in the direction of opening. To pull out the drawer on which the slats are installed, with a reverse action, you need to lightly press the front part. When you hear a click, release the force and the drawer will slide out on its own. The presence of a reverse system on pull-out furniture elements allows you to avoid installing handles on them.
The advantages include good reliability of the products; the movement of the box is smooth and free of extraneous unpleasant sounds. Closes softly and quietly.
Full opening systems
When calculating drawers on ball guides in the manufacture of furniture with deep niches, the presence of full opening systems should be taken into account. The specific telescopic design of such rail sliding mechanisms makes it possible to completely open the drawer, which is very convenient for viewing its contents. This functionality is provided by folding racks and a ball bearing. Such systems are widely used in furniture production.
Full extension slides are popular modern designs.
Types and sizes
Progress does not stand still, and guide designs are improving along with it. If you study the modern furniture assortment, you can distinguish about seven varieties: from the most primitive and cheap to complex and expensive designs. With such a variety, everyone will find an option that is acceptable in terms of installation and cost.
Roller
Similar drawer guides appeared about 15 years ago and are still considered the most popular. Silent, smooth gliding is ensured by four rollers that move back and forth on special slats, as if on rails. They deserve their popularity because:
- easy to install;
- have a long service life;
- allow small flaws in the size of the box;
- do not require maintenance;
- cheap;
- sizes vary in length - from 200 to 600 mm.
To install them, unlike most analogues, you need to make two holes on both sides of the box and two in the mounting walls. To mark, just attach the strip to the wall. The load allowed by the manufacturer is no more than 20 kg. Roller guides require maintenance and are difficult to match to the color of the furniture.
An important advantage of rollers is that the box can be easily removed from the slats. Thus, it can be completely taken out and put back in a matter of seconds, which is very convenient during general cleaning.
With door closer
The market offers furniture guides with closers. Smooth movement here can be ensured by both rollers and balls. On the far side of the slats you can see two elements - the closer itself and the damper. He picks up the box at a certain distance and presses it all the way to the front. To prevent it from slapping against the side walls, a damper (spring) is used that provides slight resistance to the closer.
The advantages of guides with closers include:
- no popping sound;
- Just push the box and it will close tightly on its own;
- thanks to the small resistance, the drawers will not open if the furniture is not installed level;
- permissible load – up to 35 kg.
The disadvantages are a more complex installation technology and not the longest service life of the damper. After a couple of years, the spring may wear out and the mechanism will begin to “slap,” although expensive options are more durable. The design of guides with a closer involves a more complex installation procedure. Since the design of the products is one-piece and is not mounted separately, as in conventional rollers, correct marking is very important. For installation, each guide is “stretched” to its full length, exposing the mounting holes, and after that, places for drilling are outlined. First, the fittings need to be secured to the walls of the structure, and only then to the box. If you do the opposite, then you will no longer be able to get to the sides of the furniture.
Types of fittings for cabinets, the best class=”aligncenter” width=”660″ height=”400″|fcw3qayjh5a| src=”https://mebel-sovet.ru/wp-content/uploads/2019/09/1b783dc4345fc1d41722fc117ce94f21.png” class=”aligncenter” width=”1280″ height=”931″|fcw3qayjh5a| src=”https://mebel-sovet.ru/wp-content/uploads/2019/09/Napravlyayushhie-Boyard-s-dovodchikom-rolikovye-polnovykatnye.jpg” class=”aligncenter” width=”1586″ height=” 828″[/img]
Ball
Under significant loads, the rollers will not last long, but the ball guide can withstand up to 36 kg. If the bottom of the furniture allows, you can store up to 50 kg of items. As the name implies, the telescopic element slides due to the balls, that is, it is a kind of bearing. Only in this case there are two cassettes: one on the side of the wall, the second on the box.
Main advantages:
- can withstand more load than rollers;
- have a reliable design;
- quite cheap;
- You can disassemble it yourself by pressing a special lock.
Depending on the load and size of the drawer, ball guides are available up to 45 mm in height, and the smallest version is 17 mm. The length, like the rollers, varies from 200 to 600 mm. To install a collapsible ball guide, you need to remove the clamp and disassemble the structure into two halves. Then you should screw each one to the desired part of the furniture, insert one into the other. After this, together with the box, return the latch to its place. Another option is to extend the guide. After this, you need to screw on the “body” first, and only then the retractable parts. Disadvantages of such guides: labor-intensive installation, inability to fix furniture elements in a certain position.
Hidden mounting
Given the special design requirements, hidden-mounted guides are also growing in popularity. The discreet system makes the drawers appear to float in the air. Their installation is very complicated, and knowledge of the technology cannot be done without it. The point is this:
- guides are fixed to the walls of the structure;
- grooves are made in the back and side walls of the box;
- the retractable part is fixed to the bottom;
- Having threaded the box into the grooves on the pins, a special hook-shaped lock is turned.
Thanks to this fastening, the guides can withstand weights of up to 50 kg. This system is more expensive, but most models are additionally equipped with dampers and closers. Thanks to them, the drawers close quietly and smoothly.
Reverse action
The furniture industry also offers options developed for the sake of design. The point of reverse action slides is that drawers no longer need handles. When you press on the front part, the damper pushes out the structure so that it can be easily opened.
Types and characteristics of furniture hinges, fastening rules
The advantages of such a system:
- attractive appearance, the absence of handles especially adorns glossy facades;
- reliable ball system;
- there are closers.
Installation is no different from rollers with a damper. The only caveat is that in the closed position the box must move 3 mm away from the edges of the walls so that the spring is activated when pressed. This system is not suitable for furniture in children's rooms, since a sharp push from the damper can injure the child.
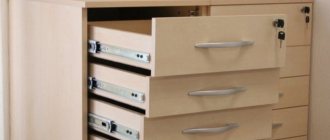
Metaboxes and tandemboxes
A fairly new phenomenon on the European market, although it has been used in the USA for more than 10 years. The point is that the closers are also the side walls of the box. Advantages of these systems:
- ideal for industrial use;
- durable;
- have a damper and closer.
There is a drawback that becomes decisive for many - the high cost. Although metaboxes and tandemboxes have a common idea, their implementation is different. For the latter, all sides of the drawer are made of metal, have a closed roller design, and the furniture storage elements extend to their entire length. Metaboxes only open ¾ way. They are made of chipboard fittings, with only two walls made of metal. At the same time, the height of the box can be increased with special strips. Tandems can withstand up to 50 kg, metaboxes - only 20-25 kg.
Installing metaboxes involves dismantling the sides of the drawers, selecting guides of the required height and connecting the remaining elements. Roller slats are also installed on the walls of the housing. Tandemboxes have a modular design. The boxes themselves are assembled like Lego. Attaching the guides to the metal box follows the same principle as in the hidden installation system.
Full opening systems
The special “folding” design of the furniture guides allows you to open the drawer up to the back wall. For this purpose, a ball bearing and the required length of folding slats are provided. The system is convenient for furniture elements with great depth. The only negative is that full extension is possible if you apply a little effort; easy opening is expected only up to half.
Full extension guides are installed in almost the same way as other types. First, the latch is removed and the structure is disassembled. After this, one part is attached directly to the boxes, the second is screwed to the walls of the product, and then connected.
Which retractable mechanism to choose
The calculation of drawers is always associated with the choice of a retractable mechanism. Three points are fundamental in this matter:
- Reasonable price.
- Design load.
- Design – design features, color.
Ball guides have a positive effect not only on convenience, but also on the efficiency of using furniture.
These points should be considered together, choosing the most compromise option. The most economical choice is roller guides of a standard design. But low cost is not always justified. If large loads are expected, then in order to avoid premature destruction of the guides, attention should be paid to ball structures or the possibility of hidden installation of the rail mechanism.
To limit the movement of the carriage and prevent the box from falling out of the working system, a limiter is installed on one side of the rail.
For furniture design features that do not require handles, it is best to use reverse-action systems, but they are not advisable in children's rooms. For furniture with deep niches, telescopic mechanisms for full opening will be most acceptable. If you don't have budget restrictions, use tandem boxes.
Such fittings appeared on the market relatively recently, but quickly became in demand.
Advantages of drawers
The main advantages of retractable drawers are practicality and the possibility of full access to all items contained in them. An ordinary shelf cannot provide such freedom of action.
When choosing drawers for the kitchen, make sure of the high quality of all components, and especially the fittings.
The varied shape and purpose of such furniture allows you to maximize the functionality of the kitchen, free up space and increase the effective area.
Assembly is assembly, but in order for hand-made furniture to please the eye and soul, it is necessary not only to assemble it efficiently, but also to correctly calculate the dimensions of the parts. If we talk about drawers, then it is very important that a well-assembled structure slides easily and naturally along its guides, without the irritation of having to make an effort to pull out the drawer. Also, it’s not very pleasant when a drawer falls through because the opening is somehow wider than it should be. Of course, it becomes a little sad when the drawer does not slide in completely because it is longer than necessary. All these problems can arise if you incorrectly calculate the dimensions and indentations during the design process of furniture, namely drawers. Therefore, let's first figure out the dimensions and indentations, and only then we will proceed directly to the manufacture and assembly of drawers.
Even though roller guides and ball guides are “two big differences,” they have a lot in common. For example, they have common size ranges and also have the same installation clearances. Simply put, calculating the dimensions and offsets for installing drawers on roller guides has the same parameters as for ball guides.
Now let's move on to specific numbers. So, according to furniture design technology, the width of the drawer should be 26mm less than the width of the opening in which it should be installed. It turns out that 13mm is allocated on each side for installation of guides.
In the figure we clearly see all the design parameters for installing drawers on roller or telescopic guides. Please note that the calculation of the width of the drawer is made not relative to the overall width of the cabinet, but relative to the internal opening for the drawer. In this example, the overall width of the cabinet is 400mm, and the internal width is 368mm. The internal opening is the overall width minus the thickness of the two bulkheads. In our example, the cabinet is made of 16mm thick chipboard. Thus, the internal opening turned out to be equal: 400-16-16 = 368mm. This is such simple arithmetic.
And now it is in relation to the width of the opening that we calculate the width of the drawer. For us it is equal: 368-26 = 342mm. That's all. Although, on the one hand, it seems like everything, but if you think carefully, it’s not quite. Look, if the dimensions of the bottom of the cabinet are exactly 400mm, then the bulkhead will definitely be screwed with a slight offset inward (as a rule, this offset is due to the thickness of the edge, in our case it is an edge of 0.5mm, so the offset will be somewhere around 1mm ). Thus, the internal size of the opening will decrease by 1mm on each side. As a result, we get the following: 400-16-16-1-1=366mm. And the drawer will then have a width of: 366mm-26mm=340mm. As you can see, its width differs by 2mm from previous calculations. And in our situation, it is this width that will be calculated correctly.
You may object: “What are these 2mm? What kind of weather can they do in the process of installing a drawer?” However, in the furniture business, sometimes 2mm can play its evil role. In this case, a wider drawer may cause the drawer to move “stiffly” along the guides. So, it is better to make calculations for installing drawers very carefully and scrupulously, so that later, as they say, “excruciatingly painful ...”
Regarding the calculation of the length of the drawer, you need to first of all know that roller and ball guides come in the following lengths: 250mm, 300mm, 350mm, 400mm, 450mm, 500mm, 550mm, 600mm. These are, so to speak, the most popular sizes. There are also ball guides up to 800mm long. For roller guides, as far as I know, there is a length limit of up to 650mm. Although, you can clarify these parameters with the accessories seller, someone who knows exactly what he has on sale.
It would seem that calculating the length of a drawer is as easy as shelling pears: if we install guides with a length of 500mm, then, accordingly, the length of the drawer will be equal to 500mm. But for our people, 4 centimeters is not just 4 cm. No, for us it’s FOUR CENTIMETERS! And the fight for them will be tough and principled.
So, in our situation, the internal depth of the cabinet is 490mm. It is clear that a box 500mm long will not fit here. It turns out that you need to place the drawer on guides 450mm long. But we have 490mm of free usable space. We will not give 40mm to the enemy! Well, it’s not 40mm, but somewhere around 35mm (5mm can be left for force majeure situations that may arise during the furniture assembly process). In general, we make a drawer 485 mm long and rejoice at the additional space we have gained. True, such a box will not move out completely, because our guides are shorter. But this is not critical. There will still be enough access to the things stored in the box. But we increased the capacity of the structure. Amazing!
I would also like to draw your attention to this. The fact is that drawers come with internal and external facades. So, when calculating the length of a drawer with an internal facade, you must always remember the thickness of this very facade. That is, if the internal depth of the cabinet is 490mm, then the useful free space (provided that the facade has a thickness of 16mm) will be equal to: 490mm-16mm-1mm=473mm. It is from this size that we “dance” when calculating the length of the drawer. And I discarded 1mm so that the inner facade of the drawer was slightly recessed into the cabinet. By the way, we also screw the guides, stepping back from the edge of the bulkhead by about 17mm. So that the facade “goes” inside.
Drawer guides
Since devices have appeared in furniture production that provide easy and soft movement of retractable elements, they have constantly undergone design changes, improving their functionality.
The load that the roller guides can withstand is 25 kg.
Roller type guides have become the most popular. The simple design and installation make it easy to remove the drawer from the guides, which is very convenient for keeping it clean and finding lost items. Disadvantages - noisy operation, difficulty in choosing colors, demanding maintenance.
When choosing roller guides, it is important to take into account their thickness: in order for them to serve for a long time, it should be from 1.2 mm.
Mechanisms with ball bearings are more complex in design, installation and higher cost. They operate silently, run smoothly, and cope well with heavy loads. They differ in design features:
- have a closer and a damper;
- with hidden installation;
- telescopic, for full opening;
- with reverse action.
Tandemboxes are a complex design that consists of both a guide and a side wall of the box. Such systems have a number of advantages:
- durability;
- perfection at work;
- They are equipped with a damper and closer.
Due to excellent performance characteristics, the products are easy to use and have a long service life.
The disadvantage is the high cost.
Installation of guides
The nature of the fastening of the bottom of the box is determined by the type of guides used. When installing roller mechanisms, the bottom can be secured using furniture nails. When the installation of ball guides is provided, fastening is carried out with self-tapping screws or the bottom is made inset.
The most accurate markings when installing ball guides will allow you to avoid distortions of the drawers and other problems with the further fastening of the facades.
Let's look at the step-by-step process of installing rail mechanisms for drawing out a drawer:
- We disconnect the guide and place its inner part along the longitudinal axis of the outer side of the side part of the box. We adjust the location along this axis using the technological holes on the rail.
- We align the front edge of the guide with the edge of the side wall on the facade side. Then we adjust the transverse position of the strip and secure it with self-tapping screws.
- Similarly, we attach the outer part of the guide rail to the vertical surfaces of the niche. The longitudinal axes of movement are preliminarily marked.
- Before finally attaching the rail to the wall, check whether the drawer will close completely.
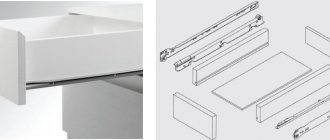
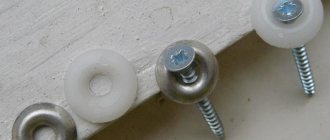
The set of ball guides consists of two steel symmetrical telescopic slides: left and right, each of which can be disassembled into two components.
It is important to take into account when marking that there should be gaps of at least 2 mm between the facades.
Basic installation errors
The one who does nothing makes no mistakes, but mistakes can and should be avoided. And we will learn from the mistakes of others. Assembling the structure is the final part, for which mastery of tools and care are important. Major inaccuracies are allowed at the stage of calculations and marking. The most common ones include:
- the depth of entry of the guide inside the niche is not taken into account;
- there is no gap left between the fronts of the drawers or between the front and the upper part of the structure;
- incorrect calculation of box dimensions;
- inaccurate measurement of the distance from the bottom edge of the facade to the bottom of the drawer.
There must be a gap of at least 10mm between the back of the chest of drawers and the back of the drawer.
During installation, the main thing is to install the left and right parts of the guides at the same height to avoid distortion. Flush mounting strips require very precise fitting.
The choice of movable fittings should be approached taking into account the design features of the furniture and personal wishes. If you want the mechanism to work longer, refuse the cheapest offers. In terms of price-quality characteristics, ball and retractable mechanisms are an acceptable option.
The minimum metal thickness should be 1 mm, but it is better to choose structures with a thickness of no less than 1.2 mm. This will allow you to easily cope with high loads and ensure long-term operation.
Calculation of drawers of a built-in wardrobe with your own hands
Let's calculate the dimensions of the parts of the drawers of the built-in wardrobe, which we will make with our own hands. The initial data will be the dimensions of the opening for the drawers from the sketch: height 784 mm, width 600 mm, depth 550 mm.
Let's calculate the lengths and heights of the parts separately. Detailed instructions and drawings below will help you not get confused and make mistakes in the calculations.
Calculation of the lengths of the walls and fronts of drawers
First, let's look at the drawer from above. The dark gray color in the figure indicates the side walls of the laminated chipboard frame, and the dotted line indicates the rear main wall.
Despite the abundance of dimensions in the sketch, the “freedom of choice” is small - we can only change the size of the gaps - between the facade and the side walls, and between the back wall of the box and the rear main wall (highlighted in red).
As a result, only the calculated lengths of the facade and side walls (highlighted in blue) will change.
This is explained by the fact that when preparing a sketch of the filling of the built-in wardrobe, the width of the opening in which the drawer should fit was already set - 600 mm. The filling depth was also set - 550 mm.
The known thickness of the laminated chipboard is 16 mm, and the thickness of the ball guide is 13 mm (more details about the guides are below).
Thus, to determine the lengths of the drawer parts, you only need to determine the gaps and carefully calculate everything.
Calculation of the height of drawer parts
To calculate the height of the drawer parts, let's look at them from the side. In the picture, the upper and lower shelves of the frame are painted gray, with drawers located between them. The drawer guides are not indicated in the figure, since they do not affect the calculation of the height of the parts.
The height of the space for placing four drawers is 784 mm - in accordance with the filling sketch. Let's start by calculating the height of the facades.
The fronts of the drawers in my wardrobe also serve as “handles” so that the drawers can be pulled out. Here we meet the first limitation.
The minimum height gap between the fronts of adjacent drawers should be such that your fingers, when opening the drawer, do not touch the drawer on top or the shelf above the topmost drawer.
Based on my experience, this distance should be at least 30 mm. I put in 35mm.
There should also be a gap between the bottom edge of the bottom drawer front and the shelf underneath it. In my example - 3 mm.
Then we get that the height of each facade will be 160 mm
. Calculated using the formula: (784 mm - 4x35 mm - 3 mm) / 4 = 160.25 mm. Round up to 160 mm. I’ll put an “extra” 1 mm in the top gap - anyway, the facades will have to be installed in place. Yes, and the shelves above and below the drawers can stand with a slight deviation in height from the calculated values.
Note:
If relatively heavy items are stored in the bottom drawer, it is also necessary to take into account how much the bottom of the HDF drawer will sag under their weight. You may need to raise the bottom of the bottom drawer above the shelf underneath. This will affect all drawer height calculations below.
The side and back walls of the box are the same height.
When calculating, I proceeded from the following considerations. The bottom edge of the facade of each drawer was 5 mm away from the bottom - this is 3 mm for the thickness of the HDF bottom, and 2 mm for the installation error of the facade (see the sketch of the top drawer in the figure).