Remember the Soviet walls? Bulky, angular, they do not fit into a modern interior. But don’t rush to throw away the old wall! Such furniture has many advantages. The cabinets are made of environmentally friendly material, equipped with reliable fittings, and are absolutely safe, unlike modern chipboard and MDF.
Modern furniture of similar quality will cost you a decent amount. But why buy a new one if you can remake the old one? All you need for this is time, desire and skillful hands.
Furniture from the past
Gone are the days when you had to stand in line for several months behind a wall of furniture. Nowadays it is very difficult to surprise guests with carefully selected details in a certain interior style. And it’s difficult to make repairs without the help of a designer.
This is due to the fact that in construction stores the necessary parts are presented in several versions. And if you paste classic wallpaper and make the ceiling in the same style, and arrange modern high-tech furniture, then terrible discomfort will reign in the room. Such a room will never feel like home.
The lack of the latter may be to blame, but recently interest in vintage items has increased in Russia. And more and more often people are starting to return old things from their dachas to their apartments. The reasoning is simple: if a well-made thing has served for more than half a century, then it will last at least as long. Or maybe much longer.
Furniture made in the USSR Source forum.shitnikovo.ru
The leaders for returning from attics and cottages are:
- old bedside tables;
- piano;
- desks;
- refrigerators.
Soviet furniture deservedly occupies a leading place in modern interiors. This is due to both the quality of the products and their memory. After all, an object with history is always much more interesting than the newest one. In addition, many things really create an inimitable comfort.
Residents of houses and apartments look for old suitcases and grandma's chests from friends. The press of past centuries and even glass containers are used. Having cut out an interesting note about a high-profile event from ancient times, you can put it in a frame and get an exclusive artifact-decoration for the wall.
But the undoubted champion in demand is the furniture set made at the end of socialism. The quality of materials and workmanship distinguishes the Soviet wall from today's furniture. Therefore, it is successfully used to decorate rooms in retro styles. And in many modern designs it finds its place.
Wardrobes from Soviet times Source luxury-house.org
Tips for repainting an old wall
One of the easiest ways to make old furniture look new is to paint it. This way it will have an attractive appearance, moreover, the work will not take up much of your time.
- In order to get started, we will need to choose a certain type and color of paint. If the furniture is made of simple material, it is quite acceptable to use absolutely any paint. In the case where you want the final result to be shiny, use enamel varnish paint. To achieve a matte surface finish, use an oil version. One of the best options for painting is acrylic (preferably water-based). Aerosol cans have proven themselves to be good for home work with furniture. When working, they lie well and evenly on the surface and do not create drips.
- If you are painting old garden furniture, then it is recommended to use paints and varnishes. They are well suited for metal objects, but do not forget to pay attention to the fact that they have an anti-corrosion effect. When painting aluminum objects, buy special paint for them. In order not to confuse anything in the types of material and paints, it is best to check with a consultant before purchasing this or that product choice.
- Speaking directly about the paint application itself - here you can use a brush, roller or spray gun. Please note that before applying paint, you will need to degrease the furniture and carefully inspect it for any damage. If necessary, replace fittings, locks or handles before starting work. Next, get rid of the old varnish and sand the entire surface with sandpaper. It is best to use fine-grain paper for this job. Alternatively, you can use a grinder instead. She will also be able to cope with the task perfectly.
Related article: Sanding the floor: a wooden primed board, how to sand it yourself, video by hand, sanding machine
- Another important point before applying paint will be the work of applying primer. If necessary, use putty to eliminate problem areas. When the primer is completely dry, apply alcohol or vodka to the surface to completely degrease the object.
- The final stage will be applying paint to the surface. This is done slowly and carefully, the coloring itself is carried out in one direction of the brush. It is best to apply several layers of paint - then the result will be much better. It is recommended to use painted furniture no earlier than a week after work.
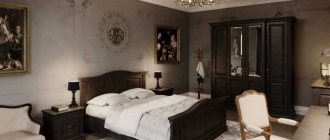
Soviet wall
For the uninitiated, this is a multinational concept. Because the first furniture sets came to the USSR from the “socialist camp,” which included more than a third of Europe. In the 50s of the last century, a great new product for that time appeared on store shelves - a wall that made it possible to place almost half of the things in the apartment.
Wardrobes and sideboards made in the USSR Source drive2.com
Story
Furniture began to arrive under economic agreements from countries that previously had a capitalist orientation. Therefore, even under socialist conditions, they retained their commercial acumen and continued to release new products for the broad masses of consumers. Designs from the GDR, Poland, Czechoslovakia and Yugoslavia had particularly excellent parameters.
Furniture set made in Yugoslavia Source fb.ru
The furniture of the latter country in the vastness of the Union was most valued. Therefore, after a while, the USSR established its own production and began to copy the version it liked. The first “Granites”, “Veche”, “Fries” and “Okhtinskie” appeared. Since chipboards were used for production, the reliability of the structures left much to be desired. Especially in places where the fittings are attached. But overall the headset was strong.
When did the best furniture appear in Soviet history?
The first Soviet interiors began to appear in the 1920s and 30s, and these were communal apartments with very simple furnishings. Bulky, roughly designed “Stalinist Empire style”, but noticeably reliable cabinets and tables - this is what minimalism looked like then.
Sets from the 1930s-50s are more reminiscent of the usual Soviet style, ostentatious, authentic. Everything created then indicated the prosperity of the houses and was carefully preserved. Therefore, the living room could combine the incongruous: a massive wall, ostentatiously filled with books and crystal, compact curved chairs, a sofa bed.
But items from that time are already more compact and convenient, adapted for small apartments. And at the same time, they are also characterized by the strength of a real solid mass.
And the best legacy that these years have left:
- Viennese (the same ones with curved backs) chairs, armchairs, tables - lightweight cabinet furniture on thin high legs, from the countries of the Eastern Bloc, stylish even by the standards of our time.
But not only that!
The rooms of the 1970s and 80s were already more individual, sometimes furnished under the influence of disco. The character of those interiors was created not by furniture, but by design details - new posters, records, bright colors. And laconic sets came into use, which opened up space for design ideas - coffee tables, low armchairs.
In typical furniture of this era, parts made of plastic and chipboard appeared - beautiful, cheap and, alas, impractical in comparison with an array of materials.
Functionality
The role of the Soviet wall at that time is very difficult to overestimate. In fact, in addition to being a fashionable item for decorating an apartment, the set served as a kind of showcase. In it one could see items of pride for the whole family, which were specially put on display for visitors to the apartment. And looking at the contents of the shelves, the level of well-being of the house became completely clear.
Standard set of cabinets in the Soviet wall Source 999.md
The furniture wall consisted of:
- wardrobe;
- pencil case;
- sideboard;
- bookcase;
- compartments with a secretary;
- lower bedside tables;
- upper mezzanines.
The closet and pencil case were filled to capacity with clothes. And the bedside tables with mezzanines - various rubbish, dear to the heart of the Soviet man in the street. The real pride of the owners of the apartment were the sideboard and bookcase. In the first, crystal dishes were displayed, which were not even taken out for all the guests.
The bookshelves were filled with the spines of subscription publications and collections of porcelain. Family photographs were also placed there and there was even space for small icons. The secretary performed two roles. Married couples kept their most valuable things there, and bachelors set up a bar.
Many pieces of Soviet furniture have survived to this day and are in perfect order. But even a deplorable situation can be improved. For this purpose, repair work and re-decoration are carried out.
Complete restoration
The entire process of restoring the appearance and performance of old furniture comes down to the following:
- The fittings are dismantled and inspected.
- The old decorative coating is removed from the furniture boards.
- A search is made for chips and irregularities.
- Surfaces are degreased and primed.
- Defects found are eliminated.
- Carry out final cleaning and priming.
- Painting in several layers and varnishing is carried out.
- Final decoration is applied.
Let's consider all the listed stages in more detail.
Required tools and materials
Before starting any work, you need to prepare everything you need - buy material, tools. The list consists of the following:
- Furniture fittings;
- Putty material for wood;
- Facades, if necessary;
- Paint or stain (preferably spray);
- Construction knife;
- Construction hair dryer;
- Screwdriver;
- Sharp scissors;
- Iron;
- Self-adhesive furniture film;
- Wax for furniture of different consistency;
- Candle;
- Spatulas;
- Rags, clamp;
- PVA glue;
- Wood varnish;
- Felt pen;
- Edge for processing ends.
This is not the entire list of materials and tools, since you can update old furniture in several ways, each option has its own specific set of necessary tools.
Accessories
Over many years of service, moving parts are the first to fail, since they bear increased load. Before repairing furniture, all hinges and locking mechanisms must be removed. So that they do not interfere with restoration processes.
Accessories from the Soviet era Source maiso.ru
Since high-quality steel was used for fittings in Soviet times, it can retain its functionality to this day. Therefore, the performance of the part is checked and if defects are detected, the product is rejected and a replacement is sought. Sometimes a simple change of fittings can even have a positive effect on the appearance.
Surface cleaning
Since the work ahead is dirty and hard, it is better to move it to a workshop (garage) or do it outside. Before this, the furniture wall is completely disassembled into parts. Each slab is separately cleaned of old paint and varnish.
Removing old coating from a furniture door Source opttools.ru
The easiest way to do this is with a power tool. You can insert a brush attachment into the grinder. But the wire should not be too stiff so as not to make grooves in the wood boards. A similar attachment can be used on a drill.
Types of update
If you don’t know how to update an old furniture wall with your own hands, before and after photos can be found on the Internet. In addition, we present several methods that can be used to give a second life to any furniture.
Restoration of an old wall
If old furniture is dear to you as a memory, but its appearance has been severely damaged by time - chips, creases, deep cracks have formed on the surface - it can be restored. After spending a minimum of time, you will receive an updated piece of furniture. For repair work, a standard set of materials and tools is used. For quality repairs, it is enough to perform the following steps:
- The working surface must be cleaned and washed with a solution of water and soap, and dried well - this will help increase the adhesion of the material to the wall facade;
- To rid the surface of deep scratches, they are filled with melted wax. After the fill has hardened, you need to take a felt-tip pen to match the wood, apply strokes to the wax that will imitate the structure of the wall material. This is not difficult to do; just continue an existing drawing. After this, take a clean rag and carefully rub it over the frozen wax, slightly smearing the lines. As soon as the desired result is achieved, the plane is coated with furniture varnish;
- If severe abrasions are visible on the facade, they are painted over with varnish of the desired shade from a spray can;
- If there are cracks and delaminated areas on the facade, you can update the old wall using basic means - PVA glue, a medical syringe and a fixative. You need to fill the syringe with glue and inject the required amount of the composition into the crack. Then press the split and remove excess glue. Using a clamp, press the area and leave to dry for 24 hours;
- Are there many chips on the façade? The same melted wax will help you deal with them. First, you need to use a spatula to trim the edges of the chip and fill it with wax. Once the wax has dried, buff the area well with a clean, dry rag. Then perform the same steps as when filling scratches and apply varnish.
After this treatment, the wall will not change its design, but its appearance will become much more attractive.
We remove dirt and dust from coatings
Treating cracks with wax
Repairing chips with glue
Painting over abrasions
Transforming a wall with furniture varnish
If the interior of your apartment has changed, and simple restoration does not suit you, then you can radically change the old furniture with your own hands. There are several ways to update furniture, the choice of which will depend on artistic skills, preferences and the amount of free time.
The easiest way is to varnish. The process is not complicated, provided that the procedure and restoration technology are followed.
The set of tools is standard, but for a good result you need to follow the following algorithm:
- Take a photo of the wall before starting work. This will help you assemble it later after the update without confusion;
- Disassemble the structure. It is necessary to remove the fittings and doors;
- Wash the wall and all components with soapy water;
- Remove dust and soot deposits in the corners using a toothbrush or toothpicks. This stage should not be ignored, since the quality of the final result depends on preparation;
- Inspect the condition of the facades. If the surface is not badly damaged, then it will be enough to simply coat it with varnish;
- If the facades are in poor condition, there are a lot of chips and deep scratches on them - the old coating is removed without leaving a trace. To make the work go faster, you can use special compounds that help remove varnish, or use a regular spatula;
- As soon as all the exfoliated areas are removed, the old varnish is removed, you can begin restoration with wax - how to do it is described above;
- Using fine-grain sandpaper, sand the surface and remove dust;
- Cover the wall façade and all components with 3-4 thin layers of furniture varnish. It is worth remembering that when applying a thick layer, drips may form that will spoil the appearance of the wall;
- As soon as the varnish coating has dried, the wall should be assembled and the fittings replaced with new elements.
By updating old furniture in this way, you can add a few more years of life to the wall in your interior.
Remove dust and dirt Remove cracks
Removing old varnish
Varnish in several layers
Installing new handles
Application of self-adhesive wallpaper
Today there are a lot of materials that can be used for restoration. Updating old furniture with self-adhesive wallpaper is one of the easiest options. This material is easy to work with and inexpensive. In addition, the range is so wide that you can choose material to suit every taste. The film is waterproof, so it can protect the wall from environmental influences. The algorithm for performing the work is as follows:
- Make preparations as in the previous method - remove the fittings and disassemble the structure;
- Clean the facades, wash them, and after drying, treat the surface with white spirit to degrease;
- While the facades are drying, we cut out the material. Sheets of film should be 10 mm larger than the original size on each side. This is necessary in order to eliminate gaps in the finishing;
- The surface on which you plan to stick the material must be moistened. Apply the film to the top edge and carefully peel off a small strip of the protective layer. The film is pasted gradually, slowly moving down;
- After gluing, you need to level the material with a soft rag, moving from the center to the edges;
- As soon as the entire wall is covered, you need to heat the iron and iron the plane through the fabric - this will help the film adhere tightly to the surface;
- Replace the doors and fittings and apply edge tape.
It is not necessary to use wood-look film; you can choose any color. A competent design combination of different shades will help turn an old wall into a real masterpiece.
We disassemble furniture
Cleaning the surface
We moisturize the coatings
We glue the film
Putting it back together
Restoration using staining
Repainting an old wall will change its appearance beyond recognition, while the main outlines will remain unchanged. You don't need any artistic skills or special tools. The work is not difficult to complete, just follow the basic rules:
- The wall is completely disassembled and the fittings are removed - this makes the restoration process much easier;
- The old coating must be completely removed, obvious flaws must be repaired with wax;
- Sand the surface after it has dried with sandpaper or a soft rag;
- Painting is carried out in several layers, and care must be taken to ensure that no sagging or smudges appear. As soon as the painting is completed, we leave the structure to dry, after which the wall should be assembled.
If a sagging has formed during the work, which was discovered after drying, it should be cleaned with sandpaper and additionally coated with paint. For a complete understanding of the painting system, watch a master class for beginners on updating furniture with your own hands.
Correcting surface defects and preparing for painting
Many restorers of Soviet walls prime the surface with one layer before repairing chips and eliminating irregularities. This helps to securely fix the putty solution in the cracks. An acrylic primer works best for this task.
Preparing furniture boards for painting Source doorchange.ru
And after that it is necessary to degrease all surfaces. To do this, they are wiped with paint solvent. But you can use any alcohol-containing composition. Therefore, even vodka will do.
Found chips, cracks and small depressions on the planes are rubbed with putty. After the composition has hardened, the entire surface is sanded with sandpaper to create a smooth and uniform surface for painting. Using an electric sander makes the process much easier. Upon completion, another layer of primer is applied.
Table makeover
Using the same technology, a banal coffee table can be turned into a modern piece of furniture. In this case, it was covered with wrapping paper. It is dense, adheres well and does not become limp when applying varnish.
Before starting work on decorating the tabletop, the legs of the old table and the edges of the tabletop were painted in a light color: this way it fits better with the new design style. Then the process of its transformation began.
When pasting, the panel is cut out significantly larger than the dimensions of the tabletop. It's necessary. The paper is glued to PVA and rolled with a roller so that there are no lumps or blisters. The surface must be absolutely smooth.
The paper is glued gradually, roll it with a roller so that there are no bubbles
After gluing, take sandpaper with fine grain (it is more convenient to work if it is attached to a block). By running it along the edge, they bend and at the same time separate the excess paper.
How to make a beautiful edge
Even cutting with a guillotine will not give you a fairly even edge. And with this method, it turns out professionally designed. There is no smell of amateur activity.
This is what the edge looks like when all the excess has been removed
After the glue has dried, the surface is coated twice with a thin layer of varnish. It should be applied with a soft brush in a small amount. Layers are applied in different directions: first along the long side, then across.
What kind of shelves there are and drawings for making them yourself can be found in this article.
Varnishing
Like painting, this operation should be carried out in a room with good ventilation. And before it you need to practice. You need to spray the varnish from a distance of 30 cm, and make smooth and wide movements. Place the part strictly horizontally. If varnish deposits are detected on the surface, then it is necessary to increase the distance from the nozzle to the product.
Varnishing furniture board Source dopracy.ru
The finishing operation is carried out in several stages. After applying the first layer, it is allowed to dry completely, and then the surface is rubbed with fine sandpaper. The application process is repeated until the visual result is satisfactory.
Decoration
Most restorers complete the work here and reassemble the disassembled wall. Many people are satisfied with the strict and monochromatic look of the furniture. And for those who do not agree to such a result, there are decoration techniques.
Remaking an old furniture wall Source Pinterest
You can use one of them:
- stencil;
- mosaic;
- applique;
- decoupage;
- hand painted.
Some even go as far as artificial aging and cover the surface of the furniture with a network of cracks using a special varnish. But the most common operation is decoupage of door corners. To do this, you need to select a pattern and stencil and use paint a couple of tones lighter or darker than the base.
How to update Soviet furniture
Sometimes it’s enough just to monotonously repaint Soviet furniture so that it looks beautiful in a new stylish interior.
However, there are other interesting ways to decorate old sets that will help if you want fresh, extraordinary solutions. Let's give a mini-list of ideas.
1) You can paint furniture through lace or tulle.
2) Use a multi-layer gold or bronze coating - a marker of an expensive classic.
3) Slate paint on facades will look even more interesting and modern.
4) Cover the furniture body with self-adhesive film. Suitable, for example, is a self-adhesive with a wood or small floral print, like a country one.
5) Another similar technique is decoupage. Its essence: individual pieces of furniture are decorated using a stylized pattern or textured fabric. For this purpose, special decoupage napkins, pieces of wallpaper, notes, and embossed leather are used.
6) Aging the furniture. Soviet furniture can be given an antique charm, but in this case professional techniques are needed - patina, craquelure.
By combining different techniques, in particular, aging and decoupage, professionals create gorgeous effects.
7) You can update only the fittings - select details in accordance with the new style of the room.
 When updating upholstered furniture, you can reupholster the fabric and decorate the body with noticeable decorative seams and buttons.
9) Or make covers individually.
There are radically different examples of converted Soviet chairs and armchairs in the Stoolstory assortment. Inspiration and new ideas can be found on their Instagram.
Rules for caring for restored furniture
Furniture from the Soviet past can serve faithfully for many years. But for this it is important to create certain conditions. First of all, it is necessary to comply with the thermal regime. The best environment is created at a positive temperature of 15 to 20 degrees Celsius.
Furniture wall from the 90s Source dictat.net
Secrets of hinges and locks
Old-style furniture fittings consist of two levers. One of them is fixed in a hinge cup, which was recessed into a round recess on the inside of the door. The second was attached to the hinge body on the side wall.
Adjusting Soviet fittings Source sdelais.ru
The adjustment is carried out in the following order:
- The screw closest to the door can be used to move the door to the right or left.
- The distant screw can press the door tightly against the body or move it away.
- A hidden screw under the lever adjusts the sash vertically.
To adjust, all screws are turned evenly and with a small amplitude. Having found the ideal position, securely fix it. Although such a loop is considered obsolete, it is still relevant. And if it is not on store shelves, then old fittings are ordered on the Internet. For example, on Avito.
Furniture locks are included in the detachable fastening group. Since parts made of high-quality steel and its alloys were used for the Soviet wall, many mechanisms still serve to this day. But in case of failure, they can be easily replaced with modern ones by choosing the right size.
Soviet wall in the interior Source Yandex.Zen
Bookmark new life for old furniture
Do you want to create a unique interior without extra costs?
Old furniture will help you with this, photos of the conversion of which you can find here.
There are many ways to transform old, familiar objects.
The choice of method depends on the purpose of using the furniture and the type of coating, as well as its condition at the time of repair.
After restoration, your nightstand will perfectly match the tone of the walls and fit perfectly into the bedroom interior
Transforming an old non-working fireplace into an extraordinary decorative element
You can find a step-by-step photo master class on making furniture with your own hands from old interior items on our website. The process of updating furniture includes two main stages:
Let's take a closer look at what you should focus on.