This article describes a method for assembling a drawer from ready-made factory parts, with marked holes for dowels, minifixes and confirmations. From this material you will learn how to assemble a drawer yourself and you can easily do it yourself.
People began to furnish their homes with furniture since the construction of the first house. Gradually, benches, tables, and beds appeared, which over time were transformed into comfortable sofas, wardrobes and beds.
There was a time when a simple wooden chair amazed with its sophistication and beauty. Then the era of unification came and all pieces of furniture began to fulfill only their functional purpose.
But man’s irresistible desire to live in comfort and coziness forced him to look for new forms and embody original ideas. The real solution was the production of cabinet furniture, which harmoniously combined attractiveness and simplicity, individuality and accessibility.
Now it is not difficult to find the necessary product; all that is required is skill in assembling it and the ability to understand furniture parts.
For some reason, many questions arise in this matter, particularly when assembling drawers, for example for a closet or chest of drawers, especially if the fasteners are minifixes. Shall we figure it out?
Drawer detailing
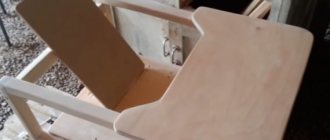
So, we take our box out of the packaging and look at it.
If there are paired holes on the sidewalls, then our structure will be attached using minifixes. More details about installing the minifixes themselves from scratch are written in the article Installing a furniture eccentric.
In addition to them, we will use confirmations, dowels and furniture glue, screws and nails.
To begin with, let's distribute our box on the floor in an unfolded form, so that it is clear where each part is.
Drawer detailing
Master class on creating a box with your own hands
We offer step-by-step instructions on how to make a box at home. To do this you will need the following tools and materials:
- tape measure;
- a simple pencil;
- board 25 mm thick;
- wooden edges 15 mm thick;
- thin plywood;
- metal corners;
- nails and screws;
- hacksaw;
- screwdriver;
- metal hinges for opening the lid structure;
- hammer.
First of all, you need to familiarize yourself with the diagrams and drawings of how to make a box. This will allow you to correctly compare the dimensions of the finished product. You should not make too large structures, as they will take up a lot of free space.
Read here: How to choose a kitchen stove: step-by-step instructions on how not to make a mistake with your choice
When all the components are ready, you can proceed to making a storage system for vegetables and fruits. The process includes several stages:
On the surface of the boards we mark the size of the side parts of the product. Next we move on to the bottom of the box. We mark the size on the wooden edges. After this, using a hacksaw, we begin to cut out the blanks.
We fix the boards together using small nails. We attach the bottom parts using the same method.
The cover of the product consists of a plywood sheet. It is installed on special hinges that allow you to control the closing process.
The photo of the DIY box shows the entire work process.
Assembling a drawer, installing dowels
Then pour glue into the largest hole in the back (it is not through) and insert a dowel. It should fit tightly without distortion (the process of preparing recesses for dowels is described in the article on drilling holes)
Dowel installation
We install the side panel on the dowel and lightly press on it so that the bar sits tightly in place. We do the same with the other side.
Installing the sidewall on the dowel
The front panel of the drawer on the inside also has holes for various fasteners, including dowels and minifixes.
Installing minifixes
Let's clarify what a minifix is.
Minifix is a fastening consisting of two parts - a pin and an eccentric. The first is similar to a screw and is used for tight installation using threads in the panel, and the eccentric is mounted into the side. Its functional duty is to grab the pin and tighten the front panel by turning it
We install the dowel in the same way as described above, and screw the pins with a screwdriver into the holes intended for them on the inside of the panel.
Installing a pin when assembling a furniture box:
90
| Album | Installing a pin when assembling a drawer |
91
| Album | Installing a pin when assembling a drawer |
Now let's install the eccentrics. We find the corresponding holes in the sidewalls (usually they are located on the same side of both side parts) and insert this fastener into them. It must be installed in such a way that the cavity inside the eccentric coincides with the exit of the hole for the pin.
We connect the panel and the rest of the structure by aligning the dowel and pin with the holes intended for them. To ensure the lid sits tightly on the dowel, you can tap the joint with a hammer.
This must be done carefully and through a thick piece of cardboard or fabric folded in several layers.
When using a dowel connection, you should not use excessive force when working with a hammer, because there is a high probability of damage to the surface of the part.
92
| Album | Installing a dowel when assembling a drawer |
93
| Album | Installing a dowel when assembling a drawer |
94
| Album | Installing a dowel when assembling a drawer |
It's time to work with eccentrics. Using a Phillips-head screwdriver, turn it clockwise, grabbing the head of the pin with the internal thread and thereby tightening the panel in the joint.
Tool storage box
This type of design is considered the best DIY box idea. This product will allow you to keep all your working tools in one place. Here you can make additional sections for storing screws, nails and nuts.
To do this you need to prepare:
- thin board;
- thick plywood;
- hacksaw;
- electric jigsaw;
- hammer;
- screwdriver;
- tape measure;
- drawing of the finished product;
- metal corners.
On sheets of thick plywood we make markings for the drawer parts. After this, we drill holes for fastening the metal hinges. Next, we connect the side parts to each other.
Let's start making the bottom for the storage system. To do this, we attach a thin board to the sides of the box. To prevent it from collapsing under the weight of tools, it must be strengthened with thin boards. To do this, several wooden elements are stuffed on the bottom surface.
On the side parts of the plywood we draw markings for the handles. They will be cut inside the main body of the product. Here you will need an electric jigsaw. The cutting base is installed at the beginning of the marking.
In the process of cutting out parts, you should not make sudden movements. They can cause cracks to appear on the surface of the product.
Now let's start installing the partitions. To do this, cut out a small square from thin plywood. It is fixed with metal corners in the middle of the structure.
Read here: DIY potholders: diagrams, patterns and a master class on sewing original and comfortable potholders (85 photos)
The diagram shows a detailed view of the tool box. The drawing shows the exact number of parts:
- side parts – 4 pcs.;
- bottom – 1 pc.;
- septal wall;
- handles – 2 pcs.
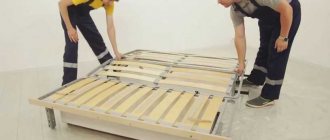
We nail the fiberboard bottom
From the bottom of the resulting box we nail a structural part made of fiberboard, having previously aligned the quadrangle along two diagonals
It is very important that the diagonal sizes are equal! Otherwise, you will have problems using the furniture box; it will constantly jam when moving, and will not fit completely
We nail the fiberboard bottom
What materials are used to build structures?
Most often, boxes are made of wood and other materials. For instruments, it is better to choose solid pine or maple. Alder or aspen is suitable for products. These tree species are distinguished by their durability and strength. They do not emit resinous secretions and do not dry out over time.
Plywood is suitable for making decorative products. You can place all sorts of little things here. To fix the parts, a special adhesive composition is used.