woodbuy.ru
Lumber from a warehouse in Moscow
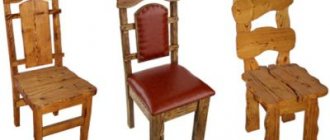
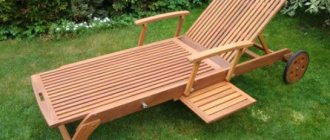
The process of making an antique chair from solid pine
The chair can be assembled with a minimum set of carpentry tools; no special knowledge is required. The material used is pine boards, upholstery fabric (it is better to use genuine leather or high-quality leatherette) and a piece of foam rubber. The height of the chair in the back is 1100 mm, the height of the seat without covering is 450 mm, the width of the seat in front is 450 mm, the width of the front legs is 420 mm, the distance between the rear legs is 390 mm.
Finished antique chair
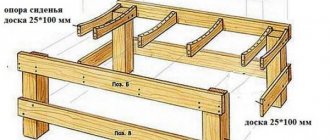
Main details of the chair
The design, as you see in the picture, is simplified to the minimum, it only fits a certain existing retro interior, it is almost impossible to buy such models in a store, they are produced only to order. All elements are assembled without tenons; they are installed in grooves, mounted with wood glue and secured with wood screws. The heads of the screws in visible places need to be recessed; in other places you don’t have to do anything additional.
- Make the front legs from timber 55×55 mm, height – 420 mm, material – pine.
- Hind legs. Length – 1020 mm, maximum width – 100 mm, thickness – 20 mm. Make the rear edge of the legs straight, the front edge should be cut at an angle, cutting can begin at a height of ≈ 450 mm from the floor level. Make the angle so that the thickness of the legs at the top is approximately 35 mm.
- Side drawers. Length – 450 mm, thickness – 30 mm, width – 50 mm. The front and rear drawers have different dimensions: length 420 mm, width – 55 mm, thickness 20 mm.
- Side legs. Thickness – 30 mm, length 380 mm, width – 50 mm.
Making the back legs of a chair
For the horizontal bars of the back, prepare 50x20 mm bars with a length of 440 mm. The upper bed is made of 20 mm boards, length – 450 mm, height 220 mm. Process both edges with a profile cutter, making the contour concave at the bottom and convex at the top. Select the radii yourself, we just took them “by eye”. The back itself should be fixed on the horizontal transverse bars of the back, align the upper end of the back with the contour of the bed, make a smooth, imperceptible transition from one element to the second. The arc of the back must necessarily coincide with the arc along the lower edge of the bed.
Begin assembly by marking the rear legs on the top leading edge. Transverse bars will be installed here; taking into account the dimensions, it is necessary to mark and cut the grooves. The depth of the grooves is approximately 5 millimeters. Do not allow gaps between the grooves and the bars; it will never be possible to seal them up later unnoticed; a real master will always notice the gap, no matter how carefully you putty it. When connecting, use wood glue, finally tighten with self-tapping screws, the assembled parts must dry for at least a day. Mark 100 mm from the upper ends of the rear legs and make a place for attaching the bed; the thickness of the cut depends on the thickness of the bed. In our case, it is quite enough to make the seat depth 5 millimeters; you can orient yourself taking into account your dimensions. The main thing is that the height of the bed completely coincides with the surface of the back. Keep in mind that all cross bars must increase in length upward, due to the slight splay of the legs. Select the specific length of the bars arbitrarily.
On the back side of the edges of the legs you need to make a groove for installing the drawer; select the fastening of the drawer and the dimensions of the groove in the usual way. The height of the drawer from the floor should be approximately 430 mm, otherwise it will be uncomfortable to sit on the chair. The ends of the drawers should protrude slightly; this gives the chair an old-fashioned, simple look.
Front legs
Height – 430 mm, beam cross-section 55×55 mm, make the side drawers 50 mm wide and 30 mm thick. Also install the side drawers on sawn platforms, fastening with glue and self-tapping screws, the heads need to be recessed and sealed. The legs need to be attached to them; the cross-section of the legs is no different from the drawers, and the method of fastening is the same. The only difference is that the drawers should not protrude beyond the profile of the legs, and for legs this condition is not considered mandatory.
Chair assembly
The backrest must be secured to the transverse bars of the backrest, the width of the backrest is 230 mm, the height is 400 mm, the thickness is 20 mm. We were a little lazy and fixed the back with self-tapping screws, but we advise you to be more diligent and fix it with dowels. In the same way, attach the beds to the legs. For the seat, you can use sheet plywood or OSB board. If you want to make a completely authentic retro chair, then you need to take natural boards for sitting, make a furniture panel from them and cut out the required part according to the specified dimensions. The front seat protrudes above the projection of the legs; make them rounded. The width at the back of the seat should match the width of the rear legs. To increase the strength of the seat, you need to additionally install a bar measuring 310x100x20 mm between the rear legs. This bar, by the way, is present on all antique chairs, which is why they served reliably for many decades.
Assembling the chair frame
Finishing
A simple “rustic” chair can be left as is, of course, coated with clear varnish. For a more “prosperous” option, pay much more attention to the finishing. Before varnishing, all parts must be covered with stain; choose the color of the stain so that the wooden structures become a little “aged” and the texture of the wood is clearly visible. Apply the stain first with a brush, and then wipe with a wet cloth until the wood texture clearly appears. Once the chair is dry, apply two coats of expensive polyurethane varnish.
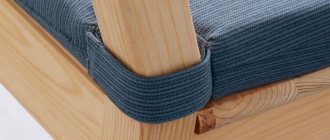
Be sure to upholster the back and seat; when upholstering, use foam rubber, the thickness of the foam rubber is no more than two centimeters, otherwise your “antique” chair will look like an element of modern upholstered furniture. When upholstering the edges of the back and seat, leather or leatherette should be upholstered with nails with decorative caps. After the upholstery is finished, the back and seat are fastened on the reverse side with self-tapping screws; carefully monitor their length, otherwise you will have to sit “on pins and needles.”
Source
Aging methods
Before you paint antique furniture at home, you need to familiarize yourself with all the available methods and techniques on how to age furniture with your own hands. It is worth noting that the process of working with modern furniture is no different from the methods of creating antique furniture with your own hands. The main differences lie in the end result, which is an appearance that resembles old, cracked objects. Before artificially aging furniture, you should carefully prepare. The most popular and in demand methods are:
- Chemical surface treatment;
- Thermal exposure;
- Mechanical restoration.
Chemical surface treatment
If you plan to use pine as the main material, then the best choice would be chemical treatment using special reagents. As a result of the reaction of the chemical and wood, the material cracks and the long-awaited effect of antiquity is obtained. However, aging furniture with your own hands at home is quite dangerous, since during work you have to come into contact with chemical reagents, measure them, and mix them. It is important to note that the substances necessary for the work corrode the material, so it is important to protect the skin of your hands as much as possible.
Thermal impact
As for heat treatment, when repairing old furniture with your own hands you will not have to use reagents, but another danger arises - working with an open source of fire. To achieve optimal results, a high temperature flame must be directed at the material. The most optimal tool would be a soldering iron or a special lamp. It is important to control the process so that the lamp burns the layers of wood unevenly. Only in this way will you get an antique-decorated item. Soft layers take much less time because they fade first. The hard surface remains slightly affected and the texture is uneven. After the firing method, it is mandatory to use sandpaper to make the surface smooth. At the end it is coated with a special varnish. As for transparency, you can choose the product according to your own preferences.
Mechanical restoration
Thanks to mechanical processing, it is possible to simplify the production of antique furniture. If this is the artist’s first experience, then decorating old furniture with your own hands from a photo will be easier. Using a brush with metal bristles, go over the entire surface along the grain. This removes the soft layer of wood to create an uneven texture. Next, as in the first case, sanding and varnishing are used to preserve the new look for as long as possible.
Another popular technique for aging furniture at home, which is used quite often by craftsmen of various levels, is brushing. With its help, you can make your own aging of furniture in the Provence style. The technology is used not only to transform furniture, but also to decorate flooring, decorative beams and even ceilings. It is worth paying attention to design projects in the old style. This technique of aging furniture looks great in combination with indoor plants, so it is often used to transform country houses and open terraces.
Brushing involves removing soft layers of wood using special metal brushes and then painting the furniture a dark shade of brown. Final processing (especially if restoration of antique antique furniture is carried out) requires varnishing of wooden furniture, which provides protection from mechanical damage, humidity and other natural phenomena. This method can be used regardless of the size of the furniture. Optimal use for pine, larch, ash. It is important to note that the brushing method cannot be used on fruit woods such as pear or cherry because their wood does not have a distinct grain.
Using this method, you can decorate old furniture with your own hands: chests of drawers, cabinets, beds and other attributes without severe damage to the structure of the material, since the impact involves the destruction of only the top layer of wood. If you plan to use brushing for large objects (Provence style furniture), then it is best to prepare a grinding machine or chisel to save time. To achieve a deeper effect, it is recommended to use several processing methods at once. Thus, brushing can be supplemented with the chemical action of special reagents or heat treatment.
It’s easy to make an antique dressing room with your own hands. You can add some zest to your living room by making a table out of old tires with your own hands or decorating the interior with designer antique furniture. However, it is worth remembering that such a style must fit into the main style, otherwise the whole concept will look ridiculous.
DIY chairs - let’s learn all the nuances
Published by Artyom on 04/29/2020 04/29/2020
The beauty and reliability of furniture is a prerequisite for comfort, but you have to pay for everything, and good furniture is expensive. There is a simple and logical solution, which is to make the furniture yourself. A tool, desire, hard work - and everything will work out, you just have to try.
You shouldn’t immediately take on complex cabinet furniture; it’s better to start with a simple product, for example, making a chair out of wood with your own hands. Masterfully made, it will decorate the interior and serve as an impetus for new achievements.
Required Tools
The second life of old furniture can change the overall perception of a boring interior. And you no longer need to think about what to do with old furniture. Many home craftsmen prefer to modify antique furniture with their own hands, and drawings and diagrams will help to measure all the necessary parameters and avoid mistakes in such an interesting task.
To begin the process, you need to familiarize yourself with the tools that will be used in the work, and also think about how to make the process as easy as possible. As a rule, tools are selected in order to solve a specific problem - how to age furniture. If you plan to create an entire interior yourself or decorate old furniture, then you should go to the store after preparing a list. The necessary equipment used to repair old furniture is presented in the table.
What tools are needed?
Without tools it is impossible to create a chair. Even if you can do it with your hands, it will hardly be possible to sit on it.
To make a chair you need a number of “helpers”. A saw or hacksaw is necessary first. Hammer, screwdriver, jigsaw, chisel, plane, mallet, grinder, stapler (construction), clamps, square and tape measure.
This is the list that we will need to prepare the stool
A chair is not a stool
Even children know what a chair is. This is a piece of furniture designed for seating and designed for one person. The main parts of a chair are: legs, seat (often soft) and back. The back is what distinguishes a chair from a stool.
But the difference is not limited solely to appearance. During operation, these similar pieces of furniture are affected by different forces. This can be described extremely simply - if they sit on a stool, then they “fall apart” on the chair.
In addition to the mechanical component, an aesthetic difference can also be distinguished. A stool is utilitarian furniture that does not bring comfort or coziness to the interior. A stool can be used in a workshop, in a country house, or every day as kitchen furniture, but do not put it in the living room, this will be a sign of bad taste. In the living room there is only room for sofas and chairs. Beautiful, skillfully made, they can transform even a tastelessly decorated room.
Applying protection to a painted surface
In order to protect the chair from rotting, it is necessary to cover its surface with a layer of wax.
All applied layers must be protected, for which you can use wax, which is represented by mastic made on the basis of wood wax. If water-based paint was used in the work, then this composition will perfectly protect it from exposure to water.
Wax can be purchased in clear or dark versions. The composition should be applied using rags that are not capable of leaving fibers; a traditional foam sponge will also work. The composition should be applied evenly to the base that has been painted, then rubbing must be carried out. In order for the composition to be completely absorbed and dry, it will take 15 minutes.
A protective layer can help adjust the resulting paint color. This can be done in two steps. To do this, the first layer should be transparent wax, which should be applied over the wooden base. After this, dark wax should be applied, which will give the furniture a certain effect, but for this the composition should be applied only in the right places.
If you want to make the previously applied paint with your own hands darker, then the dark wax should be distributed over the entire surface, replacing the transparent composition. It is also recommended to start experiments from the back of the chair. This will help you understand whether the resulting effect is suitable.
https://moyagostinaya.ru/www.youtube.com/watch?v=XbcCsiPXwqw
If the chairs you have decorated in an antique style are used quite often, they can additionally be protected with a matte acrylic compound designed for wood. Such coverage must be renewed periodically – once every 6 months. To care for such pieces of furniture, you need to use damp rags and special wood care products.
Chairs can also be decorated with unusual vintage elements, which today are easy to purchase in relevant goods stores or at stock exchanges. Such a minor addition will be a worthy completion of the master’s creative project.
https://moyagostinaya.ru/www.youtube.com/watch?v=FRJbpyzJuLA
Armchairs, if they have wooden components, for example, armrests or decorative legs, can be decorated using one of the described technologies. The main thing is that this piece of furniture is in harmony with the rest of the interior of the house or apartment.
Wood selection
You need to start making a chair with your own hands by choosing the type of wood. They are hard and soft. The first include beech, oak, birch, maple, walnut, cherry - all have high strength and resistance to deformation. Products made from such wood can last for decades, but they are also more difficult to process, since such materials have a dense structure. They are also distinguished by their high cost.
Soft woods - pine, spruce, linden, aspen, alder and others - are more susceptible to scratches and chips. They are inferior to solid ones in practicality. Their advantage is that due to its looser, straight-grained structure, such wood is convenient to saw, cut, sand and glue. The products are light and elegant. Materials made from soft rocks are much cheaper than materials made from hard rocks. There is particularly durable wood (yew, acacia, boxwood) - it is better not to process it at home.
Typically, chairs are made of timber (with a section of 60 by 40 mm or 40 by 40 mm) or boards 10-15 mm thick. You can also make furniture from a log; to do this, you must first dismantle it. This is done independently on a makeshift stand using a grinder with a circular saw. If you lack the skill, it is better to entrust the cutting to professional carpenters.
When purchasing blanks, you need to check the quality of the lumber. If the rules for drying wood have been violated, this can be determined by external defects: cracks on the surface, warping of the wood (bends, irregularities) and resin protruding in some places. Also, boards that are stored in damp areas should not be used to make a chair. All these factors negatively affect the strength and wear resistance of wood.
High-quality materials for chairs should be selected according to the following criteria:
- smooth surface, without knots, bends or distortions;
- no cracks or chips;
- The wood is dry, without signs of mold or wormholes.
Before starting work, it is useful to treat lumber with special antiseptics - this will increase their moisture resistance and prevent fungal infection. After impregnation with this composition, a chair made of solid natural wood becomes stronger and more durable.
Smooth surface, without knots, bends or distortions
No cracks or chips
The wood is dry, without signs of mold or wormholes.
Few pieces of furniture can boast such an abundance of models as an ordinary chair. Despite the wide range, there are two main types: dining and living rooms. Outwardly they are very similar, however, there are differences. The dining chair is slightly lower and more stable, and also has a narrower seat at the back. This is due to the need to provide access to the table for service personnel.
Chairs are made from various materials, most often these are:
- metal;
- tree;
- plastic;
- composite materials.
Sometimes you can find original designer models made from truly unique materials, for example glass, stone or their combination with wood. Such designs are complex, but they have a unique appearance and can amaze the most sophisticated connoisseurs of beauty.
The best material for making furniture at home is wood. It is easy to process, has sufficient strength, and an attractive appearance.
How to make furniture look old
Having all the necessary tools at hand, we begin to create a drawing. After this, having prepared the material, we assemble the furniture using the tools described above. You can also age existing furniture.
The process of aging furniture is not complicated and has several stages.
In any case, there are many nuances in this issue, which we will consider further.
Chemical treatment
An aged piece of furniture looks elegant, and this process can be accelerated with the help of chemical compounds.
Aged furniture is a work of art that can inspire admiration in anyone.
Using chemical elements you can achieve the following aging effect:
- cracking
- creating wear or fading
- darkening of tone
- uneven coloring
Craquelure varnish is a special substance that, when it comes into contact with the surface of wood, causes cracking of the top layer. By painting the inner layer in dark colors and the lower layer in light colors, you get an excellent antique effect.
Opening the treated furniture with varnish is the last stage.
To give furniture a beautiful worn or faded surface, the double painting technique is used. First, the first dark layer is applied. After it has dried, a second painting is carried out with light paint and the dried surface is unevenly sanded in different places. This technique creates a stunning visual effect of old furniture.
Painting materials give furniture an unsurpassed appearance and prevent it from losing its appearance over time.
Darkening individual parts of furniture is the simplest aging technique; it can also be achieved using ordinary stain. We treat the surface, let it dry - and voila.
The technical process for producing antique furniture is more complex than the process of assembling ordinary furniture.
Uneven coloring is a special case of the rubbed effect, also called the “dry brush effect”. As the name implies, we draw a brush lightly dipped in paint over the surface of the wood, getting the visual appearance of old furniture.
Aged furniture will look interesting, even in bright colors.
Mechanical restoration
The most commonly used machining tools are:
- chisel
- metal brush
The process of aging furniture is a very important one and you need to be careful when doing it.
The most famous and frequently used mechanical processing technique is brushing. When using it, the upper soft layers of wood are removed, but the exposed inner layers must be painted in a dark shade.
Aged furniture can be placed in an ethno-cafe.Thermal
Heat treatment is used quite rarely due to its specificity. If the impact is too strong, such furniture looks like after a fire, and is not suitable for every interior. Another thing is drying with a hairdryer, or using a soldering iron.
Heat treatment of furniture is the most complex and requires certain knowledge.
In this case, unevenness or visual marks are created on the surface, creating the effect of antiquity.
Design Features
For a beginner in carpentry, it is better not to take on chair models with fine carvings, curly elements or curved backs. Often, novice craftsmen practice making stools to gain experience. If the farm does not require them, there is no need to transfer materials and time to them. By carefully studying the manufacturing instructions, you can immediately make a wooden chair with a simple design. This is a universal piece of furniture that, due to its design, will last a long time. It will fit perfectly into the interior of a country house, and can also be used as a kitchen chair. A regular model with right angles will require the following parts:
- 2 rear legs;
- 2 front legs;
- 4 drawers, as well as horizontal strips that strengthen the seat and the entire structure as a whole;
- 3-4 legs – connect the legs at the bottom, which gives the chair additional stability;
- seat;
- back.
It is possible to install legs and drawers in larger quantities - it depends on the imagination of the master. The backs are also made in different ways. For example, you can make several narrow planks and place them vertically, fastening them at the top and bottom with transverse parts. Or make one wide plank and connect it to the back legs. The advantage of this model is its ease of implementation. Among the shortcomings, the only drawback is that the design is too primitive, which will not stand out against the background of the rest of the furniture.
The sketch and drawing of the future exclusive must exactly correspond to its purpose. For this reason, you should initially decide whether it will be just a chair for sitting or with additional functions.
With soft seat
Visually, this model looks like an ordinary chair, but its upper part is upholstered with foam rubber and fabric. To make an option with a soft seat, you will need to know how to work with a stapler. You will also need to stock up on additional parts and tools:
- A piece of plywood. The seat is cut out of it with a jigsaw exactly to the required size.
- Foam rubber with a density of 40 kg/m, thickness 40-60 mm. You can replace it with batting or padding polyester.
- Upholstery fabric. For soft seats, tapestry, velor, flock, courtesan, leather or leatherette are suitable.
- A sharp knife with a long blade. They are convenient for cutting foam rubber.
- Manual or electric stapler. Use it to cover the seat with fabric.
In addition to the seat, you can also make a soft back. In this case, you need to correctly calculate the amount of material so that there is enough for both parts.
The advantage of making such chairs yourself is the ability to choose the optimal size, taking into account your body type. However, you need to take the choice of texture seriously. Natural leather cannot be used to upholster kitchen chairs, as it stretches due to moisture and begins to bulge over time. It is better to choose jacquard - this material has excellent water-repellent properties.
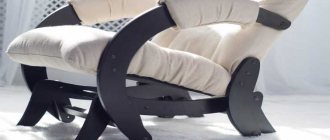
Armchair chair
The main advantage of this model is the presence of armrests. In addition, it looks more presentable, and if you decorate it with fabric, you will get a rather stylish piece of furniture. An amateur carpenter can easily make a chair of this shape with his own hands. The easiest way would be to make a model with a straight back. For stability, it is better to make the legs wide, using a 15 mm board.
The front legs should be longer than in a regular chair, so that their upper part can then be connected to the armrests. They are made 8-10 cm wide from 10-15 mm boards; the edge is usually rounded to make it more comfortable for the hands. For fastenings you will need furniture bolts - with their help the frame of the chair-chair will be assembled.
For an untrained craftsman who does not have woodworking skills, this design may be too complicated.
Folding
An excellent solution for small spaces. Thanks to its folding legs, it can be quickly assembled and disassembled. There are also disadvantages - lack of a backrest, fragility. Experienced craftsmen recommend making a folding chair from hardwood boards - oak, maple, birch, elm, then the model will be strong and stable. Pine planks are less durable. As a basis, you need to take 2 long slats, which will serve as both the front legs and the back, when they are connected from above by a transverse board. The rear legs are attached to the seat. They, unlike a regular chair, are shorter than the front ones.
In the folding version, it is important to position the central axis correctly so that the seating area does not end up being too high. To assemble a chair of this model, additional fasteners will be required: furniture bolts and nuts with matching washers. Such furniture is usually made according to a sketch, so it is very important that the craftsman knows how to work with drawings.
Transformer
Outwardly, it looks like a massive chair with a back, and if you unfold it, you get a staircase of 2-3 steps. The main advantage is the height. With its help you can reach the very top shelves of cabinets, remove curtains, and in general this chair is very useful, especially during renovations. The disadvantages are that it is heavy and takes up a lot of space. If you are making this model for the first time, it is better to choose a drawing of a chair without intricate shapes of legs and additional elements (for example, there is a design in which the steps protrude in a spiral). In addition to other materials and tools for such a chair, you will need a piano hinge and 2 sets of guides - with their help the steps will extend.
It is not easy to make such a wooden chair with your own hands. This will require skills in working with a jigsaw, drill, and plane.
Natural materials
The use of natural materials is relevant not only in school crafts. Even Italian designers (Andrea Magnani and Giovanni Delvezzio from the Re Sign studio) distinguished themselves with the simple but unexpected idea of decorating chairs with bark. Not everyone can buy designer furniture, but anyone can take an idea and bring it to life.
Wooden chairs should closely match the natural material, so they are cleaned of varnish, sanded with fine sandpaper and left in that form. The maximum that can be done is to cover it with stain to give it a tint. The prepared tree bark is glued in a loose order; the designers chose one leg and a back for gluing.
Another equally interesting approach is to decorate the chairs with flat pebbles. The stone is glued directly to the seat and back. An unusual chair can decorate a bathroom, balcony or garden, especially if there are other marine-themed items nearby.
How to determine the optimal height and dimensions
Thanks to the science of ergonomics, optimal chair sizes have been developed so that a person feels comfortable while sitting. These standards are designed for men with a height of 170-175 cm, and women with a height of 160-165 cm. The optimal parameters are as follows:
- chair height from floor to seat – 400-450 mm;
- seat width – 400-450 mm and depth – 500 mm;
- distance from the floor to the end of the upper edge of the backrest – 850-900 mm;
- back width – 300-400 mm;
- the back is straight or at a slight slope of 8-12 degrees.
The chairs are designed according to GOST for people weighing up to 100 kg. Drawings and dimensions with standard parameters can be used by those whose height and weight correspond to the average data. For the rest, to find out how to make a chair that will be comfortable to sit on and not spoil your posture, you need to take your own measurements. To do this, you need to sit down, keeping your legs at right angles and measure the distance from the floor to the inner bend of the knee - this will be the height to the seat. Then measure the length from the knee to the hip - this is the depth of the chair. The distance from your hip to your neck will help determine the height from the seat to the top edge of the backrest.
Optimal chair parameters
Calculation of parameters for selecting an individual chair
There are other standards that will help you make the right choice. Correspondence of human height to the height of the chair in cm:
- 146-177 – 43 cm;
- 159-188 – 46 cm;
- 174-207 – 51 cm.
In this case, the angle of the bent legs should be 90 degrees. The most comfortable body position is considered to be one in which the depth of the seat is 2/3 of the length of the hips. With this position, the correct deflection of the lower back is maintained.
Correspondence of a person's height to the height of the chair
Connecting chair parts
Beautiful and reliable wooden chairs are assembled exclusively using closed joints. The strength of the assembly is ensured by wood glue. Unless the chair is intended for a workshop where reliability is important rather than aesthetics, connections with bolts, nails, screws and the like are unacceptable.
The principle of fastening is extremely simple. On one part a recess is made - a groove, on the other a tenon is machined for it. These elements can be made manually, but easier and more accurately - using a router.
Note! For a quality connection, the dimensions of the tenon and groove must match exactly.
Separately, it is worth noting the wedged tenon technique; such connections ensure an ideal fit of the parts and guarantee high durability of the joint, since the mating parts dry out at the same time. In any case, before you start making a chair, it’s worth practicing creating tenons and grooves. Surely in your home workshop there will be scraps of boards that are suitable for this purpose.
Manufacturing of parts
Once the material has been prepared and the skills for creating tenon joint elements have been obtained, you can proceed directly to work. It will be easier, especially for novice craftsmen, to work according to ready-made drawings. They are easy to find on the Internet or relevant literature.
The blanks are cut according to size. Each individual part of the chair must be solid. Some craftsmen, wanting to save money, assemble the rear legs from two parts; this is a bad practice - the legs will soon break.
Back
A distinctive feature of the chair is the back. It is functional - a person relies on it, but it is also a decoration of the product, so maximum attention must be paid to its production.
There are several options for the backrest:
- solid, hard;
- typesetting from vertical or horizontal slats;
- soft.
The simplest one to make is a one-piece rigid back. This option is worth choosing when making chairs with a wooden back for the kitchen. Structurally, such a backrest is a curved bar, which is attached between the rear legs of the product using a tenon joint. Often they use not one jumper, but several at once. This allows you to make a beautiful and functional chair without spending a lot of effort and material.
The stacked back is also not particularly difficult to manufacture. Actually, this is a rigid back, in the holes (or grooves) of which slats of round or rectangular cross-section are installed.
A soft back looks more attractive both in terms of aesthetics and convenience. This option gives wide scope for imagination, because by changing the shape and color scheme of the upholstery, you can create unique antique chairs, both one-piece and full-fledged furniture sets.
The load-bearing part of the soft back is plywood 5-6 mm thick. You can use felt, foam rubber or batting as padding. The upholstery is sewn with a pocket and stitched at the bottom.
Assembly steps
The finished parts of the chair are assembled into a single structure. First, it is a dry assembly, without using glue. It allows you to verify the accuracy of dimensions and correct manufacturing of the connection elements. Each time, assembly begins with an apron - these are the rear legs, the jumper between them and the longitudinal drawers (the basis of the future seat). The procedure is as follows:
- assemble one part of the apron, left or right;
- the backrest is installed in the grooves;
- complete the apron by installing the missing leg;
- install the front legs of the chair with a jumper between them;
- check the accuracy of the dimensions and make adjustments if necessary;
- re-assemble the chair, but with gluing or wedging the joints.
The soft seat will be installed last. Depending on the chosen configuration of the product, it can be laid dry and held by friction or attached with glue. In the second case, a minimum of glue is used so that excess glue does not damage the upholstery.
Seat
The main part of the seat is made of plywood or boards 12-20 mm thick. The board can be solid or a typesetting board. In any case, the base must be strong and support the weight of an adult.
A pillow is formed on the base. Most often, the soft seat is made of foam rubber. This is a fairly good material, and also inexpensive. To ensure the durability of the product, a layer of felt or batting is placed on top of the foam rubber, which will absorb sweat.
The upholstery is durable fabric, leather or suede. It can be the same color as on the back, or, on the contrary, contrast with it. When cutting the material, it is necessary to provide scars along the edges; this will protect the upholstery from tears at the corners. It is attached using a construction stapler or decorative nails.
Drawing adaptation
The easiest way to make a drawing of a chair with your own dimensions is to rework an already finished one. To do this, you need to replace the inappropriate parameters (length of the leg from the floor to the seat and others) with the required numbers, and then draw a diagram according to the new input. To do this correctly and avoid distortions, it is important to take into account the proportions of each element and know exactly which parts should be identical and which should not. Another important nuance is that when replacing sizes, you must respect the scale. There is a second option to get a drawing of chairs with a back - enter your parameters into a computer program, which itself will draw a diagram.
Rework a completed drawing, taking into account proportions and scale
Enter parameters into a computer program, which will draw the diagram itself
Paper chair
There is also an option to make a table out of paper. This is a great way to make a children's cuddle chair. For example, if a small child wants to create a small house in which his characters will live.
However, for this you need to already learn how to work with paper. You can find out how to do this on the Internet.
The uniqueness of antique furniture
Antique wooden furniture has remained popular for several years now. This can be explained by the many advantages it has:
- It harmonizes perfectly with different colors and textures in the interior.
- Can be used for any style.
- Creates a cozy atmosphere in the room.
- Excellent workmanship.
Wood products deserve special attention, as they not only have unsurpassed characteristics, but also an interesting appearance that will help decorate any room. Antique products carry charm and elegance, which is inherent only in things that are very old. Often people who want to decorate their home with such things ask questions about where to get such pieces of furniture.
There are several solutions:
- Buying furniture from an antique store is an option for those with an unlimited budget. This fact can be explained by the fact that genuine antique furniture or restored compositions are very expensive due to exclusivity.
- Purchasing modern furniture that has been artificially aged. But even for this you will have to spend money.
- Aging furniture with your own hands. To do this, use what you have at your dacha or in the house. This approach will be a solution for those who have creative abilities and good imagination. Next, we will tell you how to age furniture with your own hands.
Procedure
When the main drawing with all the calculations of the planned model is ready, it is advisable to make a diagram of each part, especially if there are connecting grooves or holes. Making a wooden chair begins with cutting. You need to put a pattern on the board, trace it along the contour with a pencil and cut out the blanks according to the drawing.
All components must be made without errors, with an accuracy of up to 1 mm. The slightest deviation will cause a distortion, and you will have to “adjust” the part or cut out another one.
Preparing parts
When the drawing is ready, you can begin processing the bars to make suitable components from them. To do this, you need to cut out the necessary grooves for connections on each part, indicated in the diagram. They are drilled out with a router. If you don’t have one, you can use a drill, which first drills several holes nearby, and then they are combined with a chisel. Then you should carefully sand all surfaces, removing unevenness and possible wood defects. Round right corners. The parts for the homemade chair are ready.
Sanding is done using medium-grit sandpaper.
Left hind leg
Section of the right rear leg Left anterior leg from above
Left front
Sketch of the longitudinal base and footing
Front transverse base
Rear transverse base
Creating a soft seat
First, you need to place a piece of plywood on the foam rubber and use a sharp knife to cut out a part from it with an allowance of 1-1.5 cm along the entire edge. Then cut out the fabric, cut it to the shape of the seat, adding 5-6 cm on all sides. After this, lightly glue the plywood to the foam rubber so that the parts do not slip when re-tightening.
Place the workpiece with foam rubber down on the wrong side of the material, and then begin re-taping using a stapler. Drive the staples side by side, at a distance of 0.5-1 cm, so that the fabric does not bulge. First you need to make 4 fixations in the center on each side - this way there will be no distortions. Then the fabric must be stretched at the corners, after which the remaining sections must be secured with staples. When finished, trim off excess fabric.
Kitchen chairs have to be washed frequently, so it is better to reupholster them with materials such as jacquard or leatherette.
Product assembly
A simple chair with a backrest must be assembled as follows:
- coat the joints on the front drawer with glue, then insert it into the grooves of the front legs (all fastened places must be tightened with clamps to tightly press and fix the parts);
- in the same way, glue the back drawer and the back of the chair into the rear legs;
- wait for complete drying, after which you can connect these 2 pieces;
- carry out a test assembly of the chair frame and make sure that the structure is not distorted;
- disassemble the frame, glue all the connections, reassemble the chair.
After the glue has dried, you can attach the inner strips for the seat and install the seat itself. If there are pedestals in the drawing, they are attached at the end of the assembly. The finished chair must be turned over with the seat down until it is completely dry.
Finishing
When the glue dries, you need to cut off the protruding dowel heads, putty all the holes in the screws, and then sand everything thoroughly. Then cover the entire surface of the wooden chair with stain. When the initial layer has dried, you can coat it with varnish. It is better to apply it in 2 layers. The chair can also be painted - latex or acrylic paints are suitable for wood.
It is better to pre-impregnate a chair for the kitchen or garden with a special water-repellent agent for wood.
Cut off protruding dowel heads
Fill holes, sand parts
Cover the surface with stain and varnish
Ready chair
Manufacturing technologies
A modern person has a lot of ways to age furniture. Advanced equipment and technologies come to the rescue, with the help of which you can bring a variety of retro ideas to life. To achieve the desired antique effect, the wooden base of chairs is often lightened, and cracks and unevenness are created on the surface. It is important not to lose sight of the main rule: the natural look is above all. A product made a few hours ago should look as if it has “lived” for at least a hundred years. Only in this case can antique furniture become truly elite, comparable to museum pieces.
Modern aging of wooden furniture eliminates the use of chemicals, so it retains its properties. It’s a completely different matter for products with bronze plates and wheels.
Metal objects can be exposed to acids and alkalis to achieve an antique effect.
Artificial aging is carried out using the following techniques:
- craquelure;
- worn effect;
- patination;
- brushing.
The term “craquelure” translated from French means “cracks formed during the process of painting or varnishing a product.” This is nothing more than a violation of the integrity of the top layer of furniture covering, as a result of which all kinds of patterns appear. Many designers, working on the interior design of a room, use this particular technique, since crackled surfaces give the interior a special charm. The cracked surface and the pattern on it are called “crackle”.
The advantage of craquelure is that the pattern can be made on a completely new surface.
However, to perform work in this technique, you must have at least modest experience in this field. Only then will the aging process turn into an exciting activity with a unique result. You can create “antique” furniture at home, you just need to arm yourself with a set of special tools (varnishes, paints, brushes, etc.) and devote several hours to this task. The result of the work will be a delightful piece of furniture in an antique style.
In professional workshops you can order single-phase or two-phase craquelure.
- The first is used on a plain surface; the armchair or chair must already be painted in the main tone. After the paint has completely dried, the surface is coated with a one-component varnish and dried again. Next, apply the main color. Interacting with the paint, the craquelure varnish begins to crack. For durability, the chair is impregnated with transparent varnish.
- The second type of craquelure is used on surfaces with a pattern. Making a blend with your own hands is quite simple. To do this, you need to glue a decorating napkin to a hard surface and cover it with varnish, and after 40 minutes, apply a second layer of varnish using cross-shaped movements to create the effect of pronounced cracks.
If you use a hairdryer while drying the chair, the cracks will become wider and deeper. To get a contrasting pattern, you can rub pigment, dark paint or gold powder into the cracks formed, but only after the surface has completely dried. All excess paint is removed with a cotton pad soaked in vegetable oil. Next, the product is dried and painted again with acrylic varnish.
The worn effect is used to make furniture look old and shabby. In this case, you need to work on the choice of colors. Any rich, bright option is suitable as the main color. The next layer is a very light paint of a delicate shade. The combination of such contrasts creates the desired effect of paint faded with time. After complete drying, the surface is treated with fine sandpaper and coated with furniture varnish.
For patination, foil, patina, various paints, and bitumen are used. Most often, old but still “usable” furniture that has lost its attractiveness is patinated. Natural “wornness” can be played up using this method, turning the “antique” look into the main advantage of a piece of furniture. Thanks to this simple technique, even a product that is not pleasing to the eye will take on the appearance of an antique item. The golden patina looks especially beautiful on chairs with crossed legs. As a rule, only surfaces made from natural materials are patinated, but sometimes coatings made from MDF become aged.
After treatment with patina, that is, at the final stage, the artificially aged furniture is varnished. If necessary, you can apply more than one layer. After the varnish has dried, the surface is treated with sandpaper, but you need to act extremely carefully, otherwise, as a result of careless work, the furniture will not turn out to be aged, but sloppy. Patination is a rather labor-intensive process; it requires different skills and experience, perseverance and a lot of time.
Not many people can work with this technique at home.
Among the variety of wood processing methods in order to add age to young wood, brushing is successful. The essence of this process is the processing of timber with a wire brush. Brushing can be done on its own or in tandem with other techniques. The master's task is to use a simple tool and a certain force to remove soft fibers from the top layer of wood, but leave the hard ones intact.
The wood treated in this way is then given an aesthetically pleasing “antique” appearance. A small chisel and a thin drill create “wormholes” - damage caused by insects and time. Based on the idea of decorating a room that will be decorated with aged chairs, the wood is coated with various varnishes, waxes, and stains.
It is worth noting that this technique cannot be used for every type of array. Professionals advise treating oak, larch, ash, and walnut in this way. You can also brush wenge, jatoba, merbau. The main requirement of this aging method is that the wood has clearly visible soft and hard growth rings. Fruit trees, as well as beech and maple, cannot be aged by brushing.
Antique wooden chairs will undoubtedly become the highlight of any room. Thanks to such exquisite decoration, you will be able to plunge into the era of romance and adventure, and by creating an interior in an old style, you can forget about the troubles and worries you have experienced.
Decorating the product
You can transform a boring chair using various decorating techniques. The simplest and most popular methods:
- Pasting with colored film. The range of colors is so wide that it will satisfy even the most capricious buyer. The decorating process itself does not require any special skills. In addition to the film, you will need scissors, a metal spatula and a degreaser.
- Using ready-made stickers for decoration - they are attached to the surface of the furniture and smoothed out. However, over time, the products lose their attractiveness and will need to be replaced with others.
- Dyeing through a layer of tulle. You will need acrylic paint and a piece of scrap fabric with beautiful lace. The tulle is fixed with tape, paint is applied over it (it is better to use a spray can), and after drying the material is carefully removed.
Besides painting, there are also other ways to decorate furniture. A familiar and win-win decor for a chair is beautiful pillows, covers and capes. They come in a wide variety of shapes and colors. To turn an ordinary chair into an exclusive piece of furniture, you can use old curtains and tablecloths, things that are out of fashion, lace, ribbons, bows and much more. For example, pillows can be sewn using old padding polyester jackets as a basis. It is important to remember that all decorative elements must be made removable so that they can be washed or cleaned.
Using comic magazines, you can make an unusual, beautiful chair for your child. You need to cut out bright pictures, and then carefully paste them over the details of the product at your discretion. When the glue dries, coat the surface with clear varnish. This technique is called decoupage.
Antique staining of chairs
Self-made furniture can also undergo an aging process. In any case, you should start painting the chairs from the back, which is not so noticeable. This will allow you to understand how best to work, how much paint to use for one roller roll. During this you will be able to adjust the shade of the composition in time. Then you can gradually move towards the front side, applying the mixture in broad strokes, without leaving any smudges.
Tools for painting antique chairs.
Before you begin applying the next layer of paint, if necessary, you need to analyze the surface for the absence of smudges, which, if present, can be removed with sandpaper, only then you need to go over this area with a roller again.
Between applying layers, the tool should be kept in water to prevent it from drying out. The next layer should be applied after the previous one has dried. The period that will pass from the moment of application to the drying time depends on the room conditions, this concerns humidity and temperature. The time it takes to dry can be limited to 1-5 hours.
Bar chairs
The chairs that stand at the bar counters have their own characteristics. First of all, they are tall. They are massive and have a round hard or soft seat. In most cases, a backrest is not provided, but there are models with a low fence that acts as a backrest and armrests. This furniture has always had a high price, but if you wish, you can make a chair of a similar design in your home workshop.
Bar stools are not necessarily furniture for a bar; they are perfect for a kitchen studio. An excellent solution for a home in this style is a high counter separating the kitchen area, which is used as a dining table, and high chairs near it.
The simplest wooden bar stool consists of four legs - boards, connected at the top point crosswise. They are equipped with a round seat made of plywood; for greater reliability, the legs are additionally fixed in the lower part with a wooden ring assembled from segmental parts.
Due to the large height, when assembling a bar stool made of wood, it is worth moving away from the principle of exclusively glue assembly. The gluing areas must be reinforced with self-tapping screws. To prevent this from affecting the consumer qualities of the product, the screw heads must be hidden. To do this, the seat is assembled from two disks, the legs are screwed to the bottom one, and the top one is attached with glue.
The effect of a dirty base and multiple layers
Furniture that is used quite often also wears out in places where it is usually handled by hand. This effect can be achieved by using dark wax or mastic. Application should be uneven.
You can try another effect that involves layering paint. Application should be made with careless strokes, moving the brush in different directions. No sanding is required between coats. The final layer of paint should be coated with clear wax, which is necessary for protection, but after that you need to use dark wax, which will give an aged effect.
Related article: Installation instructions for wooden skirting boards
Each technology described above can be used separately or combined. All this depends on the desire and imagination of the master.
In order to carry out aging work, it is necessary to prepare tools and materials:
- sandpaper;
- respirator;
- primer;
- paint roller;
- brush;
- selected paint for a specific effect.
Highchairs
A separate topic in furniture manufacturing is children's chairs made of wood. There are a great many similar products that you can make with your own hands. On the Internet you can find drawings of different models, ranging from a functional high chair to a full-fledged student's chair, which will help preserve your posture and turn studying into a real pleasure.
The best material for children's furniture is birch or birch plywood. Although it is not very durable, in this case it is not critical. Furniture for children is smaller in size and therefore has a smaller load per unit area.
Wooden chair for country kitchen
What distinguishes this self-made specimen from an ordinary chair is that:
- The back of the chair is tilted by 10 degrees, and the supporting strips are cut not from one board, but glued together from two, which reduces wood consumption
- Made from one piece of wood. The master set himself the task of making a chair from a single piece of 2x4 wood. You will find a diagram of cutting a piece in the photo below.
- In the back of the chair, the horizontal slats have decorative cutouts that you can draw to suit your taste. And also the ends of the back have attractive bevels.
Step-by-step photo master class. Blueprints
Photo source: instructables.com/id/Dining-Chair-From-a-2×4. Author: PKM
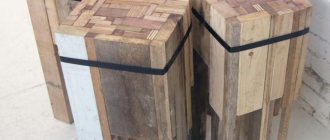
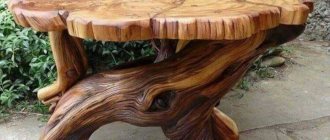
Log furniture
Most often, the interior of a country house is formed according to the residual principle, in the sense that old tables and chairs are taken to the country house, which are simply a pity to throw away. This is not a completely wrong approach, because a dacha can be furnished cheaply and in an original way, using ordinary logs as the material.
Log furniture has a number of significant advantages compared to other options. It is accessible and cheap, durable and reliable, and easy to manufacture.
If a tree grew on the site and it was cut down, the question of the material is removed. From one medium-sized tree you can easily make not just a chair, but an entire log country house set, you just need to try and give free rein to your imagination. An additional advantage from using logs in the manufacture of furniture is that the product can be used both indoors and outdoors, you just need to protect the wood from atmospheric influences.
Almost any tree can be used, the main thing is that it is not rotten and does not contain traces of forest pests. What the finished product will look like depends on the imagination of the craftsman and the tools at his disposal. In any case, it is necessary to remove the bark and soak the wood with an antiseptic, then the homemade furniture will last a long time and will delight more than one generation of its owners.
Number of blocks: 25 | Total number of characters: 30649 Number of donors used: 3 Information on each donor:
Source
What materials can antique furniture be made from?
There are many different ways to age furniture. To decorate chairs with your own hands, you will need to show patience and imagination. It all depends on how the furniture will be decorated and what kind of interior it is suitable for. So that the process is not so labor-intensive, it is necessary to prepare all the materials that will be required in the process:
- Hand tools such as an awl, wood saw, planes, jigsaw, hammer, chisels, wire cutters, screwdrivers.
- Auxiliary tools and stationery: pencil or felt-tip pen for marking, as well as drills for through holes.
- Electric tools: screwdriver, jigsaw and drill.
- Measuring tools such as a tape measure or measuring tape.
- Primers, paints, brushes and degreasers.
ATTENTION! To decorate furniture, it is better to use chalk paints for creative works. They can also be replaced with regular matte paints for walls and ceilings.