When furnishing a children's room, you need to pay close attention to every detail. And it’s not just about the beauty of the interior items, but also about their safety. For example, children's furniture should be as environmentally friendly as possible and also not pose a danger to the child.
Unfortunately, not all items sold in the store fully meet the requirements for them from this point of view. So sometimes the most environmentally friendly and safest children's furniture made of wood is considered to be made by yourself, and far from being purchased ready-made in a store. Making it is not so difficult if you know what and how.
DIY children's furniture made of wood
Requirements for children's furniture
Now, in the age of extensive production and active business development, more and more companies are appearing that manufacture and sell furniture. Unfortunately, products do not always meet all quality standards, because in most cases the manufacturer tries to save money by using cheaper materials, and consumers themselves are not averse to spending less money. But savings are not always justified - for example, it is not worth saving on the furnishings of a children’s room, because low-quality furniture can not only be dangerous from a physical point of view (sharp corners and fragility of structures), it can cause significant harm to the child’s health and from the point of view of environmental safety.
Durable and beautiful wooden furniture
Attention! Low-quality furniture made from cheap materials can become a source of formaldehyde, a dangerous carcinogen.
That is why the choice of interior items for a children's room should be treated with special attention and special care. The most stringent requirements are imposed on furniture for children After all, the child’s body is the most vulnerable and must be protected in every possible way from any negative impact.
Children's furniture
Table. Basic requirements for children's furniture.
| Requirement | Explanation |
Materials | For children's furniture, it is recommended to use the most natural and safe materials possible. It is best if it is pure solid wood. All paint and varnish coatings must not be toxic and must not release components hazardous to health into the air. Nails should not be used to connect individual furniture elements - only screws and self-tapping screws are allowed. |
Safety | This is perhaps the most important requirement for children's furniture. Any piece of furniture should not have sharp corners or small elements that are easy to tear off. Handles and other fittings must be safe. If necessary, the edges of the furniture should be covered with a protective edge, which can soften the blow if something happens. It is also worth paying attention to environmental safety - here it is important to choose the right material option used for making furniture. |
Ergonomics and simplicity of design | Furniture for a child should be durable and as simple as possible. It is better to take the option that does not have a large number of parts, but at the same time is characterized by increased strength. It is also important to evaluate the service life of furniture - children grow quickly, and it is better to take some pieces of furniture for growth, and not end-to-end. But this does not apply to desks - here, on the contrary, it is important to choose an option that will not spoil the child’s posture, if we are talking about a schoolchild. |
Design | The ideal option is not to pursue pretentiousness and carved decorative elements, but to opt for a simple but bright design. It is better to pay attention to the color scheme of the furniture than to the decorative decorations on it - this is more important for children. You can decorate furniture with stickers or drawings. It is important to understand that it should appeal primarily to children, not parents. But here it should be remembered that some colors affect the activity of children, and it is also recommended to take this into account when decorating a children's room. |
Functionality | Children's furniture should be not so much beautiful as functional. It is better to focus on those options that have some additional storage space, and some of the elements may be used for other purposes. This will avoid overloading the room with too much furniture. For example, you can store toys under the bed in special drawers. |
Children's bunk bed
Unfortunately, it is rarely possible to find furniture in stores that fully meets all requirements, as well as at a reasonable price. Sometimes it’s easier to do it yourself if you have at least modest skills required for such work. But such furniture will fully meet all the necessary requirements, and will also ideally suit the child’s room in size and design. And most importantly, you can make interior items from materials that meet all your wishes and, first of all, the level of environmental friendliness and safety.
The most necessary furniture for a child
What materials can be used?
If you have decided to make furniture for the nursery yourself, then first of all you need to decide on the type of material that will be used. Basically, all children's furniture is made of wood or its derivatives, but plastic or metal elements can additionally be used, depending on the wishes and capabilities of the master.
Children's wooden bed
Important! It is best to use the material that will meet the maximum requirements in terms of environmental safety.
The material used to create homemade children's furniture must be:
- durable;
- durable;
- reliable;
- environmentally friendly.
Children's plastic furniture
Solid wood
The ideal option for creating children's furniture is pure wood, solid wood. This is the most natural and safest material for health from any point of view. It does not emit any harmful substances, which means you don’t have to worry about it. In addition, the wood is easy to work with, has high strength characteristics and can withstand the load that even very active guys put on it.
Bed made of solid beech
Typically, oak, beech, maple, pine, walnut and a number of other species are used to make wooden furniture. But the most budget-friendly, affordable and simple option is pine boards. Unfortunately, they are not designed for high loads due to their softness, but they will withstand the activity of children's games if you choose the thickness of the array wisely. The most durable types of wood are walnut and oak. Such furniture will be of no use even after many years of intensive use in a large family.
On a note! The natural grain of wood looks quite nice, and sometimes there is no need to decorate such furniture additionally. But it is still worth varnishing the wood to avoid darkening and loss of the external beauty of the material.
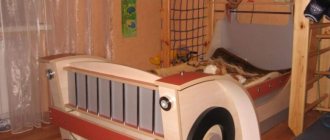
Rocking bed
Chipboard and MDF
This is a material quite often used to create homemade furniture, but it is not recommended to place such furniture in a children's room. The fact is that in the production of chipboard, very dangerous chemicals are often used, which can provoke the development of serious diseases or an allergic reaction. These components are especially dangerous for children.
But chipboard is distinguished by its high strength and durability, as well as its low price. Fortunately, there are high-end slabs on sale that are used in Europe for furniture production. They are as safe as possible for people, including children’s health, and they can be used. But this is the most expensive option for chipboard, so sometimes it will be cheaper to buy even solid wood.
Children's furniture made of chipboard
On a note! Chipboard can have different colors of facades, which allows you to choose a fairly bright and beautiful option. But this material is afraid of water - it is much more dangerous for it than for solid wood.
By the way, there is another material that is produced almost in the same way as chipboard - MDF panels. They are also made from sawdust, but no resins containing dangerous formaldehyde are used during production. In terms of other properties, MDF is very similar to chipboard.
Chipboard and MDF
Plywood
This is a good and inexpensive material for creating children's furniture, easy to work with and not as dangerous as chipboard. Making anything from it is easy and simple; you don’t have to spend a lot of effort or purchase expensive equipment. But you should choose those plywood sheets that are of fairly good quality and at least 1.5 cm thick. It is also better to choose an option that has increased resistance to water.
Children's furniture made of plywood
On a note! Some companies that sell plywood offer to cut the sheets immediately upon purchase. In this case, all that remains is to assemble the piece of furniture at home using self-tapping screws and a screwdriver.
Tools: required set
Any production process requires certain tools. To make furniture you need to have the following tools:
- Screwdriver
- Screwdriver Set
- Ratchet with different heads
- Drill and hammer drill
- Electric jigsaw
- Grinding machine
- Fraser
- Pliers, hammer, mallet
- Tape measure, marker, awl, stationery knife
For some furniture, it is not necessary to use all of the above tools. For example, children's furniture made of cardboard does not require electrical tools.
If you still need power tools, you can rent them, since purchasing everything you need will not be cheap.
What else will you need?
Depending on how and what the children's furniture is made from, other materials may be required. So, it is necessary to use self-tapping screws or self-tapping screws as fasteners, but it is better to avoid nails due to their unreliability.
Universal wood screws with countersunk head
There is furniture that needs to be finished with fabric. In this case, it is important to take not only durable, but also traditionally environmentally friendly materials. Fillers, if any, must also meet all health safety requirements.
If the furniture will be painted or varnished (and objects made of wood or plywood will have to be coated with them in any case), then it is important to look at the composition and purpose of the paints and varnishes. They should not be hazardous to health, should not provoke allergies, etc.
You may also need various types of fittings (corners, closers, handles, etc.) and some decorative elements. The main thing when choosing is to remember that they must be reliable and safe.
When it comes to children's furniture, design is often sacrificed for ergonomics, but even in this case the furniture sometimes turns out to be short-lived.
On a note! The easiest way to decorate children's furniture is with drawings made using a stencil, as well as decorative bright stickers. It’s beautiful and practical, and most importantly – simple.
How to make children's furniture?
Making furniture yourself is both a complex, exciting and interesting process. If you have the necessary equipment and skills, you can make truly unique products that, moreover, fully meet safety requirements and wishes regarding the appearance of the interior item. But it is important to understand that you can make high-quality and beautiful children's furniture only with maximum attention and effort.
Plywood furniture for children
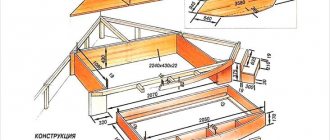
The first step is to decide what appearance this or that piece of furniture will have, what dimensions and parameters, color. After this, you need to decide on the material and calculate how much and what you need to buy. It is also important not to forget about fittings and fastening materials.
Important! Particular attention should be paid to the accuracy of measurements when marking and cutting boards/sheets of material. That is why it is important to draw an accurate diagram of the product with all dimensions.
Types of cribs by size and dimensions
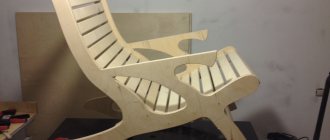
Making a children's chair
Step 1. This version of the chair is made from plywood, but in a similar way, the exact same chair can be made from solid wood. First of all, on a sheet of plywood you need to draw the outline of the parts of the high chair using a pencil and a ruler. In this model, the legs of the chair on one side will diverge to the sides at an angle of 15 degrees, and the height of the back will be 17 cm. In the upper part, the contour of the legs of the chair will close - thus forming an armrest.
First, the details of the chair are drawn
Step 2. All sharp corners, except the bottom of the legs, must be rounded. To do this, you can use a suitable round object.
All sharp corners must be rounded
Step 3. When the shape of the parts of the chair is depicted on the plywood, you need to take a jigsaw and cut out the elements strictly along the lines.
Structural elements are cut out
Step 4. Based on the received part of the legs and armrest of the chair for one side, you need to make the second part. To do this, you need to put the already cut part of the chair on another sheet of plywood and trace it with a pencil, and then cut out the part.
Plywood is marked using an already cut piece
Step 5. Next, all parts must be thoroughly sanded so that there are no sharp edges or splinters.
Sanding parts
Step 6. You also need to make blanks for the seat, backrest and so-called legs, which will help make the chair stronger and hold its legs together across the board.
Preparations for other elements are made
Step 7. You need to make 4 holes in the back and seat for further screwing of the parts.
Drilling holes
Step 8. Now you can coat the wooden elements of the chair with wood primer, dry the layer and sand the surface of the parts.
Re-sanding of parts
Step 9. Next, you need to cover the wooden elements of the chair with paint, first white and then green. Between applying layers of paint, parts must be subjected to intermediate sanding, but only after the first layer of paint has completely dried.
First, the parts are coated with white paint.
And then green
Step 10. On the legs of the chair you need to mark the places where the legs are attached. The locations where holes for fastening are made are also marked.
The places where the legs are attached are marked
Step 11. Now you need to make holes for screwing in screws or self-tapping screws according to the previously applied markings. Holes for self-tapping screws are also made at the ends of the legs.
Then the holes are drilled
Holes in the ends of the legs
Step 12. Next, you need to assemble the frame of the chair by screwing the legs to the legs and armrests.
Assembling the high chair frame
Build process
Step 13. Now you should coat this frame with varnish or special oil for wood.
Subsequent processing of the structure
Step 14. All that remains is to screw on the seat and backrest. The seat is attached to the corners and screws, and the main thing here is not to make a mistake with the length of the fasteners, so as not to drill through the surfaces.
Screwing the backrest
Ready-made children's highchair made of wood
Methods for processing plywood
Regardless of your skill in working with wood and materials made from it, it is necessary to study in advance how to cut plywood, since making furniture from it involves cutting parts in accordance with the drawing. The nuance is that the sheet of plywood must be cut without tearing. You can use different tools for this, but most often parts are cut out of plywood using a jigsaw, which is the cheapest available device. A high-quality result largely depends on a correctly selected file.
To reduce the formation of wood dust when cutting material, connect the jigsaw to a vacuum cleaner
To avoid chipping at the cutting site, you can do it in two ways: first cut the line with a stationery knife or stick tape on both sides of the marking and make the cut with a jigsaw.
Method of cutting through tape and the result
If the equipment is equipped with a pendulum stroke, it must be turned off.
The pendulum stroke regulator is set to the value “0”
Cutting results with pendulum stroke turned on and off
Some jigsaws are equipped with an anti-splinter insert. To install it, the jigsaw is unplugged!
Operating principle of an anti-splinter insert for a jigsaw
The design of this attachment is such that the jigsaw file moves inside the limiting slot.
Blade movement when using a stopper
The result of cutting plywood with a jigsaw with an anti-splinter insert
Table 2. Reasons why it is not possible to make a straight cut
| Image | Description |
Reason 1 | The jigsaw sole is not perpendicular. |
Reason 2 | The material is thick, and the jigsaw is not powerful enough to cut. |
Reason 3 | Initially, the position of the file in an inexpensive jigsaw is crooked. |
Reason 4 | Excessive pressure on the jigsaw during cutting. |
Reason 5 | Dull saw blade. |
Making a tree table
Step 1. With a little effort and imagination, you can make an original but simple table in the shape of a tree for your child. Its tabletop It will be made, like the chair in the instructions above, from plywood. First of all, you need to draw a blank “crown” tabletop on a sheet of plywood and cut it out with a jigsaw.
Cutting out the “crown” of the tabletop
Finished countertop
Step 2. After this, the edges of the tabletop need to be sanded.
Sanding the edges of the tabletop
Step 3. Next you need to draw two trunk legs on the plywood. They will be the same in size, but in the finished version they will be connected to each other by means of a sawn lock. That is, on one of them the drink will be made from below, and on the other - from above. So you need to mark the middle of each workpiece in height.
Legs painted on plywood
Step 4. Next, you need to use the jigsaw again and cut out the legs, and then sand them with sandpaper.
Legs are cut out
Sanding the cut out legs
Step 5. Then on the countertop you need to mark the locations of future holes for self-tapping screws, and then drill these same holes. They are necessary for attaching the legs to the tabletop.
The locations of future holes are marked
Drilling holes
Step 6. Both parts of the legs need to be connected using a saw lock on the elements, and then in the end upper part, mark and drill holes that coincide with the holes in the tabletop.
Leg connection
Holes are drilled in the legs
Step 7. Now you should first prime and then paint the surfaces of the table parts. It is important to dry each layer before continuing work.
First you need to apply primer
Painting table parts
Step 8. All that remains is to assemble all the elements of the table together, and you can install it in the children's room to the delight of the baby.
Assembled table for children's room
Video - Do-it-yourself bed-house
Video - DIY crib
Video - Making a chair and table
As can be seen from everything written above, making children's furniture with your own hands provides enormous opportunities to bring any child's wishes to life. At the same time, if parents treat the production with full responsibility, it will be possible to realize all the ideas of adults from the point of view of caring for the health of the child. The main thing is to choose the right materials, and also decide what type of future children's furniture should have. And remember that there is nothing more environmentally friendly and better than wood for making interior items in a nursery.
Toy dining area
The most affordable way to produce doll furniture at home is to make it from cardboard. Let's make a dining area for toys.
The first version of the table is rectangular. We make a drawing on cardboard or a box we have at home. Cut out a rectangle 100*120 mm and 16 strips 70*10 mm for the table legs. We glue the legs together, four pieces per leg, and then glue them to the tabletop.
For a round table we cut out a circle with a diameter of 80 mm, and for the legs we cut out two strips of 170 * 20 mm. We bend the strips and glue them crosswise to the tabletop. You can see the diagrams in more detail in the figure:
Now we need a chair. The chair will consist of two parts: a back with rear legs and a seat with front legs. Then we glue these parts together.
Related article: Choosing paint for printing on fabric
To make the products look more natural, it is better to paint them or cover them with remnants of wallpaper, for example.
A wicker mosaic table will look more elegant. To do this, you need to prepare: cardboard, toothpicks or skewers, an awl, a ruler, thick threads or yarn, scissors, colored cardboard for mosaics, glue.
Cut out a rectangular tabletop from cardboard. Using an awl, we pierce holes for the legs and around the perimeter for thread holders.
We cut colored cardboard into small squares and glue it onto the base of the table.
Insert skewers or toothpicks, securing them with glue. We braid the table legs with thread, and then the stands and legs alternately until we need it.
To make a shelf under the table, we tie and glue threads crosswise, these can also be skewers. Draw a shelf on cardboard or paper, cut it out and glue the threads on top.
Welcome to the table!