How to make a feeder chair for fishing with your own hands
Any fishing enthusiast will agree that, no matter how exciting fishing is, staying in one position for a long time causes discomfort.
Of course, you can simply sit on the grass or snags, but in this position your legs will quickly become numb and your back will begin to ache. To have everything you need at hand and at the same time relax, you can make a feeder chair with your own hands. It's not as difficult as it might seem. The main advantage is that you can save money. To make such a seat for feeder fishing, you will need materials that are probably available in any garage or shed. You may have to buy a few things, but the costs will not be as high as if you wanted to buy a folding chair in a store.
Finishing
To increase the durability of the feeder chair and maintain its presentable appearance, different coating options are used. They depend on the material used and can be as follows:
- Wood - treated with an antiseptic composition that actively counteracts mold and mildew. A primer and paint or varnish are also applied on top. This set of procedures will help increase the moisture resistance of the tree, as well as its resistance to temperature fluctuations.
- Metal - the main problem is rust, which destroys the structure of the pipes and the overall strength of the product. Therefore, anti-corrosion treatment is the main task; painting is also allowed.
- Plywood (chipboard) - you need to deal with this material in the same way as with wood; antiseptic treatment, priming and painting are carried out.
How to properly reupholster a chair with your own hands, step-by-step instructions
In order for a folding chair made by yourself to retain its appearance for as long as possible and remain reliable, you need to provide it with maximum care. After finishing fishing, the product should be cleaned of adhering dirt and dust, and wiped off any possible moisture. It must be stored in a dry place.
It is quite easy to make a feeder chair with your own hands. Although this task requires serious preparation and the availability of tools. When choosing the optimal fishing chair, it is best to choose a combination of a steel frame and textile fabric. It will be durable and resistant to negative external factors.
Treat wooden elements with an antiseptic and, if desired, paint them
Apply a special coating to metal parts to protect against rust.
After fishing, always clean the chair from adhering dirt and grass.
What should a feeder chair be like?
A comfortable fishing chair is, so to speak, a fisherman’s “workplace.” This means it should be comfortable.
Such a seat must have the following characteristics:
- light weight;
- compactness;
- sustainability;
- Possibility of adjusting the back and legs.
Thus, the main requirement is convenience and safety of use. To catch a big trophy, you often have to wait a long time. Of course, doing this in a chair is much more convenient than standing. The same can be said about tying leashes, attaching feeders and fishing for the catch. If the legs and back are adjustable, this will allow you to take a comfortable position and relieve your back. If you are going fishing on foot, the chair should be lightweight and equipped with a wide shoulder strap.
Finishing and operation
As for finishing, it all depends on the materials used to make the feeder chair:
- When using natural wood, it must be treated with an antiseptic, coated with a primer and paints.
This will increase the wood's resistance to moisture and sudden temperature changes. - If metal is used, it is treated with anti-corrosion compounds. Thus, it will not rust or deteriorate even under unfavorable operating conditions.
- If the seat and back are made of plywood and wood, they are also treated with antiseptics and painted to increase resistance to negative factors.
As for the operating rules, every time after fishing, the feeder chair must be cleaned of dirt, wiped from moisture and hidden in the pantry until the next fishing trip.
Tip: if you fish a lot from a boat, try making a table and chair into it. In nature, a folding table or a convenient table for a laptop can also come in handy.
The simplest option
How to make such a fishing seat with your own hands? If you're happy with a simple design, here's how to make one:
- Decide on the sizes that are right for you.
- Make the corresponding drawings.
- Take two closed rectangular metal pipes.
- Connect them crosswise with a bolt and nut.
- Sew a seat from a wide double strip of tarpaulin on top.
- Make a limiter at the bottom from a thin double strip of fabric.
- Attach another one to one of the arcs, which will act as a backrest.
This is the easiest option for making a folding bed. Although it is important to take into account that its back when unfolded will be in one position.
And here, for example, is a hybrid of a platform and a broken car seat:
How to make a fishing chair?
Simple
For beginners, you can start with a simpler product:
- We decide on the design type and dimensions and create a drawing.
- We take two closed rectangular metal contours from pipes.
- We connect the pipes crosswise with a bolt and nut.
- We make a seat from leather or canvas on top. To do this, just sew them with a wide double strip.
- From below we install a limiter from a thin double strip of fabric.
- We attach another one to one arc, which will serve as the back of the product.
Important: with this design, the back will always be in the same position.
With adjustable legs and backrest
The process of manufacturing and assembling a complex chair design with adjustable legs and backrest is as follows:
- We prepare 4 pipes for the frame and 4 fastenings.
- We install 2 fasteners on 2 pipes at a distance of 60 mm from the beginning and end.
- On one of the two prepared pipes we attach another fastener next to each other. They will be useful to us when making the backrest. This fastening should be located at a distance of 90 mm from the beginning of the pipe.
- We connect the pipes with the fastening to two others of the same length. The result should be a rectangular structure.
- Next, we connect two pipes 70 cm long using a pipe measuring 30 cm. The long pipes should be parallel to each other.
At the end of each of them we fix a fastener so that a short piece can be inserted into it perpendicular to the length of the pipe. The result should be a U-shaped structure. - Next, we insert the part into the fastenings fixed on the pipe for the backrest and tighten the structure.
- We take 4 free ends of the pipes and install one more fastener on them, and then install 4 legs in each of them. They will be height adjustable. We install rubber nozzles at the ends of the legs.
- The last stage of manufacturing the feeder chair will be covering it with fabric. Take one piece of fabric. It will be good to make several holes on each short side. This will allow the ends of the material to be tied together when stretched with an elastic band. Thus, the chair will sag under the weight of the fisherman. The same manipulations are done with the back of the product. But taking into account the fact that the holes are made on the long sides and fastened in the same way.
As a result of your efforts, you should end up with a fairly comfortable fishing chair. Its approximate weight will be about 7-8 kg.
Made from polypropylene pipes
Also, the feeder chair can be made from polypropylene pipes. The process of its manufacture and assembly will look like this:
- We draw a drawing and purchase PVC pipes.
- Using a soldering iron, we make the frame of the product according to the drawn drawing.
- We assemble three rectangles from pipes and fix them with fasteners.
- Two rectangles will act as legs and a seat, and the third will act as a backrest.
- Now you need to make the seat and back from textiles and the chair is ready for use.
Additional accessories
Some store models have armrests. Fishermen differ regarding their necessity, as such additions may restrict movement. In short, if you want to make the seat yourself, take this point into account.
Of course, every fisherman has many things that he needs to take with him. Therefore, a feature of feeder chairs is the presence of attachments. This is really convenient, since everything you need will always be at hand. You won’t have to bend down to the ground to pick up jars and bags, because they are located on a special stand. The harness can also be used to fix the rod in the most convenient position.
Characteristics of the chair
The features of any element of a winter fisherman's equipment are akin to a traveler's equipment - in size it must be designed to be carried in a backpack or suitcase, quickly disassembled and folded, lightweight, and easy to use.
It would not be at all superfluous if its covering at least partially protects the rider from the cold winter wind - not every fisherman pitches a tent over the hole.
The feeder fisherman's chair should:
- be stable on ice;
- sit securely even on uneven surfaces;
- Additionally, have support for the back, since it is this part of the body that becomes numb when sitting for a long time over the hole in a monotonous position.
DIY body kit
You can also easily make a homemade body kit for the feeder chair. To do this, you will need plastic plumbing fittings, pipe fasteners, and the aluminum pipes themselves.
There are many design options, and you can choose the one that is most convenient for you. The tubes are connected with fittings (angles or tees) and attached to the legs of the chair. The body kit made in this way is foldable, so you can simply take its parts with you and assemble it on site. The advantage of such homemade products is that they can be made to suit every taste. And you won’t have to spend a lot on purchasing store-bought products.
Text and photos – SkiP
After my wife gave me a feeder chair, I of course thought about a body kit. Since well-known manufacturers, even with the normal exchange rate of the ruble, were charging exorbitant prices, now a fishing kit is not a small expense item at all.
Buying used is also expensive. In our region they don’t sell this, but if you wait until someone in another city sells what you need, and then also pay for delivery, that’s all it will do.
I decided to start a collective farm of my own. I've been thinking for a long time about what is functional and convenient - this is a feederbox. Here you have a table, a box for transporting gear, a container with bait you can put there, and basically anything you want. I've been looking for a box for transporting dairy products for a long time, but it's not that simple. They don’t sell them individually anywhere, and my friends couldn’t help. I found a suitable box in Castorama, as well as all the other components for its assembly.
I got the idea for attaching to the legs on the D. Salapin forum from an author with the nickname ZAN. I needed: 3 meters of aluminum pipe, 25 mm plastic water fittings (2 angles, 4 tees), M6 furniture drive nuts, 26 mm drill, 25 mm pipe fasteners, and other hardware, seen in the photo.
You need to drill a hole in the plastic fittings to 26 mm for the legs. In those places where a non-removable pipe will enter the fitting, I used a 25 mm drill. Then we drill a hole on the side of the future fastener, for the drive nut. I couldn’t find any others and I had to grind off the teeth and reduce the size of the existing one. Using a soldering iron, heating the nut, we press it into the plastic, flush with the internal space.
Here is a photo of the design that I came up with for myself. Its advantage is that the frame is designed in such a way that it can be attached to the chair by two legs with one additional one, or by one leg of the chair with two additional ones.
At the bottom of the box, I screwed 4 latches under the pipe so that you can easily remove and install the box, as well as turn it over, depending on the installation of the frame.
I thought for a long time about how to make hinges for such a complex shape of the lid, but the solution was the simplest. A pair of through holes on the right and left sides, a hairpin, and stable loops are ready! ))
All that remains is to come up with telescopic stands for the lid to fix it at any angle, and find plugs for the legs. And either buy or make wing bolts for M6 yourself.
In general, the design turned out to be very reliable and stable. I'm happy with my homemade product! Field tests will show shortcomings, which I will definitely write about later.
Photo assembled:
Collapsible frame assembly:
Future plans include making LED strip lighting and pockets for small items on the lid.
From the remains of the pipe and fittings, I assembled this rod butt holder:
What kind of feeder chair is it?
The presented design must have the following list of qualities. It includes:
- Compactness. This property is necessary to make it easier for the user to carry the unit in a bag or backpack.
- Sustainability. In the winter season, you should remember that it is difficult to stand on ice on your own, which means you need to approach this issue as carefully as possible.
- In addition, even on an uneven surface, the device must be mounted as securely as possible.
As for the appearance, it is possible to fold out the backrest. At the same time, the load on the person’s waist region is significantly reduced, which indicates safety and comfort when staying in one position for a long time. It is also worth noting that all the necessary elements for catching fish are right at the angler’s fingertips. This eliminates the need to get up periodically and prevents you from being distracted from the process itself. Thus, the arrangement of a person who is engaged in a passive activity is the most practical. When using the design, the body is not subject to load, which allows a person to remain in one position for a long time.
Arrangement of the feeder's workplace
If you have the right equipment, the only thing left for an ice fisherman to do is set up his workplace well. All elements of equipment used for fishing should be located literally at arm's length from a seated person. This will save him from having to get up often, exposing himself to the cold wind and being distracted from the process of fishing.
The main element of the arrangement is the feeder chair. After all, winter fishing is mainly a passive activity - a person has to sit in one position for a long time. At the same time, the load on the back increases, especially on its lumbar region.
DIY feeder chair - a simple option
For those people who cannot afford a rather expensive device, there is a way out. It consists in the fact that without much effort and labor-intensive actions you can independently build such a structure for yourself. To do this, you just need to purchase the necessary materials, tools and devote some time. For complete creation, you should follow the following algorithm in the specified sequence:
- To begin with, it is advisable to arm yourself with the following items: bolts, 6 mm staples, a 3 mm steel plate, one fabric with parameters 800 by 400 and one with 700 by 400 mm, in addition to pipes (diameter 25 mm) and cuttings from them (4 pieces of 55 cm, two 70 cm, one 30 cm). To process the frame you will need a fabric product.
- Once all the necessary products are ready at hand, you can proceed to further actions. You must first indicate the desired dimensions of the structure. Next, you should make a drawing for them. It will be useful for orientation during the work process.
- Then you should take two circuits made from pipes and connect them so that the position is crosswise. Fixation can be achieved with either a bolt or a nut.
- Next, sew strips from any coarse fabric on top.
- On the bottom side you should make a limiter, also from a similar product.
- To perform the function of a backrest, it is worth attaching another piece of fabric.
Do-it-yourself feeder chair. Part 2
Even when the chair is ready, it is comfortable and the fisherman has sat in it enough at home, it is too early to take it fishing. For greater convenience, you need a specific kit for winter fishing.
These are additional accessories to the seat in the form of pockets for bait and bait, stands for the rod, a folding table for a thermos with tea and manipulations with the feeder and hooks. Only when everything is complete will the chair begin to “work off” the costs of its construction.
DIY body kit
Prices for feeder chair body kit elements on sale are steep. Buying the entire body kit as a set will be no cheaper than the chair itself.
Types of body kit include:
- rod stands;
- folding table with drawers for baits and groundbaits;
- special hanging bucket for bait mixture;
- pocket for thermos.
All these elements are not so complex that a person who made a chair with his own hands would buy them in a store. With such equipment, the fishing process is simplified.
Become a mechanic
Seeing the cost of branded body kit elements, the fisherman will only strengthen his desire to continue his plumbing activities. To make your own fishing seat kit, you will need the following materials:
- aluminum tube Ф25 mm, length 300 cm;
- fitting elements with which plastic pipes will be attached to the frame of the chair - 6 pcs.;
- pen for drilling plastic and wood Ф 26 mm;
- fastening elements for pipe blanks;
- drive-in nuts for furniture fittings may be useful;
- M8 threaded bolts;
- lightweight but durable plastic box;
- plastic clips for fixing pipe blanks.
The materials listed in the list do not cost a lot of money, especially since in many homes where furniture or plumbing is often repaired, they may be in abundance. From here, spare parts for the chair are then generated in case of breakdown.
We manufacture the body kit in the following order:
- We drill out the inner diameter of the tees to the diagonal size of the corrugated pipes of the chair legs.
- In the body of each tee, using a soldering iron, we fix a nut into which the M8 fastening bolt will be screwed.
- We drill holes in the legs. into which the mounting bolts will fit freely.
- We install tees and fasten them to the pipes with bolts.
- For each type of armchair body kit we make our own frame, which will allow you to install it on the side of the legs.
- We attach the bait box to the legs with clips that securely compress the corrugated pipe.
Attaching body kit elements to the feeder chair
To make a mount for fishing rods, it is enough to make a side branch from any chair leg. We also make a suspension for the bucket of food - we drill holes in the bucket for the clips and securely fix it.
Additional accessories
In addition to a luxurious chair with the necessary body kit, an ice fisherman will need various additional equipment. The main ones can be listed:
- drill for drilling holes;
- a sieve for scooping out ice crumbs from the holes;
- grip for large fish.
In different conditions of each specific fishing, the set of additional devices is different, and only the fisherman knows what he will need that day on a given body of water. It is convenient to transport all devices in a special box, which is convenient to carry along with the chair and gear.
Additional accessories
Thanks to modern technologies, it is possible to equip your structure with auxiliary elements that will improve interaction with the unit. Therefore, when making your own mastery, it is worth taking this fact into account.
- The most common component is attachments. With it, you can place the necessary parts right at your fingertips. This special stand allows you to place various bags and jars next to you. Therefore, you don’t have to reach for them to the ground. In addition, in the compartment you can fix the rod in a position in which you feel comfortable.
- The next device is a grab for large fish.
- You should also not forget about the sieve for scooping.
Body kit for the chair (our answer to the bourgeoisie!)
#1 Guest
- Moderators
- 307 messages
- City of Pskov
Some homemade items for the chair.
I haven’t used branded ones, so I can’t compare.
Considering the cost (10-15 times less than branded ones), everything is fine so far.
We used: a folding bucket, gnawed by mice in the garage, scraps of polypropylene pipe and plumbing thermal insulation (given by the guys at the construction site), elements of the “Joker” furniture system bought at “Glades” on Shosseynaya and a baking sheet from “Lenta”.
PS, when packing, I forgot to grab the cage holder, but the principle is the same as for the bait bucket. On the next trip I'll take a photo and add it.
Attached images
- Administrator, Fedorych, Sych and 4 others like this
Tackle is a complex sequential philosophical chain of combined factors and objects.
Eyes - brains - hands - plug - top - connector - droop - float - olive - pod - leash - hook.
Short transcription: brains - hook.
#2 eva57
- City of Pskov
Can you tell me more about how you made such beauty yourself? Description, materials and photos of units. I will be very grateful. I've been wanting to do something like this myself for a long time.
#3 CRUCCIAN
- City of Pskov
Let's continue the topic)))
Next we will make the table.
- Udgin likes this.
#4 CRUCCIAN
- City of Pskov
#5 CRUCCIAN
- City of Pskov
Guest. How did you manage to secure these devices? As I understand it, this is a connector for a rod? I can’t figure out how to fasten it so that the structure doesn’t fall apart.
#6 CRUCCIAN
- City of Pskov
Basic chair options
Today there are a large number of seating options; it would take a very long time to list them.
But the main types are still:
- sun lounger Very often, many fishermen lack a folding mechanism that would help them relax and lie down. This chair is used if you are not a professional, but just an amateur and catch ordinary crucian carp. This mechanism will not work for predatory fish. Many people have prejudices that for the feeder fishing method it is necessary to stand, and not sit, so that all efforts are put into catching fish;
- chair with backrest. This option is convenient and allows you to relax your back, which is ideal for retirees. Using this mechanism you can fish on a feeder. And then fishing turns into a favorite hobby;
- a chair that matches the fish box. Fishing is always accompanied by prey that needs to be stored somewhere. This chair allows you to combine 2 mechanisms in one;
- a chair resembling a cot. The simplest and most common option, represented by a folding mechanism. It is light in weight, which allows you to take it to any feeder hobby.
When choosing a chair, it is worth considering that feeder fishing methods cannot do without this device.
But, in order not to spend your finances on purchasing expensive seating, you can build them yourself.
Manufacturing stages
The manufacturing process of a feeder chair includes several stages. It is important to approach each of them responsibly:
- selection of tools and materials;
- preparation of material (cutting, grinding, etc.);
- frame assembly;
- fastening (or sewing) the seat;
- finishing treatment with protective and decorative compounds.
Simple model
Such a model can be made using a minimum number of tools and materials. You will need:
- frames made of metal pipes (two to make a chair without a back, or three if the design includes a back);
- bolts and nuts - 2 (if without a backrest) or 4 (if with a backrest) pieces;
- durable fabric such as tarpaulin;
- electric drill;
- Bulgarian;
- hacksaw for metal.
Making such a feeder chair will not take much time. It is important to follow the step-by-step instructions:
- The two frames are inserted into each other to form the shape of the letter “X”. In this case, the short sides should be located at the top and bottom. It is important that the upper (and therefore lower) sides are parallel and at the same height relative to each other.
- On long legs, holes are drilled at the intersection. There should be one hole on each pair. The legs are secured through these holes with a bolt and nut.
- Cut out a rectangular piece of fabric, the width of which will be 2 cm greater than the depth of the chair and 15 cm greater than the width of the chair (the distance between the upper short sides when unfolded). The edges of the fabric are folded and sewn to make them look neat.
- The fabric is stretched between the top sides (pipes) of the chair, the edges are folded inward and stitched so that the metal tubes are inside the wrapped fabric. When making a chair without a back, stop at this stage. To make a feeder chair with a back, continue working further.
- One short edge is cut off from the third frame. The cut area is sanded to remove any unevenness.
- Using a bolt and nut, attach the third frame to the chair to form a backrest. In this case, you need to move 10 cm down from the top edge along the frame of the chair. The cut part should be at the bottom.
- A strip of fabric is sewn onto the back of the chair.
The simplest model of a feeder chair
With adjustable legs and backrest
A chair with adjustable legs is the most comfortable type of fishing seat. You can even sit on it on a slope or other uneven surface. The design is difficult to manufacture and requires more materials than the previous version.
This chair is assembled from a steel profile and pipes. Sometimes a special table for a feeder chair and a compartment for storing gear are attached to it. The soft upholstery of the seat and back will make fishing more comfortable.
To make a feeder chair with adjustable legs with your own hands, you will need special tools for working with metal. The assembly of the structure is described in detail in the video, which describes the entire process step by step and in an accessible way.
Made from polypropylene pipes
It is easy to assemble a folding feeder chair from PVC pipes in just a few hours. For this you will need:
- PVC pipes with a diameter of 25 to 32 cm;
- corner and T-shaped adapters for PVC pipes (fittings);
- bolts and screws;
- drill or screwdriver with attachments;
- thick fabric;
- thick thread with a needle.
The size of the chair is selected individually. The length of the elements depends on the selected parameters. The main thing is that the paired elements have the same dimensions.
Fishing chair made of PVC pipes
Master class on assembling a feeder chair using PVC pipes:
- 14 elements are cut from PVC pipes. 6 of them (4 larger and 2 smaller) for the internal folding system and seat attachment. 2 for making the rear legs that go into the back (these elements are the longest). 2 for front legs. 2 for armrests.
- First, they make the internal folding system. To do this, assemble 2 U-shaped parts, each of which consists of two longer and one short piece of PVC. The pipes are connected to each other using corner fittings.
- The finished parts are connected crosswise so that the parts with a short pipe are on top at the same height, and the ends of the pipes are located below. The intersection of the elements is fixed with a nut and screw, without tightening the structure too much.
- A piece of fabric is sewn onto the upper crossbars. This is the seat.
- Assemble two identical side elements. Each of them consists of one longest segment (the leg that goes into the back), one medium-length segment (the front leg), 2 identical short strips (the armrest and the bottom strap).
- Two T-shaped adapters are put on a long pipe. One is lowered to the level of the armrest, and the second is placed down. A short piece of pipe is inserted into each adapter. The latter is attached to the armrest using a corner fitting, and to the bottom bar using a T-adapter. Make 2 of these parts.
- The armrests are covered with fabric or covered with soft material.
- The folding element with a seat is attached to two prepared parts. To do this, the legs of the folding element are screwed to the back and front legs. It should be a chair. The intersecting elements should be behind and in front.
- The back is formed by sewing a piece of fabric between the longest pieces of pipe.
Everything you need to know about folding chair designs
To assemble a chair for full feeder fishing with your own hands, you should know the designs of the main types of chairs:
- The folding bed, like a chair, has 2 main planes that are connected on a hinge. The drawing diagram is very simple, so it can be made from any material.
- A chair with a back can be of 2 classifications: solid and folding. The first option will be stronger, and the second will be more mobile, but require a greater degree of care.
- The lounge chair is the most complex of all the above designs. It can be of 3 types - prefabricated, solid and in the form of a clamshell. Monolithic will be the easiest to implement.
- A chair with shelves is the most optimal option in terms of capacity. Relevant for fishing in the summer because you can put spare clothes in it for the night.
Types of fishing "seats"
Before you start making your own fishing chair, you should decide on its type of design. It could be:
Folding chair . This product has two main planes connected on a loop. It can be made from any materials.- Chair with backrest . According to the classification, it can be: folding or solid. The second option is more durable and reliable, while the first is more portable.
- Lounge chair . This is the most difficult design to make yourself. By type, it is divided into: prefabricated, solid, in the form of a clamshell. The easiest to manufacture is a monolithic product.
- Chair with shelves . This is a very convenient option for summer fishing. You can place fishing gear and clothes on it.
Attention : when choosing one or another type of feeder chair design, be sure to consider your strengths. If you don’t have any special skills in creating such items, start with a simple and practical model.
Materials for making a homemade chair
Among the main materials for making a chair are:
- Wood and chipboard. To make a chair from these materials, you do not need to use a welding machine or good carving tools. Here are the basic building supplies required to make your own folding fishing chair.
- Steel. To use this material, you need a tool, and you should also take care of the protective coating. The advantages of steel are durability and strength.
- You should not use aluminum, because any chair will bend after the first impact. Folding chairs made of plastic also will not last long and function properly.
Therefore, the best option is still wood. To connect the elements of a feeder fishing chair you will need bolts, nuts and nails, and to add softness - leather or any other finishing material.
Manufacturing materials and tools
The strength and reliability of the structure depends on what material the feeder chair is made of. To assemble the frame, use the following options:
- Tree. To make a feeder seat from wood, you do not need a welding machine. Wooden products are quite durable, easy to assemble, and do not sink into the ground. To ensure that the structure lasts a long time, the wood is treated with protective compounds that protect it from moisture and rot.
- Chipboard. The option with the lowest cost. Chipboard frames are less strong and less durable than wooden frames. The advantages include ease of assembly.
- Steel. The steel frame is the strongest and most durable. To make it you need a welding machine. It is also important to treat the structure with an anti-corrosion compound. The legs of such chairs are equipped with rubber knobs or other devices that prevent them from sinking into the ground.
- Polypropylene pipes. From this material you can easily and quickly assemble a frame for a feeder chair with your own hands. You don't need a welding machine for this. The design is light, strong and durable.
Aluminum is not used to make the fishing chair. This material can bend under the weight of the fisherman's body.
The seat is usually made of textiles. This allows for a lighter design. It is important to choose durable fabric. A tarp works best. Faux or genuine leather is also used.
The list of tools depends on the frame material. For wood and chipboard you will need:
- screwdriver;
- glue;
- sandpaper;
- hacksaw or jigsaw;
- screws and nuts;
- drill;
- thick nylon threads and a needle (if it is intended not to glue, but to sew on the textile part).
For steel, use a welding machine, a hacksaw (or a reciprocating saw). The fabric is also sewn with threads or glued with glue.
To make a feeder chair frame from polypropylene pipes, you will need:
- fittings, bolts, nuts, pipe fasteners;
- hacksaw for metal;
- electric drill, drills;
- soldering iron
To make shelves for tackle (these elements are not always made), wooden and metal boxes, plastic trays, and fabric pockets are suitable.
Procedure
To make a chair for feeder fishing, you should follow the following procedure:
- Decide on a chair option for feeder fishing.
- Make your own drawings with dimensions, as well as make diagrams of individual parts for better consideration. It is best to do this on drawing paper.
- Make a list of materials for your homemade structure. You need to immediately count their number.
- Assemble a homemade chair ready for fishing.
It is very important to pay attention to the dimensions, which should be measured both on the sheet and in real life using a construction ruler.
Preparation of the drawing
Drawings can be easily found on online resources, especially on fishing forums, where more experienced comrades can share the plan for the chair. Any scheme can be easily improved by adding your own details. Computer programs make it easy to create feeder chair layouts.
The easiest way is to draw a plan yourself; on it you need to mark the desired dimensions of the parts, the places of their connections, and the number of parts needed. True, if you lack experience, it is better to turn to ready-made diagrams so as not to build a low-quality seat. It is important to prepare a drawing in several projections; this will eliminate flaws and problems in the finished product.
When choosing a feeder chair, planning to make it yourself, you need to focus on your own physical characteristics, because it cannot be universal. It is believed that the standard size is 1.5 * 0.5 meters, which provides the most comfortable placement and leaves freedom of action.
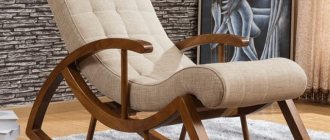
DIY bag chair: materials and assembly steps
Frameless furniture is compact, ergonomic, comfortable, and lightweight. Products are produced in different sizes, shapes, and design solutions. The types of fabric used in the design (flock, corduroy, thermo-jacquard) and fillers (expanded polystyrene, polystyrene foam) differ. You can make a bean bag chair with your own hands to decorate a bedroom, veranda, guest room, or gazebo.
Features of the chair
The frameless chair has a soft structure and is distinguished by the absence of a metal or wooden base. The standard shape is round or pear-shaped, filled with small granules.
The design of the bean bag “Pear” includes:
- removable cover;
- internal base;
- filler granules;
- decoration elements (stitching, inserts, handles).
Models for adults, a children's bean bag in the form of toys, a bean bag, etc. have been developed. Products are produced in the shape of a circle, rectangle, square, polyhedron. They produce transformable models that convert into a bed or a small sofa.
- ease of use;
- safety (the chair has no sharp corners);
- environmental materials;
- convenient transportation;
- easy cleaning (removable covers can be easily washed);
- compactness, ease of storage, etc.
What size should it be
The dimensions and dimensions of a bean bag chair are divided into standard and non-standard (on order), for adults, teenagers, and children.
The typical line of soft chairs is represented by the following indicators:
- L – reaches a height of 85 cm, a diameter of 70 cm, optimal for heights up to 120 cm;
- XL – height up to 110 cm, diameter – 85 cm, used for people up to 160 cm;
- XXL – reaches a height of 135 cm, a diameter of 100 cm, optimal for heights over 165 cm.
Height indicators are measured in a straightened, raised form, width is determined from the maximum extreme points.
The easiest way to arrange a room is to purchase universal models (size XXL with a seat height of up to 50 cm), products that are optimal for family vacations (furniture in the shape of a soccer ball or fairy-tale characters).
Required tools and materials
Before you make a beanbag chair with your own hands at home, you need to prepare raw materials and equipment.
The following will be useful at work:
- fabric base;
- 2-3 zippers;
- filler;
- tailor's scissors;
- graph paper;
- pencil;
- ruler or tape measure;
- strong threads for sewing;
- sewing machine.
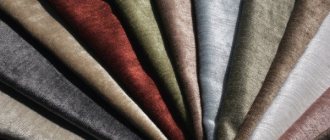
Selecting material for the case
For the outer cover, purchase a durable, wear-resistant, stain-resistant, waterproof, and pleasing to the eye fabric. In accordance with the design of the room and the functional purpose of the product (for home, cottage, gazebo), choose:
- Oxford;
- flock;
- thermojacquard;
- scotchguard;
- microcorduroy;
- eco-leather, etc.
Oxford is a synthetic material; the reverse side is covered with polyurethane to protect it from dust and dirt. The composition is durable, waterproof, elastic, resistant to temperature changes, and is available in a wide palette of colors. The fabric is practical, budget-friendly, does not require ironing, is easy to wash and clean with a damp sponge.
The outer cover for the chair is made of thermal jacquard. The material is durable, distinguished by original combinations of shades and the use of ornaments. Heat treatment technology involves applying paint to the finished fabric. The raw materials are hypoallergenic, because... contains up to 65% cotton. Suitable for indoor spaces and gazebos only.
Velor has a velvety surface, is durable, retains its shape, is wear-resistant, and does not wrinkle. The material is made from natural raw materials or synthetic ones.
Flock combines cotton raw materials and polyester. The material is durable, high quality, smooth texture, easy to clean.
Microfiber consists of polyester and polyamide, is breathable, wear-resistant, resistant to chemicals, aesthetically pleasing, easy to care for and wash.
Microvelvet is suitable for using the chair at home. The material is of high quality, available in plain colors or with graphic patterns. The fabric is made from cotton and elastane.
Artificial suede is a furniture fabric, made from polyamide fiber, and is characterized by abrasion resistance, color fastness, ease of care, and a wide palette of shades.
Eco-leather is a dense, wear-resistant material that preserves the surface structure and is optimal for modern design. The raw materials used are cotton and polyurethane (as a protective coating).
It is possible to use improvised materials. For a country house, a bean bag chair made from old jeans or raincoat fabric is optimal.
The fabric for the inner cover must be strong, with a dense cross-section of threads, and breathable. Spunbond, calico, satin, polyester, etc. are optimal.
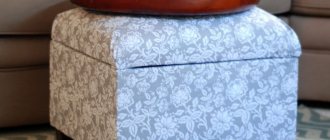
Secrets of choosing filler
Before filling a bean bag chair, it is important to determine the composition of the raw materials for a product that fits perfectly into the interior. The service life and functionality of the furniture depend on the quality of the filler.
To create the internal volume of the product, the following are used:
- expanded polystyrene;
- Styrofoam;
- holofiber;
- shavings, woolen threads;
- different types of cereals (buckwheat, rice);
- dried herbs, etc.
Expanded polystyrene is produced in the form of circles, the material is practical, hygienic, does not retain odors, has thermal insulation qualities, is non-hygroscopic, affordable, hypoallergenic, and does not absorb moisture. When choosing, experts recommend primary processing granules (they are round in shape and are made from polystyrene foam). The granules of the second stage of production are asymmetrical, quickly deteriorate and shrink.
Polypropylene granules are durable, strong, allow the chair to keep its shape, and have shock-absorbing qualities. However, the low fire resistance must be taken into account.
Polyurethane foam is elastic, hypoallergenic, and retains its shape. The material granules are dense, so they are used in chairs covered with artificial leather and jacquard.
Polystyrene foam for stuffing is produced in the form of small balls. The material is lightweight, inexpensive, has low shrinkage, a comfortable, soft texture, and density. The shape of the foam balls is retained for a long time, but with prolonged use the rigidity of the composition increases. It is recommended to add foam rubber crumbs or holofiber to the material.
Holofiber particles are added to the fillers as a softening additive. The raw materials are hypoallergenic, breathable, and do not absorb moisture. The sizes of granules of different compositions must be the same in size.
What the soft chair is filled with depends on the operating conditions. It is important to consider temperature and humidity conditions. When using natural raw materials (cereals, sawdust, grass, etc.), it is necessary to maintain a warm temperature and avoid humidity, because raw materials may be damaged by mold.
How much filler is needed depends on the dimensions of the bag and the weight of the people who will use the piece of furniture. Many materials are sold in 100 kg packs. To fill a chair measuring 120*90 cm, about 400 liters of raw materials are needed. During operation, it is necessary to add 40-50 liters every 2-3 weeks.