What you need to sew a chair cushion with your own hands
Everything necessary for the product is prepared in advance so as not to be distracted from work. There should be nothing unnecessary on the surface. Materials and tools for the product:
- stencils for patterns;
- measuring tape;
- a simple pencil;
- buttons;
- scissors;
- textile;
- threads;
- sewing machine;
- needle;
- filler;
- chalk;
- thimble;
- pin cushion.
For all master classes you will need the same tools and materials. The type of fabric is chosen at your own discretion. It is better that it matches the color of the chair and also does not cause discomfort when using the furniture.
Important! It is better to use cotton for pillows; such a seat will be comfortable at any time of the year.
How to sew a soft cushion on a chair with your own hands
Even before you start sewing a seat, you need to decide on the color (according to furniture, curtains, wallpaper, etc.), the type of product and how to attach it to the chair. Here everything will depend on the characteristics of the environment and the preferences of the person concerned.
In order to prevent health from deteriorating, we came up with chair cushions that are designed to solve this problem.
Important! When the purpose of a thing is convenience, it is better to choose calm, neutral colors. And if you want to add some zest to the design of the room, you should give preference to bright fabric with an unusual pattern. The color of the sewing threads should be in harmony with the material from which the pillow is sewn.
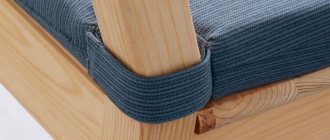
Since no one wants to encounter such a phenomenon as the seat sliding off the high chair, you should think about a suitable method of securing it:
- ties;
- ribbons;
- Velcro;
- rubber bands.
With the help of textile components, you can transform any room interior beyond recognition.
In addition, suitable materials and tools are prepared in advance. And it’s good if you work on the pattern in advance in accordance with the desired size and shape. But step-by-step instructions will tell you how to sew a pillow on a chair with your own hands, allowing even a beginner to complete the job. In order not to be mistaken, it is worth dwelling on each of these questions separately.
Types of seats
One of the advantages of such products is their wide range. Pillows are produced in different shapes, sizes, and materials. There are harder or softer, flat, convex or anatomical. The latter are convenient because they adapt to the contours of the human body, and after the load stops, they restore their shape. This feature is called the memory effect.
In addition to models for the buttocks, it is recommended to use special chair cushions for the back. These are mesh structures on a wire frame or convex rollers. Such products ensure the correct position of the spine and support it.
But it is the orthopedic seat on the chair that is most popular. It can be round or oval, rectangular, bagel-shaped, wedge-shaped or the letter “p”. There may be a hole or depression in the middle, which is necessary to reduce the load on the tailbone.
Ring
The ring shape with a hole inside is especially beneficial for the spine. Such pillows relieve stress from the tailbone and perineum and provide free air circulation. It is recommended to use them for pregnant women, as well as for hemorrhoids. They have the following properties:
- provide the correct curve of the lower back;
- withstand high weight;
- prevent blood stagnation;
- do not compress the sciatic nerve.
Ring-shaped pillows are universal; they are suitable for chairs and armchairs of any shape, even small ones. The products retain their quality for several years even with frequent use. Standard diameter is 40 cm.
Circle
They don't have a hole inside. Such pillows can be soft or hard; there are also multi-layer ones, like a mattress. Thanks to this, the load on the muscles of the back and pelvis is reduced, and proper blood circulation is ensured. A round seat is effective in the following cases:
- for muscle pain;
- osteochondrosis;
- curvature of posture;
- for back pain;
- hemorrhoids;
- after coccyx injuries.
Such pillows can be used in the complex treatment of these pathologies, during rehabilitation after injuries, and for prevention. They provide a comfortable seat, and due to their compact size they are suitable for any chairs and armchairs. The optimal diameter is 39 cm.
Rectangle, square
For those who spend a lot of time sitting, it is better to choose a rectangular or square pillow. The advantage of them is that they come in different shapes and sizes, so it’s easy to choose the right one. They are fixed and do not move, which increases the comfort of use. Such overlays are popular among drivers, office workers, and programmers.
Thanks to the soft filling, the pillow relieves tension and ensures proper blood circulation. There are anatomically shaped pads with bulges and recesses for a more comfortable seat. They follow the contours of the body and evenly distribute the load. They can be solid or with a recess for the coccyx. Designs in the shape of the letter “P” are convenient. The standard size of such products is 40 x 60 cm.
Wedge-shaped
This type of chair pads is less popular, as it is made of dense polyurethane foam. It has a rectangular shape, beveled towards one edge. This ensures the correct position of the spine, relaxation of the buttock muscles, and removal of stress from the perineum.
Such pillows restore blood circulation in the pelvis. They are used in the treatment of prostatitis, pathologies of the bladder, and rectum. The products also prevent lower back pain, numbness in the legs, and varicose veins. Common dimensions are 40 x 40 cm.
Seat pillow: recommendations before surgery
In order for the new “brainchild” to be comfortable, durable and delight the owners, it is necessary to take into account several features.
- Choosing the right material. He must be not only beautiful. The main advantage is functionality, so when purchasing fabric, craftswomen pay attention to fading resistance, strength, and density.
- Color, texture. To avoid disharmony, you need to take into account the style of the room in which new textile “inhabitants” will appear. The fabric of the seat should not stand out from the overall picture. Clumsiness is not welcomed, but the use of a contrasting solution is allowed when it is intended to enliven the interior.
What is the best material to make kitchen covers from?
The kitchen is a functional and crowded place. The whole family gathers here several times a day, food is constantly being prepared, pets are hovering underfoot, and some people use the kitchen table to do other useful things.
That is why it is not at all logical to use any material for draping furniture for every day.
The main selection criterion is good dirt-repellent properties, a “breathable” surface, density and resistance to constant cleaning or washing.
Main types of seats
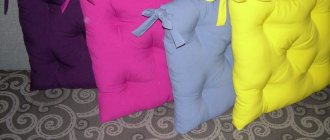
Accessories that add comfort to the hard seat of a chair must be soft and have ties so that they do not slide out of place at the most inopportune moment. The pads play this role:
- sewn from whole pieces of fabric or from scraps;
- knitted from ribbons, yarn, multi-layered and voluminous;
- made from multi-colored wool balls.
There are also more original, non-standard solutions, thanks to which almost works of art are born.
Seats: from simple to complex
Even a housewife who does not have professional skills in using a sewing machine can make this accessory. There are very simple solutions and those that require special perseverance.
New role for an old rug
This is an elementary option, but it allows you to immediately acquire a large number of identical seats. Products can be repainted or decorated. To begin with, you need a template that follows the outline of the seat of the chairs. It would be better if they were made of thick cardboard. The measured and cut piece is placed on the underside of the carpet and outlined with chalk. Add a couple of centimeters around the perimeter so that the seat can completely cover the piece of furniture.
The thickness of the rug determines whether it can be filled with filler. If there is a desire to make the seat softer, the pieces are sewn only on 3 sides, retreating 2 cm from the edge. After stuffing, the last side is stitched, the edges of the soft seat are decorated with braid or braided with thick thread.
Simple seat cover
To create a simple soft seat, in addition to the template, you will need to purchase:
- two types of fabric - upholstery and for the back;
- cotton bias tape;
- filler (for example, synthetic winterizer).
After making a template that follows the shape of the chair, it is used to cut out three blanks for each seat - from both fabrics and filling. They are folded into a “sandwich”, the middle of which is padding polyester. Parallel and perpendicular lines are applied diagonally on the face or back to fix the filler.
The layers are fixed with pins, then the lines are laid according to the resulting markings. After this operation, the shape is adjusted using a template and the excess is cut off. Places for ties are marked on the future seat. They are made from strips of upholstery fabric. Sew the ties into the marked places, sew the pillow around the perimeter, and at the same time decorate the edges with trim.
Patchwork seat
The technique called “patchwork” has been familiar to many for a long time, but they have no idea about it. It is based on unnecessary scraps, leftover cuts, from which very original products are made.
Take a piece of material, approximate dimensions 1x1 m. Line it from the inside out into strips (width 6 cm, length 10-20), then cut. Arrange the patches according to the drawings. Then two parts are cut out - from fabric for the bottom and filling, leaving a margin of 6 cm. Separately, ties are made for attaching to the chair.
Small pieces are sewn together. The resulting strips are connected into a square. Iron the seams from the inside out. The seat is assembled in layers - the lower part, the filler, the cheerful top. Fasten with pins and trim using a template. A braid is sewn around the perimeter, covering all layers, and ties are fixed in the corners. Lastly, the seat is quilted diagonally. If desired, add frills made of light fabric.
“Hook” seat: two ways
Such a product is always beautiful, and the work does not take much time. The main thing is a successful selection of threads and a color scheme that matches the interior.
- Round. Those that have this shape, complemented by a multi-colored radial ornament, are popular. First, a chain consisting of 5 loops is knitted, then it is closed into a ring. The second row is done with a double crochet. After several of them, the color of the thread is changed, this is done every 4-5 rows. Having reached the desired size, knitting is completed. If there is a need to fix it on a chair, it is better to use braid or tape of suitable colors. Crocheted ties are not recommended; they are extremely short-lived, as they tend to stretch quickly.
- Grandmother's Square. This option has 2 methods of knitting. You can immediately build one product, but no one forbids you to create a seat from several small squares. Begin knitting by casting on 6 air loops and closing the ring. 16 double crochets are knitted through it. The next row consists of the same columns, but they are separated by two air loops. Next, repeat the previous row. The corners of the seat are made from 4 double crochets, but they are separated by three air loops.
To knit such seats, take thick threads from wool, knitwear, satin fabric or denim, cut into thin strips - 0.5-1 cm.
Square pads
You will have to tinker with this seat for a long time, but it looks great. It consists of small square pads, each of them is stuffed separately. This look is especially good for square stools.
For example, there is furniture with dimensions of 30x30 cm. After making a standard template, a square with the following sides is cut out of the main fabric - 32x32, always leaving at least 2 cm for allowances. Stepping back from the edges by a centimeter, draw a grid with the same components - squares with sides 6 cm. There will be exactly 25 pieces.
From other pieces of variegated fabric, cut out squares with a side of 11.5 cm; there should also be 25 of them. Before further work begins, they are laid out in the desired order. Then, having drawn up a suitable pattern, they are sewn separately, leaving one open side, then in strips of 5. After receiving 5 strips, they are pinned to the lined base, adding folds to each pocket, making sure that the lines match.
Finally, the squares are tightly stuffed with filling and sewn up. In order to disguise threads and seams, sometimes they use a pillowcase made from the same squares and sewn on top. The most interesting option is to sew the strips on the base, from the wrong side. This option will deprive the product of untidiness. The final touch is sewing on the edging; lace looks better here. Any fabric can be used for the back side, even denim will do.
Pompom seat
An original seat, which does not require the craftswoman to master a crochet hook and knitting needles, can be built in this simple way. For it you need to purchase suitable yarn or unravel 2-3 sweaters that have served their purpose. The second option is even more interesting, since the pompoms will turn out curly and multi-colored.
Having determined the color and shape of the future seat, we begin making pom-poms. The yarn is wound directly onto your hand or onto a sheet of cardboard. When the ring has reached its maximum thickness, it is tied in the middle and the edges are cut.
The balls are connected with knots and placed on a long thread in order to lay out a certain shape from these garlands. Or attached to a craft net. A base is sewn to the back side to hide the thread knots. You can make two parts at once for a pillow with pompoms. By connecting them with a seam and adding filler, you can easily get an original product - a voluminous seat that children really like.
Do-it-yourself chair seats do not require any special skill from the housewife, however, accuracy and thoroughness of work are the main conditions. This video will tell you how to make a high-quality, cute and unique thing:
Selection of tools and materials
The seat cushion will serve for a long time and will fit harmoniously into the environment only with the right choice of materials and careful adherence to the instructions for performing the work. The necessary tools will help ease the effort and improve the quality of performance. To sew a seat, you will need the following:
- Sewing machine;
- Awl;
- Scissors (preferably tailor's);
- Threads of different thicknesses and needles of different lengths.
Before starting work, stock up on the necessary tools and materials.
Textile
In addition to color, when choosing fabric for a pad, you should pay attention to wear resistance and guaranteed durability. In this regard, it is worth highlighting rep, teak or satin. And in the case when the chair will be used outdoors, it is best to give preference to felt fabric or use old jeans.
With the choice of suitable material, the strength characteristics will match the nature of use. In addition, an attractive appearance and the most comfortable feeling for a person are achieved. The most important thing is that it is easy to avoid unnecessary expenses. The fact is that for such work they usually take materials and tools that can be found in every home.
If the pillow is intended to be used as a seat, then you need to pay attention to durable, wear-resistant fabrics such as gabardine, rep or teak.
Filler
One cannot but agree that each of us wants to sew a seat on a stool in accordance with our own ideas about comfort. A special role here is played by the characteristics of elasticity and resistance to deformation. The correct choice of filler will help you achieve the desired results. When it comes to bench seats, a variety of materials are used:
- Hollow fiber (good shape retention);
- Sintepon;
- Synthetic fluff;
- Foam rubber (thin furniture version);
- Latex;
- Buckwheat and sunflower husks;
- Small scraps of yarn and non-woven fabric;
- Bulk polystyrene filler, etc.
If the choice falls on synthetic fillers, the most commonly used ones are polyurethane foam, polystyrene, synthetic padding, and holofiber.
Another requirement will be the environmental safety of the material. In addition, you should remember the following points:
- If one of the fillers is unstable, use 2-3 layers;
- For foam rubber and holofiber, the correct pattern is enough.
Method 2
This method can be handled by a seamstress who has experience not only in sewing, but also in cutting. We will tell you in detail about the nuances in the cut of the cover, tight-fitting with zippers, which will be a single whole (seat, back, and side parts - everything is sewn into a single cover).
Make a pattern
In this case, we need an accurate pattern. To make it faster, we need polyethylene, about 1-1.5 m. Next we need:
- take a piece of film and apply it to the part of the chair limited by the seams;
- level the film so that it lies as evenly as possible;
- secure with pins near the seams;
- Use a marker to outline the contours along the seams (on the film).
The chair has a round shape. Of course, a problem will arise - the film will not fit tightly, and accordingly, it will not lie flat. That's why:
- It is necessary to straighten it out on level ground, securing it with pins.
- Gather the free part into folds, securing with pins so that the film lies flat.
- The sweets can be stitched with darts or folds as you wish.
Determining the amount of fabric
In order not to buy excess fabric, which can be by no means cheap, and the cover for your computer chair with your own hands turns out beautiful, you need to correctly take all the measurements of the fabric. To do this you should%
- Place the patterns on the floor or carpet according to the width of the intended fabric.
- Measure the resulting length and add 20 cm for material shrinkage.
Fabric cutting:
- Lay the fabric out on a flat surface.
- Place the pattern pieces and pin them in place.
- Make seam allowances of 1.5 cm.
- Trace with a simple pencil.
- Cut it out.
Your parts are ready. Let's move on to the next stage.
We sew a cover for a chair:
- We sweep the middle inner part with the side elements.
- We try on the decor of the chair, thoroughly examining whether the cover fits tightly on the computer chair. If the fabric bristles in any places, you need to remove the defect using darts.
- We remove our parts, make adjustments, and smoothly bend the fabric to the edge symmetrically on both sides.
- We sew the seams with a machine in the following sequence:
- machine sew the seam with a straight stitch;
- cut 0.5 cm from the seam allowance from the edge of one side;
- Fold the cut allowance uncut, stitch along the seam, retreating 2-3 mm.
- We assemble the outer elements of the back and sides in the same sequence, only along the seams of the connections of the central part and sides you need to sew in zippers.
- We sweep out the internal and external parts of the cover, try on all the elements - they should follow the contour of the chair.
- We sew 2 times along the same line.
- We sew in the same way as the side seam.
- We put it on the chair and draw a line along the fold of the lower part. Remove, fold in half and cut off the unnecessary part, leaving 1.5 cm for seam allowances.
- We baste a fragment of the seat and the inside of the backrest.
- Let's try it on below - you need to evenly distribute the folds of the middle of the back, pin it with pins, then remove it and draw darts with a pencil.
- We sew in the darts, cut them off by 1 cm from the stitching, and also stitch on the front side.
- We sew a zipper into the bottom part.
- We overcast the bottom of the resulting cover, step 1 cm and stitch.
Chair cushion patterns
Preparing a pattern is the first step on the path to sewing. For a square cushion, measure the dimensions of the seat. They retreat 1.5 cm on each side. Cut out the stencil, apply it to a piece of fabric, and outline it with special chalk.
You need to cut 2 identical squares
For a round pillow, patterns are prepared differently. It is difficult to measure such a shape with a simple tape, so place a piece of cardboard on the surface of the chair and outline it. The circle is made 1.5 cm larger.
Next, apply the stencil to the fabric and cut out 2 pieces
Pattern
To make a pattern for a chair cushion with your own hands, all you need to do is decide on the size and choose the shape of the product. In accordance with individual preferences, it can be a rectangular object, round or an intricate configuration. And although everything is determined by the size of the chair or stool, the pattern should be a couple of cm larger than the area of the seat for which it is being sewn. The fact is that as a result of stuffing, the dimensions of the product change downwards.
Before cutting, you should ensure that the pattern includes all possible tolerances.
Additional Information! Exact matching to the dimensions of the chair is ensured by using tracing paper, which is applied to the seat and outlined with a marker. And you can cut a pattern with scissors only after the desired shape of the product has been drawn in accordance with careful calculations and measurements.
Sewing a pillow
When it comes to sewing a pad, it is very important to follow the step-by-step instructions:
- Cut out the shape of interest according to the outline of the pattern markings.
- Cutting 2 identical pieces of fabric (with an allowance of 1.5 cm).
- Preparing the filler (according to the pattern).
- Stitching the piping on a sewing machine and attaching it to the fabric (above).
- Place the two pieces of the pillow next to each other, pin them together and sew them together.
There is only a small pocket left to insert through the filler. Next, you should turn the existing allowances, undercuts and corners inside. The already sewn cover needs to be carefully ironed and filled with filler. And the edges of the hole through which holofiber, foam rubber or padding polyester gets into the pillow should be aligned, bent inward and stitched with a hidden seam. At the same stage, all seams of the quilted pillow are stitched.
In some cases, the filler is additionally stitched to avoid the formation of lumps and matting.
Important! Don’t forget to mark in advance the attachment points for the ties that will be sewn on the underside of the workpiece.
In the case of sewing using the patchwork technique, the pattern is prepared using different patches (often different not only in color, but also in shape).
In addition to its useful purpose, the product will also play the role of decorative decoration.
Note! The greater the differences between the parts, the more interesting the product will be.
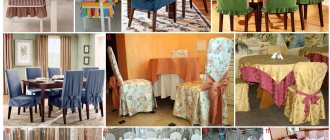
Long covers for stools
The difference between a long cover is that the side panel covers approximately 2/3 of the height of the stool, and sometimes goes down to the floor. This option is more often used in the manufacture of holiday covers that make up a single set with a tablecloth.
Before sewing a cover, you need to carefully consider its shape and compliance with the rest of the room elements. Bow folds, satin ribbons, and lace are used to decorate long stool covers.
When working with leather or leatherette, it is also worth considering the option of a long cover. Simple, clear lines and the strict beauty of the material, even without additional decor, allow you to create an exquisite product. Such covers will perfectly complement the interior of a high-tech kitchen.
How to make a knitted round chair cushion
Each of us is free to decide whether a cushion will be sewn for the stool or, to suit our own preferences, we will have to make a knitted version. In the second case, a soft item for interior decoration and increased comfort is knitted from yarn using a hook or knitting needles. To make a round chair cushion with your own hands, follow the circular pattern.
Such products are often made in the form of thin mats for benches, plastic or wooden chairs, or for the back of a chair.
Note! With a preference for knitting, there will be no problem creating colorful seats similar to the patchwork technique. To do this, the product is made by connecting multi-colored rhombuses, squares, etc. together.
It will not be difficult to prepare soft knitted items from pompoms. For their manufacture, the remains of any colored yarn, previously wound on a template or fingers, are suitable. To get a fluffy ball, the base must be tied in one place, cut and fluffed. Well, then the pompoms are tied at the same distance onto a mesh base made of plastic, curtain fabric or crocheted mesh. In addition, knitted pillows can be decorated with tassels in the corners.
Additional Information! Seats for stools turn out to be especially beautiful if they are knitted from fancy yarn, similar in appearance to “fur” or “grass”. Moreover, you choose the knitting density and pattern yourself.
Options for knitted capes
Most covers, covers and rugs for home furniture can be divided into two categories:
- Mat-cover for a stool. According to the design option, such a cape can be round or square. Distinction is usually achieved through the use of patterns, color combinations, types of edges and embellishments. It should be borne in mind that round covers are less labor-intensive to manufacture, while the square shape gives more space for imagination.
What function they should perform determines what shape, threads and style to choose in the final result. - Chair cover. There are two types of such covers: element-by-element and made as one whole. In the first case, the seat and back covers are made as separate parts. In the second, the case is a solid product. Therefore, it requires quite a lot of time for knitting, fitting and finishing: such products are most often provided with an elastic collar so that the cover does not slip off the chair.
Hand-made products will help add individuality to the environment.
Decorating a pillow
A ready-made pillow of any type can be easily transformed by decoration. Products decorated with beads, beads, sequins, buttons, etc. are suitable for interior decoration. Well, if your goal is to increase comfort, then the best options would be not too voluminous appliques, ruffles, lace or embroidery.
To avoid problems with the drawing, first make a sketch, transfer it to tracing paper and cut out a stencil. And if braid is used as decoration, it is first pinned with pins, and only then sewn on by hand.
Almost any decorations are suitable for decorative models: bows, embroidery, appliqué and others.
Pattern
Making a pattern for a chair seat is not difficult. To do this, determine the dimensions of the seat for which the accessory will be made. It is worth considering that after stuffing with filler, the dimensions of the product decrease, so the fabric must be prepared with a margin of a couple of centimeters on each side. You also need to decide what shape the finished item will be. A round pillow is more versatile - it will fit almost any stool or chair.
Round pillow
After calculations and measurements, a figure of the chosen shape is drawn on a sheet of paper and cut out using scissors.
Additional Information. To ensure that the pattern exactly matches the dimensions of the seat, you need to use tracing paper. It is applied to the surface and outlined with a marker.
Step-by-step sewing instructions
You can sew pillows with your own hands according to these step-by-step instructions:
- The pattern is marked and cut along the contour.
- The filler material is applied to the pattern and the element of the required size is cut out. After that, fabric is applied to the resulting part, and two identical parts are cut out of it with an allowance of 1.5 cm for the dimensions of the filler.
- The edging is stitched and attached to the top piece of fabric. The two pieces of the pillow are then folded together, pinned, and stitched together. There is only a small pocket left to insert the filler. All allowances, undercuts and corners are turned inside.
You might be interested in this: We sew summer dresses with skirts: interesting patterns
Stitching a pillow
- Mark the required number of places where the ties will be attached. The material from which they will be made is selected and cut to the required length. Each piece is then folded in half to form a ring and sewn onto the underside of the pillow.
Ties
- The resulting cover is carefully ironed and filler is stuffed into it. After which the hole is removed. To do this, the edge is leveled, the allowances are folded inward and sewn with a hidden seam.
- If the option of making a quilted pillow is chosen, then at this stage all other seams are sewn.
- If necessary, the pillow can be decorated with additional elements.
Schemes, patterns and sewing steps
Pattern patterns can be found on the Internet or in specialized publications. Usually the surface of the stool is measured for the pattern. After this, cut out a part of the required size from cardboard, apply it to the filler, trace it with chalk or a pencil, and cut out a piece according to the intended markings. The same actions are carried out with fabric. However, in this case, you will need to indent 1–2 cm on each side + add an additional 6 cm for the thickness of the product (due to the filler). After this, the drawn element is cut out using sharp scissors.
You might be interested in: Widening jeans and increasing their width at the waist
The type of cutting may vary depending on the shape of the furniture. The entire sewing process is divided into the following stages:
- preparation of materials;
- choosing a sewing pattern, preparing cutting;
- sewing process;
- foam insert.
Case pattern
Important! The final stage is decorating the manufactured accessory.
Sewing using the patchwork technique
This technique involves making a pillow from several pieces. For this purpose, fabrics of different colors, textures and even sizes are taken. The more each detail differs from the rest, the more interesting the finished product will be.
Patchwork
After selecting the materials, the pattern is prepared. It all depends on your own imagination. You can make flaps of the same sizes and shapes, or you can make them different. After the pattern is completed, the resulting pieces should be carefully sewn together so that the resulting shape of the future pillow is obtained. The inner side of the product is made using the same method or from a single piece of fabric. The resulting parts are carefully ironed.
A padding polyester cut to size is applied to the front side and attached to the fabric. Then both sides of the pillow are applied to each other with the outer sides and sewn together. There remains only a small hole through which the product is turned inside out. After which the pillow is ironed again, and the remaining hole is stitched with a hidden seam.
Important! To ensure an even seam when using a sewing machine, it must be worked slowly. Then, when wrinkles appear, there will be time to smooth them out.
Decoration
Whatever option for making pillows is chosen, they can later be decorated with additional decorative elements. But here it is worth considering what this piece of furniture will be needed for. If the pillow is needed only as a room decoration, then it can be decorated with beads, beads, sequins and much more. If it is used for its intended purpose, then it is better to discard such elements.
Applications
To ensure that nothing causes inconvenience when sitting on a chair, you need to decorate the pillows with materials that are not too bulky. These can be various applications, fringe or buttons. The latter not only decorate the product, but also keep the filler from clumping.
Buttons
It is better to cover buttons with fabric. The color is chosen like the pillow or one that matches it. After this, the surface of the product is marked so that the decorations are located at an equal distance from each other. In the indicated places, the buttons are firmly sewn to the pillow.
DIY pillows
Thus, it can be seen that it is quite easy to sew seats on stools with your own hands. It is enough to stock up on the necessary materials and patience. And ready-made decorative elements will subsequently decorate and update the appearance of the apartment.
Seats made from old things
Indeed, why go to the store and spend money on fabric when there are probably old things lying around in the closet that can be used as material for covers.
Bed linen is perfect for these purposes. Pillowcases are often square in shape, so you can simply stitch along one or two sides, adjusting them to fit the size of the seat of a chair or stool. Inside you can put, for example, a duvet cover folded in several layers for softness.
Important! Bed linen should be thick. Sometimes it gets so worn out that it can tear from a little pressure without scissors. It is better not to use such material.
You can sew original seats with your own hands from outerwear: down jacket, coat, etc. Firstly, thick fabric is just what we need. Secondly, down jackets already have filling. Use an old jacket as a seat, and sew or knit a beautiful cover on top.
Important! The fabric should not rustle. After all, down jackets often use oilcloth, which is not very pleasant to the touch and also makes characteristic sounds. Imagine, you sit on a chair, and there is a “rustling” sound.
Any clothing can be used: shirts, dresses, trousers, etc.
Seats are often made by hand from jeans. The fabric is thick, beautiful, stylish. One pair of jeans can be enough for two seats.
Seats made from old jeans
You need to rip the jeans apart along the inner seams (leave the outer seams). Then cut the fabric to size and sew. Accessories: rivets, zippers, etc. we remove. You will need a soft filler: padding polyester or foam rubber.
Chair restoration
Before making a chair seat with your own hands, you should inspect the product itself. For this you will need:
- conduct an external inspection of the structure;
- make sure it is fully equipped;
- tighten all connections to firmly fix the elements.
Only after the structural strength of the product has been restored can we begin to manufacture the soft seat.
Work examples
Below are several examples that clearly show how interesting and attractive a hand-knitted cover or rug can be.
Thus, if you have free time, a skein of yarn and imagination, you can do a good job updating old, battered furniture. But even if it’s not old, an original crocheted stool cover will be able to add zest to the interior decor and bring a touch of harmony to the home microcosm.
Making a seat
Step-by-step instructions for creating chair seats with your own hands look quite simple. Several steps need to be taken:
- Let's make a pattern. You need to attach a sheet of paper to the seat of the chair and use a pencil to trace its outline. Places for future ties are marked.
- The required fabric is selected and the given dimensions are transferred to it. You need two of these pieces; it is important to make reserves for making the seam.
- The padding polyester of the required thickness is cut according to the specified dimensions. Its dimensions should be 1 cm smaller than the dimensions of the fabric.
- The ties are made. To do this, 4 strips are cut from the remnants of the fabric, each no less than 8 cm wide.
- The tie strips are folded in half. They need to be stitched and turned with the seams inside.
- We sew the ties to the fabric, pushing them inside the cover.
- Place both pieces of fabric right sides on top of each other. They need to be stitched around the perimeter, leaving 15 cm without stitching.
- The finished case is turned right side out. A padding polyester is inserted into it. The ties are pulled out.
- The sewing of the cover is completed manually using a blind stitch.
- Using an iron, you need to steam the finished product to give it a neat appearance.
Sewing a cover
To diversify the aesthetic appearance of the finished product, you can make several covers for the same product.
To sew a cover for a chair seat with your own hands you will need:
- choose a suitable fabric that will match the interior of the room;
- make a pattern according to the size of the seats;
- fold the fabric right side out;
- sew the front and side parts;
- Turn the cover right side out;
- on the back side, sew fasteners in the form of hooks, buttons and loops or ties.
This way you can make several covers from different fabrics. They can be changed, while changing the visual environment in the room.
The cover protects the product from contamination and damage, thereby increasing its service life.
Service life of seats
The photo shows two seats for chairs that have been in use for 5 months. It is clearly visible that the left pillow has already lost its presentation (they sit on it much more often).
That is why it is better to sew or knit a cover that can be washed. And make a soft pillow inside separately.
You can take a purchased seat as a basis and make a cover for it yourself to give the product a new life.
When choosing a filler, pay attention to this. The most short-lived synthetic winterizer will be, it sags and rolls up faster. Whereas foam rubber will last longer.
You can fill the seat cushion with compressed sawdust, down, and feathers. If you have old sleeping pillows, they can also be used to make wonderful seating. A cotton blanket will also work.
The process of making a seat for a stool in the kitchen
Having in our arsenal the materials necessary for the seat, we begin to manufacture it.
- We mark on the filled fabric the size of the future pillow and accessories for attaching it. We make such markings with a margin (2cm will be more than enough) for comfortable sewing.
- Using scissors, we cut the material into the required number of pieces - for a pillow, two equal halves of fabric plus strips for ties are enough. Or we sew on Velcro or elastic.
- We sew the pillow and fix the pre-made ties at its corners.
- We insert the filler and stitch the last side of our pillow. If a snake was used, simply close it.
Overhead seats are much easier to care for than upholstered chairs, because they can be removed at any time and put in the washing machine.
The sequence of actions is quite simple and with a little experience you can sew a good dozen pillows in just one day.
This option is well suited for decorating chairs in the kitchen, children's room, and hallway.
As you can see, there is nothing complicated in decorating your chairs with pleasant accessories. Especially if you carefully follow the tips offered in this article, you can easily learn how to make a soft seat on a stool.
Any chair seats are very easy to sew, and even if you don’t have a sewing machine at home, you can spend a little more time sewing such an accessory by hand.
Preparing fabric and foam
Before sewing the cape, you will need to carefully smooth the fabric so that there are no wrinkles on it. You will also need to prepare foam rubber for softness. There are several types of fillers that are used for sewing furniture covers. The most popular of them are:
padding polyester Artificial and durable foam rubber that does not lose its shape, has good elasticity, and shows high thermal insulation properties. Sintepon is inexpensive, which is why many users choose it for upholstering stools. The downside is that the material allows air to pass through and loses its properties at low temperatures;
Sintepon for capes
- holofiber. The material is made of springy fibers, it shows good ductility. Hollow fiber can be washed in a washing machine. The fiber is breathable, easy to clean, does not require special care, and holds its shape for a long time. Disadvantages - the material can absorb liquid, it does not tolerate increased humidity levels in the room;
- foam rubber Dense material that holds its shape well. Foam rubber is flexible, practical, hypoallergenic. It withstands temperature changes in the room and retains its shape at sub-zero temperatures. Disadvantages - the fiber is not environmentally safe, and foam rubber is also quite fire hazardous.
For your information! Before you start sewing, you also need to take measurements of the furniture in order to cut the fabric to the right size.
Filler for accessories