How to make a wardrobe bed with your own hands: diagrams, drawings, detailed instructions
If you are the “lucky” owner of a small family, a Khrushchev apartment or just a smart apartment, then you definitely have a need for competent organization of space, or rather, saving it. The issue of placing pieces of furniture is acute in a children's room, especially if there is more than one room, and several preschool/school age children have to sleep in it at once.
In order to significantly save space in your apartment, you can purchase a folding bed. To do this, we suggest first making a drawing, and then making a wardrobe bed with your own hands. This will make it possible to significantly reduce financial costs, and you will be able to create a bed of the required size, taking into account the color scheme of the room, as well as the decorative elements that are available.
Definition with the model and design of the wardrobe bed
The most important advantage of making a transforming bed yourself is the ability to choose any of the proposed designs, and even create your own.
Consider the appearance of the room when making a wardrobe bed.
First of all, you need to build on the existing style in the room. It is unlikely that you will be able to combine a modern design wardrobe-bed if other furniture is made, for example, in a classic style. The main thing is to maintain the harmony of the living space and prevent the mixing of radically different styles.
A sketch of the bed can be drawn on a piece of paper.
It is better if, already at the planning stage, a rough sketch of the future bed is drawn up. And the best option is to find any one you like on the Internet and adapt it as much as possible to your needs. In this case, you can also save a decent amount of personal time, which can be spent creating designs and drawings yourself.
Try to clearly draw a plan for the future bed-wardrobe.
How to decide on the size
In order to build the best option for transforming a bed with the function of a wardrobe (or vice versa), it is important to determine the dimensions of the structure at the very initial stage. After all, it depends on them how comfortable the proportions of both furniture options will be.
Advantages of a prefabricated bed:
- the cost of a new bed is reduced several times, at least 2-3. The store-bought prefabricated version will still be more expensive;
- the design of the structure is universal, absolutely satisfies the needs of the owners;
- You can independently choose the highest quality materials and have no doubt about their reliability.
Selection of materials
Creating a good convertible bed starts with choosing the right materials. The main thing is to imagine what the frame of the closet and the bed itself will be made of. Today the most commonly used materials are:
- Tree.
- Plywood.
- Chipboard (chipboard).
Chipboard is the most popular material for making beds.
The easiest way to work with laminated chipboard is a slab of compressed sawdust coated with a finishing layer of paint. Wood and plywood require special treatment, since they are based on natural wood, which must be protected from moisture and other aggressive environments, such as acids, cold and heat. For such protection, materials are often used, few of which are suitable for indoor use.
Use quality wood to make the bed.
Important! The main thing is when choosing a protective impregnation for a wooden or plywood base, make sure that the composition used is safe for humans.
Having cut out the selected material, we begin its finishing. Plywood, wood or chipboard must be painted to achieve the required appearance. Laminated chipboard will help you avoid such work, since the choice of various color solutions is simply huge.
High-quality components will affect the service life of the product.
In addition to the actual frame of the closet and bed, you must have materials for:
- bed legs;
- decorating elements;
- bed lowering mechanism;
- fasteners (bolts, angles);
- loop parts.
In its simplest form, a wardrobe bed can be connected to each other with gas lifts and metal legs to hold the frame in a horizontal position.
Make an action plan and a list of necessary materials and tools to assemble the bed.
More functional solutions require the use of additional materials, which include decorating, fastening and hinge elements.
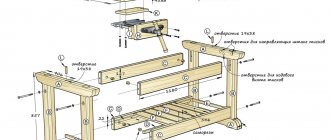
Necessary materials, tools, cutting and bed design
Materials:
- sheet of plywood or MDF 12 mm thick (1 pc.);
- boards 2.5×30×240 cm (3 pcs.);
- board 2.5×20×240 cm (1 pc.);
- board 2.5×10×240 cm (1 pc.);
- board 2.5×7.5×240 cm (1 pc.);
- boards 2.5×5×240 cm (3 pcs.);
- decorative strips 6 mm thick;
- 50 mm self-tapping screws;
- 50 mm nails;
- 30 mm nails;
- 15 mm parquet nails;
- glue;
- wood putty;
- sandpaper;
- hinges (strong door hinges or special hinges for folding beds);
- heavy-duty magnetic latch that can hold the bed in the raised position and prevent it from tipping over;
- hinges with a closer for slowly lowering the bed to a horizontal position.
Tools:
- roulette;
- square;
- pencil;
- hammer (can be replaced with a gun for hammering parquet nails with a hammer);
- protective glasses;
- Kreg Jig – a device for drilling holes for flush-mounted miter joints;
- drill;
- a circular saw;
- gun for hammering parquet nails;
- eccentric sander.
A few general notes:
Work on a clean, level surface
Take proper precautions and use personal protective equipment. Using a square, check after each step that the corners of the structure do not deviate from 90 degrees.
Use quality, non-warped lumber. Before screwing in the screws, drill pilot holes and countersink them. When starting to make your own folding bed, study the drawings presented here.
Cutting list
For "Box"
- 2.5×30×199.4 cm (2 pcs.) – side walls
- 2.5×30×107.3 cm (1 pc.) – bottom
- 2.5×10×107.3 cm (2 pcs.) – rear cross members
- 2.5×5×111.1 cm (1 pc.) – front cross member
- 2.5×5×195.6 cm (2 pcs.) – finishing of the front side of the drawer, vertical sides
- 2.5×5×31.1 cm (2 pcs.) – finishing of the side walls of the drawer, top part
- 2.5×5×114.9 (1 pc.) – finishing of the front side of the drawer, top part
- 2.5×7.5×120.0 cm (1 pc.) – back part of the “ceiling”
- 2.5×30×120.0 cm (1 pc.) – front part of the “ceiling”
For "Bed"
- plywood 6 mm thick ×102.9×191.1 cm (1 pc.) – bottom
- 2.5×20×102.9 cm (1 pc.) – back wall
- 2.5×20×139.7 cm (1 pc.) – side walls (cut the board diagonally, as shown in the plan, to get two parts)
- Finishing the front side using 6 mm thick slats according to your wishes
Which transformation mechanism is better?
When choosing a transformation mechanism, you should first of all take into account the intensity of use of your bed. The following may be responsible for turning a sofa into a bed:
- springs;
- shock absorbers (closers);
- bearings, mechanical elements.
The first step is to make a cabinet frame that is securely mounted on the wall.
The spring mechanism has the problem of stretching with frequent use, and the metallic ringing of working springs is not the most pleasant.
Decide on the mechanism for lowering the bed-wardrobe.
Gas shock absorbers (also called gas lifts, less commonly called closers) do their job perfectly, but they can also fail, so when using them, it is recommended to provide for the possibility of unhindered replacement.
Everyone chooses for themselves the mechanism for lowering the bed-wardrobe.
Bearings are used less often than any other option due to the specificity of design transformation. This is due to the fact that the bearing is not responsible for the smooth unfolding, that is, each time you have to manually lift the entire mechanism on your own.
Over the course of several years, the gas gradually leaves the rack, after which the rack or the entire mechanism will need to be replaced.
How to make a transforming mechanism for furniture
There are plenty of types of lifting mechanisms on the market today. Let's consider the equipment that is used for beds. The most popular devices: mechanical and gas springs. The first ones work by tensioning springs. The second type is spring shock absorbers (gas lifts). There is also a hinge mechanism - a design where a person puts more effort into raising the bed.
At the moment, manufacturers offer many interesting options.
Making a folding device is not easy, but it is possible if you follow the instructions:
- We make the top rail (corner) from metal parts;
- the bottom rail is flat (attached to the box);
- it is necessary to connect the slats with two metal, moving (bolted) vertical slats, one larger in size;
- We buy, for example, a gas lift and attach it to a metal base.
The mechanism of transforming furniture wears out quickly, which can lead to its premature failure.
Important! It is better to buy this mechanism in a specialized store. The sofa bed is made by hand, and the device, as a rule, is purchased.
Preparing tools
Before starting work, you should have the following tools on hand:
- construction tape;
- pencil;
- ruler;
- jigsaw or circular saw;
- pliers;
- fastening elements - bolts and European screws;
- sandpaper;
- building level;
- screwdriver.
Professional tools will help you quickly achieve excellent results.
It is recommended to use Euroscrews as the most reliable type of fastener with a screwdriver of the appropriate type.
Advantages for a small apartment
The main advantages of transformable furniture include:
- saving free space . These designs are ideal for small apartments where it is not possible to install massive furniture;
- functionality . During the daytime, they turn into a wardrobe with additional furniture items, and at night, they are transformed into a spacious sleeping area;
- variety . Transformer furniture, depending on the type of design chosen and materials of manufacture, will fit into classic and modern interiors. Their facades can consist of mirror surfaces, visually increasing the space.
Drawing up drawings and sketches
When the issue of materials and tools has been resolved, it’s time to move on to drawing up drawings. An accurate drawing plan is created based on pre-prepared sketches. Each element in the drawing must have clear dimensions and type of attachment to adjacent components.
Be sure to make a drawing of the bed, which will help you avoid making mistakes when assembling the product.
In general, the drawing should include:
- sofa frame: 4 partitions - two horizontal and the same number vertical;
- bed base;
- type of legs used;
- method of fastening and unfolding the bed.
Externally, you can decorate the wardrobe bed in different ways.
When converted into a closet, the outer façade of the bed is often decorated with additional shelves. Of course, nothing major can be placed in such storage areas, but with additional fixation, you can even design a folding tabletop.
Only a professional can draw a drawing of the mechanism.
This will allow you to organize an ergonomic workplace after folding the bed. The drawings will help you make such a transformable bed with your own hands.
contact specialists to draw up a drawing of the wardrobe-bed.
If you plan to assemble a double transformer bed wardrobe with your own hands, the drawings can be mirrored for each of the individual parts.
Manufacturing of the product
Frame assembly
To assemble the frame base, you must know all the dimensions of your future bed. They will depend on the size of the bed, as well as on the type of bed - double or single. To make the frame, you will need to take two side plates that will be located along the base for the mattress, as well as 2 side plates for fastening along the width of the bed. In addition, a back base will be required.
The last wall will occupy the entire area of the closet, and therefore it must be larger in size than the mattress that will be located on the bed. So, based on the considerations described above, we recommend making the frame 0.15 meters larger in width and 0.4 meters longer in length (a margin for length is required to make folding possible).
So, when you decide what size the side plates and back wall for the frame should be, you will need to do the following:
- Carry out the cutting on a chipboard panel or on a furniture board, and use pre-prepared patterns.
- Cut out the parts with an electric jigsaw, sand them thoroughly, and edge the edges.
- Prepare the required markings for fastening, transfer the data from the patterns to the plates.
- Connect the shield using furniture screws, and for reliable fastening, you should make holes in advance using an electric drill with a drill with the ability to perform preparatory work for the groove, head and fastening (connections will be made with screws every 0.25-0.35 meters).
When this is ready, you can move on to the next step to make a transformable “wardrobe-bed” with your own hands.
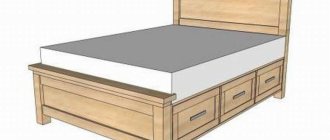
Making a mattress box and drawings
Making a mattress box for a wardrobe bed yourself is the most difficult thing. When cutting, cutting out parts from slabs for furniture (or other materials), you should carefully follow the numbers indicated in the drawing. Due to this, it will be possible to create a box that will fully correspond to the dimensions of the frame.
To make a box you will need:
- Two side walls that can be made diagonal.
- One wall for the side.
- Bottom (the most suitable material for manufacturing is, oddly enough, plywood).
Next, we suggest considering exactly how to make a box:
- To begin with, it is worth cutting and cutting the plywood bottom in the same way as the back wall for the frame.
- Make the side walls and back, sand the edges with sandpaper and edging tape.
- Using furniture screws, attach the back and side walls to the plywood bottom. It is imperative to maintain a distance of approximately 0.25 or even 0.3 meters between the screws.
- A wooden beam should be laid along the entire perimeter of the resulting structure, which will act as a support for the mattress pad. It is advisable that a beam measuring 5*5 cm be used. It will be attached using wood screws to the side walls.
- In order to make a high-quality and durable mattress pad, use edged boards that will be attached to a wooden beam with screws. The length of one board should be such that it can be reached from one edge of the beam to the opposite one. They should be placed in the same plane as the bottom of the plywood. The distance between the boards should be from 0.1 to 0.2 meters.
Now let's move on to the next step - creating a mechanism that will make the bed a real transformer.
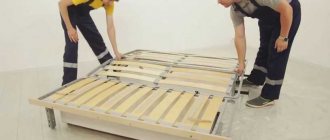
Installation of the transformation mechanism
The lifting mechanism will perform the function of moving the box in relation to the immovable frame.
How to install correctly:
So, first you need to screw the hinges from the hinge mechanism onto the bed frame and directly onto the frame. The main support should be on the frame, since it is immovable.- The dimensions of the frame and the box must be adjusted to each other, and then the mechanism can be connected.
- This work must be carried out with an assistant.
- After installing the transformation system, you should lift the box to check that it matches the dimensions for the frame.
- For correct and level installation of the hinge mechanism, you should use a building level so that the bed can rise and similarly be securely and firmly held in a single plane with the frame. It is necessary to ensure that there is a single line at the junction of the upper edge of the frame and the lower edge of the box.
Yes, it’s not difficult to make a bed-wardrobe with your own hands. In order to facilitate the transformation, you can use additional parts that will simplify the movement of the mechanism (counterweight, gas shock absorbers). Especially such mechanisms are required if you are making a children's or teenage bed.
Required hinges and their drawing
It is not recommended to allow your children to independently unfold and return a folding bed to its original position. Even in this case, it is required that they be able to unfold the bed without the help of adults, and therefore a do-it-yourself system for transforming a wardrobe-bed must be lightweight.
Making a headboard
You should definitely take into account the fact that the headboard of a transformer in the form of a wardrobe-bed should be made of soft material, especially if the bed is made for small children. It is best to make soft not only the headboard, but even the lower part of the side walls of the frame. The simplest option for creating a soft headboard, which will not be difficult to make with your own hands, is soft foam upholstery. Instead of foam rubber, you can even use synthetic winterizer.
Brief instructions for creating a headboard:
- The material that will soften everything should be folded in several layers.
- After this, it should be covered with a beautiful fabric, decorative elements should be used, or the whole thing should be finished with quilted stitching.
- For ease of maintenance, you should definitely make the upholstery a removable type, with a secret zipper. It will be convenient to remove, wash and put back in place.
- The height of a soft type headboard should be at least 0.6 meters, and ideally it should be 1 meter. This will help provide a soft layer of padding under the back of the person sitting at the head of the bed. For a similar reason, the same soft upholstery should be made for the side walls of the frame.
- The height of the foam pillow on the side walls should be the same as the height of the upholstery at the headboard.
- The prepared material can be attached to a frame or to a wall using fabric (or elastic) loops and screws. If the upholstery is not removable, the back of the fabric cover can be attached using a stapler.
Congratulations! The bulk of the work is done, all that remains is the most interesting part.
Bed legs
You have already learned basic information about how to make a wardrobe bed with your own hands. But the legs for such a sleeping place must be movable and turn around at least 180 degrees. In this case, it will be extremely convenient to use metal legs, which are connected together and form a metal strip with appropriate bends.
But how to attach it all?
- Take measurements and determine the height of the box above the floor to determine the height of future legs.
- Measure the width of the box, and then calculate the length of the metal strip.
- Sand, weld, varnish the leg or order ready-made parts.
- Prepare holes for mounting on the box and leg.
- Attach the same legs to the bottom bar of the box so that they are attached to the wooden beam in the middle.
- Check the functionality of the legs.
When unfolding the transformable bed, be sure to rotate the legs 180 degrees and place the bed on them. When lifting the box, the legs are tucked in such a way that everything can be hidden inside the so-called cabinet. Moreover, the metal strip, which plays the role of connecting two legs together (or a straight strip of a cast leg), will simultaneously play the role of holding the mattress on the mattress pad.
This way, you will be able to eliminate its movement for folding and unfolding the bed. For the same purpose, you can install a limiter, which will be located at the upper edge of the mattress pad. Horizontal planks can be used as a limiter. You can make several legs, but in this case the unfolding process will become more complicated. The leg must be strong in order to be able to support the weight of the mattress, box, sleeping people and bed linen.
Accessories and decoration
The best part was left for last. With the help of various decorative elements you can completely hide the presence of a transformable bed in the room. There are many ideas for how to decorate the bottom rail of a bed frame that faces into the room. One of the most beautiful and simplest options would be to create an imitation of a four-door or three-door cabinet.
Please note that doors can be imitated using handles and strips made of wood, which will supposedly be designed to open the doors. You can even place a mirror on one of the doors.
Another great option for hiding the presence of a bed that can transform in the room is to mount such a cabinet into a furniture wall, and also make a bed from furniture slabs of the same color as the wall. Next to the rest of the wall, the cabinet will look very natural, especially if you add decorative elements like strips and handles. At the same time, adjacent cabinets can actually be used as a place to store bed linen, and this will greatly help simplify the process of cleaning bed linen every morning.
A step-by-step description of the process of making a do-it-yourself wardrobe-bed
Stages of making a wardrobe bed:
- Selecting a future design and drawing up a rough sketch.
- Calculation of the volume of necessary materials and their acquisition.
- Creation of the final drawing.
- Cutting the material, organizing places for attaching individual parts to each other.
- Assembling the wardrobe-bed and checking its functionality.
- Cosmetic work on decorating the resulting piece of furniture.
It is important to follow the sequence of steps. This will allow you to always have the necessary materials and fasteners on hand.
First of all, you need to make the frame of the wardrobe-bed.
The most important stage is cutting. Even experienced craftsmen prefer to carry it out in specialized factories. After all, no matter how simple and reliable a hand-held household tool may seem, not a single jigsaw is capable of providing consistently high quality cutting; once during the work, your hand trembles - and the entire sheet of material can be disposed of.
Before assembly, decide on the tools, drawings and components to assemble the product.
You need to have even greater dexterity when working on organizing the landing sites for fasteners. If they are performed poorly, you may completely lose the ability to assemble the entire structure.
Before assembling the transformer bed cabinet with your own hands, the drawings must be prepared in advance.
Creating a headboard
The headboard of the transforming wardrobe should be made of soft material, especially if the bed is intended for children. It is advisable to make soft not only the headboard, but also the lower part of the side walls of the frame. The simplest option for a soft headboard that you can make yourself is soft foam upholstery. The role of foam rubber can also be played by padding polyester.
How to make a headboard:
- Fold the softening material in several layers;
- This material must be covered with a beautiful fabric with decorative elements or quilted stitching;
- For ease of care, you can create a removable padding with hidden zippers. It will be convenient to remove, wash and put on again;
- The height of the soft headboard should be at least 60-70 cm, and preferably about 1 m. This will ensure the presence of soft upholstery under the back of the person sitting at the head of the bed. For the same reason, the same softening upholstery should be prepared for the side walls of the frame;
- The height of the foam cushion on the side walls of the frame should match the height of the same upholstery at the headboard;
- The prepared upholstery can be attached to the frame or to the wall using screws and fabric (or elastic) loops. If the upholstery is not removable, the back of the fabric covering can be attached with a stapler.
We cut out the sheets
Making holes for buttons
Glue the foam rubber
Fastening the upholstery
Mounting buttons
Installation and decoration of the product
When all the components have been cut, the cutting areas have been sanded, and the mounting locations for the fasteners have been marked, it is time for assembly. You can assemble a wardrobe bed in just a few hours if all the previous steps are completed efficiently.
Installing the cabinet will not take you much time if you have made all the drawings and cut out the parts correctly.
Important! The type of fastener used depends on the material used. When working with wood and plywood, self-tapping screws are used; for chipboard and chipboard, furniture screws are used.
First of all, we assemble and attach the cabinet frame to the wall and floor. Then we move on to assembling the bed. We fasten the elements of the bed frame together, then fasten the bottom. And only after making sure that these parts are securely fastened can you proceed to installing additional shelves or other selected elements.
After assembling the bed-wardrobe, you can begin decorating it.
The last step is installation and fastening to both parts of the transformation mechanism. It is important that when folding, the fasteners do not cling to the furniture frame. We check the lifting mechanism several times for correct operation and proceed to installing the façade elements.
Choose a quality bed mattress that will serve you for a long time.
Once this stage has been completed, we again unfold our bed and install the mattress in its frame. You should remember the need to keep the mattress in place in a horizontal position - when the bed is folded. Most often, ordinary furniture belts are used for this, secured together with plastic locks.
Note! The ability to quickly remove the mattress will help with both preventative cleaning of the bed and the mattress itself.
The mattress must match the size of the bed.
Frame assembly
To assemble the frame, you need to know the exact dimensions of the intended bed. They depend on the size of the bed and the type of bed: single or double. The frame requires 2 side plates located along the frame, 2 side plates for fastening along the width of the bed, as well as a rear base. The back wall will occupy the entire area of the so-called closet, so it should be larger in size than the mattress that will be on the bed. Based on these considerations, it is recommended to make the frame 15 cm larger in width and 40 cm larger in length (the length margin is necessary for folding).
Having decided on the size of the side plates and the rear wall for the frame, you need to:
- Make cuttings on a chipboard panel or on a furniture board, using patterns for this;
- Cut out the parts with a jigsaw, sand them thoroughly, and edge the edges;
- Prepare markings for fastenings, transferring data from the patterns to the plates;
- Connect the board with furniture screws; to securely fasten them, pre-drill a hole with a drill and a drill with the possibility of preparing a groove for the head and fasteners (connections with screws should be made every 25-35 cm).
We carry out the cutting
Sanding the coating
We connect the elements with fasteners
Examples of arrangement in the interior
Having burst into the design of living rooms and houses, wardrobe beds are helping to find more and more applications.
Note! In any design of such a furniture transformer, it is important to take into account the moment of unfolding.
It is unacceptable to store loose, liquid or any poorly secured items in a folded state. The assembled transforming bed can be used as:
- Desktop;
- wardrobe;
- clothes hanger.
In the version with a desktop, its tabletop can be folding. In this simple way you can create an impressively sized work surface.
If necessary, the item is decorated using simple design techniques.
Wardrobe beds are most often decorated with front doors. Firstly, it is necessary to ensure that such doors are securely fastened in a horizontal position. Magnetic locks are best for this. Inside the cabinet, you can provide a shelf, hanger or double (combined) design. The type of interior space should be planned at the initial stages.
A folding sleeping module is no less comfortable than a regular bed, but at the same time saves space in the room.
In the design of the hanger, the front of the bed is made monolithic, and the crossbar for their location often acts as a metal leg when unfolding. That is, it is important to take into account that this emphasis can withstand not only the weight of the entire structure, but also the people located on it.
Externally, the wardrobe-bed in its assembled state will not give itself away and is guaranteed to fit into the interior.
It is worth approaching the issue of planning and independently assembling a wardrobe-bed thoroughly, and the result will be an excellent way to rationally organize living space even for a small area.
Types of beds
Transformable products differ in design options and the number of pieces of furniture combined in the product. There are models that connect a sleeping place and a wardrobe, a seating area and a work area, a bed and a spacious sofa, etc. Built-in structures, folding and folding, have been developed.
The bed, combined with a wardrobe, is pressed against the wall by a lifting mechanism and serves as a rack. The product is practical and is used in small apartments.
The wardrobe-bed is combined with a sofa. This model of furniture is optimal for living rooms, as it can be modernized into a relaxation area. When disassembled, the sofa is an additional support for the bed, increasing the load-bearing capacity.
Beds combined with a work area are used when decorating children's rooms, as the furniture is equipped with drawers, shelves and a comfortable bed. Sockets and lighting are added to the design for efficient use of the space.
The sofa bed can be standard or transformable into a two-tier structure, equipped with a spacious compartment for bedding. The built-in double transformable bed can be combined with a table. The model is used in the design of teenage and children's spaces.
The designs of hidden folding beds are original and ergonomic. The sleeping space in such models is hidden on the other side of the closet. The furniture is equipped with a rotating mechanism that allows you to move the module.
A bed model of original transformation has been developed and is gaining popularity, which allows you to raise the sleeping bed, attach and disguise it near the ceiling. The design helps free up a large area of the room and becomes invisible during the daytime.
Transformable furniture is multifunctional due to built-in cabinets, mezzanines, shelves, etc. Additional functions are selected depending on the interior design and the requests of the residents.
The structures are divided into transformers with a horizontal or vertical mechanism. The choice of system is influenced by the dimensions and design style of the room. Products that rise vertically are the most frequently purchased and functional. Horizontal transformers are suitable for narrow rooms with low ceilings.
Wardrobe-beds in the interior in the photo
Design
According to the type of design, a transformable bed can be:
Articles on the topic (click to view)
- Differences between an ottoman and a bed
- Anatomical bed frame
- Differences between a sofa and a sofa
- How to choose the right foam density for a mattress
- Canape furniture: what is it
- How to beautifully hang a picture on the wall
- The best cleaner for leather furniture
- vertical . This product is a two-meter-long wardrobe, the head of which is fixed to the wall, and the sleeping place is hidden in the closet during the day;
- horizontal . Such models are equipped with a single bed attached to the wall on the side;
- roll- out These are the most common models in which the lower built-in part slides out and forms a spacious sleeping area. Such models are suitable for arranging children's rooms and adult bedrooms;
- lifting _ This product is equipped with a pneumatic mechanism that easily allows you to remove the bed into a niche in a wall or cabinet.
In addition, the transformable bed can be a folding pouf. That is, when folded, the product is a regular pouf, and when unfolded, it is a small sleeping place. Round transformable beds are also popular, ideal for small children. They are safe because they have no sharp corners.
If there are two children in a family, it is recommended to install a transformable bunk bed in the room. This design has one mechanism by which the product folds and unfolds.
As for additional features, transformable beds are unique and versatile:
- beds for adults can be transformed not only into wardrobes and sofas, but also tables, chests of drawers, closed shelves;
- children's models are equipped with: changing tables, chests of drawers, drawers. Such products can be supplemented with lighting or a canopy.
Installation nuances
Safety is one of the main qualities of furniture purchased or made independently. A bed built into a closet must be securely fastened to the wall to eliminate the risk of the entire structure tipping over when unfolded. You should not skimp on the quality of transformation mechanisms. Considering the impressive weight of the sleeping place, if the fittings fail, you can be seriously injured.
Convertible beds that fold out manually should only be used by adults.
When installing the lifting mechanism, you must start by installing it on the inner and outer frame. After this, you need to move on to working with the gas strut. If the installation is done correctly, the inner frame rises easily, but lowers with some effort.
If you don't know how to assemble a bed, you shouldn't start working. You should study the instructions, draw up a detailed plan, consult with professionals, and familiarize yourself with examples. Any error reduces the reliability of the design. To ensure that your efforts are not wasted, you should pay special attention to choosing a model and calculating its dimensions. The bed should not take up too much space, and its design should be in harmony with the interior of the room.
Finishing
If desired, the inside and outside of the box can be covered with a special material that does not allow moisture to pass through.
To make it decorative, a wooden product can be coated with stain, varnished or painted .
To make the transforming bed look believable and resemble a real closet when folded, fittings are applied to the outside.
Expert opinion
Smirnova Ekaterina Anatolevna
7 years of experience in interior design, professional architect
The end sides are decorated with PVC adhesive tape , which is applied to the product, heated with a hair dryer and pressed firmly.
Such furniture is not only functional, but also beautiful:
Drawings and diagrams
Before you start making and assembling a transforming bed, consider its dimensions, design, and materials of manufacture. All this must be put on paper with a pencil, not forgetting to indicate the connection points with fasteners.
You can make a drawing of a bed in different ways :
- independently, armed with a pencil and paper;
- using special computer programs that can be downloaded on the Internet;
- in a specialized company that manufactures furniture;
- download a ready-made diagram from the Internet and improve it according to your personal wishes.