Home/Kitchen/Do-it-yourself kitchen from furniture panels: choice of wood type, layout, assembly, photo drawings
Making a kitchen with your own hands from furniture panels is a relatively simple and inexpensive way to create a beautiful interior. To make your own kitchen set and other furniture, you will need accurate drawings, building materials, as well as a kitchen design with the chosen layout.
A kitchen set made from furniture panels, assembled with your own hands, will help save money and take into account all the dimensions of the room
Why are furniture panels popular?
Wooden sheets are used to make DIY kitchens; they are also used to create staircase structures or as decorative elements. The furniture panel is made of natural wood, there are two varieties - solid or pressed. To make the first option, a whole piece of wood is used, while the second is obtained by gluing together several thin layers under pressure. Pressed furniture panels are more durable and less prone to deformation from moisture over time.
This is what a pressed furniture panel looks like in cross-section
Furniture panels are durable and easy to process; they are easy to fasten with nails, screws and other types of fasteners. This material is used to make a DIY kitchen for the following reasons:
- Long service life. Wooden sheets serve for years without warping or deforming.
- Environmental friendliness. Wood is a natural material, it does not emit harmful substances. Even glued furniture panels are not dangerous to the health of others, since PVA is used for gluing, and not alkyd resins.
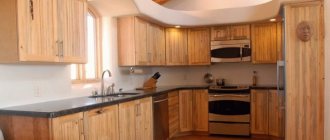
- Appearance. A kitchen made from furniture panels is practically indistinguishable in appearance from sets made from solid wood.
- Economical. Wooden sheets are cheaper than solid wood, despite the fact that they are classified as economy class, the quality of the material is very high.
- Wide choose. Since the sheets are made in different sizes, you can easily find ones that fit your kitchen plans.
A DIY kitchen made from furniture panels looks very natural and cozy, thanks to the wood used
Furniture panels are easy to process, so it will not be difficult to apply carvings, ornaments to the surface of the facades, paint them in any color, etc. There are many decor options, including stucco molding, various applications, and glass inserts.
From furniture panels you can make a functional dining group for the kitchen
Decorative elements
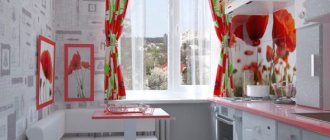
An apron is an important functional and decorative component of any kitchen. The most common option for a corner kitchen is a single apron that connects both sides of the corner into a single whole.
Moreover, the brighter the apron lining, the simpler and more inconspicuous the furniture facades should be
The most common option for a corner kitchen is a single apron that connects both sides of the corner into a single whole. Moreover, the brighter the lining of the apron, the simpler and more inconspicuous the furniture facades should be.
If the furniture is richly decorated with decorative inserts, carvings, and rich fittings, then it is better to choose the simplest apron, with an unobtrusive pattern or without one at all.
Another rule: bright decorative glass aprons with images from a 3D perspective, glossy surfaces or photo prints look better in modern interiors.
For classic styles, you should choose discreet colors and natural facing materials.
Who said that the apron should be uniform? Both sides of the corner can be decorated with an apron of different colors. This is a bold decision, but such an interior will look more elegant and bright. Especially if rich shades are chosen for the apron and the furniture is light.
Additional components.
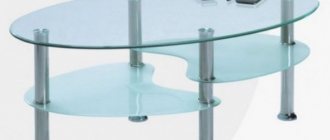
The angular arrangement of the upper and lower modules leaves free space between them. Here you can place rails and additional hooks. Transparent glass shelves will not only decorate your kitchen, but also serve as a place to store dishes or decor.
Ceiling decoration. For corner kitchens, designers advise choosing a multi-level ceiling. It is better to make the built-on box above the corner furniture in the shape of a wave.
This will help brighten up the geometry of the shapes and add color to the room. In addition, it is more convenient to install built-in lamps in such a box.
Thus, corner kitchens, with all their organicity, compactness and versatility, leave a limitless field for imagination.
Main wood species
Dozens of different species are used to make furniture sets for the kitchen. Both soft wood species (poplar, pine, cherry) and hard wood (oak, beech, yew) are used. Parts that do not bear a large load are made from soft wood - facades, decor, top cabinet covers. Frames are made from hard wood.
Different types of wood for the kitchen
Features of the most popular types of wood for making kitchen furniture with your own hands:
- Pine. Not the strongest rock, but easily processed with tools. Suitable for creating miniature cabinets, light wall shelves, as well as furniture fronts.
- Beech. Good durable material, attractive in appearance. Any parts of the set are made from it, but it is worth considering that beech absorbs water well. Before assembling furniture for the kitchen with your own hands, it must be treated with special water-repellent solutions.
- Oak. One of the hardest and densest tree species, which is why oak furniture is heavy. Oak is not afraid of moisture, does not rot, it is a very strong and durable tree. Despite their high hardness, oak sheets are easy to process and take any shape.
The choice of breed for assembling a kitchen set with your own hands depends on the expected properties, as well as price and household features.
Stylish corner kitchen made from furniture panels
Classification
Thanks to changes in various properties of the base material, wooden panels are now used in many industries. Depending on the gluing method and the type of wood used, the resulting furniture board made of maple or other material can be used for external or internal finishing work. The veneered panel used has a very insignificant thickness of 4-8 cm due to the strong internal stress of the material, which can be significantly deformed during drying. It is glued exclusively along the width.
In this way, manufacturers managed to obtain a truly high-quality material that will not begin to warp over time and that does not contain internal stress. Furniture panels of pine needles or other natural materials are classified according to different areas of application.
To avoid drying out of the base layer, different technologies are used at each stage of production, while the material is impregnated with several impregnations, which increase its main indicators of strength and endurance several times.
Having understood what a furniture panel is, you can start combining it with other materials. Often, in the production of massive laminated boards, plastic, marble or granite are additionally used. The wenge shade is especially popular.
What to pay attention to
In addition to the characteristics of the wood species, when choosing furniture panels, you should pay attention to the following:
- There should be no knots on the surface;
- Make sure there are no cracks with layers;
- If annual rings are visible, their arrangement should be uniform.
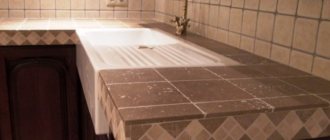
The surface of furniture panels must be smooth
Important! Some building materials stores offer services for cutting panels into finished parts.
Cutting furniture panels into kitchen unit parts
Creating Drawings
Before you make a kitchen set with your own hands from furniture panels, you need to create a drawing of the future kitchen. This can be a three-dimensional model created in a computer program, or an ordinary drawing on paper. What should be taken into account when creating a kitchen drawing:
- Wall height;
- Perimeter, the length of each wall separately;
- The width and height of each window and door opening;
- Detailed diagrams of pipelines, gas pipelines, electrical wiring, heating;
- Ventilation system location.
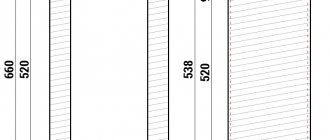
An example of a kitchen drawing for making it yourself from furniture panels
The drawing also marks the location of sockets and switches, a place for exhaust hoods, etc. For convenience, you can mark the direction of opening doors and window sashes. This is an important detail if you are going to place furniture near windows or doorways.
Important! If you plan to increase the kitchen area at the expense of a balcony or living room, you must obtain permission from the BTI.
What should be noted
Regardless of the type of panel kitchen layout, there are several areas that must be present in the drawing:
- Cutting table;
- Washing;
- Stove or hob;
- Storage systems;
- Fridge.
If the kitchen area is small, then when thinking about a furniture set made by yourself, you can combine several zones into one. For example, the countertop can be divided into two parts - a working part with a sink and a dining part.
How to calculate a kitchen with your own hands
So, all communications are marked on the drawings, as well as sockets and switches. Next, you need to think about the location of furniture and equipment. When installing a gas stove, keep in mind that it should not be further than 2 m from the gas pipe. The refrigerator and sink should be located at least 80 cm from the stove.
When choosing the height of shelves and cabinets for a kitchen made from furniture panels with your own hands, it is important to take into account the height of the housewife, as well as take into account all the nuances down to the leading hand. These seem to be little things, but they affect the comfort of work; these parameters depend on:
- Height of surfaces;
- Distance between bottom and top drawers;
- Location of door handles;
- Placement of sockets;
- Tabletop depth;
- Lighting.
Also, the drawing must indicate all the details of the kitchen unit, their quantity and dimensions. All cabinets, cabinets and shelves are counted separately. This should be given special attention, since the number of finished parts depends on the accuracy of the calculations. The slightest mistake and you won’t be able to assemble the kitchen yourself.
Work triangle
On the Internet you can find many design ideas, using which you can place a hob, sink, household appliances and all structures in a small room in such a way as to ensure the greatest convenience and functionality during use. In this case, it is recommended to adhere to some important rules that will allow you not to clutter the room with furniture and make it visually more spacious.
When arranging a kitchen, you should initially take into account the aesthetic preferences of the owners. You need to take a responsible approach to arranging the work area, because a lot of time is spent here preparing culinary dishes
Wall cabinets are made taking into account human height, furniture modules are placed around the room harmoniously and conveniently.
The working triangle has the following functional zones:
the main thing is working surfaces. This is a gas or electric stove, countertop, etc.
d.; kitchen space for long-term storage of various products in the refrigerator or freezer is also important; in the finishing area, fruits, vegetables, large and small dishes are cleaned of dirt; usually a sink or dishwasher is placed in it
Looking at the standards in the drawings, we can conclude: the distance between work areas cannot be more than two arm lengths. Only in this case will moving from the refrigerator compartment to the sink, countertop, back to the refrigerator, etc. be most comfortable.
While cooking, you have to repeatedly go to the kitchen cabinets for spices, food or equipment. Therefore, when installing furniture yourself, the height, width and location of sections should be carefully calculated so that each element is always at hand and does not violate the uniform aesthetics and functionality of the room.
Selecting a layout
When designing drawings for a kitchen with your own hands from furniture panels, you will also need to indicate the location of the furniture, that is, choose the most convenient layout option. The choice depends on the size and shape of the room, the frequency of cooking, the number of people in the apartment, etc. The photo below shows several options for kitchens made by hand from furniture panels, with different types of layout.
Linear
The simplest option for the kitchen, easily marked on the drawing, fitting into any room. All furniture and appliances are placed along one of the walls, which allows you to allocate a separate space for the dining area. There is only one drawback to such a kitchen layout made from furniture panels - an impractical working triangle, or rather the absence of one.
Corner
An excellent option for a kitchen made from furniture panels for small or elongated rooms. A set of household appliances is displayed along adjacent walls. In this case, the sink is often placed in the corner, which allows you to create a convenient working triangle with a stove on one side and a refrigerator on the other. Corner cabinets and cabinets are more spacious than straight ones, while in the drawing and in reality they look more compact.
U-shaped
This layout is suitable for spacious rooms, for example, a kitchen-living room. In this case, three walls are occupied at once - two parallel and one between them. Sometimes the set is placed only along adjacent walls, and the third side is placed perpendicularly. Usually this is a bar counter or tabletop. This technique allows you to divide the room into two zones - kitchen and dining room or kitchen and living room.
Island
Of all the types of layouts, this one requires the most space. Floor cabinets with a countertop are placed in the center of the kitchen area; in the most complex versions, they are complemented by a sink, stove, hood, minibar, etc. Storage systems and a refrigerator are located along the walls.
Important! When creating a drawing with such a layout, keep in mind that there should be enough space between the island and the rest of the furniture for comfortable movement.
Assembly of lockers
Before assembling cabinets with your own hands from furniture panels, number each part. For convenience, it is better to place them in the same place where the ready-made cabinets in the kitchen will be. The assembly order is approximately as follows:
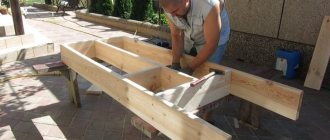
- Finished parts made from furniture panels are sanded, polished and coated with paint and (or) varnish before assembly. If you are making a kitchen inside and out with your own hands, you can apply ornaments to the facades using a router, decorate furniture legs, etc. It is best to carry out such work in the fresh air.
- First of all, the lower tiers are assembled, starting with the legs of the floor cabinets.
- Next, the sides are assembled from the furniture board. If they have retractable elements, you need to make markings for them and install guides. Self-assembled boxes are inserted into ready-made grooves. If there are ordinary shelves inside the cabinet, corners are installed under them.
- The sides are attached to the bottom of the frame using clamps. The parts are fastened with screws. However, be careful when working with the drill so that there are no through holes. The upper part of the cabinets is assembled according to the same principle.
- The back panel is made not from furniture board, but from thinner plywood. The part is cut out strictly according to the dimensions of the cabinet; if there are sockets or pipes behind it, additional holes are cut out for them.
- The last to be attached are the open facades. Door hinges are used for installation.
- Installation of metal fittings is the final stage.
You can watch the video in more detail about assembling a kitchen with your own hands from furniture panels.
Independent calculation of details for the kitchen
Well, let's get started. We already have a sketch of kitchen furniture (see “Creating a kitchen project yourself: Part II”). The only thing left to do is calculate the detailing of each element
To make it easier, I will make the necessary calculations right here, and you, based on the features of the project specifically for your kitchen and using the virtual cheat sheet I created, can easily calculate the size and number of parts needed for further assembly of the cabinets.
Important!
The lower kitchen cabinets are installed on plastic adjustable legs 100 mm high, which are subsequently covered with a decorative strip (plinth).
The first thing to do is number each locker
so as not to get confused in the huge number of parts during assembly. If there are elements of the same size in the kitchen, assign them the same numbers, so you don’t have to count twice.
How to arrange finished furniture
It’s not enough to assemble the cabinets and shelves with your own hands; they need to be placed in their places in accordance with the kitchen drawings. The assembly order is as follows:
- The outer cabinets are installed first. In this case, you should use a building level so that all the cabinets are level. Otherwise, there will be difficulties when installing the countertop. All sections are fastened with ties.
- Then the table top is placed and secured with self-tapping screws. Directly on it, with a pencil, mark the place where the stove and sink will be located. A hole of the required size is cut under them.
- When the lower tier with the countertop is ready, the upper cabinets with shelves made from furniture panels are hung on the kitchen walls.
- Household appliances and sinks are installed last.
Afterwards, all that remains is to insert glass or mirror parts of the facade, if they were planned. Then all that remains is to decorate the kitchen interior.
Assembling a kitchen with your own hands from furniture timber will not take much time if you have the proper skill. This approach to the kitchen interior will allow you to create an individual design, as well as a set that fully meets all the requirements of the household.
Kitchen cabinet for a built-in oven (calculation of details)
Details:
Sides – 500 x 712 – 2 pcs. Bottom – 500 x 568 – 1 pc. Shelf – 500 x 568 – 1 pc. Drawer: 50 x 500 – 2 pcs., 50 x 510 – 2 pcs.
The sides, bottom and shelf are calculated similarly to the previous cabinets
Please note that the box in which the built-in oven is planned to be installed does not have upper plinths, as they will interfere with both the installation of the oven and the insertion of the hob
The shelf on which the oven will be placed must be lowered 600 mm down relative to the countertop. That is, the clean opening here is at least 600 mm (it’s better to check the instructions for the household appliances).
Also, in this cabinet it is advisable to install a drawer in the remaining space in order to make maximum use of the resulting niche under the oven.