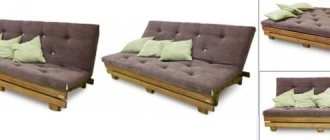
A practical guide for those who decided to independently assemble a wall slide purchased at a furniture store.
Thanks to the availability of the information provided and step-by-step recommendations, even an amateur can handle assembling a wall of furniture for the living room.
Usually, all purchased furniture is equipped with some kind of instructions, where all stages of work are perfectly described.
But, we decided to go a little further - and illustrate the main stages of working on a furniture wall, so that it would be easier for a novice furniture maker to assemble a solid structure from a mountain of parts and a bunch of accessories.
So let's get started...
Let's look at each step step by step:
Advantages of plasterboard niches
Plasterboard structures have long been firmly rooted in modern interiors. They are good for zoning and rational use of space, add individuality to the chosen style, and allow you to experiment with shapes.
A TV in a niche is at the same time impressive, neat, convenient and functional.
It has several significant advantages compared to classic cabinets! Unlike furniture, it does not take up space because it is built into the wall. You can make a plasterboard niche yourself, and it will cost less than custom-made cabinet structures.
The TV is recessed into the plasterboard structure, which means it won’t just hang in the middle of the wall and protrude forward. It’s easy to hide all the wires, built-in lighting and other communications inside the box.
The niche is more compact than hanging shelves and does not take up space on the aisle.
Shape, style, size, configuration, number and location of compartments, design - you can choose all this yourself. It is also easy to sew additional sound insulation into the drywall, and a working TV will not disturb neighbors or household members in another room.
Individual modules
Another option is to place separate modules, the so-called pencil cases, at some distance from each other. Usually they are placed to the left and right of the TV stand to complement it and create a furniture ensemble. Harmony in such a composition is created by a combination of open and closed shelves, horizontal and vertical, glass and blind doors. This technique with free-standing modules is suitable for large spaces and modern interiors, where much attention is paid to the geometric lines of the furniture.
Instagram @tonin.shop
Instagram @mebel_stavropol_lotus
Instagram @mebel_stavropol_lotus
Plasterboard niche for TV in the kitchen
Functionality always comes first in the kitchen, because it is the main workroom in any apartment. But a TV won’t hurt either, because it makes it more fun to do routine things and more enjoyable to spend time with your family watching your favorite films.
But when installing a TV in the kitchen, the most difficult thing is to choose a place.
It is important that it does not interfere, is not too close to the stove or sink, so that water and grease do not get on it, and that the protruding structure does not interfere with the passage.
Most often, the kitchen area is limited and not too large, so there is no talk of any cabinet cabinets. Putting the TV directly on the work surface between the food processor and the microwave oven is far from the best option, so a plasterboard niche comes to the rescue.
Materials required for construction
Of course, the dimensions and quantity of materials that will be used to create supports, stiffeners, railings, upper railings, steps and other elements directly depend on the dimensions of the homemade wooden slide for children. These details are clarified when choosing a play area project. To understand what materials may be needed, as well as what the installation and construction process will be, we took as an example a project for a children's slide with a slope of 3 meters and an upper platform of 50*50 cm.
List of building materials:
- Four wooden beams for creating supports measuring 100*100*1500 mm;
- Two wooden blocks, which will serve as stiffeners, measuring 20*40*500 mm;
- Two slats made of durable wood for fencing the upper platform measuring 30*30*500 mm;
- Two wooden beams for railings, dimensions 30*30*1500 mm;
- Four boards that will become connecting lower supports, measuring 20*100*500 millimeters;
- Five boards 25*100*500 mm to create a durable floor covering for the upper platform;
- 6-8 pieces of small boards that will become steps. Dimensions of lumber 25*100*300 millimeters;
- Two floorboards, moisture-resistant plywood or a factory-made plastic slide 3 meters long and at least 2 cm thick. This will be the slide descent;
- 2 boards 25*100*3000 mm, which will serve as ramp fencing.
Additional building elements for fastening are galvanized screws and anchors. If you need to improve the string of the stairs, then you should stock up on additional lumber.
Useful tips
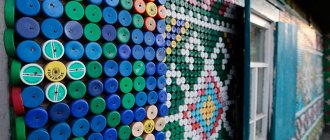
If you have a lot of time and a desire to make your niche original and unique, then a mosaic pattern will be the ideal solution.
Such work may take more than one week, but the result will definitely exceed all expectations.
There are several types of drywall. For any niche, first of all you need to choose a moisture-resistant option. You should choose the desired thickness based on the shape and dimensions of the niche, as well as the weight of the items for decorating the shelves.
When calculating the dimensions of a niche, remember that over time you may purchase another plasma of a larger size.
But even if the new technology does not fit into the existing “framework,” this will only be another reason to start a small construction project again and show imagination and ingenuity in a new style.
Don't be afraid to use wood for finishing. This will take more time than just painting or putty, but will add warmth and coziness to the overall picture.
If you use pieces of glass or mirror to decorate a niche, you must follow all safety precautions. It is best to use a thick fabric bag (or better yet, several) and a hammer for crushing.
Make sure that small fragments do not spread across the floor after finishing work. It is better not to allow pets into the room during finishing work.
Niche design options
When creatively designing this recess, it should not only have a stylish and original appearance, but also not conflict with the overall decor.
From plasterboard
A niche made of gypsum plasterboard has a truly attractive and fashionable appearance and allows you to give the space some volume. In addition, gypsum board does not require large expenditures, is quite easy to use and is durable, which ensures safety for the TV device.
With the help of elastic plasterboard, you can implement all kinds of design solutions and construct various decorative niches that give the interior a special uniqueness.
From laminate
Eco-friendliness and natural motifs are the latest trends in room decoration.
Thanks to a laminate that imitates the natural color of wood, it is possible to achieve a more intricate and interesting design for the recess with a plasma TV.
From stone
Decorative stonework is a natural object with an inimitable texture that becomes a wonderful addition to any design.
This finish allows you to add a certain rigor and reliability to the interior.
Made of wood
A wooden niche is a universal decorative find, which, due to its beauty and environmental friendliness, gives the atmosphere unobtrusive expressiveness.
Brick
Such stylish interior decoration allows you to create interesting accents in the room and, depending on its original or painted appearance, give the atmosphere brutality or relaxed naturalness.
By decorating a niche with the same wallpaper that covers the entire room, you can harmoniously combine the TV area with the entire interior and make it an integral part of the overall design.
Corner slide for the living room
If the living room is quite spacious in size, then you can make a corner slide, or place cabinets along two adjacent walls. They do not have to be placed close together: to give the room more air, it is better to place them at some distance from each other.
6 photos
Instagram @germann_design
Instagram @lenart_meble
Instagram @mmebelodessa
Instagram @mebel_stavropol
Instagram @tonin.shop
Instagram @evrostailmk
For dishes
If your home has a lot of all kinds of utensils - decorative vases, plates, figurines, then you can make cabinets with open shelves, thanks to which all this beauty will delight the eye not only of the owner, but also of the guests who come. Traditionally, dishes are placed in a sideboard with glass doors, so a wall-mounted wall can also be used for this purpose if you make glass doors and shelves in it. This option is perfect for any living room.
Instagram @interdesign_shymkent
Instagram @belorusskaiamebel
- Decoration
Making stained glass on a window in 5 steps: a simple method with video instructions
Mandatory requirements
Wooden interior partitions, first of all, should be as durable as possible, and secondly, they should preserve as much free space in the house as possible. It also happens that partitions are erected for the purpose of changing the purpose of the premises. Thus, it is prohibited to place a bathroom in the place where the neighbors have a kitchen below.
Zoning in general should be approached with caution and attention. For example, if your kitchen has only one natural light source in the form of a window, blocking it with a new wall located parallel to the window is prohibited. The base must be as strong as possible, since it is this that will support the entire weight of the partition in the house.
Niche design
Naturally, a unique niche design is selected for each room. You can find thousands of photos of TV niches made of plasterboard, differing in size and design. But all this diversity can be divided into three types:
When designing, you should strive not only to decorate the room, but also to use the space in the most functional way. Therefore, the TV shelf in most cases is complemented by harmoniously located additional shelves.
In any case, you must first draw up a detailed drawing of the future structure
. It is important to determine the size correctly. You can take an existing TV as a basis, but it would be useful to provide for the possible replacement of equipment in the future with larger ones:
The depth of the niche should be sufficient so that the device does not protrude beyond its limits. It should be taken into account that a gap must be left between the wall and the TV for ease of connecting various wires.
The protrusion of the socket is also taken into account.
At the edges of the TV or plasma panel, you also need free space of at least 10 cm wide. This will allow you to rotate the device if necessary, and it will be much easier to connect something.
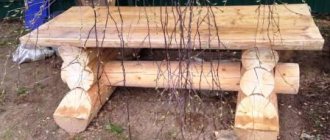
Construction stages
The process of building a durable slide for children can be divided into several stages. This includes preparation (of materials and installation location), installation of playground supports, flooring, production of a ramp, stairs and safety structures. All these stages are important; poorly performed installation work can reduce the operational life of the entire structure, as well as reduce the safety of use.
Preparing materials and space for the slide
First of all, you need to take care of the quality of the wood. It must be well dried, this will help to avoid deformation of the bars when using the slide.
This is followed by the stage of processing the lumber with an electric planer, which will allow you to quickly get rid of wood knots and nicks. After this, you will need to sand the wood and round the chamfers. The lower part of the beams is treated with a moisture-resistant material that prevents the wood from rotting, for example, resin or waterproofing mastic.
After this, you can begin to prepare a place for a children's wooden slide. The land will need to be thoroughly leveled , and then the zones where the supporting elements will be installed must be marked. The depth of the holes in the corners of the square should be at least half a meter. The lower part of the recesses is covered with crushed stone and sand.
Installation of supports and floor
The support beams are securely installed in the prepared location and then concreted. The structure can be strengthened using a “bundle”. To do this, small cuts-grooves of 2 cm are made in the racks, and a planed board is inserted into them, connecting the supporting elements to each other. Large screws or self-tapping screws are used as fastenings.
After the supports are installed, it is time to begin installing the floor of the top deck of the slide. Wooden bars of stiffeners are laid parallel to each other, followed by laying floor boards. It is worth making sure in advance that rainwater does not accumulate on the site; for this, a small gap (5-7 millimeters) is left between the boards.
Making the escapement
If a factory-made plastic ramp is used in the construction of a slide for children, then its installation will not take much time; you just need to screw it to the finished structure. When using lumber, the floorboards are fastened together, and wooden railings are mounted along them.
The floor of the upper platform is attached to the slope in several ways: by forming an acute angle (the optimal slope is 45°) or by cutting out grooves. An important point is to clean the wood forming the descent; it must be perfectly smooth. After sanding, the surface of the slope is coated with varnish or special paint.
To make a ramp, you can choose other materials, for example, slippery plastic sheet, galvanized steel, durable plywood, thick linoleum. Any of this material is applied to a wooden slide, which improves the sliding process as a child slides down the slide. To reduce the risk of injury to the children's slide, any irregularities and places where screws are attached are sanded and coated with special paints.
Installation of stairs and railings
The landing of a wooden slide built with your own hands must consist of at least several steps. The type of construction is selected individually; the ladder can be installed on a stringer or bowstring. The younger the child for whom the yard entertainment is being made, the smaller the march of steps should be. After this, you can begin attaching the fences, the size and height of which directly depends on the dimensions of the structure and the age of the children.
Applying the finishing touches
So, let's start finishing. The simplest and most economical finishing is gluing with wallpaper, the kind with which the wall is covered. You can choose the same wallpaper as in the rest of the room, then the design will merge as much as possible with the interior, or choose a different, contrasting color.
Painting the walls will be a little more difficult; in this case, the surface must be carefully leveled, since any roughness and ribbing will be evident.
Finishing with artificial stone is the most labor-intensive and energy-consuming. The tiles need to be adjusted and trimmed with a grinder; experience in handling them and compliance with safety precautions are required.
Artificial stone is attached using mounting adhesive or liquid nails. Several options of stone, laid out as your imagination allows, look original. A bas-relief can be created not only by a professional artist or sculptor, but also by anyone who has determination, patience and perseverance.
Any bas-relief is unique and inimitable in itself.
Before you start you need:
It’s worth thinking through and creating a life-size sketch in advance so that the sketch is combined with the rest of the design of the structure. A beginner should not take on large-scale paintings; a composition of flowers, fruits or the outlines of animals and birds will look quite original.
The final stage is the installation of the TV.
In accordance with the parameters of the TV, markings are made in the niche in the center for the bracket, which, as a rule, is included in the kit. Then, using self-tapping screws, the bracket is attached and the TV is hung on it.
TV mount
The simplest, but at the same time unreliable option is to simply install the TV on a shelf. However, if you move carelessly, it can easily fall. It is much more reliable to fix it on the wall using a special mounting plate.
But in a niche made of gypsum plasterboard it will be a little more difficult.
The fastening method must be decided at the stage of designing the niche. You can securely secure the TV in the following ways:
Then you can attach it using anchors.
How to create a niche for a TV from plasterboard
To make the structure itself you will need the following materials:
The first step is to create a sketch of the project: with dimensions, general design and location of the structure. Exactly according to the sketch, using a level and a marker, markings are applied to the wall, taking into account the placement of wires and sockets.
All lines should be parallel to each other, vertical perpendicular to the floor.
According to the applied markings, a profile frame is mounted, which, using a hammer drill and a screwdriver, is attached to the wall with self-tapping screws.
The niche acquires volume - vertical guides are attached, suspensions and lintels are connected.
Drawings of our users' work
The hero of the story told at the beginning of the article began his furniture journey by studying generally accepted standards.
Beginning home craftsmen can use the drawings that (in detail, with dimensions) were developed by users of our portal.
This is a popular type of chair in country houses, also known as a "throne".
Here is a comfortable rocking chair made of plywood.
Here is a creative recycling of inch board scraps left over from construction: 150 mm wide, 25 mm thick and 300-500 mm long. You could use them for firewood, or you could make stools! The photograph shows the design features of the product.
All this is work done at an amateur level, but here are the things done by a professional, FORUMHOUSE user with the nickname Woodworkers.
TV cabinets
When the living room requires a minimal amount of furniture and modern interior design, it is good to make long hanging TV stands and cabinets. They can be located parallel to the cabinet or asymmetrically, and include open shelves for glassware or decor. Such slides are suitable for the living room, where modern interior details are a priority.
Instagram @germann_design
Instagram @shemsne
Instagram @rimi.mebel
Instagram @styleville.mebel
Instagram @styleville.mebel
TV shelf made of plasterboard: photo and lighting installation
Lighting also plays an important role; it can also be a decorative element, an additional source of lighting and an opportunity to visually enlarge the space. When using lighting in a gypsum plasterboard niche, you need to take into account all the nuances: its brightness, shade of light, color scheme, direction and intensity of the light flux, as well as the reflectivity of the walls.
If the design provides lighting, we proceed to installing the lighting fixtures.
Light sources can be:
Atypical shape
The simplest and at the same time effective way to turn shelves into interior decoration is to frame them with some geometric shape.
If you want to maintain maximum functionality, choose a hexagon shape. This design allows you to use up to 4 horizontal storage surfaces, while creating interesting geometry.
This shape follows the shape of a honeycomb, so combinations of several shelves look especially interesting.
No less visually interesting designs are obtained from triangular shapes.
Don’t be afraid to experiment by placing shelves of different shapes next to each other, putting them together like a mosaic.
At first glance, round framed shelves are much more difficult to make yourself. But round-shaped kitchen items are perfect for these purposes, especially if for some reason they are not used for their intended purpose.
For example, a sieve. What else? Our master class is about this at the end of the article.
Installation of the frame and covering it with plasterboard
Guide profiles are attached. They are attached to concrete surfaces using dowel nails, and to wooden surfaces using wood screws. The use of damper tape is mandatory.
The fastening pitch should be 20–25 cm.
If you need to bend the profile, you should cut its side flanges with metal scissors, after which it will easily take the required shape.
Vertical posts are inserted into the guide profiles. They can be secured using “fleas” - small metal screws. But it’s better to use a cutter: the screw heads can prevent the drywall from fitting tightly to the profile.
The rough finishing of a niche is no different from the standard finishing of plasterboard structures: the surface of the assembled niche is primed and puttied, joints and corners are reinforced with reinforcing tape, and the outer edges are reinforced with perforated corners.
After the putty has dried, finishing work can be carried out according to the chosen niche design.