Drawings and assembly diagrams with dimensions
There are several options for drawings and diagrams for assembling a kitchen corner with your own hands. You can find ready-made instructions on the Internet - then you will have to completely adapt to all the recommendations. You can also draw all the details on the diagram yourself, taking into account individual characteristics.
There may be many reasons why you want to make a sofa corner yourself, but the primary one is savings.
It is necessary to display the parameters and dimensions of each design component as accurately as possible. All figures are indicated in footnotes. If everything is done correctly, the assembly process will be much easier and faster.
It is necessary to make drawings of the future project, which reflect all dimensions, from the height of the structure to the width and length.
If the finished circuit does not have an independent module, it is not recommended to choose such options. Significant difficulties may arise in subsequent stages. If the corner is connected with a simple seat, the furniture will not last long. Possible rapid breakdown. There must be at least several racks that will provide reliable fastening. Then the frame will be stronger and more protected.
All diagrams must be written out thoroughly. This is important: this way there will be no errors when assembling and connecting parts;
If you use separate modules, it will be much easier to change the design by moving it in different directions, which will open up more options for arranging furniture in the room. Different diagrams help you choose different options for the location of finished furniture depending on the parameters of the room.
All accurate data and indicators must be recorded in the drawings. The dimensions and dimensions of the furniture should also be indicated in the footnotes.
To choose the correct dimensions of the product, it is necessary to take measurements of the room. After this, the results are plotted on the drawing. It is important to balance the proportions and choose the optimal arrangement of all the furniture.
Preparation before assembly
To make the kitchen corner look neat, its wooden parts are sanded, and the outer edges, after trimming, are covered or varnished. Materials such as fabric and filling will require tailor's scissors; regular ones are inconvenient and cut unevenly.
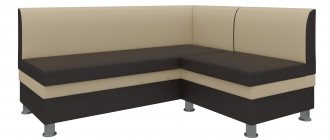
Kitchen corners are often made with shaped supports and a backrest.
Marking of furniture fasteners is done using a pencil and a ruler. The kitchen corner should not only be stable, but also comfortable. Calculate the length of the main seat and the additional (short) part. Their ratio is usually 3:1 or 3:2. This is the simplest model, consisting of 2 placement sites. You can make a more complicated version, then the ratio of the parts will be 2:1:1, 2:1:2 or 2:2:1.
The lower part must be made through so that the legs can be moved freely.
The master must remember that the quality of the finished product depends on the sequence of actions. You should not rush, but think through everything carefully.
The kitchen corner is made with a base on beams with slats or thick plywood. It should be dense, not loose. You can also use chipboard.
Non-staining upholstery materials are used for kitchen furniture. Choose an easy-to-wash fabric that won't streak while you care for it.
One of the decor options - a corner with a glowing table - is created using luminescent and polyurethane paints.
Room calculation
The kitchen corner is a stylish and multifunctional piece of furniture. To choose the right location for furniture in the room, you need to consider the following recommendations:
- It is important to think through the design and choose sizes that fit into the overall environment. Everything must be done in the same style. You can view photographs of ready-made solutions, find suitable diagrams and drawings.
- It is better to choose the simplest designs that are easy to make yourself. To increase the functionality of the furniture, you can build in drawers for storing things. More complex options allow you to use a corner for entertaining guests or even as a sleeping area with the right layout. This will require considerable investment.
- It is important to consider the direction of the corner - it can be right-handed or left-handed.
- For cladding, you should use high-quality materials that are easy to care for. For soft padding, you can use foam rubber or polyurethane plates.
According to the drawn up drawing, taking into account all the features, it is much easier to carry out the work. Then you will be able to create unique furniture that no one else has.
If you want the life of the sofa corner to be as long as possible, you need to choose classic filling and upholstery.
Required Tools
So that during the assembly process you do not have to be distracted by searching for the right item or material, you need to take care in advance of what may be needed for manufacturing. The master will need:
- hammer;
- jigsaw;
- drill or screwdriver;
- roulette;
- accessories;
- stapler;
- glue;
- sewing machine;
- stationery knife;
- anti-stapler.
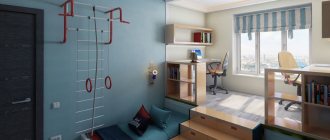
The nuances of placing corner furniture for a small kitchen, photos of interiors
The last tool is optional. With its help, it will be easier to remove failed sections of the upholstery, if there are any, but you can also do without it, which cannot be said about everything else. When assembling a kitchen corner, this minimum of tools is required.
What materials and tools are needed
To make furniture, you need not only to decide on the drawings, but also to select materials. You also cannot do without specialized tools for assembling the structure. To make a sofa for home use you will need the following materials:
- timber or layer of wood;
- array for finishing;
- plywood for arranging the side and bottom;
- foam filler for making upholstered furniture;
- fabric for covering - you can use different options.
To make a product according to step-by-step instructions, you must use the following tools:
- hammer;
- scissors and knife;
- screwdriver;
- drill;
- grinding machine (if available);
- corner for measuring;
- roulette;
- bit;
- jigsaw
To assemble high-quality furniture, you will need not only instructions for use with a brief action plan, but also certain tools and materials.
You will also need small fastening elements - screws and nuts. Hinge elements, bolts, nails and other fittings are required. For folding structures, you will also need to provide a certain type of fastening.
Small accessories require confirmants and screws, measuring 0.4 by 2 centimeters, 0.4 by 6 and 0.4 by 8 cm.
To create a high-quality frame from chipboard, it is recommended to contact a workshop. There are special tools with which you can make a reliable and durable structure according to an individual drawing.
Note! Some elements can be prepared for processing yourself. Various homemade shaped parts can be easily made using available materials.
Upholstery and upholstery
Before assembly, the sofas need to have their backrests and seats completely covered, and the corner seat parts also require backrest segments separately. We will talk about covering and assembling the corner of the kitchen corner later, but for now we will limit ourselves to sofas.
Holofiber, which is excellent for interior furniture, does not fit well in the kitchen; in the local microclimate it is not particularly hygienic. The soft padding of kitchen furniture is made from low-permeability foam rubber of the EL2240, EL2540, EL2842, EL3050, EL3245, EL3550 and EL4050 brands. The first 2 digits characterize the hardness, and the last 2 indicate the density in kg/cubic meter. m. The load-bearing capacity within this range increases from 60 to 120 kg per square meter. m, this means that this material is able to withstand such weight indefinitely, completely straightening when the load is removed. Foam rubber EL2842 is universal; lower brands go to the backrest, EL3050 and EL3245 to the seat, and EL3550 and EL4050 are intended for furniture in public buildings or for particularly heavy riders.
The thickness of the foam layer is 20-40 mm. It is recommended to cut this evenly with a heated nichrome thread. It’s not difficult to make a machine for cutting polystyrene and foam rubber with your own hands, but it’s still extra work. In addition, for the machine to be safe, the thread must be powered from a 12V 5A power source, and this is more serious work or a significant waste of money. However, cutting pieces of foam rubber with fairly even edges can be simpler:
- A steel bench ruler is taped along the cutting line;
- The cut is carried out with a new, absolutely sharp mounting knife in several steps along a ruler;
- For the first cut, the blade is extended 5-7 mm, and the knife clip rests on the ruler. Take a closer look at your knife - the end of its clip is at an angle, this is just for such cases;
- For subsequent cuts, the blade is advanced further by the same amount until the entire layer is cut.
Covering the kitchen corner seat with foam
The seats of the kitchen corner are covered with foam rubber with a fold along the front edge. For the hem you need to give an allowance of 2-3 times the thickness of the board. Sheets of foam rubber for the backs are cut exactly to the size of the base. The foam rubber is glued with 88-grade glue, the folds are glued last. If the seat has a stem, then before gluing it is better to round its front edge, and give the foam allowance equal to 4-5 times the thickness of the board, see fig. on right. It will be much more comfortable to sit on such a seat.
tight fitting
Conventional upholstery fabrics are rarely used in high-quality kitchen furniture, because... quickly become saturated with fumes and get dirty. Leatherette is more hygienic, but sitting on it in the heat is unpleasant, and installing air conditioning in the kitchen is not advisable for many reasons. It is best to cover the kitchen corner with flock or microfiber.
Flock is available in plain and colored, smooth and embossed, on the left and in the center in Fig. Dirt becomes entangled in its fibers without migrating back, and is removed during mandatory regular cleaning at least once every 2-3 months. Flock upholstery of kitchen furniture lasts up to 10 years or more.
Covering the kitchen corner with flock and microfiber
Microfiber works on the same principle, but its fibers are regular plexuses of the finest fibers. Microfiber seems to draw dirt into itself and hold it firmly; This material was originally developed for cleaning optical glasses. Microfiber is available only in single-color, modest colors (on the right in the figure); does not require maintenance at all times of use. Unfortunately, this material is expensive and lasts no more than 3-5 years, and then you need to completely change the upholstery: microfiber cannot be cleaned, because... in this case, its structure is disrupted.
Fasten the flock and microfiber upholstery as usual, using a furniture stapler to the underside of the base. The folds at the corners are glued with 88-grade glue: the fold is turned away, glue is dripped onto the fabric adjacent to the base, left until tack-free, and the folded fold is pressed. There is no need to glue PVA, it can cause stains visible from the outside.
Assembly
Assembling furniture using corner clamps
Before final assembly, thrust bearings are placed on the legs of the sidewalls. Any board as wide as thick will do, but it’s still better to use round ones with threaded or dowel heads instead of those recommended by the authors of the original design: there will be fewer nooks and crannies for dirt to accumulate. Dowel bearings are cheaper than threaded ones, and they are easier to install: holes are drilled in the edge of the leg for dowels (6 mm in this case), and the bearings are simply pushed into place.
How to assemble homemade box-panel furniture without distortions, cracks and without using complex production equipment, this is, as they say, another question. In this case, you cannot do without a pair of corner furniture clamps, see fig. on right. Welding corner clamps with a common clamp are not suitable, they cannot accurately bring together the parts to be connected, but with the help of furniture clamps this is not so difficult:
- They put dowels in the children. 4 in the drawing, lightly tapping with a rubber hammer or mallet;
- One of the sidewalls (part 1 in the drawing) and the back wall of the chest (part 4) are tightened with clamps so that the edge of the part. 4 entered the contour marked for her on the underside of the child. 1;
- Drill holes for confirmations and screw them in;
- Without removing the clamps, they place the children on the dowels. 3 – bottom of the chest;
- The upper clamp is removed and moved to the far corner of parts 3 and 4;
- Connect parts 3 and 4 (with additional drilling of holes for confirmations). The clamp from their corner is immediately removed, otherwise it will remain in the sofa;
- Remove the remaining clamp (don’t forget!), put the child. 5 (lower backrest brace) and attach to det. 4;
- They put children. 2 – façade of the stall;
- Attach the second side panel without screwing the confirms all the way. You just need to bait so that the dowel heads fit slightly into the holes;
- Assemble the backrest (inset at the bottom right in the figure with drawings) and put it in place, then pushing the sides of the backrest apart. The confirmations on the 2nd side are holding up;
- The seat is hung on piano hinges, see below.
Here a possible question may arise: why use clamps if there are already dowels? The dowels are not guides, they do not hold the angle and can break during hanging. Taking into account the fact that marking and sawing were done by hand, it was impossible to do without clamps. Conscientious professional furniture assemblers use clamps with all their might, but why do we need to hack around for ourselves?
Seats
In our case, it will not be possible to place the seats on dowels with rounded heads, because The façade of the stall is slanted. If you limit yourself to dowels on the edge of its rear wall, they will quickly break out even if you carefully remove the seat cover. The seats of the sofas in the kitchen corner are hung on piano hinges, but it’s not worth taking 1-2 long ones (item 1 in the figure): it’s difficult to hang the lid of the chest on these so that it lies in place evenly and does not warp when folded back, without special equipment. You need to take 3-4 short loops for fastening in a row, pos. 2. Loops for fastening with a zigzag (item 3) are not suitable - how to attach them to a 16 mm board? The same applies to card loops, pos. 4, strongly recommended by a number of authors.
Hinges for hanging kitchen corner seats
The wings of the seat hinges should be as wide as the thickness of the board. First, the hinges are placed on the seat, aligning the edges of the wings along the bottom edge of the board along with the upholstery. Then an assistant is needed: he will hold the seat, and the master will align the edge of the wing of one of the outer hinges with the lower edge of the board of the lower backrest screed (detail 5 in the drawings) and attach a pair of screws, not reaching them all the way. Then the other outermost loop is attached in the same way, and after that the rest are fastened to full tension and the outermost ones are pulled out. The assistant keeps the seat reclined all this time.
Frame
To create a frame, it is necessary to properly prepare the supporting structure. The functionality of the finished product depends on this. You can use chipboard or natural wood. The first option is cheaper and more accessible, the second is durable.
Chipboard can be cut in special workshops. This creates a high-quality furniture frame.
Note! For beginners, it is better not to use natural wood, as there is a chance of ruining the expensive material.
What tools are needed?
To assemble furniture you need the following tools:
- screwdriver;
- hacksaw;
- stapler with staples;
- jigsaw;
- pencil;
- ruler or caliper;
- roulette.
In the kitchen there should be no fumes from the resins that are part of the chipboard, so a coating is required or neutral laminated chipboard or wood is selected.
Wooden parts are processed with a jigsaw - rounded, shaped, etc.
Upholstery
A soft sleeping or kitchen corner is a functional decorative element. For upholstery, it is better to use materials that are easy to care for. A popular option is a high-quality leather substitute.
The choice of upholstery depends on the location of the sofa in the kitchen: the closer it is to the sink or stove, the coarser and stiffer the fabric is needed.
How to make a kitchen corner with your own hands
Below is a detailed plan on how to make a corner consisting of two sofas: an elongated and a shorter one, and a third part - located between the sofas, located in the corner part. Drawings and schematic images are made with all parameters and in section. This article will tell you about sliding doors to the kitchen.
The soft corner should be comfortable and roomy, accommodating at least 3 people.
From chipboard
This is the material that is most often used for self-made furniture, including cutting tables. It is affordable and represents a budget option. Read about removing stains from towels here.
Selection of materials according to schemes
Chipboard and plywood are used to make the frame, and materials that are affordable and of high quality are used for upholstery. Here are some of the most commonly used options:
- Synthetics . These fabrics are very durable and easy to care for. The cost is quite affordable, cleaning is carried out quickly and efficiently.
- Faux leather. The material does not absorb moisture, which is important in the kitchen. Maintenance is also easy: just wipe with a damp sponge and then wipe dry.
- Microfiber. An ideal option in the kitchen, the material is very resistant. If you make the upholstery from it, the kitchen corner will last a very long time.
It is necessary to select a filler for the upholstery fabric. The most inexpensive is foam rubber. But if you want the shape of the sofas to remain normal for a long time, it is better to use polyurethane, which has a better fiber structure. Its cost will be a little more expensive.
Tools
You should first stock up on the necessary materials and tools. It is recommended to make a list so that later everything you need is at hand. Below is a list of important tools.
- hammer;
- roulette;
- set of drills;
- drill;
- scissors;
- jigsaw or hacksaw (required for cutting sheets of plywood or chipboard yourself);
- metal corner;
- glue;
- edge for end processing;
- fasteners (confirmations, dowels);
- stapler (special construction);
- furniture bearings;
- loops for fastening seats.
The first step is to cut the plywood or chipboard.
Manufacturing
It is recommended to start with a long, cozy sofa. Two types of chipboard are used: polished chipboard is used to make the seat, backrest, niche, and also the stop strip. The remaining components are made from laminated chipboard. The elements are made one piece at a time, and there should be 2 sidewalls. The parameters are taken from pre-prepared schemes. This link will tell you how to choose the right knives for the kitchen.
Scheme of a long sofa
After preparing the parts, assembly begins.
- In the areas where fastening is planned, it is necessary to make marks with a pencil, and then drill holes in these places.
- Edge parts should be glued to the end parts of the sidewalls. This way they are closed.
- Prepare self-tapping screws and use them to attach the thrust bearings where the end parts meet the floor.
- Then you need to assemble a niche. All parts of the niche (walls, bottom) are connected to each other. This is where deferred confirmations come in handy.
- Take the pre-prepared sidewalls and fix the niche on both sides.
- The seat bar is fixed to the wall of the niche. Dowels will be needed.
- The seat is hinged as it rises. You can put things you need in the kitchen in a niche.
- The backrest blank is also fixed using dowels.
- Next, the upper bar is mounted, and the lower, persistent one is mounted below. Two metal corners will come in handy here for reliability.
We can assume that the long sofa is assembled. The next stage is upholstery. You will need to cut 2 pieces of foam rubber. For this, a nichrome thread is used, which will help to cut smoothly. If the thickness of the material is small, less than 5 cm, then a knife will be enough. This material will tell you which laminate flooring is best for the kitchen.
The back: the width needs to be 4 cm larger, the length should be left equal to the chipboard.
It is important that the end parts are covered with filler; wood glue will help fix it.
Seat: the length is several centimeters longer, the front end part should be covered. The width is equal to the parameters of the chipboard sheet.
Seat bar
Then you should cut out the upholstery. Its dimensions should allow the foam rubber and chipboard to be completely covered. Leave enough material inside to staple the fabric. Place the staples at intervals of 2 cm.
The material must be tensioned first on the planes, and only then fixed on the side end parts. It is important that the fabric does not wrinkle or sag, but is stretched evenly on all sides.
Short sofa
Again, as with the long sofa, the pieces are cut out first. The dimensions indicated in the drawings should be strictly followed. The type of chipboard (laminated or sanded) is selected in the same way as in a long sofa. The assembly is the same.
In the same way, the sidewalls are made in quantities of two pieces, and the remaining parts are made in a single copy.
Connecting part
Corner strip
Back
This is the most important, third part, connecting the long and short sofas. The thickness of the chipboard must be at least 16 mm. From it you need to cut two strips for the backrest, then a blank that will be mounted at the seat level. Next, you need to prepare a part of the backrest in the shape of a trapezoid (located in the center of the kitchen corner). Lastly, the side parts of the back are cut out.
Seat
The assembly steps are as follows.
- The central part of the backrest is attached to the side parts of the backrest using dowels and confirmations.
- Two stop strips are attached to the backrest. You will need metal corners and dowels for secure fixation.
- The prepared central structure should be carefully connected to the side panels of the long and short sofa.
- Then, by analogy, the seat should first be covered with foam rubber, and then the material should be stretched and secured with a stapler. The staples are fixed at a distance of 1 - 2 cm.
At the final stage, it is important to securely fasten the central connecting part of the kitchen corner. Metal corners and confirmations are mandatory for stability. After fixing them, the kitchen corner is ready for use.
With storage drawers
The design is not semicircular, but consists of two connected rectangles.
This version of the kitchen corner will not seem so complicated, but it will suit a certain style, for example, minimalism, very well. Moreover, it is easy to make. You will need plywood (thicker, about 18 mm) or furniture sheets.
After constructing the frame, the parts can be painted in a shade that matches the rest of the furniture and upholstered. Decorative pillows will add coziness.
Materials and tools
You will need the following:
- a hand saw or jigsaw for preparing parts;
- self-tapping screws;
- nichrome thread;
- foam;
- pencil;
- roulette;
- upholstery material;
- loops;
- drill;
- drill;
- paint (water-based);
- brush;
- primer;
- metal corners;
- plastic bearings.
Cutting parts according to drawings
Unlined frame.
- You should draw up drawings and use them to cut out parts from furniture board or thick plywood. You can use a hacksaw or an electric jigsaw. The tool must be held at a right angle.
- Initially, the base of the corner is assembled: the bottom is attached to the front part, then the back wall is fixed.
- It is necessary to attach a transverse bar in the center, which will not allow the structure to sag under the weight of the body of sitting people and will not lead to cracks in the material. From the inside and front side it forms an angle of 90 degrees.
- Then the side parts of the sofa are attached.
- Sofa No. 2 is made in a similar way.
- To make a corner in the shape of the letter “L”, you will need self-tapping screws, which fasten the 2 sofas together.
- Next, the backrests are fixed from the back of each of the sofas. And in the junction zone they are connected using confirmations. For reliability, metal corners are used.
- You should mark in advance with a pencil the places where the fasteners will be, and then just screw in the screws.
The drill must be 0.5 mm smaller than the diameter of the screws.
Lastly, the covers (seats) are attached using hinges.
Assembly
If you choose the painting option, then experts recommend using acrylic paint, which lasts a long time, does not wear off, and is easy to care for. It does not allow moisture to pass through, which is very important for this room.
You can cover furniture sheets or plywood with stain, paint or varnish. But it is very important to prime it before doing this and let it dry to protect the wood from rotting processes (in the kitchen there is often a high level of humidity).
Only after complete drying should you begin to assemble all the parts together. Lastly, the covers (seats) are attached using hinges.
Then you can start upholstery. It will be enough to make special pillows. To do this, foam rubber is first cut to fit the size of the seats, and then covers are sewn from the material and stretched. They can be removed and cleaned when dirty. And the foam rubber changes over time to a new one. As an alternative, you can cover the covers with additional fabric.
Made of wood and boards
If you have boards available, you can make a very simple but convenient version of a kitchen corner from them. And chipboard will be needed for the walls of the drawers under the seats.
Cutting parts: what materials will be needed
- boards;
- chipboard;
- stapler;
- roulette;
- scissors;
- foam;
- upholstery fabric;
- hand saw or jigsaw;
- sandpaper;
- drill, attachment for it – “crown”, diameter – one and a half centimeters;
- dowels;
- batting;
- glue;
- varnish;
- brush;
- pencil.
A detailed drawing is not necessary here, since they are based on the kitchen area. After the blanks you should get the following number of parts:
- stand – 3 pcs.
- leg – 2 pcs.
- cross piece for a long sofa – 3 pcs. (same) + 2 more;
- transverse part for a short sofa – 5 pcs.
- bars for sidewalls – 4 pcs. (2 on each side).
All prepared parts must be cleaned of debris and sanded well. First, apply coarse sandpaper. Gradually you need to switch to medium and small.
Frame diagram.
Then you need to take a drill with a “crown” attachment and make holes for the dowels. All components of the wooden frame are secured with 2 dowels. The drilled holes must be coated well with glue, and then the dowels must be driven in and pressed.
It is very important to fit the elements to each other at right angles to avoid distortions; a hammer will help to drive in the dowels. Internal corners also need additional strengthening; for this, a metal corner is used.
Varnish or stain coating
It is recommended to paint the parts with varnish or stain. But if stain is used, then you need to go over it with sandpaper again, so as not to subsequently drive in a splinter due to the raised fibers.
Assembly and upholstery of the sofa
The bottom of the drawers on the inside, at the bottom, must be secured with a metal corner. Next, you need to cut 2 sheets from the chipboard and lay them down on the frame (you get the bottom of the box). The sides and front sides are also divided. The seats need to be a few centimeters larger to fit well on top of the boxes.
Covered with fabric.
Seat installation
The chipboard needs to be coated with glue and the cut foam rubber should be placed. Lay a layer of batting on top, as when decoupaging a stool, you need to fix everything with a stapler. After this, cover it with furniture material. The corner is ready.
Choosing color and decor
When choosing colors and decorative elements, you should start from the overall style of the room. It is better to choose upholstery that will match or contrast with the overall design, creating a highlight.
You can add decorative elements to the furniture itself, depending on the overall design.
Note! Depending on the overall design of the kitchen or other room, you can supplement the structure with additional functional elements - drawers, bedside tables, shelving. You can create accents using different colors.
Since the corner type of sofa, first of all, saves space, when placing it, you can focus on the location.
Corner assembly process
The manufacture of furniture such as a kitchen corner requires accuracy and precision in calculations. Due to the composite design, the slightest misalignment can affect the stability of the product. Let's consider the simplest two-part model.
- Prepare the support panels. The sides also act as parts of the back. It is recommended to immediately make thrust bearings.
- Connect the back panels and the main and side supports separately. Take universal glue, lubricate the seats with it and attach the foam rubber (sintepon), wrapping it at the bottom. Press for a few minutes (you can put something weighty).
- Glue the filler to the back and let dry thoroughly. Trim the excess flush with the side.
- Stretch the upholstery fabric and secure it with staples to the panels, first folding the edges of the material.
- Secure the seats on the main and side parts with hinges so that you get an even angle. To do this, move the long element to the same distance as the short one.
The kitchen corner can be made of three parts. The assembly sequence is the same, only before this you need to make an angular insert (90 degrees), and then secure all the parts. This process is quite labor-intensive; it is important to maintain dimensional accuracy in order to fit the remaining parts without gaps.
Marking of furniture fasteners is done using a pencil and a ruler.
You can also make a modular corner. This does not require the pieces to be secured to each other, but simply placed side by side. This is convenient when guests come and you can move one of the seats to the other side of the table.
The wood will require careful processing and sanding to avoid burrs and protrusions or indentations from cut branches.
The rear racks may not be used if the weight of the occupants per area is 50 square meters. cm is assumed to be no more than 100 kg.
To make the kitchen corner look neat, its wooden parts are sanded, and the outer edges, after trimming, are covered or varnished.
Step-by-step instructions for making a kitchen corner
To make furniture yourself, you should follow these recommendations:
- Make drawings. All measurements are taken in advance to allow the furniture to fit most organically into the interior.
- Assembly of the frame and modular part from solid wood or chipboard.
- Formation and fastening of upholstery from the selected material - for example, foam rubber.
- Manufacturing of covers according to drawings. Fastening the fabric to the foam using tools.
- Manufacturing of parts for fastening various corner elements.
- Fixation of all fastenings.
To make a kitchen corner with your own hands, you don’t have to be a professional.
Anyone can do the job. After following the step-by-step instructions, you will become the owner of unique furniture. To create a high-quality corner sofa, you must follow all the tips.
The combination of different upholstery fabrics also looks unusual and is acceptable for “rustic”, natural designs.
Selection of materials
A kitchen corner made by yourself should be practical, comfortable and attractive. These properties largely depend on the chosen material. In the old days, furniture was made exclusively from wood; today there are other options.
Frame
First of all, the frame of the kitchen corner is made - a supporting structure on which all other elements are fixed. The configuration, strength, and capacity of the product depend on it. To create kitchen corners with your own hands, natural wood and chipboard are suitable. It is worth first assessing the features of each material and the nuances of working with them:
- Chipboard is the cheapest and most accessible option. The advantages are that it is environmentally safe and reliable. Difficulties in working with chipboards arise at the cutting stage. In production, the procedure is carried out using special machines. At home, work is often done with a jigsaw, which can lead to the formation of uneven edges and chips. Moisture gets into the damage, causing the sheets to swell and become deformed. To prevent troubles, you will need special edges attached to the saw cuts.
- A wooden corner is characterized by durability, strength, resistance to wear, and environmental friendliness - these are advantages. When working with the material, it is necessary to strictly follow the drawings, and before assembly, treat the panels with special compounds that prevent rotting.
The best species for making furniture yourself are linden, fir, birch, and pine. They are the softest, easier to process and assemble. If conifers are used, it is important to take into account one more nuance - they must be thoroughly dried so that the resin does not release.
Natural wood is one of the most expensive materials, so it is better for beginners to train on simpler and cheaper raw materials. Chipboard will do.
Chipboard
Natural wood
Upholstery
A soft corner for the kitchen is not only functional, but also a decorative element of the decor. To create upholstery, you can use various fabrics, the color and design of which should be combined with the interior:
- Tapestry. Dense textiles, resistant to wear and mechanical damage. It comes in a wide variety of colors, lasts a long time, and looks presentable.
- Velours. Quite durable material with short pile. It looks beautiful, but over time it can wear out and lose its attractiveness and requires special care.
- Flock. Often used in making kitchen corners with your own hands. The reliable, beautiful fabric withstands mechanical stress and is waterproof, making it easy to clean off dirt.
- Jacquard. Luxurious material, pleasant to the touch, but has significant drawbacks. It wears out quickly and loses its original appearance; stains from the surface are difficult to remove.
The most popular type of upholstery for kitchen models is considered to be high-quality leatherette. In structure, properties and appearance, this material is practically no different from natural material, but the cost is several times lower. It also has some disadvantages: lack of breathability, susceptibility to mechanical stress. When upholstering furniture, it is better to choose thick fabrics; thin ones can quickly become cracked and torn.
Tapestry
Velours
Flock
Jacquard
Leatherette
Photos of 50 design options for kitchen corners in the interior
Features of kitchen corner sofas
The main feature is its shape. The sofa includes 3 parts: short, longer, curved in the form of part of a circle. Some sofas consist of 2 or 4 modular parts. They include additional ottomans and tables. Functionality depends on additional equipment. There may be space under the seat, shelves in the armrest, drawers.
A sleeper sofa turns the kitchen into an additional bedroom.
You can use curved armrests or backrests or “play” with the depth of the seat.
See also: DIY kitchen furniture: drawings, diagrams, photos.
Kitchen sofa upholstery
Upholstering a sofa yourself is quite simple. The work is carried out in several stages:
- Using a painting knife, blanks are cut out of foam rubber exactly to the size of the seat and backrest, and fixed in the right place with special glue. You should not fix the foam rubber with a stapler - this will disrupt the smooth surface and damage the material.
- The fabric is laid face down on a flat surface. An inverted piece of furniture intended for processing is placed at the top center. The size of the fabric blanks must exceed the size of the base to compensate for the height of the filler and the bending of the material.
- Pressing and slightly pulling the upholstery, the edges are fixed with staples using a furniture stapler. If the surface is smooth, without distortions or folds, secure it around the entire perimeter.
- To hide the uneven edges of the fabric, a fiberboard panel is screwed onto the surface.
If the kitchen sofa is completely covered, thin synthetic padding is used instead of foam rubber on the side parts.
Why do you need a sofa in the kitchen?
Despite the fact that the sofa in the kitchen takes up quite a lot of space, it will definitely meet any expectations. This is not only a place for comfortable accommodation of guests and household members. This interior detail will add coziness and comfort, allow you to embody creative ideas and turn an ordinary kitchen into a living room or dining room. In addition, a do-it-yourself corner sofa for the kitchen can be used for quite practical purposes.
A kitchen sofa is a practical and comfortable solution.
The advantages of interior designs are as follows:
- Can be used as a main seat or as an addition to chairs.
- Used as a sleeping place. It is advisable to install a small sofa with a folding structure, but you will have to sacrifice pull-out cabinets.
- You can separate the dining and work areas, but this is only suitable for a spacious kitchen.
Modern layouts provide kitchens with a fairly large area, but even here the sofa will fit well into the interior.
In any case, a kitchen with a sofa will never be standard, and the interior will never be monotonous. When choosing a model, you should take into account the ease of transformation, practicality, reliability and attractive appearance. It is better to make such a sofa for the kitchen with your own hands, according to your own taste and budget.
You can make with your own hands exactly what fits perfectly with the existing design.