April 20, 2016
Averyanova Sveta
Little children love to get dirty, tinker with loose materials, create fantasy images, and devote themselves entirely to the creative process. Combine your child's hobbies into one whole and you'll get drawing in the sand.
Surely you yourself watched in fascination such performances on TV, watched gorgeous animations by famous world authors. Try repeating the show at home with your child. And our article will tell you how to draw with sand on glass and how to teach your child to make sand compositions.
What is the benefit of this activity
American cartoon director Carolyn Leaf presented an interesting idea to teachers and parents on how to organize children’s leisure time and develop multidirectional skills at the same time.
She created a sand video. The heroes came to life and acted on the luminous board. The artist painted them with her fingers using sand. The idea was picked up by other animators. The method of creating images and plots has been highly praised.
Gradually, drawing on a special board with sand came into the lives of ordinary people. Teachers began to practice such classes with children of different ages. The fascinating method of pedagogical work was studied from the point of view of psychology, physiology, and didactics. Teachers and preschool educators who practice innovation have noticed the following beneficial properties of such activities:
- Drawing with sand on glass is fun and interesting. 99% of children receive a charge of positive emotions during the lesson and entertainment.
- The method has no special rules. The baby can draw with his palm, one or more fingers, create any shapes and erase them quickly if something doesn’t work out.
- The absence of restrictions relieves emotional stress. Children are relaxed, moderately excited, and feel like the creators of a unique masterpiece.
- Motor skills develop. Kindergarteners are tired of plasticine and pencils; practicing finger dexterity with a light tablet and sand is no less useful. Speech develops simultaneously with motor skills.
- Graphomotor skills are improved. Schoolchildren develop the ability to follow a contour, hold a pen correctly, and observe the rhythm of movements.
- Suitable for any age. Nursery children, schoolchildren and adults enjoy drawing on the board. The magic of free-flowing animation leaves almost no one indifferent.
- Relief from stress. Working with sand is included in a course of psychotherapy for the treatment of neuroses, tics, and insomnia. Healthy children also calm down during classes, find peace of mind, and forget about troubles.
- A unique method helps to reveal creative potential and find yourself. The child shows imagination, shows hidden abilities, and is not afraid to evaluate the result.
If we consider the methodology from the point of view of organization and material costs, the following advantages are revealed:
- Consumables are cheap. It is not necessary to buy sand; use semolina or ground coffee.
- You can make a drawing tablet with your own hands. You will need a lamp, plexiglass, and a wooden box. The equipment takes up little space in the room and does not require special care.
- Any mother, father, or grandmother can teach a child to draw with sand.
No special education or courses are required for classes. Look at examples of work on the Internet and feel free to start creating.
Everything for a child's development
We suggest making your own light table (tablet) for sand painting and other creative activities with your child.
Classes on a light table develop:
- fantasy;
- sensory abilities;
- fingers and hands (fine motor skills);
- artistic and aesthetic taste;
- compositional skills when depicting objects and plots;
RECOMMENDED ************************************************* ********************* Book “Sand therapy in the development of preschool children” (in the Labyrinth).
The manual reveals the history of the issue, describes the stages of sand therapy classes, and provides approximate lesson plans developed and tested in practice with children. All aspects of speech development are affected: phonetics, grammatical structure, vocabulary, coherent speech. **************************************** ********************
Necessary materials:
- a large plastic matte or transparent container with a lid (in My-Shop);
- white wrapping paper/tracing paper/parchment paper;
- aluminum foil (optional);
- Christmas tree garland / LED plastic round hanging lantern (in My-Shop);
- scotch.
How to do
Line the inside of the container with foil, shiny side up, and secure with tape. Foil is needed to reflect and enhance light (you can do without it).
Source: danyabanya.com
Place tracing paper on the inside of the lid. It will scatter the light. Place the Christmas tree garland or lantern in a plastic box and close the lid. If the wire from the garland does not allow you to close the lid, make a hole in the wall of the container and pull the cord through it.
Connect the garland to a source of electricity. If you use a multi-colored one, then the table surface will shimmer with all the colors of the rainbow. Children's tablet for sand therapy is ready!
To paint on a light table, you can use salt or semolina instead of quartz sand. Semolina and bright lighting will create a unique play of light and shadow, and amazingly beautiful images will appear.
WE RECOMMEND
**********************************************************************
Light table for sand drawing and sand animation 280*400*80 (on Ozone)
The light table is designed for play therapy and the development of a child’s creative abilities. Drawing with sand will captivate not only kids, but also adults. You can draw anything. The main thing is to give free rein to your imagination and not be afraid to experiment. Drawing while listening to music or an audio story gives you double the pleasure.
Equipment: 1. Light table 2. Colored backlight with remote control 3. Quartz sand 4. Instructions 5. Power supply.
**********************************************************************
The light table is intended not only for sand animation, but also for creative activities and educational games with children, which you can learn about in the article “Games and activities on the light table.”
WE RECOMMEND ON LABYRINTH.RU: If you like the ideas, share them with your friends on social media. networks by clicking on the button below.K
SIMILAR ARTICLES:
Materials and tools for drawing
Without special homemade or store-bought equipment, you won’t be able to learn how to draw in the sand. The set of tools and consumables is small:
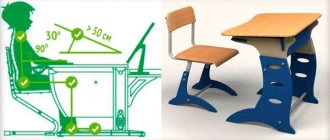
- A table with lighting and sides to prevent material from spilling onto the floor.
- Quartz sand. This is an ideal consumable option. Quartz sand grains are smooth, approximately the same shape. If it is difficult to find, replace it with washed and calcined river material, salt, semolina, and ground coffee. Renew consumables 1-2 times every three months; if the preschooler is passionate about the process, he draws daily.
- Antistatic. A spray bottle for synthetic clothing is suitable. It is necessary so that the grains of sand do not stick together and the material is crumbly after repeated use. An antistatic agent is sprayed on the glass before each lesson.
- Brushes, sticks, thin art tools, sieve. Will be needed to create small parts. They will not be useful at the initial stage of training.
On a note! Buy quartz sand at a pet store, retail store, “Everything for creativity.”
Sand graphics - a hobby for relaxation and new discoveries
Among sand artists there are many popular and world-famous personalities. Perhaps your place is among them!
Sand painting has not left the list of fashionable hobbies in the last decade. Schools for children and adults are being opened in cities and towns. Despite the variety of artistic techniques and materials used for this, the method of drawing with sand is unique. Sand graphics are made using bulk material, which is located on glass illuminated from below. Depending on the sand layer, shadows of different tones are visible on the glass surface; the smaller the layer of sand grains, the lighter.
- What are the benefits of sand painting?
- What you need to buy: materials and tools
- Sand graphics technique
- Tips for beginners
Sand painting
What are the benefits of sand painting?
Drawing pictures with sand calms you down, coordination of movements becomes better, and hand motor skills develop. The easiest way to confidently control your left and right hands is precisely sand drawing, since both hands are used simultaneously when drawing.
This type of art is useful for creative development because it develops imaginative thinking. Drawing to music gives double pleasure - I select it specially, creating a meditative background.
What you need to buy: materials and tools
For classes, a special table for sand animation and sand are used. Drawing sand is different from what you see on the beach. This is quartz sand, all grains of sand are as close as possible to the same size. Although the classic option for sand animation is usually called volcanic.
Sand for graphics
Over time, this material “works out”, the grains of sand break against each other, the sand becomes soft, and it is difficult for them to work. Therefore, it must be changed periodically.
Special materials for sand graphics can only be obtained in centers where this type of art is practiced. In large cities there are always several sand animation studios. Most often, their main activity is sand painting lessons for children.
A table for sand animation is not very expensive, but at home it can be replaced with a homemade one. The design is quite simple - glass, reflective film or a sheet of paper under it, a lamp with diffused light. But it is necessary to make sides so that the remains do not spill onto the floor.
Sand graphics table
Table with lighting
Sand graphics technique
The technique of sand drawing in different schools has its own characteristics, but the basic techniques of sand graphics remain the same. Traditional drawing always uses pencils or brushes. But in sand animation, the only tools are the hands. The technique of drawing with sand is quite simple, but at the initial stage you cannot do without patience.
Sand is collected into a fist and the hand is turned so that it slowly falls out, as if pouring from one half of an hourglass to the other. The amount of material is controlled by squeezing and unclenching the palm. Fingers and different parts of the hands carefully leave marks on the sand scattered on the tabletop. You can convey the texture, tone of the depicted objects and objects, the main rule is smoothness. It is important not to leave large, dense piles, as they will be too dark against the background of the illuminated glass.
Sand graphics technique
Tips for beginners
How to learn to paint with sand from scratch? You should start with very simple exercises - dots and lines. When placing dots, control the number of grains of sand that wakes up. This way the dots will be of different sizes. Exercises with different lines - wavy, dotted, curved, allow you to get used to the technique of drawing with sand. Do not strain your hand or squeeze your fingers too hard. This unusual art is relaxing and relaxing, so excessive stress will become an obstacle to learning the technique.
A very effective technique, which is often used at performances and master classes, is filling up a smooth background. In this case, the action of the hands becomes a kind of strainer, and the sand, freely spilling through the fingers, crumbles in an even layer on the surface of the tabletop. The only condition is that the background cannot be touched or leveled with your fingers, as unaesthetic prints remain. Only on an even layer of grains of sand can you draw. This type of painting with sand looks very impressive!
Table layout for sand graphics
It’s worth mentioning separately about sand animation. This art is somewhat higher than sand graphics, since it is necessary to transform the image quickly and beautifully. The features of sand animation are the transformation of drawings with as few movements as possible. That is why the masters carefully think through and rehearse everything when creating videos and performances of sand animation.
At home, you can try painting with other bulk materials. For example, semolina on a black baking sheet. However, there is a special magic in sand graphics with table lighting that cannot be replaced by the visual similarity of techniques.
We wish you success in mastering a new hobby. Be sure to check out other hobbies on our website.
Drawing Techniques
The art of creating animations is based on simple drawing techniques. In kindergarten or at home, show your child how to hold his hands and pour out sand so that the picture turns out clear, bright and real. Use the following techniques for beginners.
Pour sand from one palm to another
A great way to start classes. Kids get ready to work, get acquainted with the material, feel its weight, warmth or coolness, texture.
We collect sand in a fist and scatter it
You need to watch how much sand the preschooler picks up in his palm. There should be little of it so that the movements are easy, the layer of material on the glass is thin.
Sprinkle sand in a stream
Using a stream from their palm, children draw lines of different thicknesses. If you hold the pen high and release it in a thin stream, you will get a light version of the line.
If you pour roughly, almost unclenching your fist, you will draw a dark, wide curve. At this stage, it is important to practice both techniques so that the child controls the color saturation of the drawing and creates almost invisible lines.
Finger painting
Children can use each finger individually or the entire palm. Let them depict grass, hair, trees. Large objects are drawn with a fist - a mountain, a stone. The pads are fruits, stars.
For schoolchildren who have mastered simple drawing methods, offer these exciting exercises.
Maple Leaf
Draw an outline for the maple leaf, being careful to follow its shape. Adjust the lines with your fingers. Push the excess sand towards the edge of the drawn sheet to make the outline darker. Draw the petiole. Use your fingernail to draw internal lines (veins). Place a circle in the petiole area with your fingertip.
Letters
The material is scattered onto the glass from the palm of your hand or with a pinch. Leveled. On this background, write the letters of the Latin or Slavic alphabet according to the model. The child learns to be attentive and repeat the pattern. Graphomotor skills develop.
Water
Sprinkle sand over the entire surface of the container. Using four or five widely spaced fingers, draw wavy lines. Make horizontal lines with your fingernail - these are ripples. Then draw the horizon and remove the excess at the top of the glass. Draw clouds on the same composition.
Clouds
Sand is clenched in a fist. We make circular movements with our hands with a small amplitude, scattering the material in the sandbox. You can then draw small lines with your fingernail to make the clouds look lush.
Young artists at the initial stage of mastering a fascinating hobby will enjoy such exercises using additional tools.
Stencils
Take stamps, coffee stencils, plastic bottle caps. Leave marks on the sand table with them. With the help of different figures, large plot compositions are created.
Sieve
It is much easier to disperse sand through a baby sieve. You can form mountains, make a thin coating on glass. The next step is to paint with your fingers on the resulting sand space.
Funnel
A wide-necked tool helps make a high mound. Children watch the sand stream with enthusiasm and repeat the action using their fist.
Drawing animal tracks
This exercise requires careful finger work. Draw the marks with your fist, making the main background. Small details are drawn with sticks, fingertips, and marigolds.
Pendulum
Attach beads of different sizes to the ropes. Swing the pendulum so that traces of the load remain on the glass. Kids learn to control strength and maintain rhythm of movements. This is an excellent therapy for emotional overload.
Colored backgrounds
Colored cardboard and colorful pictures are placed on the glass.
Sand is scattered on top in a thin layer. Children draw circles and zigzags. The colored fragment protrudes partially. The result is an original picture.
Pattern prints
You can play with a non-standard object with patterns - a toilet paper roll. Apply designs to it with a glue gun and let dry. Run the tool along the thin surface of the sand, leaving a mark. Girls love this type of work.
There are many options for selecting additional elements and tools for creating a sand masterpiece:
- Take combs with rare or frequent teeth - you get a wave.
- Toothpicks help to draw the finest lines, making the image of the hero expressive and real.
- Children's rakes are suitable for drawing out relief in landscape compositions.
Fantasize, do not limit yourself and your child in the creative process.
Making a sand painting table
The other day I was picking up my child from kindergarten, and the teacher “suggested” making a table for sand painting. Naturally, you need to do everything for a “pack of crackers”; accordingly, you need to use improvised materials.
So let's get started.
The dimensions were announced as 50x90 cm and a depth of 12 cm. Several boards remained from the time of construction of the house, and it was decided to work with the data.
We bring the boards into a “civilized look” by planing in a planer.
But you can buy “furniture board” at any large hardware store, it will be sanded, or you can use plywood.
These are the blanks we got after chipping.
Now we “beat off” the corner and cut the required dimensions.
Now we have a complete set of blanks for assembling the box.
Let's start assembling.
Using a caliper or ruler, we measure the wall thickness of our workpiece.
We divide the resulting size by two and mark it on the edges of the two workpieces for further drilling. This is necessary for connection with another workpiece.
We have placed a mark, now we draw a line using a carpenter’s square.
Now we mark the distance from the edge of the workpiece where the screw will be, the distance is arbitrary, I have 20 mm, at the intersection of these marks we drill a hole with a diameter of 4 mm.
We place another workpiece with its end facing the drilled one, align it and drill into the end to tighten the “confirmation”.
Using an internal hex key, we screw in the “confirmat”, it is also called a furniture screw.
We perform this operation with the remaining corners of our box. You can also connect it with ordinary black self-tapping screws, it doesn’t matter, I just had the opportunity - the main thing is to get a box.
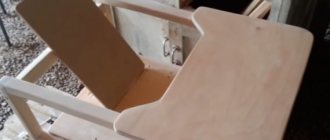
The end result is a box like this.
Now we need to figure out how to secure the glass inside the box. I got out of the situation - with the help of glazing beads. We mark the required depth from the front side inside the box, I have 24 mm, that is, 4 mm glass, and a 20 mm side of which is 10 mm beading. This operation must be done on each side of the box; marks must be placed in at least three places along the length of the workpiece.
Using a miter saw, cut the glazing bead at an angle of 45 degrees. You can do this using a hacksaw and a miter box.
We rest the cut side of the bead against the inside of the box
On the other side of the bead we put a mark where it will need to be cut. Cut at an angle of 45 degrees.
Using nails, relative to the marks, we attach the glazing bead to the inside of the box. This operation must be done on all sides of the box.
This created a ledge for installing glass.
Next, we take a sheet of plywood, or whatever is available, cut it to the size of the box and screw it on.
This created the bottom of the box, which will also hold the corner of the product. I had 10 mm thick plywood available.
We begin to assemble the electrical part of the product.
So I went to an electrical goods store and bought everything I needed there. If you don't have some experience working with electricity, ask an electrician you know to do it, electricity is no joke.
First, let's evenly arrange the lamps inside the box and secure them.
Now you need to connect the lamps in parallel. To do this, we clear the wires of insulation and connect them by color.
Connect to the connected wires from the lamps, the wire that will be connected to the network.
We measure the diameter of the wire with a caliper.
We select a drill bit of a slightly larger diameter and drill into the wall of the box to thread the network wire through.
We pass the power cable through the hole, strip it and connect it to the lamps.
A power plug must be installed on the other end of the power cord. To do this, we strip the wires, disassemble the plug and connect the wires.
We check the correct connection and assemble the plug. Once again we check the correctness of all connections, plug it into the network to check the serviceability of the lamps.
If everything is normal, the lamps light up, we solder the connections. It won't hurt the kindergarten. You can use wire connectors, but soldering is more reliable.
The soldering is done, we isolate the connections and fasten the wire to the body using staples.
At this stage we could have finished with the electrics, but for convenience I decided to install a switch. Regular external wiring switch.
To do this, we disassemble the switch and attach it to the body so that the wire from the box can be inserted.
Then we cut off the wire with a small margin, strip the ends and connect it to the switch, something like this:
We put the switch back together, plug it into the network and check the functionality of the switch and the product as a whole.
All that remains is to install the glass.
As planned, you can use frosted plexiglass with a thickness of 5-7 mm. You can do this, if you have enough money, just look at the prices for plexiglass, I looked... We will work with ordinary glass 4 mm thick.
I went to a glazier and they cut out the glass along with the box. It was possible to put it matte right away, but the price is almost three times higher, it’s up to your discretion. In short, I took the usual one.
You need to fill the mat. A grinder, sandpaper and patience come to the rescue... Remember, you need a flat surface for the glass, otherwise it will burst.
This is what happened.
Apply silicone sealant to the bead.
We install the glass with the frosted side inside the box.
We cut the corners on the glazing beads and fix the glass.
Coverage is at everyone's discretion. I opened it with varnish, since I had already remade a lot of things in the kindergarten - the main part was also varnished.
And here is the result of our work:
Thanks everyone for your attention!
Hope you find it useful!
Sergey.
Sand animation
The child will be able to perform the first simple animation in three to four lessons, having mastered the technical basics of drawing. Invite the student to draw an apple tree on the glass. A step-by-step master class is given below:
- Prepare sand and screen. Treat the surface of the table with an antistatic agent and remove excess.
- Take some sand into your fist and scatter it on the light table. The surface should be covered evenly.
- Draw the trunk with your thumb and press down on the entire pad.
- Rising to the top of the apple tree, sharpen the line. Draw not all with a pillow, but with a half, then with a nail.
- Use your little finger and index finger to draw thin and thick branches. Curve the lines to make the apple tree look like a real one.
- Draw a crown. Take sand, pour it generously around the branches, at the top.
- Leave a little for the bottom of the picture. Scatter it under a tree. It will be weed.
- Using your fingerprints, draw apples on the branches. Determine their number yourself. It is important that the circles are not blurry, the edges should be clear.
- If you draw three or four apples under a tree, on the ground, you will get an autumn version of the picture.
- Now clear the background. Draw a contour around the crown, remove excess sand from the surface. The tree will have a shape.
On a note! For animation, use a multi-colored drawing set. Using green, yellow, white, gray sand and changing the hue of the image illumination, professionals achieve the effect of a living picture.
How to draw a pig
How to draw a mouse
How to draw a hippopotamus
Game exercises
At home, in kindergarten, and in early development classes, children learn through play. This is the best way to teach the complex through the simple. A tabletop sandbox with high sides and play exercises for preschoolers will help you with this.
Training your fingers
Start your first acquaintance with animation not with theory, but with practice. Give the opportunity to touch, smell, and explore the material. Turn on the lighting in the sandbox. You can play soft music so that the kids are completely immersed in the process and understand that something unusual is about to happen.
Ask preschoolers to draw any object or figure on the glass with their finger. Let them tinker with the sand as much as they like.
At the same time, motor skills, imagination, and attention develop.
Let's play hide and seek
You will need a rake, shovels and a thick layer of sand. Give students small toys (Kinder figurines). Ask to bury it unnoticed by others. Have a competition to see who can find a friend's toy faster with their eyes closed using their fingers.
What a surprise I have
The teacher hides various small objects (buttons, rags, pieces of paper, figurines, balls, coins) in the sandbox. The children's task is to find one object each with their hands, guess what it is by touch. In the process of understanding and feeling an object, you need to talk about your feelings and assumptions.
Treasure
The sand needs to be poured into a deep container or chest. Place pirate treasures inside: beads, coins, map, “gems”. You need to look for treasure with one finger. Attach a fascinating story to every discovery. Tell it yourself or come up with it with your children.
Stone
Find a cobblestone on the street. Let it be unpleasant to the touch: cold, slippery, rough, etc. Bury the item in the sand. Ask the children to touch an unknown object at the same time, tell them how they feel, why they feel uncomfortable, and the like.
Continue exploring as a group when the stone is removed from the sandbox. Tactile sensations are responsible for the formation of speech and train emotional endurance.
Important! For games of hide and seek, when children cannot see the object under the sand, choose toys with rounded edges, made of fabric, rubber, so that children do not hurt their fingers.
Product Features
A table for drawing with sand is a structure with a transparent, illuminated tabletop, which is surrounded by additional sides so that when manipulating with sand it does not spill out. Some models are equipped with special compartments for storing tools and sand. The luminous screen is made of acrylic, glass, plexiglass. Light elements are placed inside that will not heat up during operation. Lighting helps make sand paintings more impressive and expressive. In this case, it is necessary to observe the intensity of illumination.
The light should not strain the eyes, but it should be bright enough to provide contrast to the designs.
Making a table for sand painting with your own hands is not a complicated procedure, but it will require carefully following the steps of the instructions. In addition, you need to think about what materials to choose, decide on the model, dimensions and shape of the future product. Making your own equipment for creating sand paintings will significantly save money.
Tips for beginners
You need to master an unconventional method for early development and entertainment of children after watching video lessons or recommendations from professionals. It is useful for beginners to know the following:
- Place dots with the pads of different fingers. Remember how big they will be. This will help you not to make a mistake in choosing a finger when drawing eyes, fruits, or drawings on the body of animals.
- Before the lesson, try to pour an even layer of sand onto the glass. Use a sieve, funnels, and a little later your fists.
- Do not level the surface with your fingers. Fingerprints leave an unaesthetic mark.
- When kids learn to create simple images, try creating compositions from small parts using available tools.
- Professionals minimize the number of touches to sand. Movements should be sweeping and confident.
- Choose the best picture option for your level. Practice the technique of creating it to perfection. Rehearse the pattern several times.
- Before applying a stroke, consider its length and width.
- You can draw with sand on a light and sound board, a black polished table, or a kitchen baking sheet. The most important thing is the contrast between the surface and the bulk material.
Important! Watch master classes for free on the Internet. Periodically show children complex compositions on video. This gives impetus to development, spurs interest and desire to improve drawing techniques.
Positive influence of sand
The benefits of drawing with sand on light tables for children are to stimulate creativity, develop imagination, memory, and fine motor skills. The bulk material is also calming and has a beneficial effect on the nervous system. Overly active children become more diligent and attentive, which increases their intellectual potential. Drawing with sand has a complex effect, taking into account the principle of interhemispheric asymmetry. The light table is suitable for left and right handed people. The system stimulates both hemispheres, which subsequently gives the child certain advantages - he becomes a harmonious person with developed logical and imaginative thinking. Working with sand affects speech and writing. These areas are associated with the development of the cerebral hemispheres. Additional stimulation leads to positive results: the child controls speech, quickly and accurately selects words, and when writing makes fewer mistakes, which children often make due to inattention.