What parameters to pay attention to
First of all, parents should be interested in the following aspects:
Material of manufacture. It is better to spend a lot more time on this parameter, because the base of children's furniture should be absolutely safe and not contain toxic impurities. It is also necessary to monitor the quality of decorating coatings.
The next aspect is the quality of processing. The presence of rough chips, cracks, or nicks can easily injure the baby’s skin. Unstable legs and poor-quality fastenings will inevitably lead to a fall, and, accordingly, to injury.
A chair intended for feeding a child (from 6 months of age) must be equipped with side bumpers and a limiter along the front surface. The limiter usually has a slider that allows you to adjust the width of the seat.
For the active neuropsychic development of children, today we offer a huge collection of chairs with built-in modules, handles, and ribbed toys (non-removable, of course).
It is better to choose such furniture in accordance with age. In this case, even the color design of the facades matters. Bright, but not harsh tones perfectly contribute to increasing the child’s attention, logical and cognitive activity.
Important selection criteria for parents are the height and shape of the back of the children's chair, as well as the length and width of the seat. Each age period has a number of anatomical features that should be taken into account.
Correctly selected shape and size allow you to maintain posture, and therefore the normal development of the muscles of the back, neck, pelvis, and shoulder girdle. Excellent children's chairs, the parameters of which are met in accordance with basic safety requirements, are offered by IKEA.
The furniture is made from high-quality, environmentally friendly materials, taking into account all the anatomical and physiological characteristics of children of various age groups. And the cost of children's furniture will pleasantly surprise every parent.
Making a chair from plywood
Since plywood is easy to process. It's easy to make a carved chair out of it.
In order to make it you will need:
- Sheet of plywood, 8 mm thick.
- Drill, jigsaw.
- Drill, screws.
- Sandpaper.
- PVA glue.
- Colorless varnish based on turpentine.
Based on our dimensions, we transfer the drawing of the chair onto a sheet of plywood. You can use a jigsaw to cut unusually shaped holes, which will give the chair an interesting look.
In order for the sides of the chair to be completely identical, you must first cut out one, then trace it on a sheet of plywood so that the second side wall completely coincides with the first.
You can make them in the form of an elephant. You will get an original design of the chair.
After all the parts are cut out, the sections must be carefully sanded using sandpaper.
We assemble the chair, to do this we attach the seat and back with glue, and secure everything with self-tapping screws.
We coat the chair with varnish.
Choice of material
Today, in furniture stores, customers have the opportunity to choose products from a huge assortment, focusing on cost, quality and material of manufacture. The quality requirements for children's furniture are more stringent than for adult furniture sets.
The material must be tested for pests and toxic resins. It is better to make sure that the wood has been pre-treated with an antiseptic and antipyretic. Furniture manufacturers offer the following materials for children's chairs:
- Natural wood.
- Chipboard and MDF panels.
- Plastic.
- Aluminum.
Plastic chairs
For the manufacture of children's furniture, plastic is a universal and unique material. Thanks to the special surface structure, PVC furniture is quite light, durable, and free of nicks and flaws.
High chairs for feeding babies made of plastic are widely popular among parents. After all, the surface of the material easily tolerates frequent wet cleaning and is not at all afraid of the action of chemical detergents and direct sunlight.
In addition, the price of plastic furniture plays an important role, which pleasantly pleases buyers.
How to do it yourself?
First of all, remember that the main criterion for children's furniture is its safety for the child. It must be smooth, strong and stable. Sharp corners, cracks, gaps and crevices are unacceptable. Self-tapping screws, wooden spikes, nails, and dowels can be used to fasten the parts of the chair. For reliability, the fasteners of each joint must be duplicated. Naturally, before you start making a children's chair with your own hands, you must first draw sketches, and based on them - drawings indicating all the dimensions of the future product. There are a great many models of this popular children's furniture. Let's look at the simplest and most common designs.
Option 1
To make it you will need:
- pine bars of different sizes;
- pine boards for the seat;
- fasteners.
Dimensions of wood beams for the rear legs – 30*30*550 mm – 2 pieces.
For crossbars:
- top 19*41*165 mm – 1 piece;
- carved 14*41*165 mm – 1 piece;
- medium 14*29*165 mm – 1 piece;
- bottom 14*29*165 mm – 1 piece;
- side and drawers 14*29*177 mm – 4 pieces;
- front and drawer side 14*29*195 mm – 2 pieces.
The top crossbar at the front needs to be rounded so that the child does not get injured on sharp corners. The installation height of the lower edge of the middle crossbar should coincide with the height of the upper edge of the seat. First, the rear legs are fastened to the crossbar. Then the front pair of legs and the crossbar are connected. Then they are fastened together with side bars and all the drawers. The seat is installed last.
Option 2
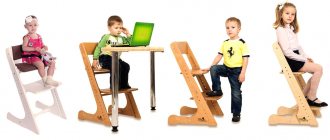
A transformable chair is a combination of a chair and a table that can be converted into different shapes by simple steps. It can be used as a table-chair for feeding, as a desk for studying, and as a table for games. It is very convenient for small spaces, as it can fold compactly.
High chair details:
- legs 39 cm long - 4 pieces;
- rounded corners - 4 pieces;
- top slats 22 cm each - 2 pieces;
- crossbars 34 cm long - 2 pieces;
- cross slats 30 cm each - 3 pieces;
- seat base (can be made of plywood 18 mm thick) 20*30 cm – 1 piece.
Table components:
- legs 50 cm long - 4 pieces;
- 41 cm strips - 4 pieces;
- cross slats 34 cm each - 4 pieces;
- tabletop (plywood 18 mm thick) 45*38 cm – 1 piece.
All parts will be fastened using glue. But to increase the strength and reliability of the product, it is necessary to use 20*50 mm wooden dowels for fastening; they are quite easy to make yourself from a plywood sheet of 8 mm thickness. For dowels, grooves are made in the places where the parts are fastened in which they should be located. Don't forget to apply glue to all joint surfaces before installing them in the grooves.
This is how the side parts of the high chair are mounted
It is important to let the glue dry completely. Then sand them down until smooth.
Cut the seat and back of the chair measuring 250*300 mm from 3-4 pieces of plywood connected with an adhesive layer. Round all corners. Foam rubber is glued to one side as a softening pillow, which is then covered with a fabric cover. The covers are secured with metal brackets.
Start assembling the chair by connecting the finished sidewalls with slats. Everything is carried out according to the scheme described above (dowels + glue). The seat will rest on the slats, so to secure it you will need screws or dowels in the form of cylinders. Then install the bottom and back strips. Attach the backrest to the back bar. Let the chair dry so that the glue has a good grip on all the connected parts.
The technique for assembling a tabletop is no different from that for a chair. First, mount the sides of the table and sand them, then connect them with cross-sections and sand them again. Then attach the tabletop itself, sand it also and varnish it several times.
Option 3
A high chair, it can be converted from a regular old chair with a backrest. It’s great if its legs are fastened with additional crossbars, and it itself is stable and reliable. The chair needs to be turned over. The back of the chair will become the front legs of the highchair. From the top points of the front of the future high chair, we attach long, strong slats (or bars) diagonally, which will become the back legs. We fasten all the legs with cross bars. The seat, back and shelf for placing dishes with food are made of sanded boards or a piece of plywood. The seat needs a cushion.
Aluminum children's furniture
Another original option for parents is children's chairs made of aluminum. The material has sufficient strength, low weight and appropriate quality. Such chairs are affordable and easy to care for.
Advantages of a transforming chair
A new product on the furniture market, which appeared thanks to the developments of designers and technologists, is transformable chairs.
They are most often made of aluminum or wood. We recommend reading:
Kitchen chairs: a review of the best models, as well as examples of beautiful design and combination of furniture in the interior (100 photos)
Stools for the kitchen - 150 photos of new designs and combinations in the interior of a modern kitchen
A distinctive feature is the ability to assemble the chair into a compact stand with just a few movements. This chair does not take up much space and can be adjusted according to the child’s age.
Such furniture is made for a certain age category of children, and therefore the height of the backrest, the width of the limiting sides, and the depth of the seat are adjusted within acceptable limits (for example, in the category from 6 months to 2 years). This approach allows parents to save on unplanned purchases of new furniture.
Drawings and projects
An approximate drawing of a homemade step stool
First of all, we are working on a drawing for the future transformer. You can use diagrams published in large quantities on the Internet, so as not to rack your brains again, especially if you are not very versed in drawing. Or you can work on your own, the one that appeals to you the most. The drawing should preserve the guiding principles of the design of such products. The geometry of the step stool and the material used must match, but the design and style can be changed according to your own preferences.
Now, if you have decided on the necessary dimensions of the future transformer, we display the cutting drawing you selected or developed yourself on graph paper. Then, using carbon paper, we transfer the patterns onto sheets of multilayer plywood.
