Leatherette furniture has a number of advantages, namely: low price and a wide selection of products. But there is also an unpleasant side to this material - a short service life, especially if you have pets who want to lie on the sofa and sharpen their claws. In addition to furniture, there are other things made from this material: bags, clothes and car covers. All of the above items become unusable over time and we are in a hurry to replace them. We suggest not to rush and for this we have prepared an article - how to remove scratches on leatherette.
How and with what to glue dermantine to leatherette?
Any type of dermatin surface is the result of a chemical combination of nitrocellulose with fabric. The strength is sufficient for high loads, but cannot reach the heaviest compaction. If damage suddenly occurs, you need to buy specialized glue or liquid leather.
Liquid skin
The development of a new product has created a solution to many problems with repairing virtually any type of damage. Its effectiveness is aimed at mutual action with real skin.
What about us?
For high-quality connection with leatherette, effective camouflage and obtaining an identical surface, it is better to use specialized glue. With this we combine the lining with 2 sides of the material. After the glue has dried, simply apply a thin layer of liquid leather.
It has the additional property of fixation and a lot of colors that will hide all the disadvantages of your product.
Adhesive bases
Properly selected adhesive ensures reliable adhesion and helps to avoid stretch marks and dysfunction. Here you need to take into account the type of dermantine and its thickness. To achieve a cheap and excellent result, some people use super glue. The resulting material
and the lining is deformed and hardened, producing an additional layer of translucent substance.
If the item is usable and expensive, there is no need to save money on repairing it. Any type of contact adhesive can solve your problem. Its composition does not “conflict” with dermatin, but at the same time ensures a tight connection.
“Moment” glue is considered very popular on this issue.
It is multifunctional and has almost no important disadvantages.
How to stick?
Having selected the accompanying materials, you begin the repair itself. Here it is necessary to adhere to the sequence of actions, on the points of which the final result depends. We wipe off the required part of the material with a solvent (or other degreasing, water-containing substance). Spread the glue in a thin layer, letting it dry (another layer is needed for a stronger connection).
After pressing or strongly squeezing the two parts, sand the emerging edges (if any).
How to repair a leatherette jacket
Faux leather is a rather difficult material to repair. Therefore, if damage is detected, it is better to transfer the item to specialists for restoration. They will be able to eliminate defects, successfully disguise the repair site, and even replace a section of eco-leather if necessary.
Of course, it is not always possible to take the product to a workshop and you have to think about repairs yourself. Find out which repair products are appropriate to use in each specific situation. So, if a leatherette jacket is cracked, what to do is always a pressing question.
When the scratches are shallow and small, a good solution to the problem would be to use an aerosol bottle with a dye. The main thing is to choose a tone identical to the product. And then, following the instructions on the bottle, it will not be at all difficult to give the jacket a fresh look and disguise the damaged area.
Important: spray it from a safe distance (at least 30 cm) and apply it in a thin layer. This will help prevent the formation of drips on the canvas.
For more noticeable scratches, it is better to use dyes that penetrate deeper into the artificial material. Similar substances with pigments are applied to the jacket with a soft sponge or a special brush and distributed evenly over the surface. After 30-40 minutes, the paint layer dries, and the jacket regains its attractive appearance.
If punctures or deep cuts form on the canvas, you can deal with them yourself by using liquid leather. The instructions for its use in this case are similar to those described above for the restoration of leather products.
How to glue dermantine on a sofa?
One of the very common damage to leatherette occurs on items (furniture) of permanent use. A single cut or crack, in a visible place, leads to a complete replacement of the covering or getting rid of the entire sofa. Why not use the means at hand and save money and time with proper repairs? The method described below can be used to restore a car dealership, items with a thick and strong layer of leatherette.
You must always remember that any approach depends on the type of damage.
Using a patch
Patches are used for tears, large abrasions and when the edges of the material do not contact each other. Their function is to cover the gap, with the edges covering more space.
The application of dermantine to the surface leads to a thickening of the layer, which is quite noticeable from the outside. To avoid losing the entire species, people resort to another option. By purchasing the right piece of dermantine, matching the color and pattern of your furniture, you cut it so that it fits correctly and tightly into the damaged space.
If it is abrasion, then you can carefully cut it around the circumference, getting rid of the corners. Here you will need a lining made of any materials, including cotton. It is needed to strengthen the seams and covers more space than the patch itself.
It should be glued with a specialized elastic adhesive onto a space previously wiped with solvent. After drying with a hairdryer, apply a small layer of adhesive to the side of the gasket that will be in contact with the patch.
Liquid skin
Applicable for a wide variety of deficiencies in dermatin coating, including the above option. After installing the patch, the seam does not disappear and continues to attract attention. This space can be filled with a liquid product, which, after drying, will make the surface uniform. Burns or various types of cuts can be removed in an easier way. Place the liner and spread the contents of the tube equally.
To obtain the pattern, a special canvas is attached to the product.
As a final action, press it with any object with a hard surface, covering the entire area.
Selection of adhesive material
Despite the fact that liquid skin is considered glue, for long-lasting and good fixation, you have to purchase additional items. All the same rules and characteristics described above (adhesive bases) apply here.
The choice definitely falls on the Moment adhesive mixture. Its characteristic is that it will withstand peak loads with a small volume. Important! Glue moment can be of different types and from different countries of manufacturers.
This must be remembered when purchasing in a store.
Be sure to look at the composition and functions of the product.
Required materials and tools
To choose the right materials, you should carefully evaluate the condition of the furniture. This is necessary to understand the nature of the problem and determine how to fix it. To repair leather furniture, you may need professional tools that are not advisable to buy for one-time home use.
If we are talking about simple contamination, then it will be enough to prepare a cloth and alcohol. Repairing cracks is a little more complicated. Before starting work, you will need to acquire construction tools - they will be used to dismantle furniture and remove old upholstery.
This is a set of screwdrivers, wrenches, screwdriver, pliers, staple removal tool. Changing the material involves using a staple gun. This is a basic set of tools.
There are repair options using paint, liquid leather and other improvised means. Therefore, it is worth purchasing them in advance. Don't forget about the sofa's filling - the material may also need to be fully or partially restored. Foam rubber is often used as a filler. You definitely need to get some thread and a needle. A sewing machine will do the job faster. If you plan to partially or completely replace the upholstery, then a large amount of new material will be required.
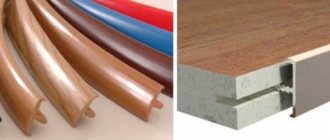
Leatherette upholstery of a metal door
When insulating and soundproofing external doors, a leatherette layer is often used. It is considered the logical end of the upholstery and a decorative part of the hallway.
When working with a wooden door, everything is simple! You can attach the layer using specialized holes for nails. Glue is used for metal doors.
This kind of work has many complexities and properties.
What should you pay your attention to?
Selecting dermantine
in the store, you need to pay your own attention to its quality and thickness. Thinner ones will hold less.
When pulled on the door, it can change its shape. You need to remember the sizes!
The width of the roll should be 10-15 cm larger than the door. You start by completely cleaning the door from any bulges. Remove the lock, peephole and other items, and begin wiping with a water-containing substance (solvent).
Depending on the corresponding functions, glue the required number of layers.
If you need serious insulation and sound insulation, use foam rubber and a special fabric with high density. The foam rubber is glued to the adhesive mixture, and the noise-proof blocks have a device - a sticky side.
At the final stage, the dermantine layer is established.
Fixing from top to bottom, pull along the length and sides. Important! Before cutting out the holes for the lock and peephole, set the layers as correctly as possible without making any mistakes in size!
Otherwise, you will need to purchase a new roll.
Types of glue
The choice of glue, in this case, is the most important point of all cases. The service life depends on it. When considering the required adhesive, carefully look at the following characteristics: Moment and contact adhesive 88 have similar characteristics. In most cases, PVA is used. Attention! When choosing PVA, do not forget about its variety.
There are office, household and multifunctional (construction) ones.
The stability and effectiveness of the latter are suitable for application to the door.
Eliminating holes
Every owner of such a thing should know how to fix a hole in a leather jacket.
After all, you need to act in this situation immediately. If restoration measures are not taken in time, then your favorite item can be damaged even more, and its appearance will be forever ruined.
On a note! Please note that once you have discovered the torn area, you should fasten it with adhesive tape from the wrong side.
This will prevent further spreading of the material. This is especially true if you are away from home and the time and resources do not allow you to begin repairs. Let's look at options for solving the most common problems and situations in which they are best used.
- Sew it up. This method is quite radical, but if the hole is quite large, then you simply cannot do without it. It will be problematic to glue a torn area of leather, so it is better to prepare threads, a suitable patch and a machine. So, now let's look at how to repair a leather jacket at home. First, you need to rip the lining, first turning the product inside out. Then carefully trim the edges of the hole to make it easier to pick up the patch and to make the damaged area look neat after repair. It is also very important to choose a material of the desired texture and appropriate color as a patch. If you do everything correctly, the jacket will look like new, and the place where the hole was will be completely invisible. You will need two patches: one can be made of any material, since it is attached from the inside, and the second - exclusively from leather that matches the jacket, because we will sew it on the outside. By the way, their size should be 1-2 cm larger than the incision site on all sides. Attach the selected scraps and sew them. Experts recommend choosing a strong needle for this procedure, which is designed for working with leather items. If you neglect this advice, you may not only ruin your jacket, but also damage your sewing machine.
- We seal it. Is it possible to repair a leather jacket without resorting to such radical methods? If you don’t have a sewing machine or the hole is small, you can carefully seal it. Place the torn piece in the damaged area using tweezers, and then glue it with tape. Next, you need to turn the jacket inside out and rip the lining to get to the hole on the inside. In this case, the prepared patch is glued to a piece of leather that we secured earlier. Once you have completed all the steps above, turn the product inside out and remove the tape. Make sure that the patch lies evenly, straighten it with your fingers and press firmly for 1-2 minutes. Let the glue dry completely and then sew the lining closed. Thanks to this method, you can quickly and efficiently repair your favorite item without resorting to the expensive services of specialists.
DrLove › Blog › What glue to use for reupholstering the interior with leather (leatherette)
I asked this question too much to everyone, everywhere. What to Glue, how to Glue, where to buy glue. Having accumulated enough information, I decided to share it with those who accidentally look at my Blog))). 1. I’ll start with the very common 88 glue - price 230 rubles.
Reviews about the adhesives, I must say, are bad. I decided to test this on painted plastic and not degreased.
Here is a video of how I tore leatherette off plastic with 88 glue.
Bottom line: I have to say that I expected the worst. But the glue held well, but there is one big problem... Aroma.
The persistent scent lasts for about 2 weeks, but has not dissipated at all in 2 months (and I don’t know how long it will last). 2. Glue Moment-1 – price 190 rubles.
Your ads will be inserted here by
Easy Plugin for AdSense
.
Please go to the plugin admin page to Paste your ad code OR Suppress this ad slot.
I work with this glue, and in other words, there are several reasons. The main thing is quality-price, and after conducting several experiments I realized that the glue holds well (this is not advertising, just my observations).
And here's what I did: 1 – applied glue
exclusively on plastic and immediately pressed the skin.
2 – applied glue
to the plastic and to the surface of the leather and immediately pressed it.
3 – applied glue
onto the plastic and onto the surface of the skin and wait 10-15 minutes.
In the end: 1 - the center did not stick at all, the sides slightly. 2 - stuck but came off easily.
3 - I barely tore it off, but in certain places the skin tore and it was necessary to scrape it off with a knife, and this is taking into account that it took 10 hours to dry (it takes 24 hours). Here is a video of how I peeled the skin off the tin.
Result: The retention is very good and after 10 hours there was virtually no smell. 3. Kaiflex K414 glue: price – 370 rubles.
I didn’t glue the leather with it, but the glue worked quite well with the carpet. The glue dries as well as the previous ones in about 24 hours, holds quite well and there is no smell in the morning. 4. GTA Boterm glue: price in our country with the requirement of delivery from Ukraine is 1500 rubles. Delivery from 5 cans.
Or 1200 rubles – from 10 cans.
It’s a pity that Polish glue has not yet reached Russian stores. Reviews are quite good about this adhesive; in Ukraine, many people use it to work with a variety of materials, including leatherette. The glue must be activated at a temperature of 50-70 degrees in order to improve its strength properties. 5. Rabokoll-406 glue: the price is unknown to me (they say that it is sold on tap at a cost of 120 rubles per liter and can be found at shoe manufacturers). I haven’t been able to find this glue anywhere, but I’ve heard great reviews about it.
The first time I found out about it was at a car reupholstery showroom; they usually use this glue there. 6. Mah glue: price 1500 for 0.5 l, order from 3 cans.
I learned about this adhesive from a reupholstery specialist, who said that the adhesive holds well enough on the plastic, is resistant to temperature changes, and at high temperatures does not become viscous, which is why strongly stretched parts come off. its upper temperature limit is +160*C, the next one that can be used is the German Kleiberit C114/5 (www.egmida.lt/out_data/Naujas%20katalogas/114.jpg) its upper temperature limit is +120*C. MAN glue (and actually with a white-black label and not a white-green one) is packaged not in 0.5 ml but in 0.615 ml... this is like a protective degree against counterfeiting.
In other words, if you bought MAN glue in a container of 0.615 ml or more, you should know that it is FAKE (p. AlekseyevE) 7. Also from my own experience... sometimes I use ABRO 1285 Professional aerosol glue (www.abro.ru/upload/shop_1...tems_catalog_image292.jpg ) good glue, and the spray head has degrees of adjustment in the amount of glue supplied and in the width of the glue spray. (p. AlekseyevE)
These are the key adhesives that I have learned something about and tried. If you don’t like these options for some reason, then you can do what I did, in the help desk I found out all the organizations that deal with reupholstery.
I called and talked about the possibility of buying from them the glue they work with, very often these are special compositions that they purchase or transport according to an individual order in barrels.
Well, from a dozen other companies, a couple gave me a positive answer, but they did not disclose the name of the glue to me, the cost for 1.5 liters is from 700 to 2000 rubles. But in general.
After talking with the craftsmen, I found out that the invisible issues with the choice of glue are an order of magnitude higher than it might seem.
That it is necessary to choose glue depending on the plastic and surface. Even within the same car there may be different plastics and different adhesives may need to be used.
What to do if your eco-leather jacket is cracked?
Has your favorite jacket lost its former shine, and has scuffs, creases and other damage appeared on the surface? How to restore a leather jacket - let's take a closer look at your next steps:
- Assess the extent of damage. This must be done first of all so that you understand what kind of repair the product needs and how much time it will take. First of all, you need to inspect the jacket; if there is severe damage on its surface, then to restore it you need to use deep dyeing products, and the repair process itself will be painstaking and long.
Important! Small scratches on artificial leather should be removed immediately after they are identified. This must be done to further preserve the item and protect it from more serious damage to the material.
- Do the repairs yourself. It is advisable to do such actions only in case of minor defects on eco-leather. If you decide to restore severely damaged leatherette on your own, then you risk damaging the product.
- Use the services of qualified specialists. The best way out of this situation is to contact a professional. This is due to the fact that working with natural and artificial materials requires special care, skills and adherence to restoration technologies.
How to seal leatherette?
Good leatherette is a reliable, practical and strikingly attractive material
. It is very durable, but no one is immune from cuts and tears.
What to do when faced with such trouble?
There is no need to rush to say goodbye to your favorite item or run to the studio. You can always seal the vinyl leather yourself.
Apply glue to leatherette
This will cost much less, and will also save valuable time. But not all means are suitable for gluing dermantine.
Advantages and disadvantages of “liquid skin”
Repair of pressed leather products with liquid leather
The mixture has many advantages. Let's note some of them.
- Easily applied to damaged areas of leather furniture.
- Short drying times.
Leather repair product available in different colors - Polymerization of the mixture takes 15-20 minutes - sufficient time to select the required color scheme. In addition, in case of an error, this time is enough to easily wash off the applied product.
- It is characterized by high strength and elasticity. The skin is able to restore its shape after deformation.
This product does not require heat treatment, has high strength and ductility - The unique formula ensures complete penetration into the structure of the surface of leather furniture and eliminates the possibility of subsequent delamination.
- High resistance to temperature fluctuations allows the use of “liquid skin” in the range from – 35 C° to +70 C°.
- Does not require additional heat treatment.
- Durability – the natural aging period reaches 35 years.
- The product does not contain harmful substances and is absolutely safe for health.
Any repair will still not replace the smooth new surface of a leather sofa, but will extend the life of the product
The disadvantages of the mixture include the small area of the damaged surface, which can be repaired using “liquid skin”. However, this is the only drawback, according to consumer reviews.
We make an impression of the repaired part for a similar pattern on the entire surface
What glue will you use?
Not all types of glue are suitable. No need to use superglue or PVA.
The first option will create an overly good connection, which is not suitable for elastic skin. PVA will last until the first rain.
This glue is water soluble.
In order to seal a cut on dermantine, it is better to use adhesives that are not afraid of water and preserve plasticity after drying. Among the most common options:
- traditional "Moment". I often use this glue to repair leatherette at home. It is reliable, not afraid of temperature changes and moisture;
- glue for shoe repair work. It can be used to repair natural and artificial leather. You can consider SAR 30E glue. It is resistant to moisture, elastic and provides greater strength to the joints. With its help you can stick leatherette to metal, rubber and other materials;
- adhesive based on polyurethane resin. For example, you can choose “Desmokol”. This glue is used to repair various dermantine items. It has good resistance to moisture and makes reliable elastic connections;
- spray glue. An excellent option for repairing leather products. It is easy to apply, guarantees a strong connection and dries fairly quickly. You can seal an item with an aerosol in a couple of minutes. Consider 888 Ultra glue as one option. The domestic aerosol “Multi-Spray” is also suitable.
Using these compounds you can easily seal vinyl leatherette. But there are more difficult situations, for example, when a hole appears on the surface.
In this case, ordinary glue can hardly be used.
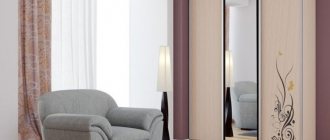
Decorative cape
You can hide damaged areas of upholstery or protect new furniture from damage by animals using a beautiful blanket or a special decorative cape. The choice is multifaceted: contrasting, colored, plain or patterned colors. The cape not only performs a practical function, but is also able to reimagine the entire interior of the room in a new way, adding a special twist to it.
In the store you can choose a cover that covers the entire surface of the furniture. If you choose several options, you can change them according to your mood or every season so that the situation does not get boring. These covers are very easy to care for: they can be removed and washed.
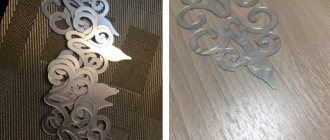
How to apply a patch?
To carry out the repair you will need a ruler, scissors, glue, a match and a weight. It is better to prepare everything you need in advance.
You will also need to cut out a small piece of leather. It will act as a patch. Then follow the instructions:
- place the break on an ideal surface;
- apply glue to the walls of the hole using a match;
- lay the patch end-to-end;
- press down with a weight and knock;
- leave the skin under pressure for 24 hours;
- remove the weight and apply glue to the seam;
- leave it under load again for a day.
Take the leatherette, stick on the patch, and carefully adjust the dimensions. This all sounds very difficult.
Thanks to this, use a very simple method - liquid skin.
It easily fills small cuts, holes and punctures. It perfectly copies the surface of real dermantine.
We eliminate gaps
This is perhaps the most common problem among leather jacket owners. If you get caught on a poorly driven nail, an iron fence or other sharp object, the item will be left with an unsightly cut that spoils its appearance. First you need to figure out what the gaps can be.
On a note! The most common are two cases: either a piece of skin is completely torn out, or the cut will be in the shape of a corner. Please note that recovery procedures in these situations are radically different.
To begin with, we suggest looking at step-by-step instructions on how to repair a leather jacket if it has a “corner” tear.
- Turn the product inside out. Find a stitched seam on one of the sleeves, and then carefully open it. It is most convenient to work on a clean, flat, well-lit surface, so think in advance about where you will carry out the procedure. Lay out the jacket, and then insert your hand into the ripped hole. You need to find the gap from the wrong side.
- Wipe the torn area thoroughly with a special solvent to remove excess fat.
- Fold the product evenly on the table, and place a weight on the patched area. Heavy books or a can of preserved food will do. Leave the jacket in this position for a day.
- After the required time has passed, treat the bonding line with a special cream paint for leather. This will help disguise the seam and give the surface an even color.
- Now all you have to do is sew up the lining and enjoy the result of the work done.
Basic recommendations
When repairing leatherette, you should follow a few simple rules. This way you will definitely be able to avoid bad consequences.
After all, mistakes during repairs can only worsen the situation.
- Before applying the patch, the surface must be degreased. Ordinary alcohol is suitable. This will make it possible to provide better grip.
- Apply liquid vinyl leather in 2 stages. Let the first layer dry. Then apply the second one.
- Recreate the surface relief. To do this, use a simple napkin. Otherwise, you will not be able to glue the product together inconspicuously.
How to restore a peeling jacket
As a result of excessively long use or after unsuccessful washing using aggressive powders, a leather jacket may begin to peel. If the damaged areas are small and not in the most visible places, special dyes can be used to disguise them. By being able to choose the most suitable color, you can hide the defects that appear and extend the life of the leather product.
Tip: It's best to avoid washing your jacket at home. Regular dry cleaning carefully removes various contaminants, maintaining the presentable appearance of the leather product.
Using the above tips and recommendations, you can ensure quality care for your outerwear. If your leather jacket is frayed or cracked, you now know what to do. The main thing is to notice the defect in time, react and apply the right remedy.
Did you like the article? Save it to your Pinterest! Hover over the image and click “Save.”
How to glue dermantine (artificial leather) to painted metal
There is an ordinary iron door (a sheet on one side and a frame made of a square pipe) and there is a textured dermantin
.
I would like to make a normal thermally insulated and aesthetic door, I haven’t fully decided on thermal insulation and finishing inside yet, but that’s not the problem, the task is to stick dermantine
on the door, and it’s painted, in a high-quality manner, without bubbles.
There is also 88 glue in the required quantity (1 liter), will it be suitable?
How to stick without bubbles? equalize with what? what to press with? how long to keep? Roll out dermantine
I conceive it from a roll wound on a stick.
Vidis wrote: There is an ordinary iron door (a sheet on one side and a frame made of a square pipe) and there is a textured dermantine. I would like to make a normal thermally insulated and aesthetic door, I haven’t fully decided on thermal insulation and finishing inside yet, but that’s not the problem, the task is to stick dermantine
on the door, and it’s painted, in a high-quality manner, without bubbles.
There is also 88 glue in the required quantity (1 liter), will it be suitable?
How to stick without bubbles? equalize with what? what to press with? how long to keep? I plan to roll out dermantine from a roll wound on a stick. PVA. wallpaper roller. Paste like wallpaper. I understand for a wood base, but PVA for paint? or metal (if I rip off the paint, but I don’t even want to)? Vidis wrote: I understand for a wood base, but PVA for paint? or metal (if I rip off the paint, but I don’t even want to)? PVA is kind of universal. glue a small square 100*100mm for testing. However, it is not durable, for example, its pull-off strength is 50 kg/sq.m. , and 88 is already 120,000 kg/sq.m., and I’m still afraid that because of the PVA, rust from the metal will appear on the dermantine. On the one hand, PVA is not for metal, on the other hand, if you apply it with a screwdriver and don’t wash it off, then try to clean it off with a screwdriver. It will stick to the metal.
But contact glue will be correct.
Review of adhesives for leather, leatherette and fabric.
As far as I know, 88 glue is used for inexpensive auto tuning (gluing leather/leatherette to interior parts, including iron ones) by those who don’t mind spending money on regular glue (like MAN). Claims: then the sun comes off and the aroma comes off.
Galileo. Faux leather
So there is a possibility that it is suitable for the door if it is not on the street. For testing, glue a small piece with 88 glue.
Alternative adhesives for upholstered furniture such as Tapitzer, Hercules, etc. In common parlance - red glue.
Maybe they will cast it somewhere in production, since it is not sold at retail. Roll out dermantine
from the roll correctly, and level it with a rag from the middle to the edges.
Comparison of eco-leather and artificial leather / Binding leatherette
The glue on the door should not be liquid, like puddles, but dried, smeared with a film - then it sticks well. ran into the same difficulty. I glued it to metal and plaster - first foam rubber, then dermantin
.
I used two glues - 88 and what was recommended by dermantine
-shop for dermantine - some kind of glue in a can. The result was discouraging (the foam stuck well, no questions):
- after applying glue to a piece of dermantine, the dermantine
changed in size up to plus 20 percent. What accuracy and precision there. - yeah, I thought - and applied glue
exclusively to the surface to which I was gluing. After the glue began to interact with the dermantine, the dimensions began to increase, bubbles appeared, smoothing with a roller did not correct the situation. - discouraged, thought lost. Well, if the dermantine becomes wider, then after drying it will become tight, yes, but by a percentage, but here when a piece of 20 cm suddenly remains dangling, well, what a tightness. stupid question - but how to stick an inexpensive piece of dermantine (5,000 rubles - 3 linear meters, plus a can of 88, plus a spray can) onto foam rubber?
How to sew up holes and cuts
In order to stitch the product, you will need a sewing machine, a special strong needle, a prepared leather patch and threads of a matching color. This largely determines how carefully you can deal with eliminating defects on a jacket at home.
Restoration of leather canvas consists of several steps:
- We get to the place of the tear from the inside of the jacket (to do this we rip the lining).
- We trim the edges of the hole, making them as even and smooth as possible. We prepare a fabric patch, which we apply in this place. We take into account that the flap should protrude beyond the edges of the “wound” by 1.5-2 cm.
- A piece of skin, which is slightly larger in size than the damaged area, is applied externally. Make sure that both patches are positioned evenly in relation to the hole.
- Using a sewing machine, attach the patches.
Important: make sure that the needle is strong enough and suitable for working with leather. Otherwise, you can not only ruin the jacket, but also damage the sewing machine.