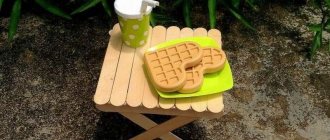
Materials and tools
Before you make a doll cabinet with your own hands, you need to prepare the necessary materials:
- cardboard box;
- cardboard;
- white paper;
- paints;
- wooden small sticks;
- scissors;
- glue;
- rulers, pencils;
- paper clips;
- matchboxes;
- miniature hinges, screws.
It is better to use acrylic paints in your work. They contain no toxic components and are therefore safe for children. To make the furniture look unique and beautiful, you will need decoration materials.
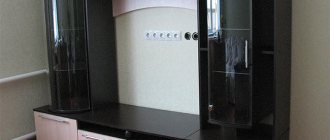
Paper wicker doll cabinet
Weaving experts using newspaper tubes can easily weave a wardrobe for dolls. Such a cabinet will be very beautiful and quite strong, especially if the tubes are painted before and after weaving.
To weave a wardrobe from paper wicker you will need:
- Newspapers.
- PVA glue.
- A piece of cardboard for the base.
- Scissors.
- Hot gun.
Execution process:
Weaving from newspapers is a rather time-consuming process, so it is recommended to divide all the work into several stages. First you can prepare the tubes. Their length will depend on the size of the cabinet.- Prepare cardboard on which to attach several tubes as the main twigs. They should be secured with a hot gun.
- The weaving process itself may vary. There are several techniques for weaving paper wicker. Examples can be found on the Internet
- In order for the cabinet to be stronger, it is necessary to reinforce it with wooden slats in the corners.
- Next, move on to decorating the cabinet with decorations, attaching handles made of wire or buttons. The child will be happy to join this process or take it completely into his own hands, because it is so interesting.
Preparing parts
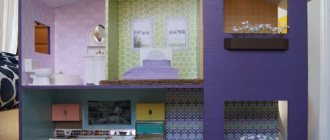
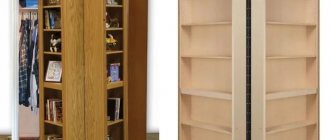
Having the necessary materials and tools, we can make furniture parts. Barbie has a lot of things, shoes, purses, and often there is nowhere to put them. For this reason, a closet even with two sections will be impractical. In order for all the doll clothes to fit, they need to be laid out on shelves or drawers. To do this, the furniture should be equipped with a large number of medium and large compartments in order to accommodate long fluffy dresses. The main compartment should be equipped with shelves. In Barbie's closet you can hang hanger holders that are easy to make with your own hands. The work is painstaking and requires concentrated attention. In order not to be distracted, all parts should be located near the workplace.
Drawing Details
Assembly
Since we took cardboard as a basis, it will not take much time to assemble a piece of furniture. It takes place in several stages:
- cut off the top part of the cardboard box, glue the edges of the box to form the base of the doll's wardrobe;
- for a presentable look, paste the resulting base with plain white paper;
- cardboard is not a strong material, so the cabinet needs to be strengthened. We cut out rectangular parts from cardboard, the height and width of which are equal to the parameters of the interior of the furniture being manufactured;
- we paste the cut out parts with paper, then glue them to the walls of the future cabinet;
- An important step when assembling furniture is the door, because doll things should not fall out of the closet. We also make it from two pieces of cardboard, the same height as the cabinet itself. The door should open and close freely. We take small hinges and attach them from the inside to the base, and then to future doors. If the process is not entirely clear, you can watch it on video.
- The last step in the assembly is the door handles. You can make them from anything, for example, use small screws or cogs.
It is better to install doors after installing all the necessary parts in the cabinet.
Connecting identical parts
We attach the wire to part 1a using tape
Glue element 1b over the tape using “Moment”
All parts of series 1, which are shelves, are attached in an identical way. Marking part 3a for shelves
We attach the shelf itself and make notes with a marker in the place where the wire will pass
Use thin scissors or a thick needle to make holes on these marks.
The edge of the shelves is coated with glue
The wire is passed through the holes
The wire is tied on the reverse side
All other wires are attached in the same way. Element 2a is attached to the back side of the shelves in exactly the same way. On the same part, we apply two wires in parallel in a vertical position and fasten with tape. Lubricate with glue, attach 2b and use the press again.
We also equip elements 4a and 4b with wires horizontally and vertically, and glue them together. In the upper part of element 2 we make a small opening
In part four we make the same hole opposite and insert a twelve-centimeter kebab stick into them
At the bottom of the cabinet, called 5a, we mark the places where the wires from the walls will pass and pierce
Immediately lubricate the lower edges of the walls with glue, pass the wires through the bottom
We tie them in knots on the reverse side
Lubricate the part, apply 5b on top and use paper clips
Now we go to the top of the cabinet (elements 5b and 5c) and do the same work. On the back wall (6a) we mark the walls and shelves, and make holes in the places for the wire
Lubricate the ends of the walls and shelves with glue, apply part 6a, passing the wires through the holes, tie them on the back side, glue element 6b on top
The creation of the cabinet is completed; now we need to finish the cabinet. To do this, take a napkin, lubricate it with PVA and glue the inside of the cabinet
In the front part it is necessary to leave one and a half centimeters “bare” for attaching the doors
Cut the napkin to size and cover the outside of the furniture on all sides.
For the ends you can use “Moment”, since with “PVA” the material may break
Decor
The resulting structure is painted or decorated using decoupage technique with napkins, trimmed with fabric and the edges are decorated with braid, stickers or natural material. You can entrust this work to your daughter, let her develop her imagination!
Handles for doors and drawers are attached at the last moment, when the surface of the cabinet is already completely decorated. Wire and round beads look good. The wire is cut into small identical pieces and a loop is formed. The middle is covered with paper or wrapped with the same wire. An awl is used to poke holes in the doors and insert a handle. The ends of the wire are bent on the reverse side and fixed by twisting together. The closet is ready, all that remains is for my daughter’s doll to carefully hang her things here and start playing.
Filling installation
The closet needs to be divided into shelves and compartments to make it spacious:
- we measure the height of the furniture, then make plates out of cardboard, which we used to strengthen the base, then glue them into the cabinet;
- measure the width and depth inside the compartments, cut out the shelves in the shape of a square or rectangle. We cover them with white paper and glue them between the divisions;
- The hanger holder is made from a wooden stick. Cover it with acrylic paint and glue it between the two divisions.
Hangers can be made from ordinary paper clips, which can also be painted in any color.
The cabinet can be equipped with drawers. Matchboxes are perfect for this. There are many videos that clearly show the assembly. In a short period of time, you have a do-it-yourself Barbie wardrobe ready.
We cut out the doors, cover them with a napkin and place a mirror on one of them
Using wire and beads we make accessories
At the bottom of the cabinet we glue a ten-centimeter kebab stick
We do the same on top, as shown in the photo.
First we install the left door
After that - right
From below and from above we glue sticks already in front of the door
Wire hangers
Decoration
The resulting piece of furniture looks rather boring - it needs to be decorated. There is room for imagination, because when decorating you can use stickers, sequins, sparkles, colored paper, and foil. Ribbons, lace, beads and flowers of different sizes will look good. You choose the style of furniture yourself, and accordingly, the decorative elements can be very different. You can even paint the cabinet with pencils or paints of different colors.
Soon there will be a magical transformation of a boring piece of furniture into a stylish, fashionable and bright wardrobe for the Barbie beauties. Your child will definitely like it, since you will create it together. Such toy pieces of furniture will always be unique.
Sizing
The dimensions of toy furniture are determined in accordance with the size of the doll.
Depending on the gender of the toy, the length of the doll may vary:
- male dolls - 15 cm;
- female dolls - 14 cm;
- baby dolls - from 7.5 to 10 cm;
- baby - from 6.5 to 7.5 cm.
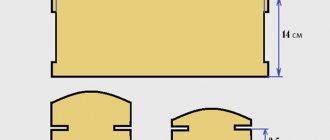
These are standard sizes, for which the cabinet height is at least 16.5 cm.
The world of dolls is quite wide. And these parameters are not constant. So, fashionista Barbie’s closet height is 30 cm.
The largest dolls are:
- Juan Antonio - 40-55 cm;
- Baby Annabell - 46 cm.
To make a wardrobe for such dolls, it is better to choose a box from under boots or household appliances.