Nature is the most perfect creator. Each of her drawings, each form is unique. Designers skillfully use this, complementing sophisticated or high-tech interiors with objects as close as possible to their natural state.
Meanwhile, everyone can see the unique true beauty in an ordinary piece of wood, a stump, a branch, skillfully highlight it with their own hands and find the best place for use in their own home, at their summer cottage, in the garden. A large or small table, made from a longitudinal or transverse cut of wood, will become the highlight of your living space.
Do-it-yourself table made from wood cuts, what could be simpler?
Today, in the age of all-consuming urbanization, various interior styles that symbolize unity with nature, such as country, Provence, peasant style and others, are becoming increasingly popular. We miss simple natural things, we reach out to nature in search of silence and peace. We invite you to create with your own hands a table from a stump that will fit perfectly into the interior of your city apartment or country house, provided that you prefer these particular directions or their adequate eclecticism. It will decorate your home and give it a vibrant personality, without making a dent in the family budget.
A table made from a cut of wood does not have to be “hatchet work”
In order to create a table from wood cuts with your own hands, you will need very little, the main thing is imagination and desire.
- Tree stump table
- Operating procedure
- Furniture made from tree branches
- Interior items made from branches
Tree stump table
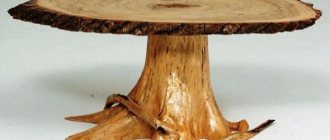
To realize your idea, you will naturally need a suitable stump. The happy owners of a dacha farm with a stove-heated house have enough of this goodness. If you are not one of them, do not despair, there will probably be such friends. Otherwise, you can just visit the nearest forest. But no, don't cut down living trees! Find a fallen tree and cut it into the necessary parts. If you are lucky, you will get not only a table, but also a chair from a stump, or even a whole set.
If a tree has been uprooted, this very root can also be used to advantage.
The root produces quite picturesque interior specimens
Important! The tree should not be rotting. If the wood is damp, it will need to be dried. To do this, leave the prepared cuts in a dry, warm place for another month. The bark should be easy to remove from the tree.
In addition to the most important material, you will also need:
- chisel or chisel and hammer (to carefully remove the bark from the trunk);
- construction level (the top of your table should be perfectly level, right?);
- plane for leveling the surface (if necessary);
- sandpaper of various grains for sanding wooden surfaces;
- antiseptics for treating wooden surfaces;
- various finishing coatings (stain, paint, varnish, etc.) depending on your wishes and preferences;
- various accessories that can be purchased at furniture stores (legs, wheels, handles, etc.).
Operating procedure
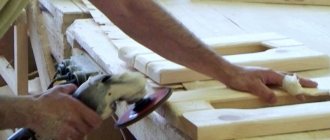
- Once the suitable material has been selected and prepared (cleaned of dirt and dried), tools and other necessary attributes have been prepared, you can begin to work. Carefully remove the tree bark using a chisel and hammer.
- Assess the evenness of the surface using a level and level it with a plane if necessary.
- Then, using sandpaper as intended, carefully sand the workpiece on all sides. You can speed up the process by using a grinding machine.
- All that remains is to cover your table with a special antiseptic and selected paint and varnish coatings, as well as install the fittings; for this you will need screws, a screwdriver or a screwdriver.
By the way, the top of such a table can be made of a different material. For example, durable transparent glass is perfect for a picturesque tree.
If you are interested in the process of making furniture from hemp, and have a great desire to try it, then for inspiration you can use the following ideas for creating interior masterpieces from end cuts of wood.
As you can see, not only heating material can be made from hemp, but with a little effort and imagination you can transform your home, creating a truly worthy option in the eco-style that is relevant today.
Furniture made from tree branches
Having used hemp, sections of the trunk and roots of the tree, you should not neglect the remaining parts, namely its branches. Let's look at the options and their applications. The branches can also make a nice table.
However, the process of making it will take much more time and effort. You will need remarkable skill or the help of someone close to you. Glue for wooden surfaces, as well as small screws, will help to connect the parts together.
Interior items made from branches
Before you start work, select the appropriate material. The main condition is the absence of rot and mold on the branches. In turn, the cracks will add decorativeness to the branches.
- Clean the natural material from excess dust and dirt, and then dry thoroughly. It is best to dry the wood in the shade in a well-ventilated area or even under a canopy, if possible.
- Next, you will need to process the branches with carving. Work in the direction of the fibers, first with a coarse and then with a fine nozzle. Don't forget about the end cuts.
- As already noted, parts can be connected to each other using glue, screws, a wedge, etc.
- After the blanks for the final product are ready and sized for joining, they must be processed. Large cracks that are very embarrassing can be eliminated using epoxy resin in several stages. Once the resin has dried, sand down any exposed areas.
- The next stage is assembling the product.
- The finished piece of furniture must be decorated. To do this, you can use stain, with which you can radically change the color of the wood, without losing all the charm of the texture of the material.
- Finally, it is advisable to use varnish applied in at least two layers.
Your wild imagination, as well as our photos, will help you adapt the branches! Be bold and don’t stop in the face of difficulties!
Decoration of any interior
Many horizontal rounded cuts of wood are now actively used as decoration for walls, floors and, of course, in the production of tables, chairs, and other furniture. Tables finished using this technique are unique; the arrangement of small and large cut circles can be arbitrary or form a specific pattern.
Making a beautiful product with your own hands is not easy, but very interesting. And if you follow all the requirements for the work, the result will please you.
How to make a table from tree roots?
Basket:
There are no items in your cart.
| 0 products | Total: 0.00 rub. |
- Entrance
- Registration
- home
- About Us
- In stock
- Workshop
- To order
- Delivery
- Contacts
- Cooperation
Original handmade furniture in the “Furniture from Branches” workshop
In recent years, a very interesting and truly creative trend has begun to gain particular popularity - rustic, furniture made from branches.
Interior items made from branches are truly handmade designer furniture. After all, it is impossible to find identical branches and roots in nature, which is why works made from such material are exceptional, exclusive.
Furniture made from branches fits perfectly into the decor of country houses and cottages, as well as into the concept of a modern interior. Products of this style look especially good in private baths, saunas or luxury offices in office interiors.
Studio of designer furniture in Moscow
If you use original wooden furniture in the interior, the style can be maintained thanks to various additional elements, such as panels made of branches, finishing elements for stairs, walls, ceilings, etc.
If desired, wooden products can be supplemented with various decorative elements, carvings, colored ornaments, and semi-precious stones.
Custom driftwood furniture
Furniture made from branches, roots and driftwood is very durable, since the types of wood for this are selected from the strongest - oak, ash, acacia, etc.
The master is ready to perform custom work of any complexity. This can be a set or simple solutions in the form of single pieces of furniture. The main thing is that they all fit perfectly into the environment and become its true decoration.
When an order is received, the master searches for the workpiece, after which he processes it, cleans it of dirt, strips it of bark, sands it to remove weak fibers to a hard layer, until a tempting pattern of layers of the plant appears.
Having decided to order original furniture from us, you can be sure that you are purchasing a one-piece, unique item, which, even with a strong desire, can only be partially repeated.
Exclusive furniture made from driftwood
Furniture made from branches is an opportunity to create your own, original interior indoors, using not only branches and driftwood, but even glass or stone.
Such furniture will add a special charm to your apartment, house, bathhouse, or garden. Nothing is impossible if a real master gets down to business - you can make almost any piece of furniture and fit it into the existing style of the room.
Furniture and interior items
We specialize in making custom-made furniture according to individual designs and sizes.
Interior design can be thought through to the smallest detail and you can diversify the main pieces of furniture with small details made from branches - right down to decorative lamps and a mirror frame.
The cost of furniture in our workshop is negotiable
Prices for furniture made from branches and driftwood may sometimes seem overpriced, but we must not forget that the master works individually on each order; there simply cannot be mass production here. Sometimes it takes more than one month of work to produce a certain product.
Eco-style seats
Wood can be heavy, so we had to put the ottomans on wheels.
You can make high bar stools.
If you add a little imagination...
And this is the designer’s job.
Features of stump tables
- What can they be?
- Tools and materials
- How to do it yourself?
More and more often there are owners of plots, houses and apartments who not only want to create a cozy space around themselves, but also add a touch of originality so that it looks not only beautiful, but also exclusive. In this case, it is worth considering stump tables and their features as an interesting option.
What can they be?
The answer to this question depends entirely on the owners’ imagination, creativity and the availability of the necessary materials, since from a stump you can make both the simplest table and a very original option that will become a real highlight of the interior.
First of all, it is worth remembering that such interior elements will be combined with certain styles, such as, for example, eco-style, chalet, country.
But it all depends on how to process the stump and what materials to use , because if desired, such an accessory can fit into Provence, Japanese style, and even loft.
The simplest option (provided that the stump is on the site) is to make a table right in the clearing and create a rest area around it. In this case, you will only need to treat the stump with the necessary solutions, if necessary, give it a shape, varnish or paint it. If you need a larger table, you can make a tabletop from boards or a sheet of plywood.
If you plan to place the piece of furniture in question indoors, you will first need to uproot the stump, put it in order, and then make a table out of it. In this case, the roots themselves may be legs, or you will need to carefully saw them off and attach supports or wheels. The tabletop can be made of various materials:
- wood;
- metal;
- glass;
- plastic.
Many materials can be combined with wood, the main thing is to skillfully combine them and subordinate them to a common idea. If at first glance it is difficult to imagine what the future table might look like, you can pay attention to ready-made examples. Getting to know them will definitely help you come up with your own unique option. As a last resort, you can repeat someone else's idea.
- Two identical tables fit very harmoniously into the interior. You can put flowers on them and use them for tea drinking.
- A glass tabletop on a stump of a bizarre shape - and an exclusive piece of furniture is ready, this can be placed in any room, and it will look harmonious.
- And several of these items already form a composition that will become an original interior decoration.
- A simple wooden tabletop in a square or rectangular shape is also a worthy option. You can spend quite comfortable evenings at such a table in the garden.
- If you combine wood and glass, and add lighting inside, you will get not just a coffee table, but also an unusual lamp.
- A stump with natural relief and an uneven top looks very original. With proper processing, it will not lose its natural beauty and will fit into any environment.
- Some craftsmen can even make a masterpiece out of a stump. The base in the form of some forest dweller gives it a fabulous look. But here you already need to have a certain talent and be familiar with wood carving.
Tools and materials
To make a table from a stump, you will need tools designed for making simple furniture from wood.
These include:
- axe;
- hammer;
- saw;
- chainsaw;
- plane;
- bit;
- jigsaw;
- grinding machine;
- hacksaw;
- screwdriver;
- screwdriver;
- drill;
- a simple pencil and marker;
- roulette
In addition, you will definitely need a solution for treating wood against rot, mold and mildew, varnish, paint, sandpaper, glue, and boards.
The set of tools and materials depends on what idea should be translated into reality: whether it will be a simple round table made of a large oak stump or an exclusive fancy-shaped table with roots-legs, or maybe the elements of the table will be metal or glass inserts. Based on your own drawing plan, you need to prepare a set of tools and materials.
How to do it yourself?
Before you make a table from a stump, you need to decide where it will be installed (in the house, on the street), what shape it will take, and what other additional materials will be needed.
- The stump first needs to be uprooted or carefully cut down at the very base, because a coffee table can look like a solid structure that doesn’t even need a tabletop.
- The stump should be checked for rot. Perhaps it has rotted inside, and nothing can be built from it.
- Next, it is best to remove the bark, as there may be insect clusters there. If the goal is to preserve the structure with bark, it should be very well treated with pest control compounds.
- In all cases, the wood must be treated against mold and mildew, especially if the table is located in a damp room or in the yard.
- The treated stump, freed from excess knots and irregularities, must be dried in a well-ventilated area. This takes about three months. But in some cases, all the irregularities and knots are left behind. It all depends on the idea.
- If you decide to make an ordinary table of simple design, you need to cut off the top part so that the top is even. The sides should be sanded (after removing the bark). This can be done with a grinding machine or sandpaper.
- After you have managed to make the workpiece smooth, it can be varnished or painted. The advantage of varnish is that it preserves all the external beauty of the wood, giving the surface only shine. Paint is applied when the table must fit into a certain color scheme. The varnish must be applied in several layers, allowing each layer to dry.
- You can glue felt to the bottom of the table, then the floor surface will be protected from scratches. Another option is to screw on compact wheels, then the table can be moved as needed.
- If the stump itself was wide, then the upper part may remain that way. But if you want more space on the table surface, you can make a wooden tabletop: round or square.
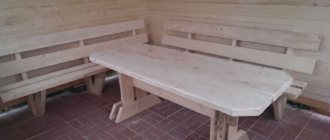
If you have several stumps, you can use the same principle to make a table and low chairs that will decorate the seating area in a room with a rustic or eco-style, and will also be a good solution for the local area.
Watch the video to see how to make a stylish coffee table from a tree stump.
Original shelves
A protruding trunk in your garden plot, like a stumbling block in your path? Get creative and turn it into an art object!
Ideas for furniture and small decor from driftwood and branches: 150 photos of interesting options
The beauty of interiors and adjacent areas is created not only by construction and finishing materials. They will not look so impressive if you do not complement them with decorative elements, contrasting spots and interesting shapes.
These properties are combined in decorative furniture, for the manufacture of which unusual materials are used. Furniture made from driftwood and branches is worth trying your hand at making unusual tables, chairs, armchairs and small decor.
Working with wood in its natural form requires experience and artistic vision.
What is best to use as a raw material and where to look for it?
Not all wood is suitable for furniture. Lucky are those who manage to find oak (especially stained), larch or ash.
Almost finished composition - furniture made from tree roots
Depending on where the branch is found and what condition it is in, the processing will differ.
Fresh ones are dried; those caught from the water are first cleaned of rot and rotten layers.
Irregularly shaped branches are used to create structures that are classic in human understanding. Return to contents
What is the value of furniture made from branches, driftwood and stumps?
First of all, of course, uniqueness. No one in the world has the same furniture, since natural exclusivity is used - there are no identical branches, just as there are no identical fingerprints.
Decorative candlestick made of planks
- Safety. The material does not cause allergies, it does not contain toxins and other delights that factory products are full of.
- Reliability, especially if roots were used. With high-quality assembly, furniture lasts for decades.
- You can assemble any piece of furniture, since the material used is different (in shape and size).
What can be made from driftwood, roots and branches
Driftwood makes fantastic pieces of furniture and decor that reveal the capabilities of man and this raw material.
Small decor
Many items fall into this class.
Candlestick
Combining fire and wood is dangerous, but this is where the skill lies. In the presented composition, a number of branches are connected, forming a solid base.
A metal patch is attached to the top of each, on which a low candle is installed. This candlestick will decorate your festive Christmas table.
Vase of branches
The photo shows a complex structure consisting of small branches.
The branches are connected to each other with glue
Inside there is a transparent vase into which you can pour water. If the inner container is removed, the product can be used as a herbarium.
Wooden chandelier
Like previous products, it does not exactly relate to furniture, but it will complement it, making the interior recognizable. There is no difficulty in manufacturing, except for the time spent.
There are a lot of twigs in it, and this is a long and painstaking work. Using the same technology you can make flower pots.
Such a chandelier will not be able to provide a lot of light - its purpose is purely decorative
Another version of the chandelier, but this time the structure is complex. When designing, you will have to not only weave branches in the shape of a nest, but also quietly lay electrical wires, not forgetting about fire safety. This chandelier is attached to a chain.
This chandelier will be appropriate in a rustic style
You can see other chandelier options in the gallery:
Clothes hanger
You can make a beautiful and reliable clothes hanger from branches. There are different execution options - mounted and in the form of racks.
Furniture made from tree trunks - knots as hooks
The photo shows an interesting option, with high-quality wood processing. This product will look appropriate with almost any style, from modern to natural.
Lamp
From uneven branches you can make something like a table lamp on an adjustable leg.
DIY furniture made from roots and driftwood
In addition to wood, the product uses rope and a fabric lampshade. The base is made of cross-cut wood.
Combination of driftwood with other materials
Driftwood is often combined with materials of non-natural origin. This includes glass, plexiglass, and epoxy resin.
For example, for such a shelf a wooden base and glass are enough.
Hanging shelf made of driftwood
The difficulty in making such furniture lies in the technology of combining different types of materials. Most often glue is used for this.
Wooden saw cuts are combined with unprocessed materials, as they have a large area, which allows the construction of countertops, seats, and shelves. This is shown in the following photo gallery.
Large furniture
Examples of large furniture are no less diverse. Garden furniture made from a tree trunk and branches looks original.
As for the types of furniture, there are plenty of options:
- Tables made of driftwood and branches differ in shapes and sizes. Having a wide base, craftsmen often make just them;
- Benches, armchairs and seats are also in great demand. You can assemble something similar yourself without much experience;
You can learn about making a garden bench from wood from the article on our website.
- Beds are much less common, but this does not reduce their visual appeal and originality. The products are massive, so they are designed for spacious rooms.
The types of furniture don’t end there – this material is suitable for everything if you approach it wisely.
Read on our website: making garden furniture from logs.
DIY furniture made from branches
It is impossible to calculate the shape and type of raw materials in advance, so everything happens right in the master’s head. You need to imagine in advance how the parts will be fastened together, what the result will be.
The best assistant here is experience, which comes only with time. Before working on a large-scale design, it is imperative to practice on simple shapes and designs.
Preparation
If the raw materials have already been found, you need to carefully consider each detail and imagine how it can be used. At this stage, you should have an idea of the layout of the branches.
You can take another path - imagine a certain shape of the product, depict it in the form of a sketch, and only then go in search of a suitable material.
Bench made of driftwood
Next, the material is processed:
- cleaned from dirt and rot;
- remove the bark (not always and everywhere);
- dried under a canopy in natural conditions;
- or dry in an unheated room.
Sanding, impregnation with antiseptics and painting are rather production steps, and are performed either during or after assembly.
How does the assembly work?
To make the furniture reliable and durable, you must follow several rules:
- Before starting assembly, after adjusting the parts to size, it is necessary to prepare the ends of the branches and roots. Ideally, they need to be given a concave shape.
- You also need to clean them with a coarse brush, using gentle clockwise movements.
- Then use an electric drill with a medium-hard brush attachment and finally polish the surface with fine-grained sandpaper.
- The parts are connected using the following methods: gluing, according to the tenon-groove principle (the tenons are made wedge-shaped), using self-tapping screws.
Manufacturing
As in any business, to begin with it makes sense to practice on simple products: small sculptures, lampshades, photo frames, mirror framing. Once the skill has been mastered, you can begin creating more impressive furniture with your own hands.
Preparatory stage
First, the layout of the product is well thought out in order to clearly understand what the output should be. It will take not only precise calculation, but also imagination to connect disparate fragments by texture or pattern. For example, the backs of chairs, armrests, footboards or headboards of a bed, legs made of curved branches will look more interesting than straight ones.
Then the material is selected. Wood of different thicknesses is used for furniture made from branches or roots: graceful thin knots for a lampshade, thicker ones for a chair or bed. You can use dry or fresh raw materials.
The wood is dried slowly under a canopy, and at the final stage - in a room without heating.
Assembly according to all rules
In order for furniture to serve for a long time and be aesthetically pleasing, when making it yourself, compliance with the rules is required.
The ends of the roots are processed clockwise without pressure: first with a coarse brush, then with a drill, then with a finer brush. After drying, assembly begins.
Furniture made from branches is connected piece by piece in several ways:
- gluing;
- wedge-spike;
- mounting on self-tapping screws or screws.
The joints are sealed with wood glue.
Final finishing
You can make furniture from branches or roots even if they have cracks - this gives the product uniqueness and charm.
However, if such defects do not inspire confidence, they can be easily repaired with dark-colored epoxy resin, and then the product can be sanded.
The most interesting stage - decorating - begins after sanding, assembling and removing excess glue. The product is covered with several layers of stain until the desired shade is obtained.
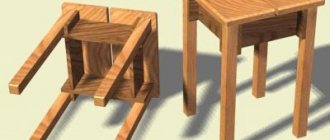
DIY wooden table
They say it's time. the time you spend at the dacha does not count towards your life! That is, time slows down, you do not age, waste does not accumulate. The sides are not growing! And if you still find time for your favorite hobby, which will also bring benefits, since you will make an excellent thing with your own hands! So there you go! Today I will tell you how to make a small country table and bar counter from those trees that our unstable spring fell here and there. It’s no secret that a maniac handicraft, when he sees a fallen tree, begins to think about it, in addition to the natural regret that such a big, beautiful tree has been felled. how to get this tree for yourself. for that. to make something beautiful out of it! I’ll tell you a secret that such thoughts begin to torment the needleworker even at the sight of a hundred-year-old oak tree, fenced off with a chain from vandals. He is ashamed, he is suffering, but in his fantasies the oak has been cut down, and the stump has been uprooted and is already lying in his dacha - awaiting rework. After all, the tree must first dry well before you start creating something beautiful from it. And that is why the stump with roots lies and waits. If not for this, the maniac would have grabbed him immediately, buzzing bloodthirsty with his saw!
So! I have already written several articles on how to recycle found stumps into utensils needed for your garden and your mood! Namely right here.
Therefore, now I’ll just tell you about two of my new crafts, which added joy to me and my loved ones.
Rotten log table
If you have a piece of log, then the fact that it is a little rotten on the inside should not stop you! You can cut the log in half lengthwise and remove the rotten part. Then process it as in the above article and what can you get as a result? And you can get an excellent base for a table. Don't believe me? Then watch! Here he is! A stump of a rotten log, from which all the rottenness was removed by caring and skillful hands:
And what ? Here's what:
Almost a leg for the tabletop! And if you take a well-dried cut of wood and treat it with stains and varnishes, then it will be an ideal tabletop for such a leg:
Not a table - but pleasure!
Table made from small saw cuts
When you have already made so many tables from stumps and logs, then simple ways are no longer for you and you want to do something unusual! Beautiful and original. Especially if the workshop has prepared well-dried small cuts of wood and logs. Each sleeper in itself is too small to become a tabletop, but the bad soldier is the one who does not dream of becoming a general!
Let's do this and lay the cuts on a flat surface. Let's trim some of them so that we get some semblance of a puzzle. Then glue it with wood glue and sand it with a sander. Then stain to achieve the desired color. After this, we make formwork from tape and fill it with epoxy resin. So what do we get? And we will get a wonderful, unusual, very beautiful, stackable table top!
She's really a beauty, isn't she? Just a piece of log, even if very well processed, will not fit on such a tabletop), so the leg here will be no less intricate, namely, a stepped leg! And it will not be attached in the middle of the table, but will be moved to the edge of the tabletop. Why is this position of the leg convenient? And the fact that this is unusual and, moreover, you can move the table so that part of the tabletop looks over the edge of the veranda, which means that children, rushing by, can grab a drink of water or grab a pie.
I think both the idea and execution are on point! Of course I'm not Papa Carlo. but on the other hand, I don’t need animated tables either, so it’s a big family!
Everyone is happy and the NJ demonstrates the height of the table, as well as its undoubted convenience:
A garden crow named Balatona Petrovna looks with envy and embarrassment.
She would also love to do a photo shoot with such a beautiful table!
Processing methods
A stump (stump, log) is a tree. Wood is a natural material and is susceptible to rotting. When it dries, it shrinks; when it gets wet, it swells. They process and protect hemp or logs to create crafts in several ways that can be combined with each other:
- Chainsaw cutting. Shaped cutting with a chainsaw to create crafts from stumps and logs for the garden and home is used to create tables, chairs, stools, and armchairs. Cutting with a gas or electric saw requires certain skills and compliance with safety precautions. You can learn how to operate a chainsaw on our website. Before cutting, it is better to make markings, outlining the contours of the future craft, for which you can use a regular pencil. And then, as with sculptors: we take a log and cut off all that is unnecessary from it.
- Firing with a burner. It will delay the rotting of hemp and give it a beautiful, aged appearance. To do this, after firing, it is necessary to clean the burned surface from excess charred wood using sandpaper, a metal brush or an angle grinder (“grinder”) with a brush or grinding disc.
- Protection. To protect wood before painting, it is necessary to use wood antiseptics, the simplest and most inexpensive of which is iron sulfate.
- Grinding. For grinding, an angle grinder with a brush or grinding disc is most often used. A brush with metal bristles, less often sandpaper. Various grinding machines are also used.
- Painting, varnishing or waxing. It will also delay rotting and give a beautiful appearance, especially when using varnishes and waxes. The varnish must be applied in at least 2 layers, allowing the previous one to dry, or even better, after applying a layer of varnish and drying it, sand the surface before applying the next layer.
Processing hemp and logs with your own hands
Slab tables
Coffee tables made from catalpa cuts No. 1
- Material category:
catalpa and oak - Thickness:
60mm - Diameter:
510mm - Height:
470mm - Coating:
Oil with hard wax Saicos (Germany) - Underframe:
oak
Coffee tables made from catalpa cuts No. 2
- Material category:
catalpa and oak - Thickness:
60mm - Diameter:
510mm - Height:
470mm - Coating:
Oil with hard wax Saicos (Germany) - Underframe:
oak
Coffee tables made from catalpa cuts No. 3
- Material category:
catalpa and oak - Thickness:
60mm - Diameter:
510mm - Height:
470mm - Coating:
Oil with hard wax Saicos (Germany) - Underframe:
oak
Coffee tables made from catalpa cuts No. 4
- Thickness:
60mm - Diameter:
560mm - Height:
470mm - Coating:
Oil with hard wax Saicos (Germany) - Underframe:
oak
Oak coffee table
- Material category:
oak and thermo-elm - Thickness:
40mm - Diameter:
600mm - Coating:
countertop oil with hard wax (Germany)
Coffee table made of thermo-ash slab
- Thickness:
40mm - Diameter:
780mm - Height:
440mm - Finish:
German oil with hard wax for countertops - Filling:
Epoxy resin filling with wave effect
Round table in loft style
- Material category:
larch, oak - Diameter:
850mm - Coating:
countertop oil with hard wax (Germany)
Oak dining table
- Width:
920mm - Length:
920mm - Material category:
Oak, thermo-elm - Finish:
Countertop oil with hard wax (Germany)
Oak dining table, No. 2
- Width:
800mm - Length:
1000mm - Material category:
oak, thermo-elm - Coating:
countertop oil with hard wax (Germany)
Loft style oak table
- Width:
850mm - Length:
1400mm - Material category:
oak, thermo-elm - Coating:
Coating oil for countertops with hard wax (Germany)
Loft-style oak table No. 2
- Width:
800mm - Length:
1200mm - Material category:
Oak and Thermo-elm - Coating:
Countertop oil with hard wax Saicos (Germany)
Loft style oak table No. 3
- Width:
800mm - Length:
1200mm - Material category:
Oak and Thermo-elm - Coating:
Countertop oil with hard wax Saicos (Germany)
Table made of walnut slab and white polymer
- Width:
840mm - Length:
1540mm - Material category:
Base - oak, table top - walnut with white polymer - Finish:
Countertop oil with hard wax (Germany)
Lamps and fixtures
Wood is an excellent material and a godsend for those who are accustomed to finding useful uses for everything. An excellent example of this is magnificent lamps, chandeliers and lamps
Advantages of natural furniture
The choice in favor of natural furniture is due to several reasons:
- Wood does not pose a risk to human health. Furniture based on it does not emit toxic substances and is suitable for people suffering from allergic reactions.
- Calm colors have a positive effect on the emotional and mental state and improve the atmosphere in the house.
- Timber products have a long service life. Wooden furniture has good wear resistance. The products are practically not subject to rotting.
- Each cut has a unique natural pattern. Graceful carving gives the cladding originality. In most cases, wood fits well into any interior style.
- This criterion is relevant only when making furniture yourself. The purchased option belongs to the expensive segment.
A table made of natural wood fits perfectly into the eco-friendly interior
Preparing for work
The room must be well ventilated or have forced ventilation. The indoor air temperature should not be lower than 22 °C. High humidity and dust can ruin the work.
It is necessary to prepare materials for the manufacture of formwork. The formwork or form can be assembled from plywood, plexiglass (without scratches or chips) or polished aluminum sheets. You will also need release agents such as wax or semi-permanent release agents. For “home” use, wax is better. And if you are planning a series of countertops, then semi-permanent separators are better, they allow you to make more than 20 removals without rebuilding the separating layer.
Some home craftsmen use ordinary cosmetic Vaseline as a separator. It is easy to purchase, but it is difficult to perfectly align on the mold/formwork and it will cause clouding in places where it comes into contact with the resin. This layer will then need to be sanded.
Accordingly, you need to prepare tools for grinding, or at least a set of abrasive paper of different grain sizes for manual sanding.
Don’t forget to prepare personal protective equipment for your loved one) These are gloves, a respirator, and safety glasses. A disposable painting overall and a cap will not be superfluous, because in its liquid state the resin seems to attract any speck of dust, lint, hair...)
Cover the floor and other horizontal surfaces in the area affected by the resin with polyethylene to keep them clean.
You will also need containers for measuring and mixing ingredients. Scales, accurate to 1 g. Or measuring cups, because Some resins are mixed by volume, and some are mixed only by weight, like EpoxyMaster.
Which epoxy to choose?
If you have already decided on the type, look, and design of the future countertop, now it is important to decide on the choice of epoxy resin. Epoxy resin for pouring a countertop must be transparent and have a long life, otherwise you risk seeing the resin “boiling” with your own eyes or spending many times more time on layer-by-layer pouring. Structural and base resins (such as ED-20) are not appropriate here, because they are thicker, which will not allow all the air bubbles to escape, they are more fragile, not always colorless (grade 1), and the hardeners that are used with such resins (pepa, theta, etc.) will give you a mixture with insufficient life time, which again It can also lead to both deformation of the product during rapid curing and boiling of the mixture.
Of the resins presented in our store, the EpoxyMaster 2.0 composition will suit you, allowing you to fill layers up to 5 cm in one layer. The composition has a low viscosity, provides good fluidity and filling of hard-to-reach areas, and moderate reactivity allows you to work with large objects. In addition, the EpoxyMaster composition has excellent self-leveling, resistance to peeling and cracking, good fillability and no “whitening” effect of the coating.
Thanks to the transparency of the composition, you can achieve almost any visual effect: pour in various fillers (shells, dry leaves, stones, pictures, etc.), you can organize lighting both in the thickness of the tabletop and under it, you can realize a creative idea with a phosphor or color the resin, while maintaining the overall transparency of the layer.
Polishing/sanding of the finished product
The product is considered finished after post-curing is completed; you can read more about this in the instructions for your resin. Post-curing allows your product to achieve its maximum properties. If post-curing is not possible or the instructions do not require it (not required), allow your product to gain strength. At a temperature of 22 -25°C this takes 5-7 days. Well, now you can start grinding and polishing work.
Attention! Wet the surface with water to avoid overheating your product, otherwise the resin will begin to melt and clog the abrasive paper. Well, or choose a speed mode that does not lead to overheating.
The final touch is to coat the product with UV-resistant polyurethane varnish in several layers, with intermediate sanding. This will save your masterpiece from yellowing due to exposure to sunlight and will give the piece a much brighter shine than polishing.
Features of caring for epoxy resin countertops
It is strictly forbidden to place pots, kettles and pans that have just been removed from the stove. The tabletop will melt.
It is not recommended to use aggressive and abrasive cleaning agents. The surface may become cloudy and lose its shine.
Source: www.livemaster.ru
We fill our tabletop. Instructions
Carefully read the instructions for the resin kit. Familiarization with this document will protect you from possible surprises in the process. We prepare the form or assemble the formwork. Be sure to make sure the mold/frame is sealed. Literally your entire future table can leak through a tiny crack. The cracks can be sealed with sealant, plasticine, thermal glue or paraffin. Treat the mold or frame with a release agent. Level it up! The wooden parts of the future countertop must be dry! BUT, even dry wood can release air during the pouring process. What to do in this situation? Before pouring, it is advisable to prime the wooden parts in places of contact with the resin. For these purposes, you can use the resin itself (ready-made mixture) or furniture varnish (polyurethane, for example). This will not only prevent air from escaping from the wood, but will also prevent dyes from migrating along the wood fibers if filled with colored resin. And so, the form/frame is ready for work. Wooden parts are primed and dried. Let's start preparing the mixture. We will talk about the EpoxyMaster 2.0 pouring kit
If it is necessary to tint the resin, then we add the dye only to component A (resin), before adding component B (hardener). You should add in very small portions, literally at the tip of a toothpick, until you get the color of the desired intensity.
Step 17: Setting up the cutter
To ensure a good fit of the legs, holes were cut from the ax handle using a hand router and a special tilting base at the same angle as the cuts of the ax handle - 22 degrees.
Important! The holes were cleared of all wood waste and sawdust before installing the legs.