Nowadays, such seemingly very simple at first glance floorings made from wooden sections of logs - such unique stumps - have become very popular. They are used as decorative elements, objects for various arts, as well as for larger projects, such as paving paths in the garden and on a summer cottage, finishing whole or part of the walls of premises.
Some craftsmen have long tried to make floors from wood cuts with their own hands for their own dacha or even apartment.
They claim that the work is not at all as difficult as it might seem, but the result is striking in its natural expressiveness of texture and design.
Almost all the materials that surround us in a modern home may be beautiful and comfortable, but, to be honest, they are artificial, not always environmentally friendly, and sometimes even toxic. Nowadays, it has become very fashionable to use more natural materials, in particular wood, both in room decoration, crafts, pieces of furniture, and in the manufacture of entire walls, floors, ceilings, even paths in the garden and on the plot.
As you know, everything new is well forgotten old. End cuts have been used in home and garden decoration for a long time. Both in rich houses and in simple village ones.
They were laid in outbuildings, forges, on the streets, in houses in the form of parquet, but not the kind we know now, but end parquet. It was made in the large halls of palaces, from a variety of wood species, even interspersed with soft types, and it looked excellent.
A variety of options for using wood cuts in the interior
It is very economical to use round cuts of wood in the interior. This is a budget option for creating an interior in eco-style, country, Scandinavian or Provence style. Logs of wood can be used as decoration (stands for dishes, shelves, frames, clocks), and as flooring or decoration of walls or ceilings. You can also lay out panels on the wall with saw cuts: in this way they usually zone the room, separating the kitchen from the living room, or accentuate individual elements, such as mirrors or doors.
Types of wood cuts
All trees have different colors and structures, respectively, and their cuts differ in these characteristics. The following types are popular in Russia:
- pine (cracks when dry, without a particular pattern, very scratchy);
— oak (combines several colors on one cut element, durable and does not crack);
— poplar (fibrous and does not crack, it is easy to process, after which the fibers become invisible);
- beech (bends when steamed, does not split, but may crack after drying);
— maple (dense and hard, which makes it difficult to saw, the texture of the fibers is clearly visible);
— alder (soft, fibrous, does not crack);
— linden (soft, does not crack, fibers are almost invisible, looks good after staining);
— birch (dense, easy to polish, does not crack, has an unusual pattern after polishing).
Pattern on a chandelier made from a cut of wood
Important: a wide cut of wood with cracks and remnants of bark is called a slab. Translated from English, the word means “slab”. In Russian, the word is used to denote a longitudinal or oblique frame of wood of considerable thickness and with raw edges. They don’t try to hide asymmetry and irregularities on the slab, but on the contrary, they highlight it even more.
Wooden cuts in the interior of a steam room in a bathhouse
DIY example
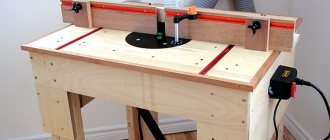
Having finished the brief overview, it's time to start the practical part. We offer you a step-by-step guide. Let's say right away that it is better for beginners to avoid tongue-and-groove joints. They require good carpentry skills and the presence of a special tool - a milling machine or, at worst, a hand router.
To work you will need several tools:
- Tape measure or ruler;
- Hand saw with fine teeth;
- Jigsaw for cutting legs and seat;
- Screwdriver for drilling holes and tightening screws;
- Belt sander for smoothing sharp edges on parts;
- PVA glue or wood glue.
Step one
– using a hacksaw from a 30 mm thick planed pine board, we cut blanks for the legs and seat. If there is no board wide enough to make a solid seat, then it can be assembled from several narrow scraps. To do this, you need to mark and drill holes in their side edges for dowels. Having smeared the dowels with glue, they are inserted into the boards, assembled into a single panel and secured with carpentry clamps. After a day, you can start making the seat.
Step two
– cut out the profile of one leg from thick cardboard and transfer it to all the blanks. We do the same with the seat blank.
Step three
– We cut out the legs and seat with a jigsaw, and then sand their sharp edges with a grinder.
Step four
— we assemble the legs in pairs, screwing self-tapping screws into their ends. We also use self-tapping screws to connect pairs of legs together. We arrange them so that they do not meet with previously twisted ones.
Step five
– marking holes for dowels on the legs and seat. Having done this work, lubricate the tenons with wood glue and place the seat on the base.
Anyone who wants to simplify the work a little can refuse to fasten the seat with dowels. Instead, you can screw four screws directly through the lid into the legs from above. To ensure that they do not stand out on a flat surface, drill shallow secret nests for them in advance. After screwing, putty them with wood putty and cover the product with varnish and stain.
When arranging your home and interior, you want to put your soul into it and do something with your own hands. The simplest way is, which is always needed and will remind you that the reader did it himself.
But in order to make a high-quality and reliable piece of furniture, desire alone is not enough. You need to strictly follow the instructions without deviating from them, otherwise the stool will break at the most inopportune moment, and the desire to make a new one will disappear instantly. Let's look at what is useful for this, how to avoid making frequent mistakes, and how to do everything quickly and the first time.
First, let’s determine what the choice of tree affects in principle:
Both cheap and expensive breeds are described here, however, all of them are suitable for the first time. Focus on the price - buy the wood you don’t mind paying for.
Reference
: the cheapest option is linden, the most expensive is oak.
Wood cutting options
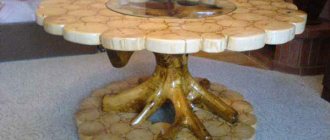
A cross-section of a log is the most famous option: the tree, like a carrot, is cut into circles. The size of the circle depends on the size of the tree trunk. If the trunk is small, then the circle turns out to be small, and it is used as a stand for cups or as a basis for a hook in the hallway. If the trunk is wide, then the slab takes up more space, and it is used as a wall panel, as a seat for a chair or a tabletop for a coffee table. The MHLIVING brand made such a stable coffee table from a transverse slab.
A cross section of a log looks like this
A tree cut is when the tree trunk is cut lengthwise. In this case, it is not the rings of the tree that are visible, as in the first option, but a pattern reminiscent of waves. The longitudinal cut is mainly used for making furniture: tabletops, benches, chairs, doors. Take a closer look at the model from the Blue River slab, which was made by the Russian brand ¾ Arshina.
Longitudinal section of wood, ready for sale
What are the benefits of driftwood furniture?
The main advantage of rustic furniture is exclusivity. In nature, there are no two identical trees, trunks or twin branches, so any furniture made from branches, driftwood, or stump will also be unique. There are also advantages:
- Environmental friendliness and absolute safety of the material.
- Reliability: strong roots from which a table, chair or other object is made guarantee its maximum strength.
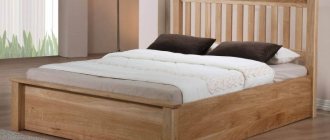
- The variety of materials allows you to make any product: from an elegant lampshade to a chest of drawers or a bed with branches on the backs.
With proper use, this furniture will last forever.
Wood cuts as finishing material for house walls
This table will help you understand how to trim different parts of the room with a cut of wood.
| Part of the room | How to use a tree cut |
| Wall | The unique pattern of the wood slab in combination with other slabs of different sizes creates a unique surface. In the bedroom or living room, you can make an accent wall from pieces of wood of different diameters. It will retain heat and add comfort to the room. You can also hang several (three to five) wide slabs on the wall to decorate it. This decor will also have a practical function: to protect the wall from drafts. |
| Ceiling | Circle by circle, you can line the surface of the ceiling with slabs, and then it will retain heat, protect from moisture, and also scent the room with the fresh smell of the forest. |
| Floor | For such a warm and environmentally friendly floor, tiles no larger than 4 cm are used; they must be free of chips and cracks. The wood species must be hard. The wood must be boiled, dried and sanded well: unevenness is not allowed. Next, the items must be treated with an antifungal agent and primer. Then the pieces of wood are laid on the floor surface, and the spaces between them are filled with cement mortar. Next, you need to check again whether the floor is even, and if not, you need to sand it again. The final stage is applying an antifungal agent and varnishing. |
Decorating the wall with slabs of wood makes a stunning impression and warms the house
A ceiling from wood cuts can be made according to the principle of a wall: stick round pieces on the surface, fill the gaps with a strengthening solution, then remove the unevenness
Ideas for home and office
Wooden slabs can be used in an apartment, in a country house, and in an office. Natural wood will add coziness to any room.
A floor carpet made from wood cuts can be placed in any room. It will provide additional warmth and protect from moisture. The trunks must be thick and durable, since the floor is subject to heavy loads.
A kitchen apron made from wooden saw cuts looks very impressive in an eco-style kitchen. The surface must first be treated with fire retardants and then varnished.
Saw cuts in the interior of the house: the kitchen apron looks aesthetically pleasing and neat
A photo zone made from slabs will be an unusual solution for wedding or other genre photography. Natural material looks beautiful in the frame and emphasizes the color of the eyes and skin of those photographed.
Look at the photo zone made from log slices: natural and beautiful
A slab shelf is convenient for any room in the apartment: kitchen, living room or bedroom. It can be made from both vertical and horizontal slabs.
Hanging slab shelf can be used for books, kitchen utensils or living room decor
Difficulties in laying out a modular floor
This type is quite complex, so it is better to be patient and get to work. Choose thick trunks to avoid the formation of large voids when laying out circles. Hardwood logs are selected to make the floor, because the floor is exposed to impact every day.
There are two reasons that will make you sweat:
- Solution. If you put all the parts on glue, then the floor will not last long, even if you cover it all with varnish. Modules will begin to fall off due to constant pressure. You will have to use a solution, possibly cement-based.
- Leveling the surface. If the thickness of each element does not play a big role in the design of the vertical plane, then for the floor this is the main condition. It is necessary to adjust all the modules to the overall thickness, and start grinding after installation. The procedure will take quite a long time, because achieving a smooth surface is not easy.
70 New Year's decor ideas: decorating your apartment and house
Next, start covering the finished surface with varnish. It will protect it from pests and external influences. The floor is easier to clean, and it will last longer in a “protected” state. An unprotected surface can be attacked by pests or it will simply begin to rot due to excessive moisture.
Saw cuts in the interior of the house
| Part of the apartment | How can you use a wooden slab? |
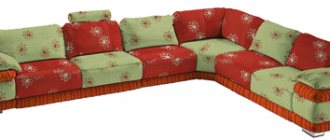
| Living room | In this room, where guests and the whole family gather, chairs and even a table made of slabs will be harmoniously arranged. Pay attention to the “Natural Elm” dining table for 12 people. |
| Bedroom | Shelves made of slabs and a small stool would look appropriate here. For example, a stool made from a cut of elm “Natural”. A small coffee table can also fit into the spacious bedroom: here you can read a book or newspaper before bed. The transverse log model from La Forma is especially suitable for Scandi interiors. |
| Kitchen | It is convenient to hang shelves for kitchen utensils on the walls, and to emphasize the eco-style, a “Tree Cuts” poster on a wooden stretcher and under glass. |
| Hallway | It is convenient to hang a log clock in the hallway to always be aware of the time. The Nicole Time brand offers an elegant model made from birch wood, while the To4rooms brand offers a more formal brown pattern. |
Birch clock: an elegant model that will harmoniously fit into a bright hallway in eco or Scandinavian style
Where to buy wood cuts and how to make wood cuts yourself
You can buy tree cuts in specialized stores and on the Internet (you need to type the search query “buy tree cuts”). You can also make slabs yourself, but you must keep in mind that this requires well-dried logs, and not just cut down trees. If you cut wood that has not yet dried and lay out the pieces to dry, they will crack (even those varieties that are not susceptible to cracking). When you dry the log, sprinkle it with sawdust: they absorb moisture well.
You can decorate anything with log slabs: just hang them on the wall or glue them to a hanger
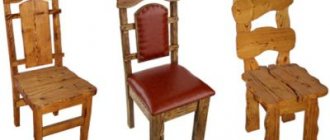
Look at this birch section and oak section: the photo shows that you can take two logs of dried wood, level the surface, treat it with an antifungal agent, varnish it if desired, and sustainable eco-style stools are ready.
Wooden slabs for decoration: birch cut and oak cut
You can attach legs to a cut of wood and then you will get a stool or table, like this one - the Wood model.
Traditional simple stools
Timeless classics live not only in the facades of buildings. Time-tested solutions are also preserved in the designs of stools. Adding smooth lines to their appearance eliminates boring angularity.
In the photo below we see the classic version. Thanks to the rounded drawers and legs, it looks quite decent. The milled grooves on the legs also improve its appearance.
Simplicity has its own charm. Designers successfully play with this quality, creating deliberately rough, brutal products. Artificially aging furniture is not an easy task. The author had to work a lot on the product, the photo of which we see below.
The category of classic “stool design” includes designs with drawers under the seat. To do this, use wide side frames and hinged lids.
Garden ideas
Flowerbeds can be lined with log cuts: transverse or longitudinal. It is very important that the wood is healthy: without the slightest hint of damage or rot. Otherwise, the disease may spread to healthy plants in the garden.
The paths are made of wide transverse slabs and the gaps are filled with gravel. The most durable tree that can lie for a long time in rain and snow is larch.
Oak is the second most durable tree: it will live for ten years, but pine - no more than seven years.
Oak cut: photo of garden path
This garden path also includes small-sized wooden slices: they fill the space between the wide plates
Folding stools
There are a huge variety of them, from the simplest solutions to very complex transformers.
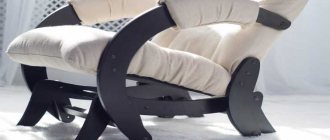
We present to your attention an original folding design. It consists of two rectangular frame-legs connected in the center by a metal axis. The support frames are attached to the seat with carpentry hinges. When folded, the axle moves along two slots cut into one of the legs. The seat rotates on hinges and stands upright.
Here is another version of a folding stool. His seat is made of two halves. When folded, the legs rotate around an axis and are placed in the same plane. The seat halves are pressed against them on both sides.
Fans of complex folding systems are offered an option consisting of eight pairs of lattice legs connected at the base by a common bar.
The upper ends of the legs on one side are hingedly connected to the seat, which is also made of bars. To fold the structure, take it by the lower slats and move them in the opposite direction. In this case, the lattice legs and seat bars fit into the gaps provided for them, and the stool becomes flat.
Another option is a folding stool with a “crawler” seat. Despite the simplicity of the design, it looks very original. Its two crossed legs are hinged in the center and connected at the top by a wooden segmental seat. By holding the edges, you can easily fold and unfold this stool.