Necessary materials
In order to make a simple table design, you need to prepare some materials:
- Plywood or any other material you could find. If we are talking about plywood, its thickness should be about 1 cm.
- For fastening, use 30–45 mm self-tapping screws.
Tools that every home craftsman most likely has in his arsenal.
REFERENCE. To make the most convenient table for your boat, you can use ready-made drawings or create a drawing according to individual parameters. This can be an additional holder for spinning rods, cans, as well as stands for other fishing gear that the fisherman needs.
Simple DIY design
If you decide to make such a product for yourself, you will probably take the work seriously. Take a sheet of plywood 1 cm thick.
REFERENCE. If you have certain skills, you can assemble this structure in just 1 hour. Agree, it’s very fast, because the manufacturing process is extremely simple.
The manufacturing algorithm is as follows:
- You need to cut four parts from plywood. Transfer the dimensions from the drawing that you prepared in advance.
- Apply a circle with a radius of 19 cm to the workpiece, provided that the diameter of the cylinder is 38 cm.
- Cut out the part along the drawn outline. Attach it to the cylinder of your boat, make a kind of fitting.
- Make two parts that are identical to each other. Please note that a battery will be installed inside them in the future.
- Connect the two shelves together, as well as the battery. Use previously prepared fasteners.
- It is worth making recesses on top of the structure being manufactured. It's important to do this. So that in the future you will be able to hide all the wiring in them, and this is important at least for your comfort.
- Make recesses in the upper part of the product. Their purpose is to move the structure along the length of your boat.
- Make a hole in the center so you can attach the stand for the echo sounder.
- Install the structure you assembled yourself.
That's the whole fairly simple process of making a table yourself.
REFERENCE. It would be better to install such a structure closer to the seat; it will be more convenient to use.
Seats for PVC boats - types, recommendations for selection
Most often, rigid types are used as seats for PVC boats - benches or special swivel and folding chairs with backs.
Hard seats for PVC boats. The regular ones included in the standard package are most often rigid ones made of moisture-resistant plywood or plastic. Seat fasteners can be stationary or movable. Stationary - when the fastener is glued to a specific place, and there is no way to move the bench. Movable - the so-called lykpaz-lyktros. Thanks to this fastener, the benches can be moved along the cylinders without difficulty.
This gives the seats the ability to move inside the boat's cockpit, passengers can be seated comfortably, and the cargo can be properly distributed when the boat motor is installed.
Tuning seats for PVC boats.
You must admit that it is not very comfortable to sit for a long time on a hard seat, which is included in the standard equipment of almost all boats. Discomfort is most often felt while riding, when the boat rides on a wave, and the hard seat bounces every blow of water against the side. To avoid discomfort, you can use one of two options for improving your seat.
Firstly, special seat pads are used to increase comfort. They can be either simple soft ones or with special compartments for additional gear. It’s very convenient; you can take a thermos of tea and a bottle of water with you into the boat, and be sure that all this will not roll along the bottom of the boat.
Materials for making a simple table design
A self-made boat structure for an echo sounder in a PVC boat is carried out using the following tools:
- calipers;
- pencil;
- plywood up to 10 mm thick;
- fastening screws 30 - 45mm;
- screwdriver, screwdriver and other wood tools.
If desired, drawings will help you build a table for an echo sounder on a PVC boat with your own hands, or according to individual parameters, with holders for spinning rods, cans and other fishing gear necessary for a successful catch. The diameter of the cylinder, the location of the liquid cable, and the compartment according to the size of the battery are also taken into account.
Manufacturing
To make a table for a PVC boat with your own hands, you need to draw up detailed drawings. The stability of the table, as well as its functionality, will depend on how accurate they are and how close the dimensional parameters are to real ones.
The main area that needs to be depicted in the drawings is the area of contact between the side walls-supports of the table and the rounded surface of the side cylinder of the boat. It is important to ensure that the semicircle of the parts matches the curved body. To achieve the best alignment, you can use a pattern. It will allow you to transfer the bend of the cylinder to the blanks from which the table parts will be cut. The pattern can be made from ordinary cardboard or other bendable material that can repeat the bend.
You can also use special tools that allow you to mark curved lines.
The side supports-walls of the table are made in an identical form. They must match in all dimensional parameters. Particular attention should be paid to marking and arranging the hole for attaching the table to the lycrop - an edge cable running along the side, which is located inside a special tape glued to the surface of the boat cylinder. It serves to strengthen the rigidity of the boat hull, attach landing pads and other equipment, including a table.
The mounting holes in the table supports must be located at the same level so that the table does not have a pronounced slope. The profile of these holes assumes that they are close to the edge of the workpiece, and their diameter should exceed the diameter of the cable by no more than 2 mm.
The table top is made separately. Its configuration is calculated and designed taking into account the specific purpose of the table. If necessary, holes are drilled in it for rod holders and grooves for cup holders. The latter must be equipped with a “tray” that limits the immersion of the glass in the cup holder.
For convenience and aesthetics, the edges of the tabletop should be cleaned of chips, burrs and other protruding sharp parts that appear after sawing. The edges should be sanded or covered with plastic groove tape, used in the manufacture of office tables (to use it you will need an electric router with a side cutter).
Step-by-step instructions for a plywood table
Option one
Option two
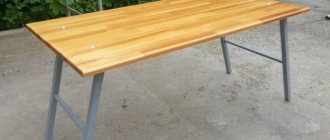
To make a table for a PVC boat yourself, which can be done in one hour with certain skills, take 10 mm thick plywood.
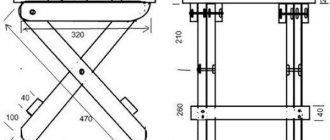
- Cut 4 side pieces of plywood of different sizes indicated in the diagram.
- Considering the diameter of the cylinder is 38 cm, we take a caliper and measure 19 cm. We draw a radius on a strip of plywood and cut out the first part - a jigsaw, and apply it to the cylinder that the boat has. We place a jar on top of the segment for measurements and cut it out, after which we draw the lower part on a strip of plywood.
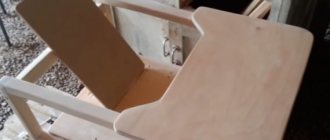
- We cut out two identical parts, taking into account the installation of the battery in the internal part of the structure. Then we attach 2 shelves for the table and battery into the drilled holes with fasteners using a screwdriver. Special recesses in the upper part of the table are used for its easy movement along the boat. When the fastening is done, we proceed to the next stage.
- Two holes are drilled in the center of the table for attaching a special stand, shown in the plan of a certain model of echo sounder.
- Move the table along the inside of the PVC boat to a position convenient for use, after which the wires are removed into a specially cut corner - a slot in the upper part of the structure.
Purpose and features
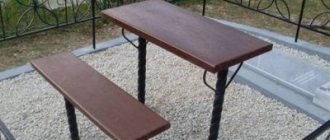
A table for a PVC boat is made taking into account the characteristics of its shape. This boat has two side cylinders - inflatable sides with a round cross-section. The roundness of their shape determines the arrangement of a semicircular cutout in the supporting walls of the table. The semicircle of this cutout must coincide with the circumference line of the side. In this case, the table supports will fit as tightly as possible to the surface of the boat, which will ensure the best stability.
The supporting walls of the table can be trapezoidal or rectangular in shape (excluding the semicircular cutout). Their size and shape may be determined by the presence of additional compartments under the tabletop - shelves, drawers or niches.
The characteristics and purpose of additional compartments also determine the extent to which additional fastenings and reinforcements are required.
The upper surface of the table can be equipped with special holes. Among the list of names for their purposes, the following can be noted:
- cup holders;
- grooves for the rod;
- recesses for storing gear.
Cup holders allow you to install small containers with the possibility of stationary fixation. This makes it possible to use them effectively even when the surface of the water is rough.
The grooves for the fishing rod are usually located at the edges of the table top or on the sides of the table. They can be made in the form of round holes with a diameter of at least 50 mm, cut in the plane of the tabletop. They can also be made using special plastic clips, which are used to attach fan pipes to walls.
In both cases, a section of gray waste pipe used for sewerage can be used. The pipe is positioned at a certain angle, which allows the rod to be inclined relative to the plane of the water. The upper edge of the pipe section usually coincides with the level of the upper surface of the tabletop, and the lower edge rests against the bottom of the boat or against special protrusions that are part of the table.
To ensure the best use of the rod grooves, it is necessary to use a piece of pipe with a diameter of at least 50 mm. This diameter will allow you to easily install and remove fishing rods and spinning rods with the handle down. The number of holes or pipes must be sufficient to install all existing fishing equipment.
A fishing boat table may contain recesses or protruding stops on its surface, allowing you to safely contain gear that is used while fishing. These grooves are not suitable for long-term storage, but they will ensure short-term preservation in the best possible way.
For convenience, the surface of the table is equipped with special sides that prevent objects from falling from it. To improve functionality, the sides are made only on the sides, and the front (closer to the water) and inner (closer to the center of the boat) sides are not fenced . This allows you to easily service the surface of the table: remove any remaining bait, small debris and other materials that contaminate the tabletop during use.
To prevent the absence of front and inner sides from leading to accidental loss of gear, they can be replaced with transverse elastic bands stretching from one side of the tabletop to another . You can also equip special loops on the upper edges of the sides, to which elastic bands are attached, equipped with hooks or small carabiners at the edges. These elastic bands, stretched crosswise, protect objects located on the surface of the table from falling off it.
Options for installing an echo sounder on a PVC boat
You can also install the echo sounder on a special factory bracket made of two plastic parts. Many craftsmen perform it themselves with their own hands. Rubber bosses are also used, which are used to secure the handrail in an inflatable boat. You can build structures according to ready-made drawings, but there are often options when the echo sounder is installed in a tool box. In particular, a bracket is attached to the lid of the box into which the echo sounder is installed for operation. When not in working condition, you can safely store the echo sounder structure in the same box.
Spinning rod holders in PVC boat
Every fisherman, while fishing from a PVC boat, constantly torments himself with the thought of where and how to safely transport spinning rods while driving.
Therefore, the selected holder model will solve the problem of placing several rods at once and save space in the boat.
One of the most popular options for such attachments in Novosibirsk are universal spinning rod holders made of wood with metal tubes. Such holders have a number of advantages.
Compatibility. Most of the handles of modern spinning rods will fit into the “glass” of the holder without any problems.
Fixation strength. The spinning rod will not fall out of the “glass” in a given position.
Versatility. Suitable for different boat models, easy to move to different place on it.
Installation. Fast and easy.
Usage. The main advantage of such a holder is its use both while stationary and while trolling. It is securely attached to the PVC cylinder of the boat, and does not dangle or become loose while moving through the water.
Field testing of a spinning rod holder for structural distortion and tackle flying out during waves.
We fish for our own pleasure by making a table in a PVC boat with our own hands
It is very important for every avid fisherman to properly organize the workplace in a PVC boat and increase the free space in it.
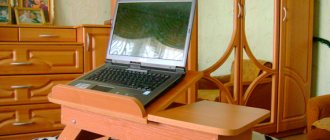
That is why most people pay due attention to compact tables for echo sounders. This product can be purchased at a fishing store or made on your own. We will opt for a homemade design. Moreover, if you show imagination and make every effort, such a table will be in no way inferior in functionality and practicality to the purchased model. And the finishing of a homemade table will make it attractive and durable.
Tables for a boat: why are they needed and how to make them yourself?
A PVC boat table is a device installed along one of its sides . Intended for installation of various devices necessary for fishing, arrangement of holding grooves, storage of supplies, equipment and other fishing purposes. The structural shape of the table is determined by the parameters of the boat and its intended purpose. Depending on the presence or absence of these and other criteria, the table may have additional structural elements.
The main device installed on this table is an echo sounder - a device that displays the topography of the bottom of a reservoir. In this case, the design of the table should provide for the presence of appropriate fasteners.
Material
The stand for the echo sounder will be used at high humidity. This should be taken into account when choosing materials for its manufacture. And you can make a table from:
plywood _ To prevent it from deteriorating under the influence of high humidity, it must be treated with special impregnations.
Plywood is distinguished by its favorable cost, ease of use, and good technical characteristics;
- MDF or chipboard . These materials are distinguished by aesthetics, efficiency, and durability. They are easy and pleasant to work with;
- foamed PVC . This material is highly resistant to moisture, has a long service life and is easy to process;
- natural wood . It is environmentally friendly and beautiful. But over time, the tree will begin to swell. Therefore, it also needs to be treated with special impregnations, coated with paint and moisture-resistant varnish.
How to make a table for an echo sounder?
If you are familiar with the process of making furniture, you can make a small table for an echo sounder within an hour. The process itself is carried out in the following sequence:
- We take plywood with a thickness of at least 1 cm and detail the necessary elements according to the drawing. In our case, we cut out 4 side products from plywood , the dimensions of which are indicated in the diagram.
- Next, using a caliper, make a radius of 19 cm (with a cylinder diameter of 38 cm) and cut out the plywood with a jigsaw . We apply the cut out part to the boat cylinder. Place the measuring jar on top and make marks on the bottom of the plywood.
- Now you will need to make 2 identical parts , taking into account that the battery will be installed in the inside.
- We fasten two shelves for the table and battery using a screwdriver with pre-prepared fasteners.
- We make special recesses in the upper part of the product to allow it to move along the entire boat.
- In the center of the tabletop we make special holes for attaching a stand for an echo sounder . Here you need to take into account your device model.
- We place the table in the boat in a position convenient for you and remove all the wires into a pre-cut slot in the upper part of the structure.
That's the whole simple process of making a table for an echo sounder yourself.
Types of holders and design features
The device consists of two functional parts:
- housings with a liquid crystal screen;
- emitter sensor or transducer.
To obtain adequate readings and achieve a clear bottom relief pattern, several conditions must be met when attaching sensors for boats:
- The signal emitted by the transducer must be strictly at an angle of 90 degrees to the surface of the water.
- There should be no air bubbles near the transducer under water.
- Even slight vibration of the transducer should be excluded.
It is recommended to use one of three fastening methods:
- transom;
- fastening to the bottom;
- remote method (homemade).
The device screen does not require special installation conditions, and it can be fixed:
- on a stand (bench) in a convenient place;
- on the lateral surface;
- at the bottom of the boat.
Mounting methods for holders are selected individually. Available options include a bracket, special couplings with locks, glue, and a vacuum suction cup.
Transom
The transom is a rigid metal plate. Its length should be equal to the width of the craft or slightly less.
The transom acts as a support for the outboard motor. It bears a large load, so it must have high strength. If an inflatable floating device is used, the transom design can be stationary or hinged. Fasteners for a mounted transom on a boat can be purchased at a retail chain.
The transom is often used for fastening additional devices and elements.
To install the device sensor on the transom of a floating craft, special transom holders or transom brackets are used.
Attachments to the bottom of the boat
Several methods of attachment to the bottom are used. One of them is most often used and only in boats made of polyvinyl chloride. The transducer is attached to the bottom of the boat using epoxy. This method is for amateurs.
Professionals use mortise and mortise swivel fasteners. The best methods for attaching an echo sounder sensor are those that are done using factory-made fixtures. They are easy to use and safe.
Mortise
The mortise mount is a bracket or angle that is used to mount the sensor into the bottom of the boat. The connection is hermetically sealed; neither the flow from the propeller nor algae interferes with the sensor’s operation.
The sensor, fixed by means of a cut-in, should be mounted in front of the rudder or propeller. It is important.
Mortise rotary
This device is a mortise mount, inside which the sensor rotates at an angle of no more than 120 degrees. Thanks to this, the image on the echo sounder screen can be seen from different angles. This installation method is used if the bottom of the reservoir has a complex topography.
Homemade
Floating sensor option
This option can be used if the surface of the reservoir is smooth, there is no current, and a rowing boat is used that does not have a transom. In this case, a do-it-yourself device for an echo sounder sensor can be used as a budget option.
Sequence of installation and manufacturing of a floating transducer:
- The echo sounder body is fixed on the stand.
- In the central part, a plastic half-liter bottle is intercepted with adhesive tape, attaching the sensor, and the sensor wire is fixed on the neck.
- The hand-made device is lowered into the water on a wire.
- To adjust the depth of the sensor, add water to the bottle.
Finishing
As for finishing, it not only improves the aesthetics of the product, but also extends its service life. To do this, the product is treated with special impregnations, varnish and moisture-resistant paint .
The design is simple enough to allow further modifications as in the following photos: