Working in the office or at home in most cases involves using a computer. A standard countertop and built-in niches are not always convenient for the location of office equipment. Placing a PC on a table is considered the most rational option. This furniture has a number of advantages. But it is difficult to find a ready-made model that meets individual requirements, so most often such items are made to order or independently. By choosing materials and following step-by-step instructions, it is quite possible to end up with a practical and functional product.
DIY FRIEND
Dear visitors of the site “SAMODELKINDRUG”, in the material presented to your attention we will discuss how you understand about creating a table-system unit. Today it has become fashionable to make tables for computers and laptops with your own hands, so our author decided to surprise us once again with his product. As everyone knows, conventional system units are sometimes unable to provide cooling to the computer system, which is why it begins to freeze and slow down. Many solve this problem by placing a fan opposite the system unit and a cool air flow cools the heated unit. This action certainly helps, but I still want the computer to not get warm and work normally, for example, when we play a variety of games or work on the Internet .
But our author went much further and solved the problem in the following way: he made a special computer desk and placed all the insides of the system unit in it, and also made a reinforced ventilation system consisting of 6 coolers located on the right and left sides of the table.
How did he do it? Let's take a look and understand everything. Let's look at what the author needed to create a table-system unit.
Materials
- system unit
- table
- glass
- cooler 6 pcs
- dye
- putty
- putty knife
- speakers
- LED Strip Light
- wires
Tools
- jigsaw
- drill
- screwdriver
- putty knife
- brush
- ruler
- hammer
- stationery knife
The process of creating a table-system unit with your own hands.
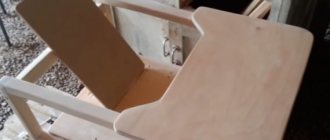
And so first the author dismantled the table he had, namely, removed the tabletop. The top part will not be needed. And so the upper part is removed and the tool is prepared. 6 holes are cut into the side panels of the table for installing fans. The author makes the corners beveled and fills up the uneven areas. Then the tools and all debris are removed, and then painting will be done. And so the author added another panel on the front for installing speakers and painted everything. The top of the table is then covered with vinyl. This is what comes out of it. The glass is installed on the table surface. Coolers and all the internal filling of the system unit are inserted. And now the table is ready. Now the author can calmly play and work on the Internet Thanks to a powerful cooling system consisting of 6 coolers, there will be no more overheating. And the design is simply mesmerizing; no one has anything like it.
You can buy an inexpensive LED strip here and the delivery is free. (to view, click on the picture) Inexpensive computer coolers at a price of 61 rubles per piece, you can buy here We hope the information was useful to you. Join our VKontakte group and you will receive high-quality, interesting summaries on new homemade products.
Thank you for your attention!
Source
- Tweet
- 14
Shared
Manufacturing materials
To make a computer desk with a system unit, the easiest way is to take a ready-made product as a basis. It can be a wooden desk, a computer or a regular model. If you plan to integrate a ventilation system, speakers, or electrical sockets into the structure, it is advisable to choose the option with side panels. A table with a metal frame is also suitable for work. During the manufacturing process, it is covered with plexiglass. The tools you will need are a jigsaw, a screwdriver, a drill, a ruler with a level, and a heat gun. Before starting work, the parts of the system unit itself that will be mounted into the system must be prepared.
Tempered or organic glass (plexiglass) is used to transform the table and decoration. The latter material will be required in two types: 5 mm thick (for partitions) and 10 mm (for the back panel, bottom, tabletop). It is not advisable to use thin plexiglass for horizontal panels, since it may not withstand the weight of heavy objects. In addition, a complete set of materials is required:
- LED Strip Light;
- wires;
- screws, self-tapping screws;
- carbon sheets;
- paints;
- chalk or washable marker;
- construction adhesive;
- sandpaper;
- voltage regulator;
- cooler
It is recommended to take fasteners with a reserve so that their deficiency is not discovered during assembly.
LED Strip Light
Carbon sheets
Strained glass
Voltage regulator
Coolers
Manufacturing materials and consumables
The basis for built-in structures is most often taken from a factory desk or computer desk. The first option is preferable because the working surface is larger. Another plus is that fewer modifications will be required due to the presence of side walls, into which it is convenient to integrate a cooling system and speakers. You can also find table options that have a metal frame completely covered with plexiglass.
What may be required for production:
- plexiglass in two versions - for the back wall, bottom and panels with increased load it is better to choose sheets with a thickness of 10 mm, and for partitions 5 mm is enough;
- self-tapping screws and a heat gun for fastening parts;
- jigsaw;
- drill;
- screwdriver;
- LEDs or LED strip.
This is a minimal set of tools. To create a table you will also need the contents of the system unit, additional sources of cooling and sound.
How to make it yourself
After all the requirements for the table have been determined, they proceed to drawing a sketch and drawing up a drawing. The diagram indicates the height, width, length of the product, as well as the place where the system unit will be located inside the structure. The layout is drawn in detail, marking the places of fastenings and the location of elements. Further work consists of successive stages:
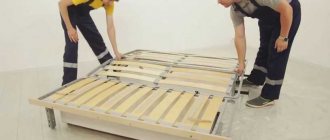
- The tabletop, which is taken as a basis, is removed. Two long strips 10 cm wide and two short ones are cut out of it.
- Three round holes with a diameter of 8 cm are cut out in the upper part of the side panels. The perforations should be located at the same distance from each other.
- The edges of the holes are treated with sandpaper of different grain sizes so that they do not have nicks or roughness.
- If necessary, the sidewalls are cut at an angle so that the narrowing is at the bottom of the panels.
- The strips cut from the tabletop are glued to the base. The cable channel is insulated with a grid measuring 20 cm.
- The required number of technical holes are cut out in the front plank of the tabletop for installing buttons, switches, and speakers.
- All debris is carefully removed from the surface. To do this, it is recommended to use a vacuum cleaner so that no dust particles remain inside the table.
- The PC cooling system is placed in the holes cut out on the sides - three coolers on each side.
- A button for turning on the backlight is located on one of the sides.
- Install speakers and all other components of office equipment. The wiring is hidden in cable channels.
- After completing the assembly of the system unit, check how the PC works in the table.
- A new lid is cut out of plexiglass to the size of the old table top and fixed to the table frame with glue.
The most crucial moment is assembling the system unit. If you do not have the necessary skills in this matter, it is better to contact a specialist.
DIY computer on the table
Greetings, Habr! I am a fan of desktop PCs, I have been working on them for a long time and today I want to show you my new project. The most compact and thinnest Computer in a desk that I have ever made.
A friend asked me to make a desktop PC for him, but with unusual dimensions and high requirements.
He had a corner from which he wanted to make himself a compact, gaming setup.
The dimensions of this area are 93 by 160 cm.
Client's wishes:
The dimensions of the table are 92 by 65 cm. Good hardware with a liquid cooling system should fit inside.
Two 360 mm radiators.
Cover the tabletop with a single piece of leather.
On the front of the tabletop are two USB 3.0 ports and a full-fledged card reader.
Add sixteen USB 3.0 to the rear
Matte black color, red stripes on legs.
Add a dock with buttons to the tabletop.
The first button turns on the power supply, the second button turns on the PC itself, and the remaining four buttons control the lighting in his room.
I made a tabletop, the dimensions are 92 by 65 cm.
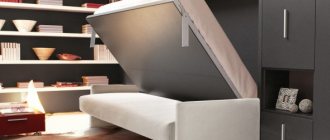
The table top has a mechanism and the glass can be raised and lowered to easily replace or service components.
I made guides for the mechanism and casings.
I figured out how to make a removable dock with buttons.
The base will be attached to the bottom of the tabletop, and the cables from the buttons will be routed through the internal cable channel. The client can easily replace the buttons if he wants something new.
The most difficult thing is the foundation.
Minimal area, but everything should fit inside and be well cooled.
1 and 2 are 360 mm radiators for cooling the processor and video card.
3 and 4 are trays for SSD and HDD.
5 is a casing for the power supply, Wi-Fi module, cable synchronizer and controllers.
6 is a false panel with a motherboard and video card.
I decided to make a double bottom to make cable management and hide all the cables.
Let’s say in the 24 pin power supply area we cut out a cable channel and hide the cable inside.
And I do this with every cable that is in this computer, this is how I can create cleanliness and order inside.
There is a lot of ventilation at the very base.
Under the motherboard and video card, cold air is blown in and on the sides, and six coolers are responsible for blowing out hot air.
It took 25 days to produce.
I changed the geometry of the legs in this revision and added a new feature.
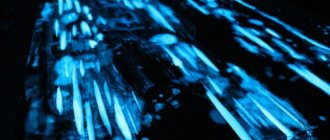
The insert in the center of the leg is now illuminated. Live, in the dark it looks unusual, but I like it when there is no backlight at all.
I now make the inserts themselves on magnets and they are removable, you can quickly replace them and update the design of your table.
I made a black table, a year later, when you were already tired of it, you removed the insert in the leg and changed it to any other, thereby easily updating the design of your table.
On the front of the tabletop I installed two USB 3.0 and a full-fledged card reader.
And buttons to turn on the PC and control the lighting in the room, just like my friend wanted.
The tabletop is covered with a single piece of leather, without a single joint.
It turned out to be a very pleasant table to the touch.
The table is matte black, with red stripes on the legs.
The angle of the tabletop can be changed.
The tabletop rises and you get access to all components; they can be easily replaced or serviced. Everything is done for maximum convenience.
The bracket was made for one monitor; it allows you to move the monitor in all planes and does not take up space on the tabletop.
Technical part.
i9 9900K installed inside
on MSI Z390 GAMING PRO CARBON motherboard.
Thermaltake Floe Riing RGB 360 TT is used to cool the processor.
In AIDA 64 I got 73-78 degrees
, at the quietest operating mode of the coolers.
The glass tabletop “heated up” to 27 degrees during peak load on the system.
The noise at peak load (I turned on AIDA64 and FurMark at the same time) was 35-38 dB.
Distance 40 cm from the table.
The table was delivered to the new owner's home.
Here is his setup at the moment.
Soon he will install additional lighting in this corner, change the chair and add shelves for devices.
There is an electric curtain installed here.
That's all, thanks for your attention!
Finishing and lighting
Decoration and installation of the LED strip is carried out during the assembly of the computer desk. Instead of LED strip, you can use spot LEDs. Their number, as well as the length of the glowing cord, is determined by the dimensions of the tabletop, as well as the size of the parts that want to be illuminated.
Advantages of using a transformable console table in the interior
The LED strip is laid around the perimeter of the housing and fixed. If desired, you can equip the motherboard, card reader, video card and other parts of the PC system unit with backlighting. Illuminating the computer inside the desk creates a beautiful visual effect that is especially loved by gamers. If the LEDs are combined with a stereo sound system, the effect of light music is obtained. An additional bonus of the backlight is the softening of the light radiation coming from the monitor in the absence of overhead light. Reducing the negative physical impact on the visual apparatus preserves the vision of a person working at a computer.
Decorating an aquarium table in different styles, basic shapes and sizes
A table made of wood or chipboard is coated with paint. For minimalist, high-tech designs, black, gray, silver, and brown colors are used. For rooms in more democratic styles, for example, fusion or modern, a table painted in lighter or richer colors is suitable. The surface is dried for 15–20 hours. To improve the appearance, the structure is covered with carbon sheets.
A desk with a built-in computer is an exclusive model that is made individually. The fully finished product is distinguished not only by its original appearance, but also by its convenience for long-term work at the monitor. In addition, parts of the system unit hidden under glass collect less dust. This definitely extends their service life and makes maintenance easier.