Making a laptop table with your own hands is a great idea for those who spend a lot of time on the Internet or often have to sit at the computer. Laptop manufacturers claim that their products can be used comfortably anywhere and in any body position, but in reality a person will not be able to complete even the simplest task at a laptop while lying on his stomach or sitting cross-legged. Therefore, most often the laptop is placed on the table and used as a regular desktop computer.
But real comfort is still possible, and laptop tables provide it. However, these small but convenient pieces of furniture are quite expensive. The way out of the situation is to make them yourself. Such a table will be characterized by multifunctionality - it can be used as a breakfast tray, a children's table or a bench for relaxation.
Popular table models
Laptop desks are similar to each other, but still have some differences. All models can be divided into several groups:
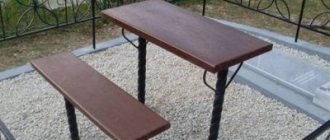
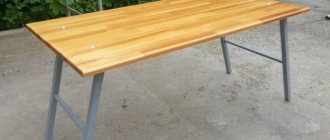
- Classic monolithic table. To make it, you need to use a board made of beech or other material, the main thing is that the thickness of the tabletop must be at least 20 mm. This table is attached to 4 legs, which are fixed on the underside of the tabletop using self-tapping screws and corners. This model is the easiest to make and is suitable for beginners. The finished table can be used both for working on a laptop and for reading books, eating, and other activities.
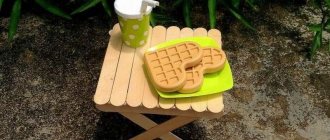
- Table with folding legs. This model is similar to the first one, but it is more convenient. A folding table is suitable for those who like to use a laptop in bed or sitting cross-legged. To make it, you will need a tabletop and 4 standard legs or 2 wide supports, which are attached to the table using screws and nuts (or piano hinges). A variant of this model is a table with a cutout for a mug. This product allows you not only to work comfortably on your laptop, but also to drink your favorite drink.
- Table with armrests. In the manufacture of this model, an oversized shield is used. Special boomerang-shaped recesses are cut into the tabletop to accommodate hands. This model provides maximum comfort for the user.
If desired, the master can combine several options, for example, make a monolithic table with armrests or a table with armrests and folding legs. Other options are possible, the only limitation is the author’s imagination.
Drawing
Before making a piece of furniture, it is necessary to make a preliminary drawing. It indicates the exact dimensions of the table and the materials used to make it.
If you can’t make a drawing yourself, you can find a ready-made sketch on the Internet, you can contact specialists in this field, or simply use a special program for furniture makers. The last option is the simplest. After you draw or print a finished sketch of the future table, you will need to transfer it to the wooden surface of the prepared materials.
Attention: before making the table, you should once again carefully calculate the dimensions and place control points on the material.
Useful tips for a beginner master
In order for the work to be done efficiently and the plywood table to serve its owner for a long time, the following recommendations must be followed:
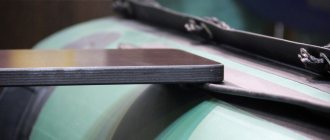
- Carefully process the edges of the elements from which the product is assembled. If this is not done, the structure will eventually lose its original appearance, and the user may be injured.
- Cover the table with 2-3 layers of varnish (if chipboard or natural wood is used for assembly). The coating will give the product a pleasant shine and protect it from the negative influence of the external environment, for example, from damage from hot dishes.
- Place a wooden saucer in place of the hole for the mug. This plate is attached with glue, and the craftsman does not need to drill into the wood. The standard hole for the cup is a vulnerable point: if you press hard on it, the table can crack. Using a saucer allows you to avoid such developments.
- Use paints to decorate the table. Using paints, you can apply the desired design to the surface of the product. Then the image needs to be covered with several layers of varnish to protect it from damage.
- Coat the vinyl stickers with varnish. The use of stickers allows you to make the table truly attractive even if the artist has no artistic skills, but over time the stickers become filled with dust and dirt. To protect the stickers from contamination, they need to be coated with two layers of varnish.
When decorating the finished product, you can use any means to make the product truly unique. Beads, fabric and other materials will be used.
Standard wooden table
The easiest way is to assemble a classic laptop table with your own hands. Even someone who does not have furniture making skills can solve such a problem. To work, first of all, you need drawings of the future product. You can compose them yourself or find them ready-made and then adapt them to your own needs. The dimensions of the structure can be any, they depend on the wishes of the master and the dimensions of the laptop, the main thing is to maintain the ratio of the parameters of the design parts.
The furniture maker will need boards or a sheet of plywood at least 20 mm thick, as well as nails, screws, wood paint or varnish, primer or putty, wood glue, hammer, sandpaper, brush, handsaw, sponge.
First of all, you need to prepare the details of the future product. You can cut them yourself or order them from wood suppliers in finished form (in this case, when placing an order, you must indicate the dimensions of each element or provide the supplier company with a design drawing).
You can make a table of universal size; to do this, you should cut out the following parts:
- tabletop 665x300 millimeters;
- legs (20x20 mm thick) - 230 mm in length;
- long parts of the apron (10x20 mm thick) - 630 mm (in this case, the ends of the parts must be cut at an angle of 45 degrees);
- side elements of the apron (10x20 mm thick) - 280 mm each.
When all parts of the structure are prepared, you can begin to work. It consists of several stages:
- Apron installation. The tabletop must be placed face down on a flat surface, and then using wood glue, attach the apron elements to the tabletop, press firmly, and leave for 30 minutes to dry. If the product will subsequently be painted, the glue fragments protruding from under the parts must be removed with a sponge before hardening. Otherwise, the paint in these areas will not absorb and will look like dirt. When the apron is firmly glued, the tabletop needs to be turned face up and the apron needs to be nailed.
- Installation of legs. The tabletop needs to be turned upside down again. Then the legs should be installed in the corners of the apron, attaching them first with glue and then with nails or screws. Each leg must be secured on both sides. In order for the glue to dry completely, the structure must be left for a day.
- Sanding, priming. At the next stage, the table needs to be sanded with a grinding machine or sandpaper. This will make the surface of the table smooth and free of splinters. If the structure was assembled from several boards, then the surface should be primed, and after the primer has dried, it should be covered with putty.
- Decoration. When the plywood table is ready, all that remains is to varnish or paint it. It is important to use high-quality materials that will not crack during use. Now that the work is finished, it’s time to try the table in action!
Using the same scheme, you can assemble a table from slats. Although making such a product is more labor-intensive, the result will be more creative.
Required materials and tools
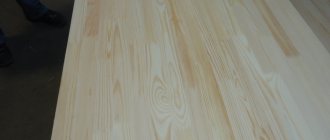
Tables made of wood will be reliable and environmentally friendly. The best option would be pine - a reliable and lightweight material. Laminated chipboard, MDF, and plywood, which are characterized by their low weight and accessibility, are suitable for work. Tools must be prepared in advance:
- Saw, jigsaw. They are used for cutting material and making holes in the tabletop.
- Screwdriver. Indispensable for tightening confirms and screws and fastening accessories.
- Electric drill. Required for drilling holes in chipboard. Experts recommend giving preference to models with reverse.
- Grinder machine. Helps to thoroughly process the wood and make the surface of the material smooth. The optimal equipment would be one equipped with a sanding belt centering regulator and a dust collector.
- Drill. You will need 4.5, 7.5 or 10 mm products.
- Screwdriver. Reverse models with replaceable nozzles are easy to use.
Tips for making a computer desk with your own hands, stages of work
In addition to the tools listed, you will need a tape measure, pliers, a square, and a hammer. To mark on wood, use a pencil or marker.
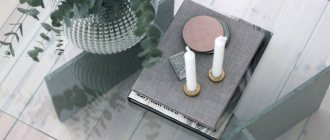
A bedside table for a laptop made of metal and glass looks attractive. However, without special skills and tools, it will not be possible to make such furniture.
Solid wood or wood boards
Grinder
Tools
Table that folds
Many novice craftsmen think that making a folding table is very difficult, but in reality it is not so. To make it you will need:
- a frame from an old painting, suitable in size for the future product (instead of a frame, you can use boards or slats of the appropriate length);
- a sheet of plywood the same size as the picture frame (the picture itself will do, it will make the table more creative and interesting);
- 4 thin slats, which in their length correspond to the perimeter of the table;
- 6 slats or bars for legs;
- 4 bolts, 4 nuts;
- wood glue;
- paint, varnish or self-adhesive film;
- brush;
- hammer;
- hacksaw.
First you need to check the integrity of the frame. If its elements are not tightly connected to each other, then they must be strengthened with glue or nails. Then you should nail the plywood panel to the apron-frame, and then turn the workpiece face up and stick limit strips along its perimeter.
The next step is to assemble the legs in the shape of the letter “H”. The result should be 2 legs, reinforced with prongs (connecting strips). The tops and bases of the legs need to be cut at an angle of 45 degrees - when using the table, they will not stand straight, but at an angle, and thereby make the structure more stable. The legs need to be attached using nuts and bolts.
In order for the surface of the product to be perfectly smooth, the tabletop must be leveled using putty. When the table is ready, all that remains is to cover it with paint, varnish or self-adhesive film, laminate it or decorate it in decoupage style.
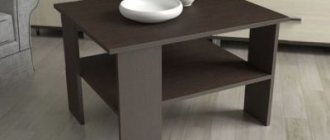
Creative table
The advantage of this model is the ability to change the position of the legs, the height of the tabletop or its angle of inclination. This gives the user maximum freedom of movement.
To work, you need a plywood panel, a sheet of wood or a panel from a cabinet. Along the edges of the shield, you need to drill 6 small holes - 3 on each side (they are needed for screwing in screws).
Then 2 leg supports and 4 legs are made from wooden blocks. To make the legs lighter, you can drill several holes in the middle of the bars.
Then gears are formed from the washer and secured to the legs. After this, a bolt is created from a nail, a spring from a ballpoint pen and a bicycle spoke to fix the table.
Then the shutter is inserted into the hole on the leg; for convenience, each shutter can be equipped with a cap made of thermoclay.
At the final stage of work, the structure is assembled: the legs are attached to the tabletop using screws. This completes the work.
Table with lifting top
This instruction will help you make a laptop table with a lifting top. To work you will need:
- furniture board (preferably pine) measuring 800x300x18 mm (for the tabletop);
- oak or pine bars with a cross-section of 30x20 mm, length 2000-2200 mm (for the frame);
- scraps of furniture board or slats with a cross-section of 28x18 mm (for legs and legs);
- dowels 30 and 40 mm long, 8 mm in diameter;
- 2 loops 20x75 mm;
- 4 M6x50 bolts with internal hexagon, 4 M6 nuts with Teflon, 12 M6 washers (for connecting the legs to the frame).
The work is carried out in several stages.
Assembling the support structure
First, a frame is made from bars. The craftsman will need blanks: 2 bars 720 mm long and 3 bars 220 mm long (for the sides). They need to be connected into a common structure using wood glue. Then you need to make holes in the 4 corners with a diameter of 8 mm and a depth of 40 mm. Holes are drilled into the ends of the sidewalls through the plane of the longitudinal strips. Then dowels are inserted into these holes to strengthen the structure.
In addition, blind holes with a depth of 20 mm and a diameter of 8 mm are made in the frame on the upper side. They are needed to install dowels, with the help of which the stationary part of the tabletop will be attached to the supporting structure. In the tabletop itself, blind holes 10 mm deep are drilled in appropriate places. In order not to make a mistake with the location of the holes, it is recommended to mark the drilling locations on the structural elements using a cardboard template.
Then you need to mark the location of future hinges on the frame. The first of them is located on the left side, at a distance of 60 mm from the edge of the support structure, and the second loop is placed on the right, at a distance of 305 mm from the inner edge of the left loop.
How to make a laptop table for your bed with your own hands?
It is necessary to make a table for a laptop in the bed, if only for the reason that your laptop “suffers” on a soft blanket due to lack of air. Of course, he doesn’t need oxygen at all, but don’t forget about cooling your friend. And it wouldn’t hurt to just get ease of use and a stable position for the laptop. There are many design options for this simple device.
A laptop table for a bed can be made of any materials and in any design, but one thing is constant - such a table is necessary in every home these days.
You can also use different materials, but a wooden product will have huge advantages: it does not heat up, has excellent dielectric properties, and the design of such a product can be simply beautiful. So, to make a laptop table you will need the following tools and materials:
- a piece of board (preference should be given to material made from deciduous trees);
- hacksaw;
- drill;
- screwdriver or screwdriver;
- sandpaper;
- stain;
- polish or varnish on a natural basis;
- screws.
DIY tabletop and paper sketch
An example of a sketch of a simple laptop table.
First, you need to cut a rectangle from the board that will be 10 cm wider and longer than the size of the computer (the size can be much larger if you decide to combine computer work with morning coffee). This rectangle will become a kind of tabletop. Next, we will make sure that the laptop stand is comfortable for you.
For this purpose, we measure the approximate height from the surface of the bed and, using these dimensions, cut out two rectangular trapezoids from paper. It will not be amiss to see the convenience and height in advance: you will agree that it is much easier to change paper legs for a stand than to remake existing wooden blanks.
Using a paper template, we make a corresponding imprint on a wooden blank and cut out the parts using a hacksaw or jigsaw.
All parts must be thoroughly cleaned with sandpaper. We carry out cleaning in a circular motion in two stages: first with coarser sandpaper (primary processing), and then with finer sandpaper. We pay special attention to the edges of the parts. Poor sanding or remaining nicks on the edges of the product will certainly cause puffiness on the bed linen, so it is better to make all edges oval.
Screws or studs for connection?
The connection between the tabletop and supporting parts can be made in different ways. The easiest way is with screws. But in this case, there are two options for further action: either the screw heads will spoil the appearance of the countertop, or they will have to be masked using additional finishing.
Connections with studs will help avoid this. For their accurate installation, we can recommend using the ancient method of obtaining high-quality markings. On the cover of the stand we draw lines at a distance of 5 cm from the side cuts. At the same distance from the ends of the resulting segments, we make two holes to a depth of 2 cm.
We insert wooden pins into these holes (you can use homemade ones) and dip the outer cut of the pins in any coloring pigment. By placing the side parts in the intended position, you will get marks where you should make holes.
Next, you just need to press the side parts onto the studs and the main part of the work can be considered complete.
The importance of vents
Ventilation holes in the table are necessary for the smooth operation of the laptop.
The resulting laptop stand cannot be used yet, since it is not functionally ready yet. Namely, it lacks the main detail that distinguishes a laptop table from a regular morning breakfast table.
We remind you that the laptop must have access to fresh air, so the resulting table still needs to be modified - holes must be made in its upper part. It's stupid to just drill holes. This can be done very aesthetically.
Craftsmen, using an electric jigsaw, cut such intricate end-to-end patterns into the tabletop that the laptop stand becomes a work of art. You should strive for this only if you have a large supply of time, patience and desire.
In other cases, we make the usual geometric markings and drill the necessary holes at certain distances.
You can make a pattern of dots in the shape of a butterfly or flower: this will turn out to be both functional and very beautiful. In addition, with an asymmetrical arrangement of points, marking flaws will not be visible at all. For drilling, we recommend drills with a diameter of 3 to 7 mm. It is advisable to process each hole with a drill of a larger diameter (chamfers will give the product additional sophistication).
Surface finishing stages
The finishing of the table is a matter of your imagination and taste.
Now the stand can be subjected to finishing work. The wood should be treated with stain. It is advisable to choose the color in accordance with the main range of furniture in the bedroom. The stain dries quickly, so you can start using polish almost immediately.
It makes no sense to varnish a laptop table - the rubber supports on the laptop will leave matte marks on the surface, so the stand will often have to be cleaned and varnished. In addition, under the influence of warm air from the laptop fan, the varnish coating may crack or darken.
But polishing or varnishes based on cedar (or other) resin are more resistant to these influences. The varnish is applied as usual, the polish should be rubbed into the wood using felt in a circular motion. Moreover, this procedure should be repeated at least three times.
The laptop stand will be ready after the polish has dried.
Making a countertop
The tabletop consists of two parts:
- movable, size 490x300 mm;
- fixed, 260x300 mm.
Both parts need to be made from furniture board. Then they should be closed with slats on the end sides. It is recommended to round the edges of the tabletop with an electric jigsaw, then process it around the perimeter with a router. The product can be equipped with a support bar that will prevent the laptop from sliding off the table. Recommended plank size: 260x20x10 mm. Instead of a strip, you can use removable dowels inserted into blind holes.
Assembling the legs
At the next stage, you need to make 4 legs 295 mm long and 4 legs 184 mm long. Each pair of legs is connected by two legs, one of which is installed along the edge of the structure, this increases the stability of the table on soft surfaces.
The legs and legs are connected using dowels or screws. In the second case, to improve the aesthetics of the product, special plugs are used to cover the unsightly screw heads. In the places where the fasteners are installed, blind holes with a diameter of 10 mm and a depth of 5 mm are drilled, screws are inserted into them, and then closed with plugs made from the same wood from which the legs are made. The plugs are attached using glue. If the edges of the plugs protrude above the surface of the legs, they should be carefully cut off with a chisel.
The holes for connecting the legs to the frame are drilled at a distance of 14 mm from the edges of the legs, and the edges themselves are rounded. Thanks to this, the legs can be easily folded and unfolded. In the frame for attaching the legs, holes with a diameter of 6 mm are drilled at a distance of 20 mm from the inner edges. The outer edges of the legs are cut at an angle of 65 degrees, which ensures the stability of the table on a flat surface.
How to make a cooling system
For most modern technology, it is necessary to purchase additional equipment. For example, laptops often require an auxiliary cooling system. This is especially true for digital equipment that is used quite often.
To build cooling yourself, you will need an old computer or a couple of coolers from the system unit. Based on old units, you can build an effective cooling system that will run from a USB cable.
The cooler can also be installed in the table itself. Installation is carried out from the reverse side of the tabletop. Air will flow to the bottom of the laptop case through a specially prepared hole of a certain diameter. This design can be used both on the bed and in any other place.
To do this you will need to make markings for the cooler. The hole should be aligned with the laptop's ventilation grille. If you use 2 coolers, you should visually divide the tabletop into 2 sections and cut out one hole in each. The cut areas are carefully sanded and also treated with a protective compound. To install the cooler, you can use small self-tapping screws.