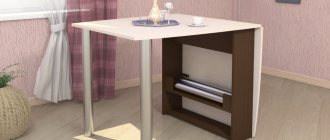
Timber is an excellent building material from which walls and partitions are erected and used as support beams and columns. It is also used in furniture production: most often it is used to make frames for upholstered furniture, legs of tables and chairs. However, the same table can consist entirely of this material if operating conditions (street, bathhouse) or interior style (loft, retro) require it.
Timber table
Such furniture turns out to be durable, but massive, bulky and very heavy, which, however, in some cases is very useful.
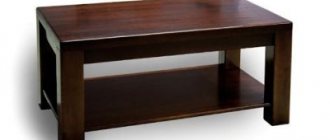
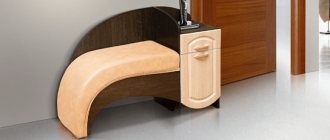
Another option for an unusual table
For example, if a table made of timber is in the courtyard of a country house, you don’t have to worry about its safety in the absence of the owners - you won’t be able to carry such a product under your arm. It will perfectly complement and emphasize the brutality of the interior of a country house in a rustic or hunting style.
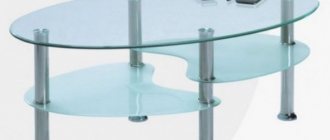
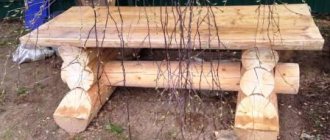
Massive timber table
In a word, if you need such a table, do not waste time looking for it in stores - you are unlikely to find a suitable model there. It's better to do it yourself. This is not difficult, and if you have leftover timber from the construction site, it is also very profitable.
Stylish wooden table
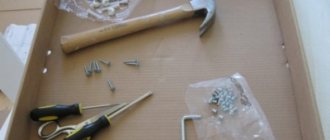
Tools
Since the structure must be made of wood, the tool was mainly needed for woodworking. Here's what I used to make my own timber table:
- jigsaw;
- saw;
- gas-burner;
- drill-driver;
- wrench with socket head;
- chisels;
- reamer drill ø 2 cm;
- hammer;
- hacksaw;
- clamps – 2 pcs.;
- die for cutting external threads ø 6 mm;
- sander;
- roulette;
- brushes
Deciding on the design and construction of the table
The fewer skills, the less it costs to be tricky with the design. The design and diagram are simpler, think through and imagine each step in your mind. Be sure to make a preliminary sketch and drawing.
The clearer you are about what exactly you want to get as a result, the less likely you are to encounter unexpected difficulties during the work process. The required minimum of drawers and shelves, fewer shaped elements and complex connections.
Complex designs will take more time and materials.
We'll leave the design details for next time, when we have more experience.
Materials
I went to a construction supermarket and bought the following:
- beam 10 x 15 x 600 cm – 1 piece;
- beam 10 x 20 x 200 cm – 1 piece;
- timber 30 x 30 x 2000 mm – 1 piece;
- board 20 x 150 x 740 mm;
- abrasive wheels for grinders R 180 and R 220;
- fittings with a diameter of ø 6 mm and a length of 2 m;
- nuts and washers 4 pcs.;
- sandpaper;
- stain – 0.5 l.;
- varnish PF 170 – 0.5 l.;
- wood glue;
- screws 7 cm, 50 cm, washers and nuts, plastic plugs.
Kitchen table assembly instructions
So, let’s say everything is ready for assembly: furniture panels, legs, other necessary materials, fasteners, tools. The easiest option to assemble is a kitchen table with chrome legs. To assemble it you need to do the following:
- Place marks where the legs are screwed.
- Place the fastener where it should be and mark the points for the screws.
- Screw all fasteners with a screwdriver or screwdriver.
- Screw in the legs and the table is ready!
The same principles apply in solving the problem of how to assemble a folding or sliding kitchen table. It’s just that in this case you’ll have to tinker a little longer.
Assembling a folding kitchen table
In front of you is a package containing your table in a disassembled state. Don’t rush to tear it apart at random, it will still serve you well. Let's describe all the actions step by step.
- Cut the packaging so that it can be laid out on the floor in one layer. Place the tabletop face down on it.
- Unpack all fasteners - washers, nuts, screws, angles, etc. Lay it all out separately.
- Take the leg and place it in the corresponding slot of the furniture panel so that it forms an angle of 90° with it. Secure it with the fasteners provided for this purpose. Tighten the nuts so that the leg stands firmly and does not play.
- Do these manipulations with the remaining three legs.
Sliding structures sometimes have a locking system. To remove it, you need to hold the two halves of the tabletop and carefully remove the block from the mechanisms. Now the sliding parts of the table will easily move apart if you and an assistant pull them in opposite directions.
Before assembling an extendable kitchen table, you have seen additional surfaces. They are necessary to fill the resulting space after sliding the two halves of the tabletop apart. We think that at this stage, you yourself have already guessed this. After installing them, move the main parts of the tabletop so that you get a flat surface. Voila, you've done it!
Glass table - special attention
The question of how to assemble a glass kitchen table is solved according to approximately the same plan as described above. Most often, glass tables are also mounted with their legs up. At the same time, you need to put something under the tabletop so that it does not get scratched.
Important points:
- If you overtighten the connections, the glass may crack.
- It takes two people to move the glass table so that the load on its surface is distributed evenly - glass is a fragile material.
- When assembling, you cannot place the tabletop on two supports - again, it will crack.
- Do not place the glass table close to other pieces of furniture so that it does not knock against them, and chips do not form on the edges of the tabletop.
Ideally, before assembling a kitchen table of any configuration, you should read the instructions. The latter is either included with the kit of parts, or can be found on the Internet. For example, in this article we outlined the basic assembly principles that apply to any more or less standard dining table. Follow them and you will succeed!
Share with friends:
Step-by-step instructions on how to make a wooden table from timber with your own hands
Initially I wanted to make a table with my own hands from 50 x 50 mm bars. But this idea had to be abandoned. Friends asked us to make massive furniture in the loft style. Therefore, I used larger lumber. I decided to make the table in two stages: assembling the supporting structure and forming the tabletop.
Making a countertop
- Wood 10 x 15 x 600 cm was divided into 6 sections with a saw.
- The upper corners along the perimeter of each element were cleaned with an abrasive wheel at an angle of 450, 0.5 cm wide.
- To make 2 through holes ø 6 mm through the tabletop, I clamped 3 pieces each with clamps and drilled them with a drill. Then I left 2 pieces and added a new element and drilled again. I did this because I didn’t have a long drill.
- From the outside, I expanded the holes with a ø 2 cm reamer to a depth of 1 cm.
- Reinforcement ø 6 mm was sawn into 2 pieces 0.9 m long.
- I cut threads at the ends of the studs with a die.
- I coated the adjacent sides of the wooden elements with wood glue.
- I inserted 2 pins into the holes. I put washers on the ends of the rods and screwed the nuts.
- The nuts were covered with plastic plugs.
- I sanded all the side and horizontal surfaces with a fine abrasive wheel mounted on a grinder.
- Using a gas torch, I lightly burned the surface of the tabletop. This gave the wood a noble appearance, emphasizing the structural pattern of the wood cut.
- I treated the entire tabletop with stain using a brush.
- The property of this product is characterized by the fact that it penetrates deeply into the structure of the wood, strengthening and disinfecting it. But small fibers create hairiness on the furniture surface. So I sanded everything again.
- The surface of the table top was coated with PF 170 varnish in 2 coats.
Assembling the support structure
Before making a table from timber, I drew drawings of the supporting part and tabletop of the future furniture. According to the dimensions and dimensions specified in the drawings, I began to make the supporting structure of the table with my own hands.
- I made furniture legs by sawing wood 10 x 20 cm into 2 pieces 86 cm long + waste.
- At the top of the supports, I secured 30 x 30 mm bars with screws from the outside.
- I made the crossbar from a board 20 x 150 x 660 cm, securing it with screws to the centers of the sides of the supports.
- I burned the entire outer surface with a gas torch, covered it with stain, and sanded it.
- The supports were coated with PF 170 varnish in two layers.
- The tabletop was installed on a support frame.
- Using 30 x 30 mm slats, I secured the tabletop with screws.
How to assemble a table?
The main difficulty in assembling the table lies in securing the legs to the tabletop support. This can be done in various ways. Here I will describe the traditional method and the one that was used for the table given at the beginning of the article.
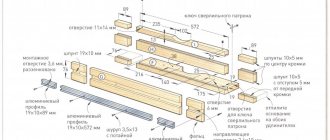
The traditional method involves using a special screed. This is a reliable and simple option. It is clearly shown in the figure below.
Fig.5.
Attaching the legs to the table.
If you decide to use this method, you may encounter one very significant problem. The problem lies in the difficulty of purchasing a special screed. In this case, you will have to use a non-traditional method.
In relation to the table under consideration, it is as follows. First, the tabletop support elements are secured to the tabletop. This is done using self-tapping screws and PVA glue.
Fig.6.
Attaching the table top support to the table top.
Then, using self-tapping screws with a pre-installed washer, the legs are secured to the tabletop support. To make the legs more rigid, the joints can be glued.
Fig.7.
Attaching the legs to the table.
After the glue has dried, we have a durable, lightweight table.
Fig.8.
Small table made of wood.
Naturally, before use, it is advisable to paint or varnish the table. This way the wood will not darken, and the table will be well protected from precipitation and will last for many years. Such a table can be installed anywhere in the country house and will provide comfort not only to you, but also to your children.
Cost of materials
- timber 100 x 150 x 6000 mm = 1500 rub.;
- timber 100 x 200 x 2000 mm = 440 rubles;
- timber 30 x 30 x 2000 mm = 50 rub.;
- board 20 x 150 x 740 mm = 20 rubles;
- abrasive wheels for a grinder = 50 rub.;
- fittings with a diameter of ø 6 mm and a length of 2 m = 20 rubles;
- nuts and washers 4 pcs. in stock;
- sandpaper = 10 rub.;
- stain – 0.5 l. = 100 rub.;
- varnish PF 170 – 0.5 l. = 50 rub.;
- wood glue 250 g = 160 rub.;
- screws 70 mm, 50 mm available.
Total costs were: 2400 rubles.
Creating a working sketch of the structure
Specialized websites offer a large selection of photos of homemade wood tables. Realistically assessing your potential, it would not be a sin to carefully study master classes on making wooden tables yourself at home.
This will help with choosing the type of table design, dimensions, and source material. Now you should make a working sketch of a homemade wooden table in a simplified form, indicating all dimensions. The most common designs are those with four rectangular or round legs at the corners of the table top. Tables with intersecting legs in the shape of the letter "X" are usually used for gardening.
Dining tables with round and oval tops are sometimes made on one or two legs. The surface of the tabletop is inlaid with wood in a contrasting color of fruit trees.
Those with a high level of wealth often become owners of dining tables made of solid wood, and the arrangement of the legs simply surprises even the carpenters themselves.
Labor costs
The time spent on making a table from timber with your own hands according to the drawings is combined in the following table.
| № | Work stage | Number of hours |
| 1 | Assembling the support frame | 4 |
| 2 | Making a countertop | 4 |
| 3 | Varnish coating | 2 |
| 4 | Total | 10 |
Taking into account technological interruptions in work, it was possible to make the table in 3 working days. A country table made of timber, made by me according to drawings, can serve not only as a plane for arranging objects, but also as comfortable furniture for sitting. This model is attractive due to its ease of manufacture, low labor costs and practicality. When performing furniture assembly work, you must comply with all safety requirements and use personal protective equipment.
Wood selection
There are many different building materials that you can use when making your own dining table for the kitchen. But natural wood is considered the best.
The main thing is to choose the right material, size, shape of the tabletop and supports, which will extend the service life and ensure the product’s resistance to rotting and various types of mechanical damage.
Natural wood varies in density and can be soft, hard or very dense.
A countertop made of soft material is easier to process, but any scratches or traces of mechanical damage remain on it. The same cannot be said about the hardest and most dense rocks.
Soft varieties are used in the manufacture of kitchen tables:
- poplars;
- pine and spruce;
- cedar;
- fir;
- alders;
- chestnut;
- juniper.
Solids include:
- nut;
- birch;
- oak;
- maple;
- plum;
- elm;
- ash.
The following are considered very dense:
- acacia;
- Erman birch;
- boxwood;
- yew.
The best material for making a kitchen table yourself is oak - a high-strength, durable material that is not subject to deformation and moisture. It is easy to process and varnish.
Siberian larch and horse chestnut are no less popular. It is better to make the tabletop from pine, walnut or wenge, and the stand from acacia, birch or boxwood.
The table top can also be made from chipboard, plywood and fiberboard. The edges of such materials are laminated with vinyl film. Note that they are less durable and strong, they contain chemical components that are not harmless to human health, but are easy to process and affordable.
Manufacturing examples
Despite the uniformity of all elements of such furniture, it can be assembled in a variety of options. We invite you to look at several examples to see this and find the optimal design for yourself.
In order not to repeat ourselves in each description, we immediately note that all structural elements must be cleaned, planed and sanded before marking and assembly begins. It will be difficult to do this with a finished product.
Low coffee table on two legs
This is the most basic design, the assembly of which requires only a drill with a drill bit, wooden dowels and wood glue.
Step 1. Cut several beams along the length of the tabletop. Their number depends on its width.
Cutting beams to the length of the tabletop
Step 2. Prepare two more pieces of timber with a length equal to or slightly less than the width of the tabletop.
Step 3. Lay out the tabletop beams close to each other or with a small gap, face down, and place supports across them.
We drill them through approximately in the middle of each flooring beam with a drill equal to the diameter of the dowels. If the drill is long enough, then we continue drilling, making deep but not through holes in the tabletop beams. If not, then drill them separately according to the markings.