What is necessary
Necessary tools for furniture assembly
To successfully assemble the transformer you will need:
- Phillips screwdriver or screwdriver with attachments;
- furniture hammer;
- fasteners and accessories included in the delivery kit.
Detailing the table frame and its legs
Box with fittings and fastenings
Despite the many offers on the furniture market, for most manufacturers the process consists of the following steps:
Housing assembly
Assembling the corner legs of our table
All legs for the transforming table are assembled
Corner legs of two halves are connected with screws or eccentrics. In the same way, a body is assembled from long and short drawers.
Housing assembly diagram
Detailed case assembly process
Screw the legs to the body according to the instructions
IMPORTANT! Special holes are made on the legs and drawers for simultaneous installation of the lift and screed of the entire structure. Check after assembly if they match.
Assembled base with legs
Nail the plastic foot pads to the bottom ends of the legs. At the upper ends of the drawers, install shock absorbers to soften the impact of the tabletop when folding it.
We nail heel pads to the legs
Installation of the lifting mechanism
Installation diagram of the lifting mechanism
Bring the lift into working position. For this:
- hook the spring with one end to the hole inside the lift;
- insert a pin threaded into the second end of the spring into the groove located on the opposite side;
Spring in working order, attached to the mechanism - Screw the lifters to the long and then to the short drawers.
Fixed springs for operation of the transforming table mechanism
The mechanism is in a calm, unexpanded state
IMPORTANT! The legs of the holders designed for a folding tabletop are higher than those made for the underframe.
Mechanism for bringing the table to the upper position
Installation of countertops and underframes
Mounting a smaller part of the countertop
Installing the base for a large part of the tabletop
Screw the bottom flap of the book-table top and the base to the holder platforms. Install shock absorbers on the outside of the tabletop to absorb shock when unfolding the tabletop. Using an outside-in motion, fold the lift legs into the box. It will be covered by the bottom of the tabletop.
Fix the upper movable part of the tabletop
Place the second half on top so that the end holes for the hidden hinges are on one side, and their center-to-center distance is minimal (about 14 mm). Carefully insert the hinges and secure with screws.
Hidden hinges to secure the table when assembled
The table you assemble will last a long time. Do not forget to tighten its fastening joints once a year, clean the surface with a dry soft cloth or a special furniture polish.
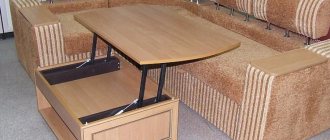
Coffee version or folded table
The process of transforming a table from a coffee table to a table for receiving guests
Dining option or unfolded table
Assembly Features
Be sure to tighten all bolts on the mechanisms securely. Since the table will be unfolding all the time, you need to take care of its strength in advance. Assembling a transformable table from Much Furniture will not take much time if you follow the instructions.
Carefully study the assembly diagram and do everything as indicated in it. Even small deviations will change the quality of use of the table.
Assembling the table legs Assembled base Screwing the legs to the body Fixed spring in the table Transformation mechanism inoperative Mounting the smaller part of the tabletop Fixing the upper movable part Hiding the loop for fixation
Remember that there are different types of original transformer tables. When purchasing a specific model and assembling it using a video, make sure that it shows exactly what you need. In general, most of them are similar, but even some decoration elements can spoil its appearance. The most popular models today are:
- Dolphin;
- Caesar;
- Levmar;
- Demi.
When assembling a transformer table, the question often arises: how do the mechanisms withstand such heavy tabletops? There is nothing unusual in this, because their strength is in no way inferior to sofa options. They can withstand a lot of weight, and their service life, established by the manufacturer, will surprise any buyer. Steel fasteners do not come apart even after many years of daily use, the main thing is to secure them firmly.
Self-assembly requires sufficient physical strength. A weak woman is unlikely to be able to tighten bolts and nuts well enough, so men should do this task. Tables from Much Furniture have been and remain one of the highest quality and most reliable, and that is why they are so popular. Having assembled the model you like, you will understand that you were not mistaken with your choice.
You can buy a writing desk “CITY” inexpensively in our online store! The writing desk “CITY” is an excellent and most importantly inexpensive option for both your office and home. A table with great design. The selected color of the table material, and the design - all this will contribute to fruitful work or study, both at home and in the office. The CITY table has 4 convenient drawers, one of which is located under the tabletop, and the other three on the right. There is also a convenient niche under the table.
Table dimensions
:
- Width 1200 mm
- Depth 600 mm
- Height 750 mm
Facade material laminated chipboard
Body material laminated chipboard
Color:
- option: Wenge / Belfort
Desk "CITY"
:
CHARACTERISTICS of the CITY desk
Table dimensions
:
- Width 1200 mm
- Depth 600 mm
- Height 750 mm
Facade material laminated chipboard
Body material laminated chipboard
Color:
- option: Wenge / Belfort
- option: Shimo Ash dark / light
Desk "CITY"
Available in color options:
Where to start?
Table assembly diagram
The transforming table from “Much Furniture” should be assembled in stages, starting with the legs. The drawings show in detail how the parts are twisted. It is worth noting that assembly must be carried out according to technology, otherwise the furniture will not be able to serve you for the required period. In general, the tables are assembled according to the following plan:
- Legs.
- Table top lifting mechanism.
- Table frame.
- Additional shelves and drawers (if available).
Knowing how to assemble a transforming table from “A Lot of Furniture” using a video, you will cope with this task in a few hours. To simplify the process, you can use a screwdriver and a ruler with a pencil to make marks. It may not be very convenient to do this alone; the help of a friend will not be superfluous, at least to hold some elements of the table.
Assembly steps
Let's look at how to assemble a kitchen table with chrome legs. This option is simple and can be applied to any countertop. First, let's put marks for the subsequent screwing of the legs. Let's lean the mount against the tabletop and mark the points for the screws with a pencil. After this you need to screw the mount. To do this you will need a screwdriver or screwdriver. Then you need to install the leg into the mounting location. It easily screws into a special hole in the center. Similar actions need to be done with the remaining supports.
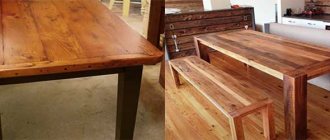
A more difficult question is how to screw the legs to a wooden kitchen table. Such a design is much more difficult to assemble, since you need to think about the types of connections.
The classic one is strengthened with the help of a special base, which is a frame made of timber. The minimum height of each plank is 12 cm, and the thickness is 3 cm.
If the legs are made of timber, then their cross-section should not be less than 6x6 cm. Traditionally, the entire structure is assembled using a tongue-and-groove connection. Then a metal corner is used to fasten the slats and legs. After this, they move on to installing the countertop. It can be connected to the base using screws.
Materials
I bought all the necessary materials at a construction supermarket. I had some in stock. The list of all materials turned out like this:
- edged pine board 4100 x 400 x 25 mm;
- screws 20 mm – 40 pcs.;
- screws 50 mm, 70 mm – 10 pcs.;
- metal corners 40 x 40 mm – 4 pcs.;
- stain 0.5 l.;
- furniture varnish PF 170 – 0.5 l.;
- wood glue “Stolyar” - 125 g;
- wooden dowels 30 mm - 24 pcs.;
- round self-adhesives – 8 pcs.;
- piano hinge 400 mm – 4 pcs.
How to properly assemble the body of a transforming table
Assembling the table begins with a thorough study of the manufacturer’s drawings or your own if it is made with your own hands. First of all, you need to understand the order of assembly of the units. The body is assembled first.
All parts are fastened using confirmatory connections. It is important to ensure that right angles are maintained when assembling parts. It is also important to remember such details as heel pads, which prevent your feet from scratching the floor, and shock absorbers, which reduce the tabletop’s run-out against the edge of the cabinet when unfolding furniture.
Assembling a computer desk according to instructions
Ordering a ready-made table without assembly and delivery will save a significant amount, and the process itself, although it requires accuracy and painstakingness, is quite simple. Even if difficulties arise with the table assembly diagram or during the process, you can always contact the support center of the store that sold the product.
Before assembly, check that each necessary part and the diagram itself are present. The fastest and easiest way to assemble a cabinet, and the most difficult stage is the installation of moving parts, so it is recommended to start with a cabinet.
Carefully fasten the supporting components to the tabletop so that the finished structure does not wobble.
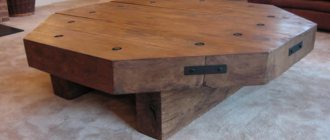
Description of appearance
This table is considered a transformer because it has two positions. When lowered, it is a square-shaped coffee table. Side length is 80 cm. This is a rather bulky option for a small room. Judging by the reviews about the transforming table from “Lots of Furniture,” you can understand that you cannot place it in rooms with limited free space. Also, respondents write that the table is quite heavy, which causes some inconvenience during operation. So, if you place it next to the sofa on which the residents sleep at night, you have to move it away every evening to make a sleeping place for yourself. This is somewhat problematic, since the product weighs 30 kilograms.
But for owners of a large apartment, this table is simply irreplaceable. When assembled, it perfectly accommodates plates for food and cups for drinking tea in the family circle. And if guests come, then you can transform a low and small coffee table into a full-fledged dining table for 8 people in a couple of deft movements.
When the transforming table from “Lots of Furniture” is opened (according to user reviews), it becomes quite high. It is comfortable to sit on chairs. Guests seated on the sofa will have to place pillows under the heel, as the table will seem high. The height of the product when raised is almost 80 cm, and the length is 162 cm.
Before assembly
Before directly placing homemade or purchased furniture, you need to decide exactly where it will be located. This is an extremely important step, because the location of the equipment must meet all safety rules and proper operation.
The basic rules are:
- Availability of outlets nearby and the ability to easily connect devices.
- It is better to position the structure so that it does not take up much space in the room.
- To avoid vision problems, the room with the computer should be well lit with natural light.
- The wall to which the computer table will be placed must be level and there should be no paintings or other decorations hanging on it.
- Do not place equipment near heaters or radiators, otherwise the devices may overheat.
By following these rules, you can eliminate most problems that may arise when working on a personal computer in the future.
Video: Transformable table. Assembly
Previous
TablesExtendable table - space saving and stylish interior solution
Next
TablesUnique DIY dressing table
Making a desk with your own hands: the manufacturing process Today, the market offers a wide selection of furniture of various designs, various models and purposes. Manufacturers also take into account the financial capabilities of buyers, so furniture showrooms can...
Table transformation mechanism: advantages and disadvantages The table is, of course, a necessary piece of furniture; we use it every day. I would like to have both a coffee table and a dining table in my home. But what if the footage of the room is small, and without both tables...
The table can be a console table: we do it ourselves The concept of a console table appeared during the reign of Louis the fourteenth. In those distant times, these interior items were very popular, and they are no less in demand today. Console…
Unique dressing table with your own hands Modern techniques, equipment and materials make it possible to create a unique dressing table with your own hands. By following simple instructions, even people without experience can make a beautiful object...
How to make a computer desk with your own hands A computer desk should combine many functions: in addition to the fact that it should be convenient for working at the computer, it should also serve as a desk and, preferably, it should include...
How to make a table from epoxy resin: design and manufacturing features A table made from epoxy resin looks unusual. Thanks to the use of this material, it is possible to create unique designs that look good in any interior. Using resin you can…
Parts preparation and assembly
When the final option has already been selected, all parameters suit the user and are well thought out, it is time to turn the idea into reality. In order to assemble a computer table according to the diagram, you will need:
- Material: furniture sheet of the required size, the use of MDF boards, plywood or chipboard is allowed;
- Machine, hacksaw, chisel;
- Sandpaper;
- Any varnish for coating;
- Self-tapping screws, mounting screws, drawer handles, pull-out shelf rollers and other pre-designed parts.
- Pencil, tape measure, square;
- Screwdriver and drill with drill bits.
Once all the tools are ready for use, you can start cutting:
First of all, you need to cut out the tabletop, sides, top and bottom of the cabinet. Take the dimensions exactly as indicated on the drawing.
Cut off the corners of the vertical panels; the back corners can be left as is as they will face the wall. Using sandpaper, round off all cut irregularities and sand sharp corners.
Cut out a shelf for the keyboard and a stand on which the system unit will be located. If the drawing calls for additional shelves, cut them out as well. Round the front corners and cut out a small area near the bottom back corner for the baseboard so that the shelves and stands sit flush against the wall.
Using a drill, make holes in the places marked in advance (with a pencil). Check that the holes will line up perfectly.
If a cabinet is provided, then cut out all the remaining walls and drawers, make pencil marks where the drawer guides should be located, and attach them with mounting screws. Connect the false panel to the bottom part, and then to the cabinet walls themselves. Assemble the box, not forgetting the back wall and drawers, and check the movement of the drawers along the guides.
An extension is made in a similar way, if it is provided for according to the plan. To do this, use a drill to cut holes in the tabletop and on the vertical walls of the structure, where they will be attached to the tabletop. Take a square and install the sides so that they are perpendicular to the plane of the table, and secure them.
Screw the screws into the underside of the tabletop; you may need to find someone to help hold the panels. All other walls, parallel to the floor plane, are attached in the same way as the side strips. The main thing is to check their location relative to the floor using a level.
The assembled table must be completely disassembled. Mark the parts in advance so that you can immediately understand what is attached to what. Sand and varnish every detail to ensure the smoothness and longevity of your design.
Connect the modules together according to the diagram and check the structure for instability.
If the table stands firmly and does not tilt from side to side when working, then it is ready for use. You can safely place it in a pre-designated place and connect the equipment.
The quality and durability of the structure depend on the accuracy of installation and cutting of parts, as well as on the quality of the fasteners themselves. By choosing each component of your table model yourself, you can prevent breakage and other inconveniences that may arise in the future.
Thus, in addition to buying a ready-made table, you can save quite a round amount by assembling a computer desk with your own hands. But this method will require extreme accuracy, painstakingness and more time than assembling ready-made parts.
A homemade table can look exactly the way the user personally wants it, the main thing is to use the tools correctly and pay more attention to assembling and sanding the wooden panels.
Recommendations for selection
Choosing a kitchen is a very important and pressing issue for the housewife. Everything should be convenient and functional. In the case of a small kitchen, the situation is complicated by space. It is important that the kitchen does not look cluttered. In this case, tips on choosing a folding headset will come in handy.
- To save space, you can use built-in household appliances. If the housewife cooks often, then she should take a good stove of the right size. If cooking occurs infrequently or in small quantities, then it makes sense to pay attention to hobs with two burners.
- If the kitchen has a clear place for a dining area, then it is better to choose a folding table. If the meal is planned somewhere in the middle of the kitchen, then you should choose a table-book or a folding transformer.
- You can completely abandon the usual table. An excellent alternative is a built-in countertop and two stools in the kitchen unit. This can be done when purchasing custom-made furniture.
A modular sofa with a sleeping place is the best solution for a small kitchen-living room. During the daytime, you can move the modules apart and use them as chairs.
Types of tables
Such furniture is usually divided into subtypes, which depend on the mechanism for its folding:
- When to use inserts This option is considered common. A tabletop is built into the coffee table, which unfolds along guides during transformation. The insert parts can be
placed in the center or along the edges. - When using an automatic mechanism. Such tables, as a rule, have one or two additional surfaces that are located under the tabletop. If you start moving the main part, then the additional ones automatically start moving. Such tables can be folded out in several ways, and they can also have either gas lifts or springs.
- When there is a double folding. This table has two surfaces that are superimposed on each other. In order to unfold such an object, it is enough to lift its upper part.
- Rotary tables. This option is quite interesting. A special feature of this table is that when turned, its tabletops do not form a continuous surface. To create such a table, special guides are used.
DIY inset shelves
If the shelves are simply placed on the holders, they will periodically fall and will not fix the fiberboard back wall located behind them. Therefore, they tried to make the fastening of the shelves more reliable by drilling recesses in them for supports.
ASSEMBLY DIAGRAM (BOTTOM)
The diagram shows the optimal dimensions. The dimensions of the wall structure (60 x 75 cm) do not make it too bulky and at the same time provide sufficient space for the tabletop. If you want to increase the size of the table, keep in mind that the weight of the product will also increase. Consider whether the child can fold and unfold the table independently.
Attention! Both insert shelves also serve as stiffening ribs, so they should be positioned exactly as shown in the diagram.
1. The shelves were fixed with a clamp exactly above each other and two holes for supports were drilled from the ends in the middle of the gap.
2. Blind holes were drilled in the side parts for shelf supports. The drill was wrapped with tape as a visual depth limiter.
Labor costs
The time spent on assembling the transforming table was reflected in tabular form.
| № | Work stage | Number of hours |
| 1 | Assembling the tabletop | 4 |
| 2 | Assembling sidewalls with legs | 2 |
| 3 | Stain and varnish coating | 2 |
| 4 | Installing piano hinges | 1 |
| Total | 9 |
This is pure time spent only on performing individual operations. Taking into account technological breaks and rest, I assembled the table in 2 days.
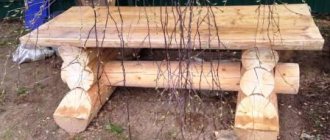
A table of this design, when assembled, can serve as a convenient surface on which newspapers and magazines will be placed. The table is suitable for serving breakfast or dinner. When folded, the structure occupies a minimum of usable space. If necessary, the transformer can be “turned” into a fairly spacious dining table.
Folding furniture is attractive for use in the country, in summer pavilions and on picnics. The table easily fits in the trunk of a car.
Final finishing and decoration
To give the finished product originality and make it unique, final finishing is needed. There are many ways to decorate. When choosing, it is important to consider the overall style of the interior. Homemade transformable tables should fit harmoniously into the space. What finishing options can be used:
- Artificial aging of a product. This is a fashionable design technique that suits different styles. The surface, previously painted with gold or silver paint, is varnished, and then sandpaper is passed over it.
- Varnish coating. You can buy a special varnish in the store, which when dried gives a cracking effect. The product with it looks like expensive antique furniture. You can add confiture or sparkles to it, then the table will be even more beautiful.
- Marine theme. If after rest there are various pebbles and shells left, they can be used for decoration. They are perfect for decorating a table top, legs or just the sides of a product. You can glue them in any order or create a composition.
- Stencils. They will help you draw any drawings or patterns on the surface. Ready-made store-bought ones or home-made ones will do.
- Mosaic. You can make a beautiful composition from fragments of multi-colored glass and mirrors by gluing them to the surface. Such a table will be unusual and original.
After reading the information on how to make a transformer table with your own hands, it becomes clear that this is a simple process. If you take the task responsibly, prepare and complete all the necessary steps, then within a few hours you can get a wonderful multifunctional piece of furniture, and use the saved money to invite guests to try it out.
Artificial aging
Varnish coating
Marine theme
Stencils
Mosaic
Required tools and materials
Most often, when assembling a kitchen table, furniture panels and chipboard (laminated chipboard) are used. The main advantage of the first option is ease of use. On sale there is a pine board that can be easily drilled and sanded. You don’t need a workshop to work with it – you can assemble the table right at home. Panel furniture also has disadvantages. It has to be sanded to a smooth surface and additionally treated with protective coatings - impregnation and varnish.
Particular attention should be paid to. The larger this parameter is, the stronger the furniture will be. A thin tabletop without additional reinforcement can bend under the weight of objects. For a table, it is not recommended to buy a furniture panel whose thickness is less than 3 cm.
Laminated chipboard is a more difficult material to work with: chips may form during cutting, and an edge will need to be glued to all open cuts. It is easier for novice craftsmen to buy a ready-made countertop made of laminated chipboard of the required size or order cutting and gluing of the edges when purchasing the material at a hardware store. Chipboard also has its advantages. These include a wide range of colors and a variety of textures.
To create a kitchen table you will need furniture fittings - fastenings and ready-made supports. Sometimes timber is additionally used. With its help, they prevent sagging of furniture made from panels. To do this, a rectangular frame is made from timber. This design is called the underframe. Its task is to distribute the stress that most affects the corners of the furniture. Then the tabletop is placed on the frame. The timber is also used as table legs.
Tools you may need are a drill, a screwdriver or a screwdriver. The legs are often attached to the top of the table using self-tapping screws. Sometimes metal corners are used as fastenings.
Instead of an epilogue
At the end of our review, let us give you some practical advice:
- Before purchasing a transforming table, make sure its integrity and the quality of all fittings. If everything is fine, then there is no doubt about the strength of this product.
- Be careful when unfolding the table. Its springs are stretched so tightly that you can injure your fingers.
- Carefully consider the place in the room where your desk will be placed so that you don’t have to move it too often in the future.
- Do not spare money on the work of professional assemblers. You'll spend some cash, but you'll save time and stress.
Remember that the service life of each product, including the transformable table from “Lots of Furniture,” depends on careful treatment of it.
Delivery
You can order delivery from us or pick up the selected product from the warehouse yourself in Moscow.
Hassle-free delivery! Read our delivery terms - we will deliver the selected product directly to your address.
Delivery within Moscow within the Moscow Ring Road: RUB 900.00. to the entrance
Delivery outside the Moscow Ring Road to 900.00 rub. plus 30.00 rub. for 1 km.
Pickup from the warehouse in Mytishchi
Delivery throughout Russia by transport companies
Climb
Ascent without an elevator 1 (one) package for 1 (one) floor RUB 60.00.
Elevator ride = 1 (one) package 120 RUR (any floor)
Purchase returns
When you receive your order, carefully check its contents and colors.
Be careful! Immediately inform the driver if the product does not correspond to what you ordered or is defective.
If a product is found to be defective or incomplete after shipment, re-delivery is carried out at the buyer's expense.
Our furniture production facility provides professional furniture assembly services.
Assembly is 10% of the cost, but not less than 1,500 rubles.
Additional assembly work will be charged separately.
You can check with our managers for more detailed information about the cost of assembly.
It is possible to schedule assembly as early as the next day after delivery (depending on the workload of the assemblers). The departure of the assemblers is agreed upon with the manager in advance.
The buyer has the right to carry out assembly independently, in accordance with the attached instructions.
Before assembling, be sure to make sure it matches your order.
Remember, purchased goods can only be returned in disassembled form, without traces of attempted assembly!
Be careful when opening the goods, keep the packaging until you are completely sure that your order has arrived in the desired color and configuration. Removal of packaging is carried out independently.
Attention! In case of unprofessional assembly, defects may occur, which leads to loss of the right to warranty service.
It is no longer easy to imagine our life without a computer. Although some people prefer laptops and all-in-one PCs for their compactness and portability, a traditional desktop computer is still the most convenient solution. But equipment of this kind should be placed in a place specially equipped for this, but often buyers do not quite understand how to assemble a computer desk, and whether it is worth doing it themselves.