Installation of mortise furniture handles
Mortise handles are usually installed on the internal facades of sliding wardrobes.
After all, an ordinary “convex” part inside the cabinet will interfere with the sliding system. To install a furniture mortise handle in the front of a drawer (can be used in either chipboard or MDF), you need to mill a special recess into which, in fact, it will be installed.
In general, this is all done using a router, without it it will be quite difficult, but I don’t have one, so we’ll make do with a screwdriver, a 4 mm drill and a 35 mm hinge cutter.
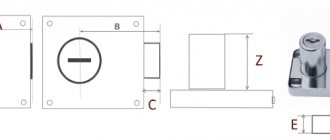
Handles are classified by shape, design and size. The installation dimension is the distance between the mounting bolts. The most important of them:
The dimensions of the handle itself, as you understand, will be larger.
Let's say we need to install a 128 mm mortise handle (distance between bolt holes).
On the facade, you first need to mark the area for the holes for the bolts and make a hole 4 mm thick. On the inside you can make a small chamfer (a recess for the head of the screws that will secure it).
Next, a rectangular area is marked for milling the recess for installation. In the corners of this rectangle we drill holes 10-12 mm deep, and using a cutter for furniture hinges we “gnaw out” the main recess. And we clean out what remains with a drill or chisel.
The edges, of course, will not be perfect, but the handle has its own edge, which will cover these irregularities. Now all that remains is to adjust all the irregularities to an ideal state and secure it to the facade.
This method, of course, is considered clumsy, but, you see, it would be stupid to buy a special tool to install three or four mortise handles.
There is also another option. For a small additional payment, you can negotiate with the craftsmen who will do the cutting and edge cutting for you, so that they immediately make these recesses, just do not forget to immediately give them the installation dimensions of your handles.
Watch the video on how to install a mortise river - step-by-step instructions:
Source
Setting dimensions and drilling the façade
Let's start by installing handles on the doors of the kitchen unit.
- The door is placed on a flat surface, let it be a table.
- In the corner where it is necessary to install the handle itself, a distance of 5 cm is set aside from one and the second edges.
- Two mutually perpendicular lines are drawn through the points. Their intersection point is the place of the first fastener. In order for the lines to turn out to be mutually perpendicular, it is necessary to use a square to draw them, applying it to the edges of the door.
- Now you need to accurately measure the distance between the mounting holes on the handle itself.
- This value is transferred to the door from the point of intersection of the two lines. If the fitting element will be installed vertically, then the displacement must be carried out downwards, if horizontally, then to the side. The second location for fastening the fittings is indicated. In this way, the exact location of the handles on the facades is determined.
- Now we need to drill. This operation is performed from the front side of the facade. The thing is that when the drill comes out of the material, it may delaminate and chips may appear along the edges. And although they will be closed with the fittings themselves, there is always the possibility of a large chip or crack appearing. Of course, this all depends on the quality of the material used and the sharpness of the drill used. Therefore, when drilling, be careful and carry out this operation carefully.
- So, two mounting holes are drilled, now you need to insert two mounting screws from the back side. Install the handle on the front side and attach it to the facade, screwing in the screws with a screwdriver. If it is not pressed tightly against the door and is loose, then you will have to remove it, put washers under the heads of the screws, and put the fastening back on.
Marking an interior door for inserting a handle
Before you cut the door handle into the interior door yourself, you need to correctly mark the door leaf. First of all, it is necessary to decide in which direction the leaf will open, after which the height of the fittings is determined. The standard height is around 90-100 cm from the floor.
In the box with the door handle you can also find insert instructions, which indicate the expected height of the fittings. If the handle is the simplest, without any additional devices, then its installation is quick and without problems. If you don’t have the tools to carry out the work, you can purchase them at any hardware store.
To insert the handle, you need to purchase a feather drill with a diameter of 23 mm and wood crowns with a diameter of 50-54 mm. After everything is prepared, you can begin active actions.
From the end of the canvas, a height of 95 cm is marked and using a square, a line is drawn perpendicular to the end, the middle is marked with a pencil and marked with some sharp object - a nail, a screw, etc. In the marked place in further work it will be necessary to drill a hole for the latch.
Next, markings are made directly for the mortise handle. To do this, it is worth continuing the line onto the canvas itself, drawn earlier at the end. To ensure that the line is strictly straight and perpendicular, a square must be used.
It is important to pay attention to the fact that the mortise handle for an interior door can be located from the edge of the door either 60 or 70 mm. Only the one who carries out the work should decide which distance to choose, because the length of the latch allows this to be done. But it is also worth paying attention to the fact that choosing the cutting distance from the edge is only allowed on a blank canvas, that is, on one that does not have decorative strips, and where they are, then you will have to cut in the way that decorative elements allow you to do.
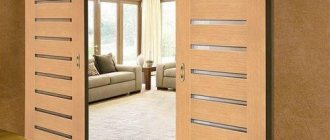
Handles for sliding doors: types, their advantages and disadvantages
When approaching the question of studying the varieties of door handles for sliding doors, one special nuance should immediately be noted - there are no varieties here. In essence, these are modifications that differ from each other only in some details. But, nevertheless, they have different names and are considered precisely as varieties. They have one thing in common - they are all mortise, and the handle itself is an ordinary recess that you can grab with your fingers. So what are the differences between these types? What are these varieties that are not varieties at all? And that’s what we’ll find out right now.
- Independent handles for sliding interior doors - first of all, they do not depend on any locking mechanism. They are simply not designed to work in conjunction with a lock or latch - the most that can be equipped with sliding doors equipped with such a handle is a magnet, which keeps the door from spontaneously opening or closing. In principle, the need for such devices disappears by itself if the sliding doors are properly oriented relative to the level. The advantages of independent handles for sliding doors include a very simple design that does not have any mechanisms, low cost and easy installation compared to other modifications. As a rule, this type of handles refers to mortise products, which during installation are placed inside the door leaf (embedded) - they do not protrude beyond its limits, allowing the doors to open easily even in the most cramped conditions, as is the case with cassette sliding doors. By the way, when closing, cassette doors completely go into the wall, which causes some problems with opening them - as a rule, such doors are additionally equipped with a special handle that allows you to remove the panel from the pencil case.
- Mortise handles for sliding doors with latch. Their main difference from the previous version of the handles is the presence of a mechanism that allows you to control the latch - open it when necessary. This mechanism is somewhat different from the usual version for swing doors - and it’s not just a matter of size. Often, to release the latch from the strike plate, you have to turn either a small rounded handle or move a slider. Both parts of the door handle for a sliding door are placed in the recess of the handle itself, which allows the doors to operate freely even in the most cramped conditions, as is the case with cassette doors.
- Lock handle for sliding door. In principle, this sliding door handle differs from the previous two except for the presence in it of a special hole for a keyhole - sometimes a lock cylinder, or rather some semblance of it, is even built into the handle itself.
Door handles for sliding doors photo
If we talk about special types of handles for sliding doors, which differ both structurally and in terms of operation, then, undoubtedly, handles for glass sliding doors and handles for compartment doors should be distinguished as a separate type. We will talk about them briefly, since in most cases these products are installed in production during the manufacturing process of doors.
- Compartment handles for sliding doors are nothing special - in most cases they are combined with the profile structure of the panels and look like an ordinary protrusion on them.
- Another thing is handles for glass sliding doors; sometimes their design is very interesting. Take, for example, the most common version of these products - it is a removable larva. For it, a special hole is drilled in the glass, in which the handle is fixed with a special bushing nut. Such a lock is closed simply by turning the key - the handle in these devices is the lock itself, which has special protrusions.
Handles for sliding glass doors photo
In principle, this is all that can be said about the varieties of handles for sliding doors - as you can see, not a lot, but, by and large, this assortment is quite enough to ensure the operation of any sliding mechanism.
See the video for details on how to install a handle for an interior sliding door.
Hole for handle
The first step is to insert the handle, and then the latches into the interior door. This is done because when drilling a hole for the latch, the master will know where he needs to stop, and the second advantage is that all the chips from drilling will simply fall down and will not need to be blown out with a vacuum cleaner.
In order to make a hole for the handle, you need to take a wood crown with a diameter of 50-54 mm and start drilling in the place where it was originally marked with a pencil. Drilling should occur in small jerks; you should not try to do everything in one go, because in this case the crown will become heavily clogged with sawdust and heat up from friction with the wood. Having passed 4 mm, you should stop, clean the crown and then continue further. When cleaning the instrument, you must be careful because it can be very hot.
Since the depth of the crown does not allow it to pass through the canvas, then it is necessary to drill from both sides. When you reach the middle of the door leaf, you shouldn’t put too much pressure on the crown so as not to hit the door leaf sharply with the drill.
How to make cabinets without handles
The minimalistic design of furnishings with smooth, even surfaces of the facades can be supported by the absence of protruding handles. Using such furniture is quite convenient: cabinets without handles open simply and without unnecessary effort. In this case, the function of the handle is either completely replaced by a built-in mechanism for automatically opening the facade by pressing. Or the facade itself has a special shape, with a hidden place for easy grip. This possibility can be provided at the stage of ordering furniture facades, having decided on the type of material.
Installation of the locking mechanism
As already mentioned, inserting a handle and latch into an interior door with your own hands should be done as carefully as possible and in compliance with all recommendations. The next step is to install the locking mechanism flush with the canvas.
To begin with, install the mechanism in a ready-made hole and use a pencil to trace the bar, after which the hole is hollowed out to the required depth using a chisel.
When everything is ready, the mechanism is inserted and the bar is screwed on. Next, the handle is installed and screwed in accordance with the instructions supplied with it.
Rock, paper, scissors - pick one
Of course, to make handles we choose stone, which goes well with wooden furniture. It is only necessary that all the pebbles be approximately the same size and be flat on one side.
Rice. 1. Handles made of natural stone can be completely different, but they are always beautiful
What will you need for the work besides the stones already mentioned? We list the tools and materials needed to make cabinet handles with your own hands:
- a bowl of sand;
- two-component epoxy adhesive;
- slotted flat head metal screws;
- small flat washers;
- lock washers.
As you can see, to give furniture your own unique design, not much is required. By the way, don’t even think about purchasing stones – we don’t need a closet like our neighbor’s; pick them up under your feet while walking and traveling. Exclusive, so exclusive!
Manufacturing technology:
- Preparatory stage. Assemble everything listed above, check the length of the screws. It should match the thickness of the cabinet door board.
- Place the stone, flat (inside) side up, in a bowl of sand. This will give it the necessary stability during further gluing.
- After making sure that the glue is intended for joining metal and concrete, mix both components according to the instructions.
- Apply some epoxy glue to the side of the stone (center) and the head of the screw. Glue them together and leave the glue to dry for a while.
Tips for caring for a door handle
In order for a door handle to serve for a long time, it must be properly cared for. After several years, the fittings wear out and this negatively affects its operation. To try to slow down this process, you need to properly care for it:
As you can see, embedding a handle into a door is not so difficult if you follow all the recommendations and subtleties of installation. But if you can’t cope with the task yourself, then it is advisable to resort to the services of a master who will do all the work efficiently and quickly.
Source
Choosing handles for kitchen facades (36 photos)
Handles for kitchen facades (36 photos): instructions for installing kitchen facade elements with your own hands, price, video, photo
Add to bookmarks
Home / Furniture / Facades
If you purchased a branded kitchen set in a store, then you are unlikely to need to replace the handles, at least at first. But perhaps you have decided to assemble such a structure yourself, then handles for kitchen fronts and their installation will be of extreme interest to you.
A variety of handles for kitchen facades
The variety of pens is amazing
From old forks and spoons
Don't know what to do with your old appliances? Make them into pens! Especially if the forks and spoons are aluminum and bend easily. This option is perfect for kitchen cabinets.
Handles for sliding doors: their types and features
Have you ever wondered why sliding doors are equipped with a special type of handle? The answer to this question lies on the surface - the protruding parts of standard handles simply interfere with the process of closing such doors. It is difficult to guess about this only if a person is not familiar with such doors in principle. In this article, together with the website dveridoma.net, we will study handles for sliding doors - we will get acquainted with their types, consider the advantages and disadvantages of each of them, and also understand the technology of their installation.
Mortise handles for sliding doors photo
From rubber toys
When children grow up, there are a lot of unnecessary toys left behind; residents of indoor zoos, small dolls or superhero figurines are especially common. They will make original furniture handles: just paint them with paint and a spray can (optional) and place them on a screw and glue or a special base for handles. You can’t make anything out of old toys: “Life after childhood: toys in the interior.”
From the rope
If the room in which the furniture is located is decorated in a marine style or others where deliberate roughness and wear are appropriate, then the furniture handles can be replaced with ship's rope. The easiest and most stylish way to secure such a handle is to make a round hole in the furniture door, thread a rope and tie knots on both sides. If you don’t want to make too many holes in good furniture, you can wrap old or tatty new handles with thin rope or twine coated with glue.
Main types of kitchen handles
Furniture handles can be made of colored plastic or decorated with rhinestones. Naturally, before purchasing, you will have to analyze many factors - from the color of the room and the style of furniture to financial possibilities, but the main thing you will have to figure out is what kind of handles there are.
As a rule, fittings offered by trusted manufacturers can be of the following types and forms:
- ring handles mounted on a decorative base are massive, noble and elegant. The material for their manufacture is metal, patinated or coated with bronze plating. They go perfectly with classic wooden kitchen fronts. However, each time the doors will need to be opened very carefully so as not to damage the facades;
- Shell handles are popular (made of both metal and plastic), the surface of which can be decorated with paintings and carvings;
- compact and convenient fittings in the form of “buttons” can be made of wood, metal or plastic and are perfect for lightweight facades;
- Small teardrop handles are also considered lightweight - this product is classic, but is best combined with a plastic facade;
- The most practical and laconic (and therefore very common) are considered to be handle-brackets, which can be made of different sizes;
- built-in handles (look like a canvas cut into a smooth facade) - ideal if the facades of the kitchen furniture are already richly decorated (for example, with rhinestones or carvings).
From pebbles
Beautiful, natural and in perfect harmony with wooden furniture, and not only. To make stone handles, you need large pebbles of similar size, with at least one side flat. The metal base for mounting the handle in this case is attached with strong glue.
Advantages and disadvantages
A mortise handle is simply irreplaceable when furniture doors interfere with each other when opening. This model has many advantages:
- Versatility. For each piece of furniture, regardless of its purpose, you can choose a suitable handle. Most often, “sinks” are found on cabinets, chests of drawers, computer and desks, dressing rooms, and kitchen cabinets.
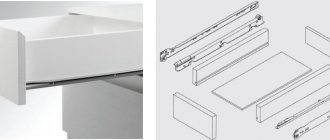
- Multifunctionality. A mortise furniture handle can be installed not only on cabinet doors, but also on drawers. Such accessories are convenient to use.
- Diversity. The stores offer a large selection of models. They differ in color, material, shape. You can choose suitable fittings for furniture of any style.
- Attractive price. It depends on the complexity of manufacturing and the quality of the product. But the price range is such that even the most original fittings will remain affordable to the average buyer.
Among the disadvantages is the difficulty of inserting handles into furniture facades. You can’t do this without special skills and the necessary tools. Installing conventional handles does not require such a high level of skill, but the convenience and space savings are worth it.
From wine corks
We have already told you how many things can come out of wine corks: “9 creative ideas from wine corks.” Another interesting option is furniture handles. When placing plugs on metal fasteners, lubricate them with glue for better adhesion.
From leather strips or belt
Handles made of leather strips look very stylish and are pleasant to the touch. Each handle will need two bolts with a neat head. You can cut an unnecessary leather strap into such strips, but then it is better to sew the cut edges on a machine. More ideas: “What a leather belt can be used for: 16 DIY ideas.”
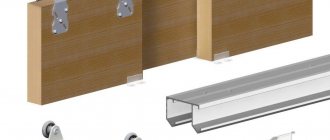
All about doors
It is difficult to overestimate the advantages of compartment doors, which are among the sliding products. They allow you to save unnecessary space in apartments with small square footage, so their popularity is only growing. It is also attractive that handles for sliding doors differ from the standard ones intended for other door designs. This is due to the fact that traditional devices will interfere with the opening/closing of the sliding system. Therefore, several types of such fittings have been invented, which will allow homeowners to purchase products in accordance with their preferences and wallet.