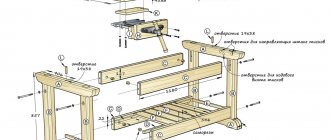
DIY wooden bed drawing
A good night's rest is paramount to living a productive and healthy life. If you decide to make a bed out of wood with your own hands , then you benefit not only in price. You will be able to assemble a design that is ideal for you, will suit your lifestyle and preferences.
The most important thing is to know exactly what you want to do. Here are drawings of do-it-yourself wooden beds with step-by-step photos and instructions, dimensions of parts and assembly diagrams. All you have to do is choose the right model from the options below - from a regular single bed to economical beds with storage drawers and stylish platform beds, and if difficulties arise, use the link to the source site.
Selection of materials
You need to start by choosing materials for a homemade bed. Three integral structural elements of this furniture: box, base and headboard. Making beds is a process in which every detail needs to be given special attention.
For the box
This element is made from MDF, natural wood or chipboard. At home, it will be easiest to work with the latter material; moreover, it is the most budget option. Chipboard is of low quality and fragility, and this is its main drawback. Moreover, low-quality material contains formaldehyde resins, which are hazardous to health. It begins to release harmful substances under the influence of humidity and heat.
A beautiful MDF bed will be much more expensive, but of better quality. To make these boards, wood chips are used, compressed under pressure and high temperatures. In this case, harmful resins are not used, so the material is environmentally friendly; it is often used in the production of children's furniture. A box made of natural wood will be the most expensive, but it will also last much longer than chipboard and MDF. In this case, the owner will be provided with pleasant tactile sensations, and a special smell will be in the bedroom.
If you decide to make a bed with your own hands, it is better to order cutting at a specialized place. It costs very little, but it will save a lot of time and will be made much better.
MDF
Natural wood
Chipboard
For the base
When making a bed for the bedroom yourself, you should decide on the material for the base and choose wood, metal, chipboard or MDF. The first option is popular among those who value high quality furniture. This material has excellent performance and technical characteristics. The array itself is environmentally friendly, strong and durable. You can assemble furniture from logs or boards. Teak and mahogany are perfect for making a bed base. The most commonly used are oak, beech, pine, ash, cherry, birch, and alder.
Soft woods work best. Pine practically does not crack, while alder often cracks when drilling.
Chipboard and MDF are much cheaper than wood. The toxicity of the first material frightens many, but only low-quality products pose harm. MDF is the best option and is easy to process. In modern interiors, you can increasingly come across interesting ideas on how to make a bed out of metal. This is a particularly durable material, characterized by durability and wear resistance. Such structures are often treated with silver or bronze, covered with fabric or leather. The result is original furniture that will fit seamlessly into a bedroom in modern, country or high-tech style. Another variety is a bed made from a profile pipe. It is not difficult to make such models if you have the skills to work with metal, a workshop and all the necessary equipment.
Criteria for choosing a bed with a soft headboard, design options
Tree
Metal
Chipboard
MDF
For headboard
The headboard is an important part of the furniture. This is the first thing the eye stops at, so the detail can set the style of the entire bedroom and have a decisive influence on the interior design. The headboard can be soft. It is important that the material from which the upholstery is made retains its presentable appearance over time. Artificial and natural leather withstand any impact, and also look very stylish. Textiles can also be used for upholstery. A headboard covered with velor, suede or microfiber will look homely. Models with a carriage coupler are very interesting and unusual.
A rigid headboard will make the bed look antique. There are many more design options here. A classic example is a backrest made of wood. Alternatives can be metal, wood panels, plastic, tempered glass and even mirrors. Finally, there may be no headboard at all, which looks very original. In such cases, it is recommended to decorate the wall to form an impromptu backrest from scrap materials.
Faux leather
Genuine Leather
Velours
Suede
Microfiber
Wood panels
Metal
Tree
Plastic
How to make a bed with your own hands at home
4.2 Step 2. Assembling parts
It is assumed that in this model of bed the headboard will be fixed directly to the overall structure, so that it can be dealt with right away. If you want it to have a rounded shape, you should first make a template on paper, then transfer it to chipboard and cut it out using a jigsaw.
Now the design details can be “tried on” at the place where the bed will stand. If the dimensions match, you can begin fixing the side and end panels, as well as the cross beam, using metal corners. The headboard has not yet been attached - it needs to be sheathed first.
It's quite simple: first, the chipboard is covered with foam rubber, which is fixed using a construction stapler so that there are no protruding parts left anywhere. Now you need to cover the back with fabric. It is worth purchasing in advance a dense material that will not “catch” dust. The fabric needs to be stretched well and fixed only on the back of the headboard so that the brackets do not spoil the overall appearance of the bed. When everything is ready, the backrest is connected to the already partially finished frame.
You need to cover both the headboard and its sides with foam rubber and then with fabric
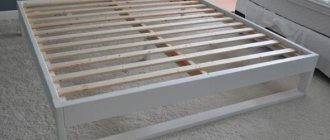
It's time to start making the sheathing. To do this, pre-prepared beams (5 for the longitudinal part and 2 for the transverse part) are distributed at approximately the same distance from each other, but are not fixed to the bed frame - they will rise. They only need to be fastened together. The middle beam should rest on the cross beam.
Now you need to start lining the walls of the box. Here everything is similar to the back covering: first the padding polyester is fixed, then the fabric.
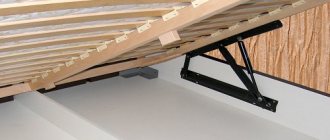
If everything is ready, you can proceed to securing the elements of the lifting mechanism. This is also done using self-tapping screws. Check if everything is working correctly. If yes, you can proceed to the next part - attaching the slats.
The slats are also attached using self-tapping screws across the beams. At the same time, be sure to recess their caps into the wood by at least 0.5 cm! This is necessary for the strength of the structure.
The last thing remains - covering the bottom part. For convenience, it is better to place the bed on its side - this way you will quickly finish this stage. You can fix fiberboard sheets using either a construction stapler or self-tapping screws (here you need to choose those that are short in length but have wide heads). Attach them carefully in several places.
Now you can lower the structure, place the mattress on it and use it for its intended purpose! In addition, now, thanks to the lifting mechanism, you have a lot of space to store various things.
Legs
Making legs with your own hands is the easiest step in the entire construction process.
The whole manufacturing process:
- the prepared timber with a cross-section of 10x10 cm needs to be cut into 6 bars 10.5 cm long;
Blank for future legs
- fastening is carried out to the support bars;
- to strengthen the frame, two additional legs are attached under the central support, at a distance of 50 cm from the edges of the frame;
- To decorate them, you can give them any shape. You can saw off one of the corners approximately 3 cm from the bottom, at an angle of 45 degrees, as in the photo;
- Upon completion of the work, all sides must be sanded.
Fastening all created elements:
- as mentioned above, the legs are attached to the frame support boards. To do this, you need to use 60 mm self-tapping screws. You need to spend at least two on each leg;
This is what the leg mounting looks like from the inside
- holes are pre-drilled with a drill, a drill whose diameter coincides with the cross-section of the screws.
Legs attached to the frame
Before screwing in the screws, you must first drill holes, which will reduce the risk of splitting the boards.
Tools and consumables
The next step is preparing all the necessary tools. To make a bed with your own hands you will need:
- circular saw (if you do not order the cut separately);
- roulette;
- a set of special devices that allow drilling at an angle;
- wood glue;
- drill;
- square (it must be adjustable);
- grinding machine;
- wood putty;
- sandpaper.
You can’t do without fasteners and accessories: metal corners, confirmations, melamine edges, legs, self-tapping screws. When working with metal you must have:
- welding machine with electrodes;
- drill;
- grinder;
- brushes;
- primer;
- sandpaper of varying abrasiveness;
- forging devices.
This is the required minimum. Depending on the type of furniture you choose, some other tools may be required.