Restoration of upholstered furniture inside and outside. Step by step examples
Repair and restoration of upholstered furniture may consist of the following stages:
- Disassembling an object into its component parts. Typically, this is required for furniture with wooden legs, armrests or other parts that need repair or replacement.
- Sanding wooden elements using sandpaper, followed by cleaning with a damp cloth. The wet cloth should absorb all the small particles, so the paint (or varnish) will lie smoother and last longer.
- Painting wood. Before applying paint with a brush, it is recommended to coat the surface with a primer. We still recommend using spray paint, which is applied easily and evenly, which will greatly simplify your work and save time. Usually 3 layers is more than enough. After the paint has dried, you can apply a protective coating to it, which will prevent chipping.
To learn more about painting, varnishing, decoupage and repair of wooden furniture, read our article Restoration of Soviet furniture.
- Replacement of internal filling and upholstery. We will tell you in detail how to repair the springs inside an old sofa or chair below in this article. As for reupholstering upholstered furniture, everything depends on the characteristics of the product being restored. For example, the seat of the chair in this example was simply wrapped in new fabric, which was secured with a stapler. You will see more examples with step-by-step photos below!
- Assembling a piece of furniture into a single whole.
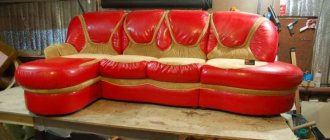
How do you like this transformation?
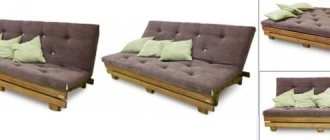
Restoration of cushions for sofas and armchairs
Perhaps this point is the simplest and most inexpensive in the process of restoring upholstered furniture. You will need to measure the height, length and width of your pillows and, based on the data obtained, purchase the required amount of foam. Subtract about 5-10mm from each edge to get the correct dimensions for filling the pillow. For softness and increased service life, be sure to wrap the foam rubber with batting or padding polyester. Here's what the finished filling looks like in the photo:
Also read: How to make sofa cushions with your own hands (35 ideas)
Decorating the sofa
The finishing touch will be the decoration of the structure. This can be easily done by using pillows or small poufs. They are laid out in different places on the sofa, creating additional charm.
You can decorate the sofa with pillows.
You can also make a carriage tie. Typically this technique is used only for the back. As a rule, large decorative buttons are used, which are sewn in a checkerboard pattern. To tighten, you need a strong thread, which is secured on the back side of the back.
You can also strengthen the armrests. But it is better to do this in advance, when the structure is completely disassembled. Wide strips of wood are glued to the original elements, decorating them in unison with the rest of the details.
Repairing spring upholstered furniture: the best way
This method of repairing a spring sofa or chair is considered the most reliable of all existing ones, although it is time-consuming. Let's look at its implementation step by step:
- Make sure you remove all trim, staples, and nails from the frame. In this case, the furniture body was already completely ready for installing the seat (cleaned, sanded, washed, painted). The springs were removed and set aside for later use. Before this, the master took several photos so as not to forget how they were located.
- Install straps (slings) to secure the springs on the lower part of the seat. The more strips you install, the stronger the seat will be. Secure them with a stapler, leaving a couple of centimeters of material on each edge. The tension should be moderate so that the sling bends slightly when pressing on it.
- The extra centimeters on each edge should be folded and also attached to the frame with a stapler. Repeat these steps until you have installed all the vertical lines, then move on to the horizontal ones. Don't forget that they should intertwine with the vertical ones, and not just go under them.
- Reinforce the strength of each strap with three small upholstery nails. This is what this whole process of upholstered furniture repair looks like in the photo:
5. Now you can proceed directly to installing the springs. You can use an old photo or just distribute them evenly on the sling support. The end of each spring should "face" in the same direction as all the others.
6. The springs are attached to the straps either using a special tool or with a thick strand of twine and a special button. Each spring must be secured at three points.
7. Drive 2 nails into the end of each vertical and horizontal row of springs.
8. Measure the length of the twine, which will be 2 times the length of the seat plus 40-50 cm. Fold the piece in half and create a loop around the nails, as shown in the photo below. After this, pulling the twine taut, hammer in the nails with the loop to the very end.
9. Now our goal is to intertwine the springs together to form the seat and connect all the springs into a single unit. Start and finish tying knots at each end on the second “ring” from the top, then immediately move on to the top rings. This will allow you to get a dome-shaped seat.
10. Once you have tied all the springs together, wrap the twine around the nail and hammer it in until it stops. Secure the free end of the thread with a stapler.
11. For the second thread from each secured loop, repeat steps 9 and 10, but it should be tied exclusively on the upper rings, without “falling” to the second level from above.
12. Knit all the vertical rows like this, then the horizontal ones, and to be sure, you can also go diagonally. As a result, none of your springs will be able to move separately from the rest. Follow the step-by-step photos to secure the springs in the seat of upholstered furniture:
Finally, all that remains is to reupholster the finished seat. In this case, the craftsman simply sewed on the fabric (which could also be done using a stapler), and masked the seams with ribbon.
Reupholstering or replacing upholstery of upholstered furniture
Reupholstering can also be quite a task, but it's definitely worth it, especially if you don't have any special plans for the weekend. Next, you will learn how to properly reupholster an old sofa or chair with your own hands.
Stage 1. Removing old upholstery
- You may feel like you know this piece of furniture by heart. But still, before removing the upholstery, take pictures of it inside, outside, front and back, taking close-ups of especially difficult areas near the armrests, etc.
- Carefully remove the old upholstery, being careful not to damage it or the furniture itself. You may need an anti-staple gun, a screwdriver and other tools for this. It is recommended to remove the fabric in the following order:
- From the lower base (turning the sofa onto its back or upside down);
- From the outside of the backrest and armrests;
- From the inside of the back and armrests;
- From the seat.
You will use the old upholstery as a template. Before applying it to new fabric, we recommend ironing it.
Stage 2. Sewing new upholstery and reupholstering upholstered furniture
- Use your photos and old upholstery as a guide. Start reupholstering the furniture from the bottom base, then work on the armrests, backrest and seat in that order.
2. Cut the fabric according to the finished template, taking into account the following:
- On the edges that will be sewn with thread, leave an additional 10-15 mm of fabric;
- At the edges that will be stapled, add about 50mm, which will be used to pull the upholstery over the sofa.
3. Sew sections of fabric where necessary and stretch it over the bottom, securing it with a stapler along the edges.
4. Next comes the inner side of the armrests.
5. Next to it is the outer part of the armrests.
Notice how the craftsman avoided seams and secured the outer armrest padding with a hammer.
The photo below shows an alternative option for restoring the armrests. The master secured them with a stapler, and then covered the staples with a beautiful braid.
- Let's return to our example. After the armrests came the turn of the backrest. A rope sewn around the perimeter gives it an interesting and expressive shape.
This technique can also be used to add expressiveness to the armrests, which is what was done during the restoration of this chair.
- The outer part of the backrest is secured in the same way as the outer upholstery of the armrests. Additionally, the sofa was decorated with buttons and new legs. In the next photo you can compare the sofa before and after repair and reupholstery.
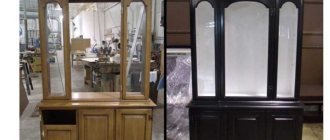
The restoration process from start to finish
So, you have decided to restore an old chest of drawers with your own hands. The work ahead is painstaking, requiring attention and time. Every step is extremely important, so try not to miss anything.
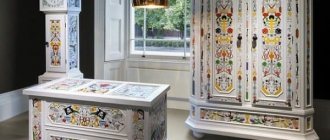
Old chest of drawers in need of restoration
To work you will need:
- wood putty and glue;
- sandpaper of different grits in the set;
- hammer;
- Screwdriver Set;
- rubber mallet;
- gloves and respirator;
- toothpicks, toothbrush;
- means for cleaning accessories (tooth powder will do);
- tassels;
- paint and varnish.
Cleaning the product
The old chest of drawers must be cleaned so that the surfaces and decorative parts are not damaged. First, wipe the product with a sponge and soapy water. The water should be warm, but not hot, and the detergent used should be laundry or stain-removing soap without chlorine.
Antique pieces of furniture, especially chests of drawers, are often decorated with fine details and carved inserts. A toothbrush will help you clean them well.
Remove the furniture fittings (this will give you access to the surfaces underneath the pieces to better remove dirt) and rub with a cleaning solution. For example, tooth powder works well for silver.
Clean hard-to-reach places such as crevices and corners with an awl or toothpick. Plaque and stubborn dirt can be removed with fine sandpaper. It must be used very carefully, otherwise the finish may fade due to strong pressure.
If you decide to change the color of an old chest of drawers or cover it with a new layer of varnish, the surface must be thoroughly sanded.
Preliminary preparation
After the old chest of drawers is washed and thoroughly dried, repair or replace the damaged elements. Finding suitable parts will most likely be difficult. To do this, it is better to contact an antique shop or carpentry workshop to order the production of the necessary decorative items. There you can also get professional help installing parts.
Check how well the screws and bolts are tightened and whether the wood is cracked. Remove rusty or loose bolts: they need to be replaced with new ones. Glue small cracks on the surface with wood glue; Cover the larger ones with wood putty, matching it exactly to the same tone. If you plan to subsequently cover the chest of drawers with stain, then use a special putty.
We recommend: Connecting a gas stove: how to install a gas stove step by step
Painting work
Nowadays you rarely see furniture made of natural wood on wide sale. An old chest of drawers may not fit with the modern style of your home. Therefore, in addition to a fresh look, this product can be given a new image. The easiest way is to paint it one color, for example white.
First of all, remove the old coating from the surface. Do this carefully so as not to damage the wood or leave traces of the old coating in cracks and corners.
Thoroughly clean the surfaces of the dresser so that there are no uneven spots left.
Now sand the surface to get rid of roughness and minor imperfections.
Sand the surface well
After sanding, move on to putty. Carefully repair all chips and unnecessary holes. After the putty has dried, sand it with fine-grained sandpaper.
To paint the chest of drawers, use a special wood paint. You may need to sand the surface again. To give the chest of drawers a glossy look, you can apply a layer of varnish on top of the paint (after it has completely dried, of course).
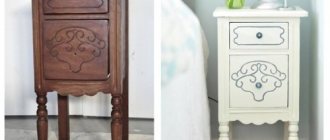
Replacing old parts
The old chest of drawers used in our example had iron handles. Of course, they are beautiful and give the furniture an antique look. But unfortunately, some of these pens are hopelessly damaged. The easiest way out is to completely replace them with new ones that are more suitable in style. This is easy to do: drill holes of the required diameter in suitable places and insert the fittings.
Replace old dresser handles with new ones for a modern look.
As you can see, the chest of drawers has become completely different: new, modern and exclusive.
New life for old furniture
Decoupage chest of drawers
If you don't think pure white is enough to breathe new life into an old chest of drawers, do decoupage.
- Paint the surface with white acrylic paint. Let dry thoroughly.
- Cut out pattern pieces from decorative paper napkins. Glue them to the chest of drawers with PVA glue.
- After everything is dry, coat the chest of drawers with varnish.
That's all, your chest of drawers has sparkled with new colors! The good thing about decoupage is that you can choose any pattern and design that your imagination allows.
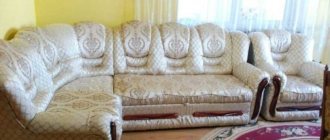
Restoration of upholstered furniture: before and after photos
At the end of this article, we offer you a few more photos of upholstered furniture before and after restoration. We hope that these examples will clearly demonstrate to you that any furniture can be restored beyond recognition and bring you pleasure with its new style, color and upholstery!
Also read: Transformable furniture for a small apartment Also read: 10 best things you can do for your home with your own hands
And if you don’t have the desire to restore and reupholster furniture, then here are some simple solutions for masking problem areas and repairing upholstered furniture with your own hands :
Home restoration services
Among our clients, reupholstering sofas
at home is a popular service. This contributes to several significant advantages:
- Saving money. Our services will be much cheaper than buying a new friend
.
This is especially true for repairing furniture with premium upholstery
, since new models cost a lot of money. - Appearance. If an old friend does not fit into the interior, but at the same time has retained its functionality and form well, it is not wise to go shopping in search of a new option. It is better to change the upholstery
by choosing a material of a suitable color and texture. - Unlimited scope for design. We offer a huge number of fabrics and other upholstery materials, so it’s easy to realize any design ideas.
- Convenience. If the service is performed at home, a heavy straight or corner sofa
will not have to be transported to the workshop, which means there is no need to hire movers and look for suitable material.
Upholstery replacement
and filler on
upholstered furniture
may be required in different situations:
- the seat was heavily squashed (the filler lost its properties and shape, the spring block broke);
- the upholstery has lost its attractive appearance, severe scuffs or even torn spots have appeared on it, stains that cannot be cleaned off with anything;
- the color or texture of the upholstery does not match the new interior, or the style or size of the furniture needs to be changed.
Repair may also be required if the frame breaks, the folding mechanism or other components fail. In any situation, you can contact our company. Repair work of any complexity will be carried out by our specialists as quickly as possible.