Assembling a frame for a simple wooden bed with your own hands
The bed is the center of the bedroom, its main and most important part. Here we spend time reading a book, relaxing, sleeping and communicating with our loved ones. It is extremely important that the bed has a pleasant appearance and fits harmoniously into the interior of the room. Furniture stores offer many options for purchase, but most often the price exceeds the quality. Why overpay when you can do it yourself?
The bed is the center of the bedroom, its main and most important part.
Making a bed frame with your own hands is much easier than it seems. In addition, a homemade bed has a number of advantages:
- independent selection of quality materials;
- confidence in the reliability of the assembly;
- development of useful skills in the household;
- opportunity for creativity.
Having made a bed frame with your own hands, you will receive an original product in a single copy, and it is in your power to make it unique.
It is extremely important that the bed has a pleasant appearance and fits harmoniously into the interior of the room.
Design
Decide on the dimensions of the bed frame you want to make. Choose a mattress that suits your needs.
A mattress is an expensive purchase, but the quality of sleep and rest depends on it. A bad mattress can cause circulation and back problems. Be careful when choosing!
Making a bed frame with your own hands is much easier than it seems.
Try to choose orthopedic mattresses. For a comfortable sleep, it is recommended to purchase mattresses 15-17 cm longer than a person’s height. When the choice is made, measure the parameters and, based on the measurements, draw up a schematic drawing of the future sleeping place.
Be sure to make allowances so that the mattress fits into the frame and does not lie on it like a lid.
Having made a bed frame with your own hands, you will receive an original product in a single copy, and it is in your power to make it unique.
! Mattress dimensions + 1.2 cm per side = bed frame dimensions.
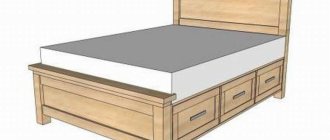
We will make a frame for a standard mattress 2000 by 1300 mm.
Making a bed frame along with decorating the product yourself will not take more than a week, and your new bed will delight you for many years!
It is important to determine the height of the legs - try to imagine at what level it is convenient for you to stand up. The bed should not be too low, but not too high, although non-standard forms of furniture are welcome in a modern interior. Leave enough space for built-in cabinets under the bed if you plan to store things there.
Think in advance about the size and shape of the headboard.
Decide on the dimensions of the bed frame you want to make.
Minor clarifications and comments
Since we need to use some size to make the bed, we chose standard dimensions for our case. Be sure to adjust your measurements to the dimensions of your mattress. In our case, we make a base for an orthopedic mattress, which has the following dimensions: length 200 cm, width 160 cm, thickness 20 cm. The height of the bed is calculated taking into account the mattress used.
It is not advisable to make the base of the bed from a board; it is better to assemble it from bars connected along the length.
What do we need during manufacturing?
In addition to everything else, we will need carpentry tools and fixtures, and of course skillful hands and a quick-witted head.
Selection of materials
The counters contain wood of varying quality. Try to buy the smoothest boards without knots - a large amount of loose wood will take a lot of time to sand. To prevent the bed from costing a pretty penny, you need to select materials based on their role in the manufacture of the bed frame.
For the frame and decoration, choose the highest quality wood, which can be expensive, but is durable and easy to work with. For the legs, wood of average price and quality is suitable, and for the slats (they will be needed when making the lattice that holds the mattress) - the simplest option. We will use pine boards as a highly environmentally friendly and durable material.
For a comfortable sleep, it is recommended to purchase mattresses 15-17 cm longer than a person’s height.
Some builders use chipboard to replace slats, because chipboard can be tempting with its price. But a bed made from this type of material will not last as long as a bed made from real wood.
So, in the store using a tape measure we select:
| Dimensions | Quantity | Purpose |
| 2040*250*20 mm | 2 | side walls |
| 1300*250*20 mm | 3 | end sides |
| 2000*40*20 | 5 | load-bearing longitudinal, supporting for middle load-bearing |
| 1300*40*20 | 30 | production of slats |
| · self-tapping screws · coating materials (protection against insects – stain, varnish) | ||
It is important to determine the height of the legs - try to imagine at what level it is convenient for you to stand up.
Installation of legs, decoration of the product
The height of the finished bed, including the mattress, is about 350 mm. If a person prefers to sleep at a higher distance from the floor, then the bed should be equipped with legs. To do this, you will need a beam of 50 by 50 mm; it should be cut into fragments of suitable length and attached to the bed body using confirmations or self-tapping screws. If the bed is double, then the legs must be attached not only to the corners of the frame, but also to the longitudinal partition, which was installed in the middle of the base.
If desired, you can make wooden stands at the foot and head of the bed. They can be simple, rectangular, or figured - it all depends on the wishes of the owner of the future product, as well as on the skill of the furniture maker. When everything is ready, all that remains is to putty all the joints of the structural elements and technical holes.
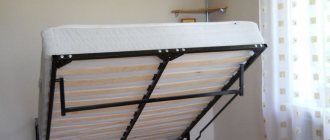
One of the serious problems of small-sized apartments is the lack of space for things, so many owners tend to buy or make beds with drawers for clothes and bed linen. It is not difficult to make such a design, but for it you need to purchase drawers and retractable mechanisms. Another popular option: equip the frame with lifts. In this case, the mattress can be raised and the space underneath can be used for storing things.
Required Tools
To make a frame with your own hands, you need a certain set of tools. The list is impressive, but the purchases will serve you for many years and will help you create other works besides the bed:
- plane;
- electric saw;
- hacksaw;
- jigsaw;
- drill;
- screwdriver
+bits 8 and 10;
- cutter, sandpaper;
- pencil for notes, metal ruler, laser level.
Leave enough space for built-in cabinets under the bed if you plan to store things there.
How to assemble a single bed?
Often a model assembly diagram is included in the kit. However, the general design of all metal or wooden beds is the same. You can make the frame alone, but it is better to have an assistant who will hold the side elements.
Before starting work, you need to check the number of parts and the presence of fasteners that are supplied in the kit. There should be enough free space to allow the bed to be turned over.
To assemble a single bed, you need to prepare the following tools:
- a set of screwdrivers or a screwdriver;
- rubber hammer;
- hexagon.
Preparatory work
This is where you will need a drawing. Measure the required parameters and mark the cutting lines with a pencil. Use a ruler and cutter to make the cut. When the blanks fully correspond to your design, begin processing.
Remove all knots and kinks using sandpaper. It is better to have several types of sandpaper: coarse, medium and fine. Start leveling the surface with coarse sandpaper, then move on to fine sandpaper.
Some builders use chipboard to replace slats, because chipboard can be tempting with its price.
The end boards and headboard are cleaned with an electric planer - this helps to create an absolutely flat surface and correct the lines.
Assembly and installation of the bed frame
Step back from the edges of the end walls by approximately 110 mm to ensure the correct positioning of the mattress (when calculating the seating depth of the mattress is approximately 50 mm) - a horizontal line.
Make marks on one and the other side of the end boards - retreat a third of the distance on each side - vertical lines.
For the frame and decoration, choose the highest quality wood, which can be expensive, but is durable and easy to work with.
The intersection points of the two lines are places for attaching support bars.
On the side walls of the frame, measure 70 mm from the top of the board. Using a laser level, draw parallel lines on them.
The head of the bed is a great place for creativity.
As marked, the bars will be located along each of the sides. Back off 20 mm from the ends and secure them.
To prevent the bed from costing a pretty penny, you need to select materials based on their role in the manufacture of the bed frame.
! To maintain the aesthetic appeal of the bed frame, use self-tapping screws that are no thicker than the boards.
The primer is needed so that the pattern is as even as possible and fits well to the headboard.
Screw them in from the inside.
Take the future headboard of the bed and attach it to the end side using slats (3 pcs).
To make a frame with your own hands, you need a certain set of tools.
! Check all joints and corners for looseness before finally securing the structure.
Remove dust from frame elements.
! Use a dry cloth. A wet cloth can ruin the sanding process. Irregularities in the slats can damage the fabric of the mattress.
The end boards and headboard are cleaned with an electric planer - this helps to create an absolutely flat surface and correct the lines.
Use stain and cover the frame elements. Next you need to apply two layers of varnish. We recommend using polyurethane-based varnish, as it is less toxic and more wear-resistant. The polyurethane-based clear coat is self-leveling for easy application. Wait for it to dry.
To maintain the aesthetic appeal of the bed frame, use self-tapping screws that are no thicker than the boards.
Fasten all the walls of your bed frame.
Lay the medium size support beams on top of the support beams (which we attached to the end boards).
Start leveling the surface with coarse sandpaper, then move on to fine sandpaper.
!To fasten the elements it is necessary to use self-tapping screws.
The main bed frame is assembled. Now you need to lay the slats. Choose the lengths of indentation between them yourself so that the mattress can be easily supported. Connect the slats with the longitudinal bars.
The advantage of decoupage is that it does not require large expenses, but it looks like a good design solution.
Next, the bed legs are placed. Attach beams measuring 40*40 mm to the inside corners of the frame. If desired, you can make a pair of support legs in the middle to ensure the reliability of the assembled bed. Consider the amount of space under the bed and the presence or absence of cabinets and boxes that can be stored there. All this affects the height of the legs. Sometimes fastening the legs is not required at all if the height of the frame itself and the interior allow it.
Measure the required parameters, mark the cutting lines with a pencil
Orthopedic base design options
The basis of the structure is a rigid frame made of metal or wood. Slats, usually made of birch or beech, are attached to it. The width of the elements varies from 5 to 12 cm and depends on the purpose of the base. Fastening is done using holders, which in the cheapest models are made of plastic, and in more expensive ones - from elastic rubber.
Manufacturers produce many options for orthopedic bases:
- with drawers for linen and a lifting mechanism;
- several zones of rigidity;
- transformable base;
- on legs of different heights.
Client's review of the orthopedic base.
Prestigious models can adjust zones of different hardness using special double slats.
Orthopedic base Promtex-Orient Ortoflex B1 with wide slats.
Decor
We indicated the easiest way to make a bed look attractive in the algorithm for working on the frame - stain and varnish preserve the color of the timber, making it brighter. You can choose a matte varnish - dust and scratches will be less noticeable. Glossy varnish adds shine to the wood, but reveals all the builder’s mistakes - unevenness, cuts, scratches. You don’t have to stop at the usual wood color; you can paint the bed in any color that harmonizes with the interior.
Another option is bed upholstery. To do this, you need to stock up on fabric, foam rubber, a construction stapler and staples. You can create a relief or pattern on the upholstery using curly nails.
Check all joints and corners for looseness before finally securing the structure.
The head of the bed is a great place for creativity. You can make it shaped, with upholstery, or paint it in an unusual way, for example, using the decoupage technique. This decoration option is easy to apply at home. Another advantage of decoupage is that it does not require large expenses, but it looks like a good design solution.
Required:
- primer;
- glue;
- varnish;
- white acrylic paint, acrylic paint to add shade;
- napkins.
There are special napkins for decoupage that can be purchased at an art supply store.
The primer is needed so that the pattern is as even as possible and fits well to the headboard. The primer is bought in specialized office supply stores, but on the scale of our craft it is an expensive option. We take construction primer.
Lay the medium size support beams on top of the support beams (which we attached to the end boards).
Decoupage is carried out on white surfaces, so we use white acrylic paint, which we purchase at a hardware store. If you want to get a different shade, mix white and the color you like.
There are special napkins for decoupage that can be purchased at an art supply store. However, regular napkins will also work.
We indicated the easiest way to make a bed look attractive in the algorithm for working on the frame - stain and varnish preserve the color of the timber, making it brighter.
You can work on the headboard directly on the frame of the future bed or separately from it, if the design provides for the possibility of attaching and removing this element. Self-tapping screws will again help you with fastening.
So, you're done! If defects are discovered during the operation of the structure, this can always be corrected, because you know how the bed is assembled - finding a creaking element will not be difficult. Making a bed frame along with decorating the product yourself will not take more than a week, and your new bed will delight you for many years!
Another option is bed upholstery.