Floating bed, options in the photo. How to make a bed with your own hands, with lighting, with a floating effect. Drawings and dimensions and what tools are required for self-assembly.
Sleep is a favorite mode for many people. Did you know that a person spends 35% of his entire life sleeping? Today we propose to improve your sleeping place, making it not only of high quality, but also stylishly decorated.
Floating bed. This type of bed is called a modern breakthrough in furniture products. Today you can learn more about it, and even make it yourself. We will be happy to provide you with information about:
- Advantages and disadvantages of a floating bed;
- How to make it yourself;
- What tools will be useful;
- What is the best material to make floating upholstered furniture from?
- Drawing of a floating bed;
- Dimensions;
- Floating bed mechanism;
- Illumination for hanging sleeping place.
The first floating bed was invented by Italian designer Daniel Lago. It was called "float" in Italian, Fluttua. It had a central, inconspicuous support, and the back was attached to the wall. A floating bed gives the room a special charm and stylistic look, especially with colored lighting. And if you decide that it’s time to update your bedroom, grab your tools, read our articles and let’s get to work.
The main advantages of floating beds
A floating bed will fit perfectly into any modern interior. With its minimalist design it will create a unique atmosphere of lightness and purity. In addition to the unusual appearance, such furniture has a lot of other advantages, namely:
Articles on the topic (click to view)
- Differences between an ottoman and a bed
- Anatomical bed frame
- Differences between a sofa and a sofa
- How to choose the right foam density for a mattress
- Canape furniture: what is it
- How to beautifully hang a picture on the wall
- The best cleaner for leather furniture
- variety of shapes – designers offer a large selection of shapes and sizes of flying beds. There are products of both traditional rectangular or square design, as well as flying beds of round and other non-standard shapes;
- comfort - usually such furniture has a fairly spacious sleeping area, designed for one or two people, as well as a large selection of models;
- thanks to the presence of illumination from below, additional lighting of the room is provided;
- Despite, at first glance, the lightness of this design, it is quite stable and reliable. In addition to the central supports, from which the rays extend in different directions and due to which the load is evenly distributed over the entire surface, some models provide for fastening the bed with the back or both sides at once to the wall. There are also floating beds with regular legs, but made of tempered glass, which makes them almost invisible;
- versatility - this bed can be used as a sleeping place for both a married couple and an adult, child, teenager and other family members;
- convenience and practicality - the absence of legs does not limit movements during cleaning and does not clutter up the bedroom space, creating a feeling of freedom and lightness.
Attention! when choosing such a bed for your bedroom, it is important to remember that it does not provide storage space, as in conventional models; you cannot put anything under it, since the appearance of the product and its main advantage will be lost.
Bed lighting with LED strip
An LED strip is a board with LEDs placed on it. It also has its pros and cons. The advantages include the following:
- easy installation due to the adhesive layer;
- ease of use, compactness;
- the price is lower than for duralight.
Flaws:
- low moisture resistance;
- lack of protection from mechanical damage.
Most often, LED strip is used to illuminate the bed. Now let's look at the installation methods step by step.
Material of manufacture
The floating beds that manufacturers offer today are quite diverse in their design, design, size and, of course, material. Most often you can find three furniture options:
- wooden - most of the floating beds are made of solid wood (cherry, walnut, oak, pine, etc.). Accordingly, the cost of such models is high. A more accessible alternative to them is a sleeping bed with a frame made of chipboard and MDF. The main advantage of wooden products is their high strength. The maximum load they can withstand is 100 kilograms or more. Also, such beds have an aesthetically attractive appearance and are environmentally friendly and safe.
- metal - floating beds, which basically have a metal frame that is attached to the wall, reliably fixing the sleeping place in the desired position. The main thing in this design is the reliability of the fastenings, which is ensured using special fasteners or welding. The metal frame is powder coated to protect against corrosion;
- combined - beds in the design of which there is also wood and metal. Usually the metal frame is covered with MDF panels.
Headboard and bedside tables
The headboard for a floating bed is made as a separate block, rigidly attached to the wall. A frame frame is attached to it, which ensures the stability and immobility of the structure. The usual appearance of this unit is a headboard the width of a bed and two shelves on the sides that act as bedside tables. As an option, you can make two hanging bedside tables that do not have supports, which will create the effect of matching the flying bed. The cabinets can be made and installed separately or combined with the headboard into a single unit; this is decided by the owner himself based on his own preferences.
Making a headboard is not very difficult. The main task is the decorative design of the front panel, which can be made in various stylistic options. A variety of materials and colors are used. The selection criterion is usually the resistance of the material to abrasion and contamination, since cleaning the headboard is not always possible. If you use fabric with a soft layer of polyurethane foam installed underneath, cleaning it will become problematic, so you will have to constantly monitor the cleanliness of the front panel. Recently, panels made from wooden planks or artificial imitation wood, without upholstery fabric, have become widespread. This option will allow for periodic cleaning of the headboard, but the surface itself is hard, which is not the best solution for a bed.
Important! When designing the headboard of the bed, you should take into account the color and material of the rest of the furniture in the bedroom. This way you can create the most harmonious atmosphere in the room.
The headboard is mounted to the wall using anchor bolts. Their number is determined by the type of bed support, but should not be less than 2. It is advisable that the headboard has additional support on the floor, this will help reduce the load on the wall and distribute it more evenly.
Making a floating bed: main stages of work
It's not often that you come across a floating bed on sale, and those that do come across are not cheap. Therefore, most often they are made to order, trusted to experienced specialists, or made by hand.
Expert opinion
Smirnova Ekaterina Anatolevna
7 years of experience in interior design, professional architect
This will not only save on purchases, but also create a unique sleeping bed. The main requirement is the availability of the necessary materials and tools, as well as design skills.
The process of making a floating bed involves the following stages of work:
- Drawing up a drawing of the future product with the placement of each part, determining the dimensions and method of fastening.
Advice. On the Internet it is easy to find photos of drawings of such beds, which can be taken as a basis;
- Preparation of the necessary materials (wooden blocks, boards, plywood, metal corners, screws, LED strip, paint, stain, varnish, mattress and much more) and tools (screwdriver, hammer, screwdriver, drill, electric jigsaw, paint brushes, etc.). At this stage, you can calculate the cost of the bed;
- Manufacturing of the frame and base - their dimensions and configuration depend on the design of the bed itself and how many people it will be designed for;
- Installation of LED lighting around the perimeter of the base;
- Laying sheets of plywood on the base, securing them securely with self-tapping screws and PVA glue if necessary. A mattress will be installed on top;
- Making a wooden frame from boards, which is mounted on the sides of the base, as well as the headboard;
- Sanding a wooden surface with sandpaper, coating it with paint and varnish.
After the paint coating has dried, the bed can be used for its intended purpose: lay a mattress on top, lay down beautiful bed linen, etc.
Thus, making a flying bed with your own hands is not as difficult as it might seem. It will delight you with practicality and convenience, giving the bedroom an original look.
Backlight installation
LED strips are used for illumination. They are safe, have a lot of options for choosing colors or brightness levels. They are installed from below on the back wall of the decorative trim of the frame. The main condition for the effectiveness of the lighting is the complete invisibility of the tape from the outside, so that only the illuminated space under the bed can be seen. Installation is carried out on the sides and under the footboard; installing the tape under the headboard does not make sense - this space is not visible, and the side areas sufficiently illuminate the space visible from the outside. To attach the tape, the manufacturers provide an adhesive layer on the back side, so installation will not create any problems. You will need to remove the protective film and simply stick the tape around the perimeter of the inside of the decorative frame. If the condition of the surface does not allow the tape to be firmly attached (the surface is rough or has a noticeable relief), then the connection should be strengthened with glue. You can use “Moment” glue, gel second glue, transparent thick “Titan”. These materials are suitable for attaching the tape to almost any surface and will ensure reliable fixation.
More detailed or visual information can be obtained in various videos, of which there are many on the Internet, for example:
A flying or hovering bed, created with your own hands, will save a significant amount of money and create a unique, magical interior in the bedroom. To make it, you will not need any specific tools or materials, but you must have skills and experience working with wood or metal, otherwise the quality of the product will be low. Design skills also don’t hurt, although there are many design options for such beds online, you can choose any one you like. All materials needed for the work are commercially available and quite affordable. Prices for materials are relatively low, in addition, there is always the possibility of choosing materials of one or another price category. All that is required from the master is his experience, diligence and patience, which will certainly be rewarded and will be able to create a cozy and comfortable environment in the bedroom.
How to make a floating bed with your own hands step by step
Remember the fairy tale about the flying carpet? Probably everyone, reading or listening to this story, dreamed of finding themselves on it. Now, it turns out, you can create such a miracle with your own hands.
This is the so-called floating bed. The peculiarity of this sleeping place is that it is made in such a way that the legs are not visible, and is decorated with lighting from below.
This creates a feeling of miracle: your bed floats above the floor. Visually, this model greatly decorates the interior of your bedroom.
Of course, it’s easier to purchase a ready-made one, but this is not always possible. Sometimes it is difficult to choose the size or you are not satisfied with the material.
It should be noted that the cost of such furniture is much higher than a regular bed. If you want to perfectly fit the bed into your bedroom, then it is better to take the time and make it yourself.
Locations
The location of the bed lighting depends on many factors: design features, the interior of the bedroom and its parameters, and the personal wishes of the owners. Let us examine separately the lighting features of each part of the structure.
At the head
The head of the bed is most often equipped with lighting. Lighting fixtures that can be used here:
- Spotlights;
- LED bulbs;
- LED Strip Light.
The option of directing flows of white light from the headboard to the top looks beautiful and modern. If you want to add beauty and functionality to this part of the design, you can install mirrors or small shelves.
Often, instead of a headboard, a bedside niche is equipped with additional light. LED lighting is used for this.
From below
A bed equipped with lighting from below looks luxurious. To make the interior lighter and more modern, you can use a so-called “floating” bed on discreet legs, which is complemented by lighting from an LED strip attached around the perimeter.
In order to connect the backlight with your own hands, you will need to perform the following steps:
- first of all, it is necessary to secure the tape by putting a cap on each end;
- then you should put on the adapters and immediately attach the plugs to them;
- check the operation of the LED backlight;
- Now you can start fixing the backlight. This will require special fastenings that are screwed to the bed with self-tapping screws;
- Once the strip is fully attached, you can plug the strip into a pre-prepared extension cord and enjoy a beautifully illuminated bed.
If you have the skills to work with electrical wiring, you can do everything more carefully by installing hidden wiring with a specially designated switch for lighting.
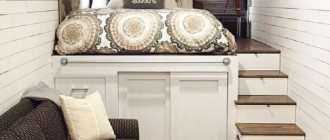
Illuminated podium
The podium bed looks impressive and stylish. In addition, it helps to significantly save space. And if you add lighting to this furniture, then in the dark a “floating effect” will be created. This is also convenient, since at night the possibility of falling will be eliminated due to the lighting of the step.
In order to organize lighting in this part of the structure, two options are used:
- Spotlights;
- LED Strip Light.
Often, additional storage boxes are built into the podium. Here it is imperative to provide lighting that will help maintain order and create a comfortable environment for the user.
Children's models
For any child, their own room is a space where they can enjoy play, relaxation or their own fantasies. In order to make this world more interesting for a child, you should think about purchasing a children's bed designed in the shape of your favorite cartoon characters.
A wide variety of car beds have been developed for boys that will help the child imagine himself in the role of a racer. The best option would be a bed equipped with lighting. It will be very interesting to sleep in a car with glowing headlights and dimensions.
Car beds have also been designed for girls in a more delicate pink or white design. Additional lighting can be installed in the following areas:
- headlights;
- street racing lower lighting;
- lower contour headlights, which are cilia.
These models are equipped with a remote control that allows you to adjust the lighting from a distance.
Children are often afraid of the dark, so a bed with additional lighting will be a great alternative to a night light. You can arrange additional lighting in the bedroom above the bed, which will make children's sleep more restful. To do this, you can use spotlights or LED strip.
Nuances of a floating bed
We recommend installing such a bed in your home. This wonderful piece of furniture has the following advantages:
- As a rule, it is double. You will get a very decent place to sleep. And in what composition you will use it, this is no longer so important.
- The base of the product is made of wood or metal. It is mounted to the wall, and the legs are installed in such a way that they are not visible at eye level.
- Bottom lighting, in addition to emphasizing the effect of flight, makes it possible to create a romantic mood and save on overhead light or a night light.
- Such a bed can completely transform a room. Whether you have high-tech, loft or classic – the product will fit perfectly into everything and will decorate your bedroom favorably.
- There is a wide range of options. This allows you to take into account any taste and any requests of the owners.
It is important to note that the design is difficult to install, and you will most likely need the help of a relative, neighbor or a furniture assembly specialist.
Expert opinion
Smirnova Ekaterina Anatolevna
7 years of experience in interior design, professional architect
You also need to think about the fact that the drawer under the bed will make the structure heavier. Therefore, take care of a furniture pencil case, chest of drawers or wardrobe for bedding.
How to make a working drawing
If all the work is planned to be carried out independently, then it is not decisive in what form the drawing will be drawn up. The main goal that is pursued when creating it is to carefully think through all stages of the work, clarify the dimensions, methods of connecting elements and parts, clarify some points and detect possible errors and miscalculations. It is imperative to draw up the most complete list of necessary materials (indicating their quantities) and tools that will be needed when performing the work. It is necessary to draw the design to scale in order to be able to evaluate your plan from an aesthetic point of view and, before it is too late, make some changes if they are needed.
Attention! Drawing up drawings of parts, the production of which will have to be ordered from specialized organizations, must be carried out in accordance with current technical standards and rules. Otherwise, discrepancies will arise that can lead to the production of inappropriate components and parts.
Tools for work
To make a bed relatively quick and of high quality, make sure you have the following tools, especially since they are not in short supply:
- screwdriver, screwdrivers, hammer;
- electric drill;
- saw or jigsaw;
- building level;
- tape measure, pencil.
Required materials for a floating bed
To make a bed, you need to purchase:
- orthopedic mattress;
- a sheet of plywood for the bottom;
- wooden beams, boards for sidewalls and headboards;
- fasteners (screws, corners). PVA glue;
- materials for wood finishing (varnish, stain);
- LED lighting.
The nuances of working with duralight
In view of the technical features of such a lighting device, several points should be noted that should be taken into account when making lighting from a light cord:
- if you are joining several pieces for a bed, make sure they have the same characteristics;
- connectors are selected according to the shape and number of contacts of the connected cords;
- The connection points must be dry without visible damage to the insulation;
- before turning it on, unwind it and check its functionality, but you can assemble and mount the backlight from duralight only in the switched off state;
- the cord has a special hermetic sheath, which you must keep intact, but if you damage the silicone during the installation process, this place is sealed with insulation;
- If you want the cord to not only light up, but also enter the blinking mode, install the controller along with the adapter.
Step-by-step instruction
Let's look at the main stages of making a floating bed:
- Make the frame according to your measurements. To do this, use screwdrivers or a screwdriver, nails, and a hammer. If necessary, trim excess wood with a hacksaw or jigsaw.
- Board base. It is made, as a rule, 2 times smaller relative to the area of the frame.
- Fixing lighting. LED lamps are most often used; they are mounted on all sides of the bottom of the bed.
- Installation of plywood on the frame and its installation. For better fixation, use adhesive (PVA) and self-tapping screws. Buy a sheet of plywood thick enough to support the weight of the mattress and you.
- Making a frame. Boards are attached along the perimeter of the frame, thus forming the side walls of your bed.
- You can really make a headboard yourself or buy a ready-made one. It can be made in various shapes: rectangular, oval, square, rectangular.
- Sanding the boards of the entire product. Final coating with varnish and stain.
If you carefully calculate everything and make every effort, then a miracle bed will appear in your home. It’s especially nice that you made it yourself.
UNUSUAL HOMEMADE BED WITH YOUR OWN HANDS - HOW TO MAKE IT?
You can give your bedroom an unusual look with a floating bed. And you can do it yourself.
The floating, or “levitating” bed gets its name because its support points are not visible. It seems as if the furniture is literally hovering above the floor.
However, the feeling of fragility is deceptive - the bed is very stable and reliable. The support is right here.
It’s just that it’s small in size (relative to the bed itself) and is located so that you can notice it either from a great distance or by looking under the bed.
I’m not a professional carpenter, but I decided to try my hand at making a floating bed measuring 200x180 cm. I looked at all the available materials on the Internet, took a screwdriver, a drill and a jigsaw, the boards were already in stock, I bought only the missing parts, and the work began!
EVERYTHING YOU NEED FOR THIS ARTICLE IS HERE >>>
The Downside of Focus
A “floating” bed only looks like it’s floating. It actually has attachment points, but they are positioned so that they are not visible. If you plan to make such a bed, you need to come to terms with the fact that you can’t put any boxes or drawers there, all the charm will be lost. On the contrary, the floor itself can be made very beautiful, because it will be clearly visible, but you will have to wash or clean the surface often.
Depending on what kind of walls, floor and size of the room you have, you need to choose a mounting method.
wall mounting.
This method of fastening makes the appearance of the bed especially impressive in a large room. The floors under the bed are visible from any point, no legs are visible, a distinct feeling of miracle is created.
However, everyone understands that miracles do not happen, everything obeys the laws of physics. Therefore, the master must calculate that the fastening, as well as the wall itself at the fastening point, will have to withstand the load in the form of the weight of the bed structure itself, a mattress, textiles, as well as two adults, plus children sometimes crawling towards them.
Also, such a bed cannot be rearranged anywhere; it is mounted only once. All these nuances must be taken into account. Due to the complexity of the design, such fasteners are used very rarely.
fastening to the wall and floor.
The frame is attached with one edge to the wall, and the other to a small leg, invisible under the bottom of the bed.
legs made of high-strength glass. The bed frame is attached to a special design of transparent glass legs that can withstand a vertical load of several tons.
without fastenings.
The bed frame has legs, but they are not made in the corners, like a regular bed, but closer to the center of the structure. They can be made in the form of a box, or they can simply be thin and light. And “dissolve” on the light floor. The base of the bed, on which the frame rests, may be darker than the main bed. Due to this, a “floating” effect is achieved.
In the photo below you can see an example of a bed design, “floating” due to the structure on legs moved to the center, equipped with LEDs for illumination.
metal frame.
The frame of such a bed can be made not only of metal, but also of wood. Below are diagrams and photos.
ceiling mount. Heavy chains make such a bed not so “airy”, but if the goal is to free up the floors, then it has been achieved.
Ropes are also used as ceiling fastenings.
Everyone is free to evaluate the convenience and comfort of sleeping on a floating bed for themselves. Despite the apparent instability of such beds, more and more designers are offering bedroom design options using such beds. By applying the knowledge gained, it is quite possible to become your own designer.
More information on how to create a “floating” bed yourself can be found in the video tutorials at the end of the article.
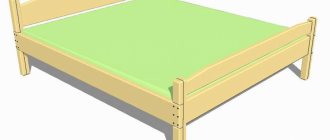
The first element - the base of the bed - is assembled
To make the lower part (support of the floating bed), I needed 2 boards measuring 1920x200x25 mm, 3 boards measuring 960x200x25 mm and 2 boards 1010x200x25 mm. There was no 200 m wide board available, so we had to make it composite, from two 100 mm boards.
On a flat surface, I began assembling according to the drawing made in advance. In the right places in the boards I drilled holes for self-tapping screws. To prevent the stock from creaking in the future, I coated all joints with silicone glue.
IMPORTANT. Unfortunately, such glue was not enough, so I laid thick polyethylene on the horizontal joints. During operation, it became clear that modifications with glue and polyethylene turned out to be very effective. For two years - not a single squeak!
Then I checked the diagonal with a tape measure. Everything turned out to be accurate. For additional strength, the corners of the base were reinforced with additional posts.
For the top of the bed I needed 5 bars measuring 1710x100x50 mm, 2 bars each 2010x100x50 mm and 350x 100x50 mm, 5 bars 560x 100x50 mm and 3 boards 560x100x25 mm. I used 400x100x25 boards to secure the stock to the base.
I pre-connected blanks 560x100x50 mm with 350x100x50 mm in the shape of the letter “T”. Next, from bars 2010 mm and 1710 mm long, I assembled a rectangle measuring 2010 × 1810 mm.
To hold the diagonal, I attached tie boards to the corners of the rectangle. I drilled holes in the boards ahead of time, but did not connect the parts yet.
And finally, I connected the parts according to the drawing, starting with 560 mm long bars and “T” blanks. Let me mention again: I coated all joints with silicone! It ended up taking several hours to assemble the bed frame.
It's time to make the headboard. I decided to decorate it with a carriage tie. This is a popular technique for decorating upholstered furniture; it got its name due to the fact that it was originally used for the interior decoration of carriages.
On an OSB board measuring 1810x1000 mm, I marked a grid with a side length of 200x215 mm. This made it possible to identify and drill the places where the buttons were attached. Then I transferred the drawing onto a sheet of special furniture foam rubber (density 25) and glued it to the OSB using PVA-M Extra glue. From below I left 300 mm of the slab, not sealed with foam rubber.
Then I covered the headboard with fabric. I started laying it from the top corner.
I’ll warn you right away: when determining the size of the canvas, you need to make a reserve - about 40 cm on each side. Then I installed buttons in the right places using a thick furniture needle.
I secured the threads on the wrong side with a furniture stapler. And later I used it to secure the edges of the fabric.
The lower indentation of 30 mm, which was left without foam rubber, was also covered with fabric. It took about a day to complete the headboard, taking into account the glue drying.
Expert opinion
Smirnova Ekaterina Anatolevna
7 years of experience in interior design, professional architect
The final stage is assembling the bed. I installed the base and upper part of the bed in a permanent place and connected them using small boards.
IMPORTANT. If you have animals (cats), you need to close all the holes inside the base of the bed.
I screwed an OSB sheet on top, but I recommend using natural wood (without glue) or an orthopedic base. The base was leveled relative to the headboard so that the foam was raised above the base by 200 mm, that is, to the height of the mattress.
The sides of the bed were decorated with panels (shelves) made of chipboard. For this purpose, in a large furniture store I bought furniture shelves measuring 2700 x 300 x 16 mm (4 pcs.) and 1200 x 300 x 16 mm (6 pcs.), as well as a 19 mm wide melamine edge strip with an adhesive layer.
IMPORTANT. It was not possible even to very carefully cut through the laminated chipboard panels with a jigsaw without “casualties”: there were still several chips in the coating. To minimize this effect, you need to take special files for laminated chipboard (with small, non-directional teeth). So if you do something similar, it is better to cut the slab on a machine or in a specialized store.
I glued the edge strip onto the laminated chipboard cuts with an iron, through cotton fabric, cut off the excess and sanded it.
I fixed the panels with a clamp (there was no assistant) and drilled holes with a 5 mm confirmat drill (Euroscrew), made a 6.3x50 mm HEX screw tie (100 screws were needed). These screws have a special pitch and cutting angle, which increases the reliability of the connection.
From the remnants of chipboard I assembled shelves behind the head of the bed. They provide additional counterweight for better stability of the bed, as well as a large top shelf and 3 small side shelves for placing interior items and storing things and bed linen.
WHAT DOES IT COST ME TO MAKE A HOMEMADE BED?
I had the wood for the frame and screws in stock.
Furniture shelf laminated chipboard size 1200x300x16 mm, wenge - 6 pcs. 166 rub. = 996 rub. Furniture shelf laminated chipboard, 2700x300x16 mm, wenge – 4 pcs. for 419 rub. = 1676 rub.
OSB-3 (OSB-3) 9x1250x2500 mm (Europe) – 2 pcs. for 467 rub. = 934 rub.
Drill for confirmation 5 mm high-pressure – 50 rub.
Galvanized screw tie 6.3×50 HEX (100 pcs.) – 142 rub. Plug for tie screw HEX D5mm, black, 100 pcs. – 50 rub. Melamine edge tape with glue, 19 mm, wenge, 5m-62 rub.
Sintepon 2×2 m – approximately 200 rubles.
Buttons and rope - approximately 400 rubles.
From the editor. Often, from below, along the perimeter of the frame of a floating bed, LED lighting is attached - a strip with a power supply, so that the LEDs are not visible from the outside. When it is turned on, the bed, the base of which is not visible from a height of human height, literally floats in the air.
Nuances and important design points
One of the most important nuances is the choice of material for the structure. We have 4 choices:
- Wood. If we decide to create a house structure with our own hands, we should focus on this material. Wood is easy to cut and process. But it is recommended to choose hard wood, and take care of protection from moisture in advance. Screws and bolts are suitable as fastening parts. The strength of a wooden bed will depend on the quality of the chosen material, fastenings, and correct assembly.
- Metal. Processing is several times more difficult, since it requires the use of a welding machine. You can use only bolts as fastenings, but this is only suitable if welding is not possible. You need to pay special attention to the fastening parts, since they break most often. The material itself is very durable. A combination of bolting and welding can also be used to allow the structure to be disassembled if it needs to be moved.
- Combination of materials. We can use both wood and metal. This will make assembly work easier, and the weight of some structural parts will be lower. You can use strong metal to create fastenings and places that need to be made strong. And wood is suitable for parts that are difficult to process. This will solve all the problems that arise during assembly.
- Sheet materials (MDF, plywood and fiberboard). With their help, the place to lie can be made as flat as possible. In addition, they are suitable for creating additional devices (bedside tables and shelves next to the bed). We need polyurethane foam or foam rubber to create soft areas of the bed.
Types of Home LED Lighting
For home interiors, LED strip (LED strip) or duralight are usually used. They are energy saving and durable. But there are some differences between them. To make choosing easier, I suggest you understand their advantages and disadvantages.
Illuminating the bed using duralight
Duralight is a flexible cord with LEDs inside. Its main advantages include:
- protection from any damage;
- resistance to temperature changes;
- waterproofness and strength of the material.
Flaws:
- the price is higher than for LED strip;
- the glow is not very bright.
Drawings and diagrams
The main goals of creating a drawing are to think through all the work, clarify the details that will secure the design and detect potential errors.
The average thickness of the board that will be used for the frame is 5 cm. Construction stores most often sell pine boards. You need to calculate the amount of material (depending on the size of the person).
Where to begin
The beginning of all work on creating a flying bed is careful preparation. It includes:
- Choosing a certain type, design solution, option for the appearance of the bed.
- Creating a project, working drawing or product plan.
- Purchase of all necessary materials.
- Purchasing the necessary tools.
At each stage of preparatory work, the final development of the project is carried out, various minor issues arise and are promptly resolved.
Note! The first point that you must begin the preparation process with is the purchase of a mattress. Its dimensions are very important; all working drawings, dimensions of support platforms, and the amount of materials are tied to the parameters of the mattress. Not everyone can make it themselves; most often a finished product is used, and it must be at the user’s disposal by the time work begins.
Advantages and disadvantages
In addition to the unusual design, the flying bed has a number of other advantages:
- The risk of loosening or falling due to broken legs is completely eliminated. The frame is firmly attached to the wall.
- Along with other standard models, flying stocks look unusual and original.
- A wide selection of different designs will allow you to purchase a product to suit any style.
Expert opinion
Smirnova Ekaterina Anatolevna
7 years of experience in interior design, professional architect
The disadvantages include the complexity of installation. You need to have some knowledge of carpentry and construction. A negative characteristic is the inability to equip drawers and storage shelves under the bed.
The use of a floating model obliges the housewife to carefully monitor the order in the house, otherwise even a two-day layer of dust will be visible to the naked eye.
Choosing a bed design
A double bed, which seems to hover above the surface, can itself decorate the bedroom and create a full-fledged interior without additional pieces of furniture and decorative ornaments. Therefore, it is difficult to choose the design that will fit well into the existing environment.
Illumination of the under-bed space creates a special feeling of floating and highlights the area that always remains hidden. For this reason, designers advise purchasing a bed immediately after renovation and before the bedroom is furnished, so that it is possible to organize the space around it.
If you plan to make it yourself, you need to be especially careful when choosing a design so as not to encounter insurmountable difficulties during the creation process.
Hanging beds: shapes and their features
Of course, leaving the usual sleeping bed firmly placed on the floor is not easy. A floating hanging bed in interior design is the prerogative of brave and creative individuals. If you are going to solve the issue this way, then let’s consider the subject of your idea in detail. Let's start with the forms.
Visually, the hanging bed seems to float above the surface of the room
A rectangular hanging bed is a traditional shape for a sleeping area. It is most often chosen, because even in a suspended version it easily fits into the interior and does not create difficulties in planning. The bed is secured using four ropes. Suitable for both children's and adult bedrooms. For safe sleep, the bed is equipped with bumpers on three sides. Such models do not have a full-fledged headboard, but in children's models it is better to have one.
This type of furniture is great for children's rooms.
Hanging bed in tropical style - the feeling of a permanent resort vacation
A round hanging bed requires a thoughtful approach to its placement. Designers advise placing such models on terraces, spacious loggias, or in a country house. The product is attached to one point on the ceiling and several points located around the circumference of the bed. The round shape is optimal for a short daytime rest at the dacha or in a private house.
A round four-poster bed is a great place to relax and create fabulous coziness in the room
There are square-shaped models, but this is more a whim of the owner than a reasonable decision. For an adult of average height, you will get a rather large sleeping space, which is difficult to fit into the interior.
Using a wide chain of a hanging bed, you can emphasize the main idea of the interior
What to look for when buying a floating bed
A floating bed with lighting is quite expensive, so you need to approach the purchase responsibly, choosing trusted manufacturers.
If we are talking about a wooden product, you need to make sure that oak, cherry or pine is used in the creation. They are durable and can withstand up to 100 kg per bed.
Before use, metal frames must be carefully inspected and the joints checked.
All fasteners must be included with the product, including dowels for wall screwing.
Photos of beds in various styles
Several photo examples in the most popular stylistic directions.
Loft
In most cases, this style is decorated with beds made of solid wood in a slightly rough, natural and raw design, with a headboard upholstered in genuine leather or eco-leather. Also for a loft, a laconic design with a metal frame or a model in the form of a mattress located on pallets would be appropriate.
Classical
A bed model in a classic design, most often made of metal or various wood species, such as oak, pine, ash or mahogany. Mostly here you can find products with low legs with beautifully decorated backs and headboards, which can be decorated with carvings, forging, fabric or leather upholstery.
Oriental
In the Chinese style, the structures are large in size and installed on a podium. For Japanese minimalism, frameless models are used that closely resemble a futon, beds without legs or low floor products.
Scandinavian
It assumes natural materials, such as wood or metal, simple shapes, laconic design and high functionality, for example, equipped with drawers for bed linen. Wooden frames can be painted in white, blue, beige and other soft colors, airy and elegant iron bases, often in black.
The photo shows a Scandinavian-style bedroom interior with a rectangular bed on a wooden frame.
Baroque
Models made of natural oak or other high-quality wood, distinguished by a large, towering headboard, decorated with curvilinear carved scrolls or gilded elements, due to such a unique and beautiful design, will add uniqueness to the Baroque bedroom.
High tech
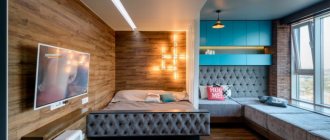
This direction is characterized by ascetic products, without unnecessary decor, a floating sleeping place with lighting or designs with clear, harmonious and restrained lines.
The photo shows a black floating bed, decorated with lighting in a high-tech bedroom interior.
Neoclassical
Here they choose elegant furniture made of wood, in beige, peach, turquoise or caramel shades, which has a solid, expensive, aesthetic and original appearance. For decoration, carvings, canopies made of heavy fabric, pillows with elegant embroidery with rhinestones, silk or velvet upholstery are used.
Provence
In Provencal design, metal structures with openwork headboards or simple wooden products with carved decor, the effect of artificial aging or forged elements are most appropriate. Also, beds are sometimes complemented with a canopy made of light and airy fabrics of a light shade.
The photo shows a Provence style bedroom with a white wooden bed with a carved headboard.