Antique products have always been and are valued by collectors and lovers of antiques. You can decorate the interior of a room by creating extraordinary antique furniture with your own hands. The option of making furniture products yourself is economical and unique.
Techniques for making aged furniture
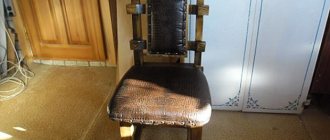
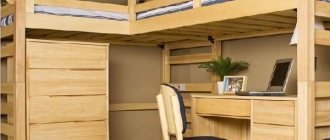
The effect of aged shabby furniture
When making furniture from antique wood with your own hands, you should know the basic ways of aging wood. In the process of wood processing, highly qualified craftsmen use methods that age the surface of furniture:
- chemical treatment;
- finishing with fire;
- mechanical movements.
Having studied detailed information about each technique, even a novice painter and carpenter will create an antique piece of furniture.
Preparatory work
When choosing what to do with old but high-quality furniture, many people prefer to decorate it with original elements and change the style. Repair is not only much cheaper than purchasing new products, it allows you not to part with your favorite things, while radically changing the design of the room.
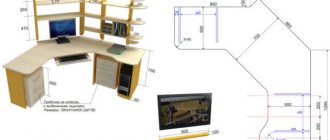
If you decide to make a piece of furniture yourself, you need to draw up drawings and detailing diagrams. This can be done manually using paper, pencil and ruler. A more advanced option is to use a special computer program.
If aging used furniture is chosen as a finishing option, it should be carefully prepared. Before the main work, we remove all existing fittings: be sure to unscrew the handles and remove decorative elements. After this, the tree is cleared of its previous coating. Paint and old varnish are removed from the furniture, and the surface is sanded using fine sandpaper.
Work is carried out manually or using power tools. Significant cracks and chips are repaired with hard furniture wax. Minor problems are left on purpose - the presence of scratches and traces of knots adds age to the product. Then the surfaces are primed with a special composition for wood and painted in tones characteristic of the chosen style. When aging new furniture, you can immediately begin the finishing process.
Special decoration allows you to get furniture in the Provence style with your own hands for a summer house or country house. Flowers on wallpaper or curtains will be the final link in the composition. The easiest way to age furniture in this manner is to rub the surface with a regular candle before painting. The result will be an uneven application of layers of paint, creating the appearance of long-term use of the item.
Remove fittings, handles and decorative elements
Chemical treatment
When chemically aging wood, corrosive reagents are used
You can make antique furniture from solid pine with your own hands using chemical finishing. This technique involves treating the countertop with a chemical that creates an aged appearance.
You need to be careful with chemicals
When working with chemical elements, observe the following precautions.
- Strictly adhere to the exact dosage of reagents.
- It is necessary to carry out actions with chemicals in a respirator, and with caution - harmful substances affect human health.
- When working with chemicals, you need to use protective gloves.
Adhering to the rules described above, even a beginner will create an antique cabinet or chair with his own hands.
This is what chemical brushing of wood looks like
Required Tools
The second life of old furniture can change the overall perception of a boring interior. And you no longer need to think about what to do with old furniture. Many home craftsmen prefer to modify antique furniture with their own hands, and drawings and diagrams will help to measure all the necessary parameters and avoid mistakes in such an interesting task.
To begin the process, you need to familiarize yourself with the tools that will be used in the work, and also think about how to make the process as easy as possible. As a rule, tools are selected in order to solve a specific problem - how to age furniture. If you plan to create an entire interior yourself or decorate old furniture, then you should go to the store after preparing a list. The necessary equipment used to repair old furniture is presented in the table.
View Tools
Manual
An awl, an adjustable wrench, a saw for wood or metal material, planes, a jigsaw, several types of knives, a hammer (you can immediately buy one with a nail puller), chisels, wire cutters, screwdrivers (it is better to purchase a set).
Consumables, equipment
Bright pencil or felt-tip pen for marking, several types of drills (to make through holes), crowns (ring), clamps (the best clamps when you need to glue parts), drills for working with metal (2-10mm).
Electric
Screwdriver (electric), drill, grinder, jigsaw (electric).
Measuring
Tape measure (preferably buy up to 5m), ruler (preferably metal 100cm long), level (up to 60cm), squares.
Beginner craftsmen most often have difficulty choosing an electric tool with which to age furniture. In order not to waste money in vain, it is better to consult with a sales consultant.
Heat treatment
Thermal aging of furniture occurs by firing
The option of heat treatment of the wood surface is characterized by performing actions with an open fire. Woodworkers use a blowtorch, directing a stream of fire onto the surface of the table. Under the influence of fire, the wood layer burns intermittently, creating the desired effect.
Wood sample aged by firing
Having finished manipulating fire, the master performs the following actions.
- Sand the wooden surface with sandpaper.
- Covers the prepared area with transparent or matte varnish.
The combination of chemical and heat treatment will add uniqueness to the items. Artificial aging of wood is achieved through mechanical finishing. A carpenter treats the surface of a table or other product with a metal brush, making movements along the grain. Having completed the mechanical processing, the specialist goes over the furniture with sandpaper and varnishes the finished area of the product.
Aged wood using chemical and thermal methods
Brushing
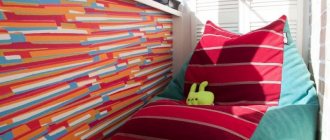
Using brushing, you can decorate an interior in a country style, where aged furniture is effectively complemented by forged elements.
You can age furniture using brushing. Craftsmen create unique cabinets or tables with an antique look. Wood processed by brushing will ideally fit into the interior of an apartment in the Provence or Country style.
The described technique is suitable for processing floors, beams, panels and looks harmonious with forging and large plants.
Brushing technology involves aging furniture using metal brushes, coarse sandpaper, chisels and drills.
Brushing is achieved:
- surface treatment with a metal brush;
- cleaning from dust and wood residues;
- painting the finished area with a dark color;
- coating the prepared tabletop with varnish.
This method can be used to make products of various sizes.
The brushed surface must be varnished
Brushing is suitable for objects made of wood, namely:
- pine trees;
- oak;
- larches;
- ash;
- nut
Attention! Fruit trees cannot be processed.
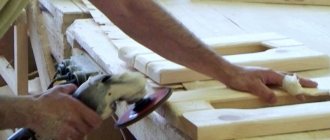
The sequence of brushing or texturing wood with your own hands
Methods for aging furniture
To obtain various types of aging, you can use acrylic paint, bitumen varnish, various waxes, and dry pigments. Most often, abrasions occur on the edges and corners of tables, chairs, cabinet doors, drawer handles, textured parts, etc.
On furniture made in industrial conditions, imitation of scuffs and other aging effects are produced using photo printing. Don't count on such an impeccable result - your work is manual.
Do-it-yourself aging of furniture will not look natural if it is too correct.
By artificially aging a piece of furniture, you can create scuffs, imitate sun-bleached paint or patina, or a touch of antiquity.
There are several ways and techniques to obtain one or another aging effect. The most common means will help you achieve the desired result.
Antique painting of products
The aging effect manifests itself when dark areas peek through light paint, and vice versa
A popular method of aging wood is painting furniture products. Benches, cabinets and tables are usually painted. All kinds of chests of drawers and bookshelves look original. Preliminary preparation of the tree occurs as in the previously described techniques. You can speed up the processing process using a drill and a grinding wheel. When choosing paint, choose a washed out, fuzzy color. Professional carpenters recommend using paint that is used for interior wall and ceiling painting.
Painting aged wood in several layers
Before painting the product
- Remove the fittings.
- Remove the top layer of coating with sandpaper.
- Clean the working area from dirt and dust particles with a soap solution.
- The treated surface is dried.
- Carefully lower the roller into the paint and paint the product.
Surface painting begins with difficult-to-work furniture parts
It is recommended to start painting in an inconspicuous area to understand the entire process. You need to paint, forming wide and even strokes to prevent drips. Paint the corners carefully. The second layer of paintwork is applied only after the first layer has completely dried. Objects begin to age after varnishing. Aging occurs in this way:
- take fine-caliber sandpaper;
- sandpaper is used to process furniture parts that are susceptible to abrasion (corners, protruding elements).
The erasing process is controlled by a master.
A quick way to age furniture: master class
To quickly achieve the effect of aging furniture, use the dry brush technique. This decorative technique creates a worn-out effect on the surface of the furniture. You will need a dry bristle brush and a small amount of acrylic paint.
The brush is the main secret of this technique. The brush should be a paint brush with long, uneven bristles.
This technique works well for furniture with flat surfaces. When decorating large surfaces, use a medium-sized brush.
It will not be difficult for you to age furniture by following a master class that clearly demonstrates all stages of work:
- Dip the tip of a dry bristle brush into the paint, undiluted with water. And apply it lightly so that it does not cover the color of the surface to be decorated.
- Apply with loose strokes across the wood fibers, highlighting them.
- Wait until the paint has completely dried, after which you can use your piece of furniture for its intended purpose.
Depending on the color combinations, you can get either a patina or a burnt-out effect, which will be an excellent finish for new furniture and help update old ones.
Experiment with pastels and darker shades. Close colors and only slightly different shades may work best, but interesting results can be achieved with contrasting colors.
Painting using the dry brush technique with silver or gold acrylic paint will look elegant on a black surface.
How to age a table?
To make an antique table with your own hands, you need to prepare drawings of the intended design, tools, materials and begin the creative process.
Required material
To create high-quality antique furniture, the following is used:
- natural wood from which furniture will be created;
- paints and varnishes (stain, varnish);
- high-quality fittings (locks, mechanisms, handles) that match the style of the intended product;
- decorative items.
Having prepared the necessary material and drawings of the desired product, processing of wood products begins.
Required Tools
When making an antique wooden table with your own hands, you will need:
- different caliber sandpaper;
- metal brush;
- hacksaw, saw;
- grinding machine with different attachments.
Tools for working with wood using the artificial aging technique
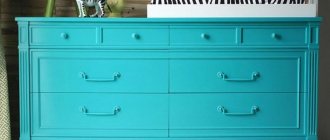
Transforming an old chest of drawers into a vintage one
To age a wooden chest of drawers, in this project we will use staining and gilding. The product will not only be saturated with the spirit of the time, but its color scheme will be in perfect harmony with the desired colors of the interior. Follow the description of the work, then the result will pleasantly surprise you.
Prepare for work:
- Sandpaper of different grits.
- Stain of the shade you need.
- Solvent.
- Matte acrylic water-based varnish.
- Craquelure varnish.
- Gold acrylic paint.
- Water-based acrylic paint in the color you want.
- Brushes, sponges, pieces of soft textiles.
The final stage is decoration
Antique wooden furniture, made by yourself, is decorated with all kinds of decorative elements:
- acanthus;
- molding;
- overhead elements;
- cartouche;
- overlaid pattern, etc.
Hand-decorated chairs, beds, and cabinets look original and fit into a home interior in the “country” or “Provence” style. Handmade antique furniture demonstrates the good taste and sense of style of the owner.
Preparation
To prepare, you will need to complete several mandatory steps. They are carried out regardless of which method you choose.
You can age white, black, or just wooden furniture, opened with wax or varnish. You will need:
[adv1]
- remove all handles;
- remove or remove protruding elements;
- remove excess decor;
- empty drawers and chests of drawers;
- completely pull out the removable drawers;
- remove a layer of old paint;
- remove varnish using sandpaper;
- achieve the appearance of wood texture;
- wash greasy areas with a solution of laundry soap;
- dry all surfaces.
If you work at home, be sure to use protective equipment to prevent small particles and dust from entering your respiratory tract.
The polishing layer on furniture can be removed manually or using chemical means.
If, after removing the layer, small cracks and small crevices appear, like other defects, you should not try to hide them with putty. On the contrary, they will play an important role in creating the image of an old piece of furniture. At the same time, I recommend learning how to remove scratches on furniture.
The set of necessary tools consists of:
See also
DIY knife stand: 8 simple and beautiful ideas
- special paint;
- paint roller;
- sandpaper;
- steel brush;
- brushes;
- craquelure varnish;
- napkins;
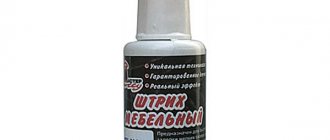
- sticky mark;
- rags;
- grinders, etc.
Tools and materials are largely selected individually. Based on specific circumstances.