Instructions for proper assembly and disassembly of a bed with a lifting mechanism
Having a bed as a sleeping place is a wonderful privilege that is not available to every small apartment. But having nevertheless allocated a place for healthy rest, many families are faced with the impossibility of placing a closet, because the bed is large and takes up a significant part of the free space. To solve the storage problem in a small bedroom, you can use an ergonomic bed with a lifting mechanism. It performs several functions at once: a comfortable, orthopedically correct sleeping place, as well as a spacious box for bedding, located below and not annoying the owners in any way. Is it possible to assemble such a bed yourself or do you need the help of qualified workers? In this article we will answer your questions and provide detailed assembly instructions.
Detailed instructions on how to assemble the bed correctly
In my article I will tell you how to assemble a bed without any extra effort. I'll show you what tools to use. What sequence of actions to choose so that new furniture brings only pleasant emotions. I will list the features of different furniture models and possible difficulties during assembly.
- Where to start assembling a bed
- Assembling a bed with a lifting mechanism
- Required tools and materials
- Assembly nuances
- Base
- Frame
- Standard model
- With orthopedic base
- Headboard
- Installation of the lifting mechanism
- Additional equipment
- Assembly diagram for children's version
- Single
- How to assemble a double structure
Detailed diagram for assembling a bed with a lifting mechanism
The desired bed has been purchased. How to assemble it? In fact, a berth with a lift folds up like a regular bed, only parts are added, in the form of a gas lift or a spring mechanism.
The first stage involves assembling the bed frame. The facing panels are connected to each other, a central crossbar is attached, on which sheets of chipboard, MDF or wooden panels are laid for further fastening (the bottom material is supplied depending on the furniture model and its price). Next, the headboard is attached, and the finished box is covered with a removable cover, most often soft (but again, it all depends on the chosen model; some budget options are not equipped with such a cover).
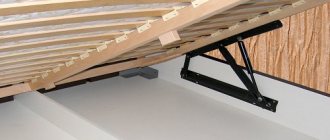
At the second stage, the lifting mechanism is installed. It is very important to do this correctly, because inaccuracies in placement, an error in determining the sides, can disrupt the operation of the lift and break the mechanism. Experienced craftsmen recommend ordering an already assembled lifting device, which must be attached one by one to the lower body. In this case, the lifting mechanism itself is mounted first, and gas shock absorbers are installed on it.
The third stage consists of assembling the upper part of the bed, most often an orthopedic base with slats. They are driven into special holders with a hammer. This takes a lot of time, because each slats need to be secured on both sides, and there are at least 15 of them for a single bed, twice as many for a double bed.
The fourth stage involves connecting the upper base to the lifting mechanism. The sequence is the same: first, the top of the bed is screwed to the lift, and then the gas shock absorber is attached to it. At the same time, all work is performed with the base raised and the mechanism folded back.
The main process is complete. If necessary, some parts are tightened, legs are installed (if they are included in the package), the mechanism is tested, and it is lubricated for silent operation.
DIY bunk bed / 09/26/2017 07:28
Good afternoon, now I’ll tell you how, I made a bunk bed in the garage.
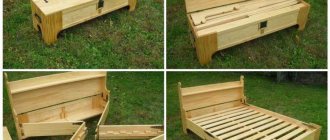
It all started with a project, the initial data were as follows: the bed should be compact, reliable, beautiful, collapsible and preferably inexpensive. The question remained open - where to put the folding sofa-baby? After looking at numerous projects on the Internet, I decided to make a single bed with a raised sleeping place, and place a sofa below; it was decided to make the rise to the “second floor” from steps-shelves with railings.
Having completed the project, I went to purchase wood.
Having brought a bunch of “firewood,” sorted it, I easily and evenly cut the boards to size on a miter saw.
Stacked them through spacers.
Next, I started making the side - a structure consisting of two parallel boards connected by jumpers. On a homemade milling table, I used an edge cutter to make grooves for 6 mm thick plywood slats.
Since all this was done in winter, and I glued it using PVA (for gluing the temperature must be at least +5 C⁰), I had to take the parts prepared for gluing home.
Next, I started making load-bearing pillars; for this, four carved stair pillars of 90x90x1100 mm were purchased. In them, I used an 18 mm feather drill and a drilling machine to make holes for the tenons.
The supporting pillars needed to be lengthened; to do this, I carefully cut off the decorative balls with a miter saw and extended the pillars with beams of the required length; I glued everything on PVA using dowels.
Unfortunately, it was not always possible to take a camera with me; in the photo, the side of the bed with the headboard was glued together; the back-headboard was glued from boards 95 mm wide. using 1/2″ pipe clamps
When everything was ready, I assembled the bed for testing in the living room and fastened it together with furniture bolts. This design allows, if necessary, to disassemble the bed to move it to another place (which is what I did when moving the bed to the nursery).
First assembly, here it is, my beauty! :), there is still a lot of work to be done, hand sanding and varnishing.
The deadlines were tight, so I couldn’t take pictures of the process of making the ladder-shelf. According to a well-thought-out project, I purchased the required number of furniture panels, a couple of shovel handles, a front door and three balusters for making railings. It took me four days to saw, fit and assemble the entire structure, I was worried that the railings would wobble, I even thought about drilling them tightly to the wall, but as practice has shown, everything turned out to be very strong and reliable.
The top drawer-step is made retractable, the bottom one simply opens. Since these are steps, instead of hinged handles I made curly cutouts; for beauty, my wife drew suns according to the template. I purchased the front door from a nearby hardware store.
It is possible to assemble the bed yourself or it is better to use the help of specialists
It is possible to assemble a lift-up bed yourself; this is not a super task only for the initiated. Typically, each piece of furniture is accompanied by instructions from the manufacturer, which contain all the necessary instructions for proper installation. Of course, any consultant will offer the help of professional craftsmen; this is his direct responsibility. But you have the right to refuse the service and assemble it yourself. There are a few important points to mention here:
- any damage incurred during self-installation is not covered under warranty;
- the time spent on self-assembly of furniture is not compensated by anyone;
- a failed lift will not be compensated free of charge during the unexpired warranty period if it is proven that the breakdown was caused by incorrect self-installation.
At the same time, by paying extra for a professional assembly service, you save time and protect yourself from non-warranty breakdowns.
Loading and unloading the bed during transportation
An oversized lightweight bed can be moved and placed in the back by two loaders; there is no need to hire rigging equipment. If the structure is of non-standard size and heavy, a team of 4-5 people is needed.
Correct loading:
- All flat panels are laid on the bottom of the body. It is necessary to ensure that there are no hard, protruding objects under the backrests or frames, otherwise during the shaking process there is a risk of damage and cracks.
- Transporting structural parts in a vertical position is permissible if the car has belts for securing furniture to the side.
You should not place heavy objects or a mattress on a partially disassembled frame - the panels may not withstand the load during a sharp push or braking.
What difficulties may arise during the process of assembling a lift-up bed?
For experienced craftsmen, such furniture does not involve any difficulties; assembling and disassembling a bed takes an hour. Beginners will have to tinker a little longer to get the stock and lifting mechanism into working condition. The main difficulties that a person may encounter when starting to assemble a bed for the first time are given below:
- The presence in the design of technologically blind holes that need to be drilled. Most often they are found in the back of the headboard. An inexperienced person will be puzzled as to how to attach it to the box. The answer is simple - they need to be drilled and connected with screws.
- Assembly and installation of gas lift. The process is technologically complex, requiring accuracy and symmetry when placing. It is difficult to describe it; it will be more clear to watch a training video.
- Lack of markings on the wooden frame, or incorrect application. This is the most unpleasant difficulty, because you cannot overcome it on your own. You can ask the manufacturer for clarification or call a furniture maker who, based on his experience, will suggest the correct option.
Failure options and fixes
To repair a bed at home, you must first find out the cause and type of damage. Most often it is necessary to restore the legs, slats, frame of the product, as well as the spring mattress. The technology for carrying out work is different in each case.
Leg repair
If the entire structure is attached to the legs, then bed repairs must be carried out very carefully. When parts become loose, the fasteners must be tightened. If they break, it is better to completely replace them. To do this, the nuts are unscrewed, damaged components are removed, and others are installed in their place and clamped with fasteners. Ready-made parts can be purchased or made independently. If the master is a beginner, then the first option is preferable.
Tips for making a headboard with your own hands, installation nuances
If the legs become loose, the fasteners need to be tightened
If a leg breaks, a complete replacement of the part is required.
Lamels
Most often, children's beds have to be repaired. The reason is that this type of furniture for a child is not only a piece of recreation. He can play on it, jump, do what he likes. This often causes damage to the lamella. If the damage is minor, then it is enough to fix the element with glue. Otherwise, the part is replaced. Moreover, now you can purchase not only the lamella itself, but also its holders, which are most often damaged.
If the damage is minor, then it is enough to fix the element with glue
In the event of a serious breakdown, the failed part will have to be replaced.
Frame frame
Although this part does not experience maximum stress, failure of the bed frame is common if it lasts more than 3-4 years. The problem may be as follows: the crossbars that connect the backrests pop out. The reason for this is the wear of the coupling bolt. To correct the situation, you need to drill several holes in the end of the cross member. After this, insert guide pins into the outer holes, and a tightening bolt into the middle one.
Another type of failure is the loss of the metal fitting connecting the front backrest and the crossbar of the furniture. To solve the problem, you should simply fix the element in its place. To do this, wind the thread around the foot in the opposite direction to the twist. The diameter of the product should be slightly larger than the size of the loosened hole.
Before fixing the part, the hole is coated with glue, and then the component is installed in place. A screw or self-tapping screw is also screwed into the back of the furniture, securing the footing on the back side. Once it has hardened, the bed can be used.
After 3-4 years of use of the product, the tightening bolt may fail, which will lead to breakage of the bed frame
If the cause of the breakdown is associated with a fallen out fitting, you should fix the element in place by winding a thread around it and lubricating the loose hole with glue
Lifting mechanism
Different types of lifting mechanisms are installed in beds, therefore their repair schemes are not the same. Before starting work, the type of structure is determined and a visual inspection is performed. The algorithm for repairing the bed lifting mechanism is as follows:
- First, the structure must be removed and disassembled. It is advisable to photograph the entire process or write down the sequence of unscrewing the parts so as not to get confused during assembly.
- Conduct a visual inspection of the mechanism to identify broken parts.
- Replace damaged components and assemble the structure.
- Place the product in place.
How to choose the right corner bed for children and adults
To prevent the lifting mechanism from breaking for a long time, it must be periodically lubricated. Thanks to this, the friction of the fragments, as well as their wear, will be reduced. In addition, the protective oil film will prevent rusting and corrosion processes.
To ensure that the lifting mechanism lasts as long as possible, it must be lubricated periodically.
What is a lamella
Before you begin, you need to familiarize yourself with the description of the features of the lamellas in more detail. Lamels are wooden structures that have a curved shape. Their characteristic features include a high level of elasticity and elasticity. It is thanks to these features that the mattress can be securely fixed.
Such wood products are laid out at a distance of 2-5 centimeters. This allows slatted beds to be used by both thin and overweight people. The thickness of one plank reaches ten millimeters, and the width does not exceed thirty. However, cheap beds can use boards 4-5 millimeters thick.
Stock and guards
Regardless of the type of base, it is recommended to make the stock from solid wood. If desired, you can frame this part with a decorative screen made of laminated chipboard or MDF in the color of the main structure. To make a stock you will need:
- Board 40 mm, preferably glued or calibrated. The width of the board is half the thickness of the mattress plus an additional 50 mm.
- Beam 50x50 mm.
- Planed planks about 10 mm thick and 35–40 mm wide.
From the board you need to knock down a box, the internal dimensions of which will be 20 mm larger than the mattress in each direction. A timber frame is screwed flush with the bottom end of the box from the inside. If the bed is double, you need to screw an additional beam made of timber along its longitudinal center.
From thin slats we prepare a slatted base for the mattress. The planks need to be cut 20–25 mm shorter than the internal dimensions of the box and laid out on a timber frame at a distance of 50–70 mm from each other, and then screwed to the frame with self-tapping screws. The slats do not need to be screwed to the middle additional crossbar.
A fence for a loft bed is necessary, even if adults sleep on it. The height of the fences is small - about 150–200 mm above the level of the mattress. They provide fall protection and preservation of wall finishes. At the location of the lifting ladder, you need to create a gap in the fence about a meter wide; if the ladder is adjacent to the short side of the bed, here you don’t have to make a fence at all.
In the simplest case, the material for fencing is a decorative panel made of chipboard or MDF, which frames the box of the stock - just increase its height. You can also enclose the bed with a frame made of 25x25 mm timber. The racks of such a frame rest against a beam on which the slatted base of the bed is attached, and are attached to the box enclosing them with through ties. There is no need to worry that the bars will interfere with the placement of the mattress - they will easily press into it, you just need to remove the chamfers so that the sharp edges do not damage the mattress cover.
Main causes of breakdowns
Sometimes people find that the board in their bed is broken. There are several main reasons why a wooden plank can break:
- Exceeding permissible loads. Wooden slats have certain load limits that should not be exceeded. However, some people still overload them, which later leads to breakdowns. Therefore, it is recommended to familiarize yourself with the permissible loads of the slatted bed in advance.
- Marriage. Sometimes manufacturers install low-quality products made from defective wood. This often happens when using overdried wood, which quickly breaks even under light loads.
- Long-term operation. Slats may break if used for more than ten years.
How to choose new ones
Sometimes it is not possible to repair old products and you have to replace them with new ones. Before purchasing new boards, you will have to understand the specifics of the purchase.
Size
When making sofa grilles, lamellas are used, which may differ in size. Therefore, before purchasing, you should familiarize yourself with the main types of such products:
- Wide. These designs are purchased if you need to replace the slats on large sofas where bonnells with springs are installed. The width of such boards does not exceed seven centimeters.
- Narrow. They are considered a universal material, as they are suitable for any mattress. Experts advise buying narrow slats for beds that have spring mattresses. This will increase the strength of the structure. The width of narrow lamella materials is 4-5 millimeters. The thickness of such planks is small and reaches only three millimeters.
Quantity
Having decided on the dimensions, you need to figure out the optimal number of slats. Some people don't know how many boards they need to buy to strengthen the base of the bed.
Experts recommend buying a lot of lamellas, since the strength of the product depends on this.
To determine the required number of slats, take into account the dimensions of the bed. For example, for double structures, at least thirty planks are purchased. For single beds, 15-20 pieces are enough. However, some manufacturers install more than thirty slats to make the sofa more elastic and resistant to stress.
Material
Most often, slats for sofas are made of wood. It is used to make adhesive plywood, which is laid in several layers to create a more durable surface. Products made from plywood are characterized by good elasticity and elasticity. The lamellas can also be made from the following materials:
- Birch. Budget products are made from young birch trees. Such structures are not very durable and therefore are not recommended to be used.
- Beech. To make more reliable bed bases, beech is often used. This wood is flexible and highly durable.
How to reupholster the base of a bed with your own hands: master class + tricks and tips
If the base of your bed is upholstered in fabric, and the fabric is no longer as fresh as you would like, here is a master class on how to make new upholstery.
This method is suitable if the upholstery of the bed base is worn out, dirty, or you just want to change it. For example, in our case, for a small bedroom, we wanted the furniture in it to be light. Therefore, it was decided to change the dark fabric upholstery to a new, light pink color.
All work was completed in 1 day. Here the reupholstery took a little longer than it might have, as the original dark upholstery could show through the new light pink fabric, and the base was first reupholstered with an additional layer of white fabric. If your fabric for upholstery is thick enough, you can skip the “lining” step.
How to sew a sofa cover: 3 master classes
You will need:
— fabric for reupholstery;
- if necessary - fabric for an additional “lining” layer;
- tools to disassemble and then assemble the bed base;
- fabric scissors;
- sewing machine and threads;
- furniture stapler and staples;
- if necessary - small nails and a hammer.
Bed valance skirt: master class
Step 1
Disassemble the bed, remove the legs and other parts that will interfere with the upholstery. To avoid confusion later during assembly, you can mark the right/left parts and write down on a piece of paper at what distance from the edges of the parts the fastening points are located (holes for screws, etc.).
Step 2
First - the headboard, the “lining” layer. Take a piece of fabric sufficient to wrap the part with a large margin (minimum 20-30 cm, the excess can then be trimmed). Wrap the headboard with fabric, inside out. At the corners, secure the folds with pins. Then remove the fabric, stitch the corners and trim off the excess.
Turn the part for the headboard upholstery right side out and place it on the headboard. Wrap the edges of the fabric, pull them quite tightly and secure with a stapler. You can start from the middle of each side, gradually moving to the edges. Ideally, two people work: one stretches and holds the fabric, the second secures the fabric with a stapler.
Step 3
Now - the outer layer of fabric. Here the excess fabric is simply neatly folded into folds, and the folds are secured with a stapler. You can do the same as in the step above, sewing up the corners and cutting off the excess.
Step 4
When finished, return the headboard fastening elements to their place.
If you use two layers of fabric, as in our case, you can, after the first layer is ready, find, by checking the notes, places for fastenings, and mark them by screwing in and out the screws. It will be easier to find these holes later.
Step 5
Tighten the side and end parts according to the same principle. The corners on these bed parts can simply be cut off (see top photo). In places that are difficult to reach/inconvenient to work with a stapler, you can use small nails and a hammer.
How to repair and replace slats
At the initial stage of repair, it is necessary to get rid of damaged planks. They are carefully removed from the groove, moved to the side and removed from the structure. Some types of lamellas are attached using special holders. In this case, you will have to use pliers or a screwdriver.
Some people use a hammer, but it is not recommended to use it so as not to accidentally damage the structure.
If the slats are broken in the central part of the bed, you can swap them with the outer slats. This is done when one or two planks are broken. If more lamellas are broken, you will have to buy new ones. In this case, it is recommended to buy the same products as before. The purchased products are carefully attached to the bed using clamps. After installation, you need to check the reliability of the fastening and make sure that the slats are not loose.
Restoring an old iron bunk
An old metal bed can be restored by careful polishing.
- Scrape off the rust . To remove large pieces from rusty areas, use both a wire sponge and a special brush. Then the frame is washed and all parts that have peeled off are removed.
- Polish the product . Use sand and sandpaper to remove fine rust. Particular attention should be paid to hard-to-reach places. Sanding is carried out until completely smooth.
- Solvent wipe . The treated bed is prepared for priming and painting, wiping with any solvent, for example, acetone.
- Primed . For light-colored furniture, use a white primer; for dark furniture, use a duller primer. The primer is applied with gentle movements, in two to three thin layers, allowing each to dry thoroughly. After the piece of furniture has dried, wipe it with a rag to remove dust and primer residues.
- They paint . For painting, it is recommended to use high-quality aerosol paint, which protects furniture from rust.
How to restore a metal bed in the video:
How to repair a lifting mechanism with your own hands
Sometimes the bed lifting mechanism, which is responsible for transforming the structure, breaks along with the slats. The following signs indicate a breakdown:
- spontaneous lowering of the orthopedic base;
- jamming of the mechanism when lifting or lowering the structure;
- creaking and other extraneous sounds that occur during operation.
If one of the listed symptoms appears, it is necessary to disassemble the lifting mechanism. To do this, the mattress is removed from the bed, after which its base is unscrewed. Then the fasteners are unscrewed, with the help of which the mechanism is screwed to the structure. It is difficult to repair such a product yourself and therefore it is better to take it to a specialist who professionally repairs furniture.
Methods for restoring an old bed
If the bed is too old, you can restore it and make it look like new furniture. During the restoration process, it is necessary to carefully inspect the structure and identify parts that require replacement. Most often, the springs and mattress are changed during restoration. Sometimes people decide to replace worn side panels. To do this, you will have to purchase new panels that are suitable for the restored sofa. If the side parts are not very worn, you can sand them and varnish them. It is recommended to use varnish mixtures that have a mahogany tint.
Troubleshooting spring mattress problems
The mattress is an essential part of the bed design that provides comfort. This item requires proper care. It is better to change it every 5 years, but if this is not possible, then it is recommended to correct the shortcomings that appear yourself. Standard beds use a spring mattress that deforms over time.
Review of the most original beds in the world for adults and children
For repair work you will need the following materials and tools:
- nails with a hammer;
- slats;
- upholstery fabric;
- furniture stapler;
- foam;
- spare springs.
Repairing a spring mattress involves the following steps:
- Preparation of the workplace. The product must be placed so that it can be approached from all sides. It is better to place it on stools placed in the corners. The base is freed from fasteners and paper clips.
- Replacement of internal parts. The fabric that insulates the springs is cleaned of dust. The old element binding is removed.
- Elimination of defects on the base of the mattress. The torn parts are sewn back into place.
- Restoration of springs. Each element must stand strictly vertically and rise 10 cm above the frame level. To fasten the parts, slats and belts are used.
- Strapping. This process requires a responsible approach. It is necessary to hammer nails along the edges of the frame. A thin rope is used to tie the top of the springs. First, the rows are processed across, and then along. Do not pull the string too tightly so that the springs maintain a vertical position and do not touch each other. Additionally, the strapping is done diagonally, after which the nails are bent.
- Finishing. A lining is placed on the resulting mesh, which is fixed to the frame with slats.
Lastly, the mattress is covered with facing fabric. Immediately after the restoration work is completed, the furniture is ready for use. Repairing a bed with your own hands is a completely feasible task. You need to collect the necessary tools and materials, and also determine the cause of the breakdown. If you cannot restore the product, then it is better to purchase a new model.
Prepare the workplace, lay the mattress and free it from fasteners and staples
Remove the old binding of the elements and clean the dust from the fabric
Eliminate defects on the mattress base
Install new springs or restore old ones, make binding
Place the lining and secure it with slats on the frame
Place the restored mattress on the bed
How to disassemble a bed
Every person sooner or later faces the question of how to disassemble a bed. It doesn’t matter what the reason was – a planned move or replacement of old furniture. Even an adult is not always able to solve a problem correctly and quickly. The variety of models and the complexity of the design suggest some problems when disassembling them. Dismantling simple products does not require effort. It is better to deal with “tricky”, intricate modifications with an experienced assistant. The online store “Sleep Therapy” offers you to read an article that will be useful.
Disassemble the playpen bed
The simplest design, which should not be difficult to disassemble, is considered to be a playpen bed. This model is widely used when a child reaches six months of age. By this time, babies begin to sit up and become more actively interested in the surrounding space, and a playpen is the best option. Typically, assembling and disassembling the structure takes a little time. If you have a wrench and furniture wrench of the required diameter, then unscrewing all the joints is not difficult. The main thing is to remember, and to be sure, you can sketch or photograph what was installed and where. Some modifications will require the purchase and use of specialized tools.
Child safety is a priority! Therefore, such expenses are trifles. The advantage of disassembling furniture yourself is the opportunity to relieve your brain by working with your hands.
How can you improve the look of a double bed?
You can update the appearance of a double bed in several ways:
- Plaster and paint . You can radically transform a double bed in a simple way: level the surface with plaster and paint it in the desired shade. The restoration method is suitable for any straight model.
- Renew the varnish layer . The bed is disassembled, the parts are sanded, and varnished in several layers. When the product is dry, it is polished.
- Gilding is applied . Gilding is used to update the shabby surface. It will turn an ordinary bed into a luxurious bed and disguise minor flaws. You can cover the entire bed with gold or paint only individual parts.
- Upholster with leather . If surface damage cannot be masked with varnish or paint, the use of eco-leather will help out. It can be used to cover the back and side panels. Before covering, a sheet of foam rubber must be laid to soften it. The legs are painted the same color as the upholstery material.
- Artificially age the surface . The bed is covered with craquelure varnish or stain, then sanded. This processing method allows you to hide furniture defects and transform a shabby look into a vintage one.
The video shows one of the options for restoring an old double bed:
Disassemble the transformable bed
Modern manufacturers of children's furniture amaze with a huge variety of different modifications. Of course, one of the most multifunctional is the transformable bed. Usually it consists of several parts connected to each other. Assembling such a structure is a job for experienced professionals. Dismantling can be done independently:
• how to disassemble a bed consisting of a cabinet, a pendulum and a base, with drawers for linen located in it? Partial dismantling is possible. This option will be required when it is necessary to install the cabinet at the head of the bed and remove the base. Using a set of keys, completing the procedure is not difficult; • transformer options, when the models “hide” inside each other, are more difficult to disassemble. Without the appropriate experience and knowledge, it is better not to do the work on your own. The help of an experienced furniture maker will come in handy; • if the assembly instructions have not been preserved, then do not despair. You can search for a scanned document on websites on the Internet, contact the furniture manufacturer (every self-respecting company has a resource on the World Wide Web).
If you decide to carry out the work yourself, then the bed should be disassembled in a horizontal position, in a certain sequence, using specific tools. If you have instructions, this is easy to do; just follow all the assembly steps in reverse order.
Disassemble the loft bed
The design of such furniture resembles a transformer, but unlike it, it has a larger number of different components. The process of disassembling a loft bed is difficult for one person to carry out. But with a competent approach to business, you can save nerves and time. The most important thing is the correct choice of wrenches. Using a high-quality set will allow you to quickly select the necessary elements for the job.
It is better to start disassembling from the top, gradually moving down. Fasteners should be placed in a container or box to keep them intact. Unscrewing nuts, screws, bolts requires some physical effort, because wooden parts can be quite massive. This is where you will need an assistant. Sometimes the bed is disassembled in order to wash it or repair damage. In this case, it is better not to touch the main structure. Components, spare parts and main mechanisms must be protected.
Preparing the bed for dismantling
Before you start disassembling the bed, you need to prepare it, and also make sure that it makes sense to transport it. It often happens that the mattress has not been removed from the bed for many years, and its owner may not even know that cracks have long formed on the base. Perhaps, in this case, you should think about replacing the bed with a new one, rather than transporting the old one.
At the stage of preparation for the disassembly process, you need to remove all removable elements of the bed. Most often this is a mattress, bed linen, plastic caps for bolts.
Next, decide on the process of dismantling the bed. Most likely, you will need to prepare screwdrivers (to remove screws) or wrenches.
note
In some cases, you will also need a hammer to knock out the bolts or screws into the grooves, where they could come out due to physical impact on the bed elements during operation.
Disassemble a bed with a lifting mechanism
Undoubtedly, one of the most problematic structures for dismantling is furniture equipped with a lifting mechanism. How to disassemble a bed quickly and efficiently? After all, it consists not only of wooden parts and small fastening metal components, but also of a specialized system. To save space and rationalize the internal space, it is located on the sides of the base and consists of several iron pipes connected at a certain angle.
Typically, the storage space in such a bed is divided into two parts. After removing the upper base, they begin to disassemble the crossbar that separates the base itself. The rest of the steps are not difficult. All that remains is to unscrew a couple of screws and assemble all the parts into the box. After disassembling yourself, you will need to properly assemble the structure. To avoid mistakes, you need to follow a certain order, and if necessary, make your own diagram and photograph each stage.
How to pack a disassembled wardrobe for moving?
For high-quality packaging you will need sheets of cardboard, film for painting, tape, foam rubber or polystyrene foam. You can pick up empty used boxes from any store for free. So let's get started:
- Cover all panels and shelves with corrugated cardboard to prevent abrasions on the laminated surface of furniture parts during transportation.
- Fold long slabs first, then smaller panels.
- Cover glass or mirror sheets with bubble polyethylene film or foam strips.
- Wrap all stacks with two layers of covering polymer film for painting work. Pre-wrap the ends with foam rubber or corrugated cardboard.
- Secure the plastic cover with tape along both the length and width of the panels.
- Wrap drawers and cabinet bodies with film with foam or foam padding at the corners.
- Place bags of accessories in one box.
- Do the same with packing the back walls.
- Now, all this can be taken out and put into transport.
Conclusion
The advantages of disassembling any furniture yourself are obvious, but you should not forget about the disadvantages. After all, the question of how to disassemble a bed yourself can become unsolvable. Each model has assembly instructions, so you should read them carefully before starting work. This is the only way to avoid annoying surprises, inconsistencies of various elements, and other troubles. It is pleasant for every person to do the job perfectly, but if you do not have the necessary skills, then it is better to entrust the dismantling to real professionals, whose experience and knowledge will help solve the problem in accordance with the technology.
Collapsible bunk bed - how to choose the optimal solution
If you are purchasing a bunk bed for children, you must immediately decide whether it will be divided into two single elements in the future. If yes, then you need a collapsible option, from which you can make two full beds in just half an hour. In this article we will talk about the main features of such furniture and figure out what aspects you should pay attention to when purchasing.
The ability to split a bunk bed into two single beds is a huge advantage for the future