The variety of types of connections of wooden parts involves the use of not only metal parts as connecting elements, but also wooden ones - the so-called insert tenons, or furniture dowels.
We’ll talk about the types, uses and options for making them yourself in this article.
What is a dowel, its main dimensions
Modern cabinet furniture, sold by retail chains in flat packs, requires self-assembly by buyers or specialized workers. This is a good opportunity for the common man to get acquainted with dowels. They are small wooden or plastic cylinders with small chamfers at the ends. Usually they do not have a smooth, but a corrugated surface, represented by shallow longitudinal, helical or annular grooves.
As a rule, in places where round insert tenons are installed, the furniture manufacturer pre-makes mounting holes of the appropriate diameter. The linear dimensions of the dowels used vary greatly and depend on the size of the parts being connected and the type of connections. Joinery connecting elements have a diameter from 4 to 10 mm and a length from 15 to 100 mm.
How to arrange a connection between furniture parts
The procedure for attaching parts to a wooden nail is not complicated. By following the instructions below, you can connect the parts and assemble the furniture without much effort. The assembly diagram looks like this:
At first glance, it seems that this technique does not provide reliable fixation of the structure, but in practice it turns out that when using high-quality, well-dried dowels, furniture, log houses and timber are durable and stable.
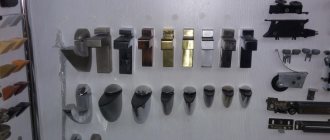
Dowels, dowels, choppers, metal fasteners are types of fastening elements used for reliable connections. Without their use it is impossible to imagine the house-building industry and the furniture industry.
Source
Joiner's and carpenter's dowel
Carpentry dowels are widely used in the manufacture of furniture made from natural wood and artificial wood materials (chipboard). When selecting the dimensions of elements for independent use, their diameter is selected to be approximately equal to 1/3 of the thickness of the parts: this allows for maximum assembly quality and maintaining strength. The length of furniture dowels is selected arbitrarily.
When installing furniture dowels yourself, the greatest difficulty is associated with making holes that are equidistant from the planes of the parts and directed perpendicular to the edge. To facilitate this, it is convenient to use a jig with guides for the drill. The diameter of the latter is selected equal to or slightly smaller than the diameter of the dowel.
In specialized stores, the price of wooden or plastic connecting elements is relatively low.
Video on the topic
How to easily make a dowel
with your own hands
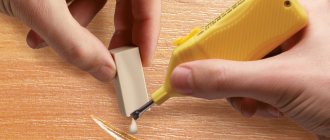
In the absence of a suitable size, it is not difficult to make a furniture dowel yourself, using a simple device or passing a wooden square blank through a round die of a suitable diameter. To ensure rotation, the free end of the rod is clamped in the chuck of an electric drill or screwdriver.
The dowel has also become widespread in carpentry work - making log houses and bathhouses. Experienced builders clearly confirm the need to use plug-in fasteners both when working with round logs and beams. As blanks for making carpenter's dowels, you can purchase birch cuttings with a diameter of 20 to 30 mm from specialized companies, since this fastener is usually made only from hardwood.
With standard timber sizes, you can also order ready-made rods of the required length. It should be approximately 1.5 times the thickness of the building material. Particular attention should be paid to preparing the mounting hole for installing carpentry dowels. To do this, you will need a powerful drill and a long drill of a suitable diameter.
The log or beam of the upper crown is drilled through, the bottom - about halfway. To control the drilling depth, it is convenient to attach a stop to the drill or stick paper tape several times. The drilling step should not exceed 1 meter.
Video on the topic
Installation of dowels
into profiled timber
Particular difficulties arise when the drill passes through a layer of pre-laid insulation - the natural one begins to wrap around the drill, the artificial one begins to fuse. To prevent this, professionals recommend that after passing the first crown with a drill, lightly compact the layer with light blows with the engine turned off, as well as monitor the sharpening of the tool and avoid overheating. The dowel (dowel) is driven into the prepared hole using a light sledgehammer or mallet through a wooden plank to prevent flattening of the upper end.
Making Perun's chur from wood
In this master class I would like to show how you can make your own figurine of the Slavic thunder god Perun, he is also the patron saint of all warriors. Such a figurine can be an excellent gift for a man. So let's begin!
First, we need to decide on the image of the future figure. Personally, I decided to make this image:
I strongly recommend that beginning carvers make sketches on paper before starting carving. This makes it easier to finally decide on the placement of all the elements, and besides, you can regularly “peek” along the thread so as not to get confused and spoil anything (the tree does not forgive mistakes; the cut part is unlikely to be glued back).
The set of necessary tools for carving is quite simple:
Now we need to take directly what we will cut out the future figure from. To do this, I took a piece of linden, measuring 50x80x150 mm. In order to cut less, I immediately sawed off the corners in the area of the head of the future figure:
Then, using a knife-jamb, we bring the workpiece to this form:
Now we mark the position of the hands and the ax:
After marking, we begin to cut:
“Roughly” cuts through the outlines of the hands and the handle of the ax:
Then, using a chisel with a beveled blade, we begin to cut out the arms and ax of our figure in more detail:
At the same time, we cut through the edges of the cloak, as well as the edges of the chain mail and shirt:
Now comes the most important part of the work - cutting out the face. The character of the figure will depend on what the face will be like. Mark the face with a pencil:
And we carefully cut everything out. The God of warriors, storms and thunder is quite severe and this should be visible on the figure:
Then we cut out the outlines of the beard, hair and the top of the cloak:
You should also add folds to the cloak:
Now take sandpaper and smooth out all the angularities:
After the figure is sanded, we begin to cut through small elements (hair, chain mail and patterns on clothes):
Our figurine is almost completely ready. We need to add color to our product. For this I use a water-based stain in maple color. I diluted this stain a little with water to get a slightly lighter shade:
The figurine is covered with stain, now we send it to dry. At room temperature it will not dry so quickly, so I sent the figure to dry on the radiator.
After a couple of hours, the stain was completely dry and the shade became a little duller:
Then, arm yourself with fine sandpaper and begin to highlight the convex areas on the figure:
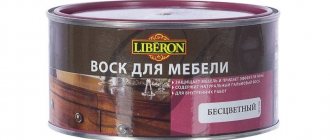
Now it's time for the finishing coat. I use this wax. The result suits me quite well. To apply wax we need a toothbrush and a regular cloth. First, apply wax to the figurine with a toothbrush and rub it over the entire surface. When the wax dries, polish the finished product with a cloth:
Here's the final result:
Several years ago I had a great desire to try my hand at carving, but I had neither a normal tool nor a normal material. He began to cut out his first figures from ordinary shovel cuttings using a stationery knife. Over time, I mastered linden, purchased tools for carving, and here is the result:
It is not necessary to immediately have all the necessary tools and supplies for creativity. It is important to have a desire to learn something and everything will definitely work out. I was convinced of this by my own example. Perhaps after my master class someone will also decide to try their hand at carving. I really hope everything works out for you!
Source
Lamel as a type of carpenter's dowel
In addition to the round one, there is a flat insert dowel, called a lamella. It is also widely used in both carpentry and carpentry. The lamella for log houses and baths is a flat board with a thickness of at least 25 mm.
The process of preparing a rectangular hole presents certain difficulties. This can be done manually using a carpenter's chisel and mallet, after first marking and gouging out a rectangular groove. This process is labor-intensive and time-consuming, so it is recommended to use a special milling cutter or slotting attachments. Cuttings of birch or oak planks of suitable size are suitable as blanks for making carpentry slats.
How to arrange a connection between furniture parts
The procedure for attaching parts to a wooden nail is not complicated. By following the instructions below, you can connect the parts and assemble the furniture without much effort. The assembly diagram looks like this:
At first glance, it seems that this technique does not provide reliable fixation of the structure, but in practice it turns out that when using high-quality, well-dried dowels, furniture, log houses and timber are durable and stable.
Dowels, dowels, choppers, metal fasteners are types of fastening elements used for reliable connections. Without their use it is impossible to imagine the house-building industry and the furniture industry.
Using glue when attaching to dowels
The adhesive joint has the highest quality among all carpentry joints. To increase the strength of the assembly, carpenters often use glue when installing dowels. This is only advisable when the dowel is the only type of connecting elements used.
In this case, the glue is applied in a thin layer to the surface of half of the dowel, which is installed in the hole in one of the parts. After this, the surface of the remaining part is lubricated and the second part is installed. At the same time, the use of glue is recommended both when working with chipboard and when using natural wood.
Video on the topic
Fasteners for dowels
using glue
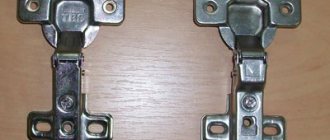
Installation of modern cabinet furniture is carried out using special screws - confirmats. The dowels used in this case play only an auxiliary role, therefore the use of adhesive compositions for their installation is not recommended. Among other things, this will complicate the disassembly of furniture if it is transported, for example, to the country.
In carpentry, as a rule, dowels are fixed only using friction. To avoid subsequent drying, the moisture content of the wood must be within the required limits. The diameter of the hole for the dowel is made 1-2 mm smaller than the diameter of the rods, which will ensure a tight connection without the use of glue. Water-based adhesive composition is used only when installing carpentry lamellas, which is due to their shape and conditions of use.
We recommend other articles on the topic
Do-it-yourself bed with a soft headboard - step-by-step instructions
DIY wooden bed, drawings, step-by-step photos
Review of folding picnic tables, DIY
PVA glue - composition, technical characteristics, application
Common mistakes
Errors when using dowels in assembling furniture occur mainly among beginners. They can be avoided by considering the main difficulties:
- The planes of the structural elements do not coincide, while the edges of the connections themselves are located at the same level. To correct this, you should align the drill along the base planes of the two blades being joined, focusing on the central part of the edges.
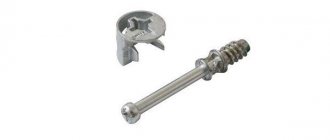
- The holes in different elements do not match. This may make it difficult to secure the dowels properly. To ensure that all the holes are made exactly opposite each other, special markers are used. First, holes are drilled in one sheet and markers are inserted into them. After this, the two elements are pressed tightly against each other the way they should be assembled. On the second part, the markers will leave marks at the points where you need to drill holes so that the blades fit together as much as possible.
- Furniture dowels do not fit into the holes. It also happens that they simply fall into them. The correct fastener should fit tightly into the intended hole, so you should check that the diameter of the dowels matches the size of the holes. Factory-produced parts may not match the parameters of the technical documentation, both due to mass production and due to high or low humidity (products may swell or lose volume).
If the diameter of the dowels corresponds to the declared one, the problem is in the drill, namely in the drilling jig, due to wear of which the drill deviates. You should change the bushings or purchase a new tool.
These are the main problems that can arise with the installation of furniture on dowels. In order for the assembly to be successful, you also need to take into account a number of rules:
- It is better to mark with a sharpened pencil (an unsharpened one will not give accuracy) or a knife.
- Use straight drills with the point pointing down. If the sharpening is spiral, then strong versatile deviations are possible, and the direction of the hole made will be incorrect.
- A retaining ring is used to create a hole with the same depth. It is fixed on the drill and does not allow you to drill more than necessary. The optimal depth in this case should be 2–3 mm greater than the length of the rod itself.
Design features of furniture gas lifts, nuances of selection and installation
For high-quality assembly of cabinets, sofas and other structures, you can use special fasteners - furniture dowels of various sizes and configurations. It is best to give preference to wooden elements, for which holes are created in the canvases, and the rods themselves are attached with wood glue. You should first measure all furniture elements and parts, check the equipment and apply approximate markings. This will allow you to use fasteners as accurately as possible with the smallest error.
Characteristics and dimensions
Dowels may vary in length and diameter. Diameter sizes range from 4 to 30 mm, and lengths from 15 to 200 mm. At the buyer's request, they are manufactured in any variations, where D is the diameter and L is the length of the product.
The dowel is a popular fastener, and therefore professionals try to purchase parts in bulk in advance, so as not to waste time and money on constant purchases. The advantages of fasteners include:
- Corrugation of the surface on the rod - this helps to securely fix the parts, ensuring their strong adhesion;
- Improved appearance of furniture, because the fastenings are completely hidden from view;
- Possibility of selecting the diameter and length required for assembly of the product, in accordance with the design features.
Varieties
In fact, a dowel is a small spike - it is a hidden type of furniture fastener. In appearance, it resembles a cylinder-shaped rod, with slightly rounded or simply truncated ends on both sides. Sometimes, to assemble furniture on dowels, not only wooden elements are used, but also plastic ones. They have slightly different purposes:
- Wooden ones are needed for positioning and connecting furniture parts made of MDF, chipboard, plywood, and solid wood;
- Plastic ones mainly connect parts when installing prefabricated panel furniture.
Wooden
Plastic
There are also metal products. They have improved strength characteristics; they are also called dowels or dowels. But the most commonly used are wooden dowels measuring 30 by 8, that is, the length is 30 mm and the diameter is 8 mm. There is also a smaller diameter - 6 mm. You can purchase different types in construction stores or markets. If you wish, you can make dowels yourself.
There are different grooves on wooden dowels:
- Straight vertical;
- Helical – located at a slight angle to the vertical axis;
- Complex ones - there are transverse and longitudinal recesses - they also allow you to make the adhesive joint stronger;
- Horizontal – help to make the adhesive joint as strong as possible;
- Smooth - do not have corrugation.
Corrugation helps air pass during the installation of dowels, improving the adhesion of the glue with the “glue” method of connecting parts.
Vertical straight lines
Complex
Smooth