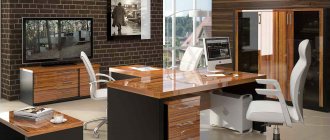
Furnishing a house or apartment, the correct placement of elements is a natural and non-alternative way to decorate the interior. A person himself cannot imagine his existence without these objects, be it a chair, table or bed. However, each thing has its own service life and eventually becomes faulty. For some, it’s easier to throw away an old chest of drawers or a sofa that has broken, lost its appearance, or gone out of fashion. Some believe that the best solution would be furniture restoration.
Lovers of antiquity resort to renovations; in their houses you can even find examples from the 16th-18th centuries. Restored elements are evidence of the owner's taste preferences. It is especially important to use old things in different styles; for these purposes, they specially give furniture an aged look or buy their favorite models at various sites.
Features of furniture restoration
Furniture is not purchased for one day or even for a year, and therefore they treat it very carefully. High-quality options are quite expensive, and few people can afford to frequently change tables, chairs, sofas, and beds. But even with the most careful handling of items, it will not be possible to avoid minor defects and sometimes serious damage. In such situations, things are restored, and most parts can be restored with your own hands at home.
Experts divide the process of returning various elements to their former beauty into two main types: partial and full. Any work begins with an assessment of the item and its visual inspection. When restoring, certain rules must be followed:
- When mold or rot is detected, it is necessary to assess the condition of the wood, whether it is possible to clean it and treat it with special compounds or whether it is completely rotten.
- As a result of temperature changes, high humidity, and human activity, cracks may appear on the surface. In this case, the damaged areas are either completely removed or processed and masked.
- After removing the varnish, it is recommended to disinfect the wood or other material to prevent the appearance of bugs and mold.
- If there are stains on the surface that cannot be removed using standard methods, then you will have to bleach the wood.
- Complete restoration will require certain skills and experience from a home craftsman. For example, when reupholstering chairs or sofas, replacing springs.
It is better to entrust work with antique models to professionals. In this case, it will be necessary not only to replace the upholstery and some parts, but also to maintain the unique style of the product.
How to update old furniture - painting furniture
Let's start with the most popular and easiest way to update old furniture. Here you will learn how to paint Soviet-era furniture.
Furniture should only be painted if it is made of cheap wood (pine, etc.). If your Soviet furniture is made, for example, of oak, then painting it is highly not recommended, since this will forever reduce its value.
Do-it-yourself restoration of Soviet furniture is usually done with oil paint. How to paint furniture correctly:
- Apply the paint with light movements in a thin layer along the wood grain.
- Let dry for about 12 hours.
- Clean the surface with sandpaper, wipe off dust and apply a second coat.
If you are restoring Soviet furniture from the 50s to 70s, which was made in a minimalist style, then black, as well as light pastel colors, are perfect for painting it. With this finish it will become an excellent accessory for a modern interior.
If you want to take a more creative approach to painting furniture, but you don’t know how to paint by hand, then use templates. They are sold in stores, they can also be printed from the Internet and cut out on thick paper. Before applying the design to the furniture, the stencil should be secured with adhesive tape.
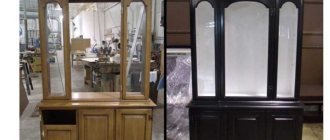
Painting furniture - before and after photos of old furniture:
Restoring a chest of drawers with your own hands:
Also read: Soviet furniture: history of development, styles and photos
How to update an old cabinet:
How to repurpose an old nightstand and chairs:
It has become very fashionable to paint furniture with thin lace. Simply attach the lace fabric to the surface of the Soviet furniture, then apply paint. The result is amazing!
The benefits of upgrading your furniture yourself
Most people who own old furniture do not want to get rid of good, durable products; they prefer to restore them, change the color, and fit them into the style of the existing interior. Some people want to add value to an item before selling it. Whatever the motives, to save money, both on repairs and on the purchase of new things, many prefer to do restoration work with their own hands. Such actions have a number of significant advantages, namely:
- Minor cosmetic repairs can be done using improvised means, using leftover wallpaper, textiles, leather, and other materials.
- After a high-quality update, the products will last for a long time and will not be inferior in appearance to new models.
- During the restoration process, owners can show their creativity and create an item that will complement any interior.
- With independent recovery, a person gains experience, masters interesting techniques and methods, and later will be able to use them and perform similar actions more efficiently.
Restoring an old cabinet
Once the bedside table has been reassembled and all its fastenings have been replaced or strengthened, you can start transforming its appearance. Restoring a bedside table with your own hands can be done in different ways. But if you are not going to use dark opaque paint for this, then it is wiser to first coat all surfaces with one layer of colorless acrylic varnish. This will prevent yellow spots from appearing.
Then you can paint your furniture, use the decoupage method, laminate and veneer its surfaces, or simply treat it with stain and varnish. In addition, if desired, these techniques can be combined and supplemented with others. For example, it is now fashionable to artificially age furniture using the craquelure technique. It all depends on your personal tastes and preferences.
Related article: Beautiful do-it-yourself dacha: decor ideas for the garden and house (48 photos)
Of course, painting furniture is the simplest and most affordable restoration option. It can be used by people who do not have drawing skills, and the use of stencils will help give your cabinet a unique and very original look. Ideas can be gleaned from fashion magazines, but floral and folklore motifs are especially relevant. A bedside table intended for a children's room can be decorated with funny animals, flowers or cartoon characters. You can even involve children in this work. Such furniture, improved with your own hands, will become much more valuable for kids.
Decorating a bedside table using painting
To make the cabinet look antique and worn, you should use acrylic paints along with liquid silver and silver leaf.
Before applying the paint, the bedside table is washed again, degreased with a weak soda solution (1 tablespoon per 2 liters of warm water) and dried thoroughly.
Then the primer is applied in 2 layers, allowing each of them to dry completely. The easiest way to prime the surface is with a small foam roller or sprayer. Next, the background paint is applied. It is best to use acrylic paints, as they dry very quickly and do not have an unpleasant odor. To apply an image to a varnished surface, use automotive spray paint.
First, paint the inside of the bedside table. Using a brush, apply paint to the corners and joints of the walls, and then paint the surfaces with a roller. This technique will help you avoid drips. The bedside table must be painted at least 2 times.
After the paint has dried, the outside of the bedside table is treated in a similar way. Then you can start painting. Now you can purchase ready-made stencils. They are sold in art supply stores. But you can create the pattern yourself. To do this, print out the design you like on a printer and copy it onto thick cardboard. The thicker your stencil, the longer it will last.
Then remove the places where the paint will be applied using a stationery knife or nail scissors. The stencil is applied or glued to the surface with masking tape and paint is applied with a sponge or roller. It is necessary to remove the cardboard before the coloring composition dries. But this should be done extremely carefully so as not to damage the drawing.
Related article: Modular sofa for a living room with a sleeper
In the same way, you can decorate the cabinet with relief patterns. In this case, decorative plaster is used instead of paint.
Small defects and partial restoration - ways to eliminate them
A simple, fragmented restoration, including fighting stains, replacing coatings, strengthening joints, can be handled by anyone, even without professional skills. The process consists of certain stages, some of which can be omitted, depending on the type of defect:
- Visual inspection – assessment of the condition of the damaged area, determination of the plan and scope of work.
- Disassembly – necessary for large items; it involves removing drawers, shelves, and handles.
- Cleaning – removing dust, wet cleaning, degreasing the surface.
- Minor repairs - refinishing, repairing cracks, chips, working with breakages.
- Decoration – gluing veneer, applying patterns, painting, painting.
Stains and dirt
Any stain spoils the appearance of furniture products. Under the influence of substances that have turned into pollution, the surface of a particular object deteriorates. Therefore, it is very important to clean things from plaque, stains, and blots in a timely manner. But even experienced housewives cannot boast of knowing how to deal with a dirty place. Let's consider the possible options:
For all surfaces:
- Cleaners. Before restoring an element, it is necessary to check the effect of the selected cleaner on the coating in an inconspicuous area. If a trace remains, you will have to choose another method.
- Table vinegar. Used to remove strong, long-standing stains.
- Sauerkraut brine. It has a similar effect to the previous substance.
Natural wood:
- Baby soap. The raw materials are crushed, diluted in heated water, and applied to the dirt using soft textiles.
- A mixture of lemon essential oil and water at the rate of a teaspoon per glass.
- Lemon juice. The squeezed fruit is mixed half and half with water. Used to remove stains.
- Ammonia and water at a ratio of 1:6. Used for most types of stains.
Polished furniture:
- Raw potatoes. Used to remove iodine drops from wooden surfaces, as well as fingerprints from lacquered furniture.
- Laundry soap. It will help restore the coating after streaks from spilled liquids.
- A mixture of table vinegar and olive oil.
- Vegetable oil. Used for difficult stains.
- Baby powder for grease removal.
- Wax dissolved in boiling beer.
It is prohibited to use acetone or alcohol to clean polished surfaces. Upon contact with these substances, the top layer may become pale and cloudy.
Cushioned furniture:
- Gasoline is used to remove grease stains.
- Methyl alcohol is used when necessary to remove traces of chewing gum.
- A solution of ammonia and acetic acid is applied to the dirt formed from vegetables and fruits.
- Laundry soap to remove coffee and chocolate stains.
- Table salt helps against red wine, ice against white wine.
- Saline solution for all types of contaminants.
Removing scratches
Scratches often appear on a smooth surface, which spoil the façade of the furniture set. Therefore they need to be eliminated. There are several ways to solve the problem. Let's look at the most common ones:
Special means:
- Pencil. Helps paint over damaged surfaces
- Hatch. It is poured into potholes and paints them over.
- Wax for wood. Divided into soft and hard. It is used for cosmetic purposes and for the restoration of chips.
- Stain. It will help remove any abrasions.
Traditional methods:
- Walnut kernel. When rubbed on the surface, the cracks are filled with grains of raw materials and become invisible.
- Mayonnaise. Used for natural wood. It is poured into the groove, after a few days the area is sanded.
- Flax oil. Mix with alcohol and apply to scratches.
- Tea leaves and iodine. Used only for painting and masking.
- A solution of table vinegar with vegetable oil.
- Mastic. A mixed solution of wax, turpentine and alcohol at a ratio of 4:3:1 is applied to the damaged area.
Chipped wood surface
Getting rid of a chip is a more difficult task than eliminating a regular scratch; there are fewer materials to solve this problem. But anyone can cope with it at home. The work can be done using the following materials:
- Visual camouflage. Stopgap measure. In the absence of funds to purchase the necessary coatings, the damage is simply painted over using improvised means, for example, iodine or tea leaves.
- Decorative corners, protective profile, corners. In some cases, you can simply close the defective area using special elements, which are often sold in specialized stores.
- Putty for furniture. Not suitable for frequently used items, be it a table top or a pull-out element, except for expensive polyester options.
- Hard furniture wax. The substance melted with a soldering iron or lighter is applied to the damaged area in excess. Afterwards the surface is leveled, sanded and varnished.
- Furniture edge. There are many types from paper to plastic. It allows you to replace the old coating without traces of repair.
Damage to paintwork
It is quite difficult to eliminate defects in paintwork at home. First you need to determine the type of varnish with which the product is coated. To identify this, you should do the following:
- Apply a drop of 10% alkaline solution to an inconspicuous area. If after a few minutes the substance dissolves, then an alcohol-based varnish is applied to the surface.
- To determine nitro varnish, acetone is used.
- If the top layer does not dissolve under the action of a solvent, then the product is coated with a polyester, alkyd substance.
After determining the type of coating used, a substance corresponding in composition and color is purchased. Areas that do not require restoration work are covered with paper or Vaseline. Old material is removed using solvent or sandpaper. Then new raw materials are applied in several layers.
Veneering/veneering
By covering the surface of a product with veneer, you can significantly transform old furniture and give it the appearance of expensive wood. A large selection of colors and natural patterns will allow you to turn a tattered item into an integral part of the interior, matching any style. There are several veneering methods:
- Hot. The veneer is glued to the object using an adhesive solution.
- Cold. The material is pressed onto the base using special equipment.
- Membrane. An industrial method for vacuum bonding materials with complex surfaces.
At home, only the first option is used. The process looks like this:
- Preparing the base. Includes removing fittings, removing the old layer of cladding, eliminating possible defects, leveling the surface with putty to a perfectly smooth state, and sanding with sandpaper.
- Veneer preparation. The roll is unwound, the material is moistened with a damp sponge, covered with cloth or wrapping paper, and laid between two flat sheets of plywood or fiberboard boards. Once dry it becomes straight.
- Veneering. On the one hand, a thin layer of glue is applied to the object and the veneer; usually the manufacturer indicates the required brand, but PVA-based glue is suitable. After the first layer has dried, apply the second. The sheet is applied to the product using an iron heated to 50 °C and smoothed through the paper. Then it is leveled with a wooden block. Each subsequent part is overlapped by 3-4 cm.
Decoupage
A very simple and interesting method of restoring furniture, which even children will be interested in doing. Drawings and ornaments cut out of fabric and paper are pasted onto the products and covered with varnish. There are several types of decoupage:
- Standard. Pictures are glued to the front side of the item and varnished.
- Reverse. Suitable only for glass surfaces, for example, a coffee table. The image is pasted under the glass.
- Volumetric. Individual elements are highlighted in the overall picture. To do this, some identical fragments are glued in several layers.
- Artistic. A single image is created on the entire plane, simulating a real painting. At the same time, no boundaries are visible between the background of the object and the picture.
- Decopatch. Using paper and napkins, torn into pieces, the entire front side of the product is filled.
Craquelure
Many people use the crackle technique to restore furniture. After the paint dries, it cracks, giving the furniture an antique effect. To get cracks, special varnishes are used, which are divided by type of composition: one-step and two-step. This division is conditional; for each subtype the number of stages is greater.
- Single-phase craquelure. The coating has the appearance of cracked paint, with the base layer or wood visible underneath the cracks. The effect is achieved due to the different drying speeds of the first and second layers. However, a base paint is not always used; sometimes only a paint coating is sufficient. Craquelure varnish is applied to the surface and not completely dried for half an hour. Afterwards the finishing layer of acrylic paint is applied using a brush or roller. The size of the cracks will depend on the thickness of the composition.
- Two-phase. It is not the paint that is cracking here, but the varnish applied over the finished image. This technique gives the maximum resemblance to antiquity. It consists of the following: the first base layer of varnish is applied to the prepared base, which is dried until “tack-free”. Then everything is covered with a second layer, after it dries, the cracks are rubbed with powder and pigments. The workpiece is washed under running water and completely dried. At the final stage it is covered with a layer of varnish.
Furniture patina
Plaque on a wooden base indicates its damage by microorganisms, but on oak surfaces it is a sign of antiquity. It is very difficult to obtain patina naturally, so modern ideas are used - the artificial patina method. The construction market offers several types of compositions: thick paste, liquid, beveled varnish. Regardless of the substance used, the technology is almost the same, it is as follows:
- Preparing the base. It is rubbed with a metal brush and degreased.
- Padding. After drying, it is rubbed with sandpaper.
- Varnishing. The composition must dry completely.
- Application of a patating composition. Do not dry until completely dry; excess is removed with a sponge.
- The product is covered with a second layer of patina and left to dry.
- To fix the result, a transparent varnish is used.
Varnishing and polishing
Varnishing is a fairly popular type of cladding for furniture. Transparent coatings protect the surface of the product from moisture and dirt, giving it shine and contrast. For these purposes, oil, alcohol, and nitro varnishes are used. A new finish may be needed if scratches appear or the coating loses its original appearance. To do this, the old layer is completely removed, the base is sanded, primed, and varnish is applied.
The final stage of work will be finishing with polishing paste. For repainting, you can use furniture paint, but many people prefer automotive paint. The work consists of rubbing a special composition using felt over a varnished surface. To speed up the process, you can use a grinder. After these steps, the furniture has a mirrored, shiny finish.
Inlay
One of the oldest techniques for decorating furniture, known since Ancient Egypt. The application of a shaped image by wood on wood is called intarsia. It is quite difficult to make this type of mosaic at home. The wooden plates that make up the overall picture are tightly fitted to each other and glued together. The front side is smoothed, varnished, and polished.
Due to the fact that inlay is a free technique, block mosaic can be diluted with glass, stone, and plastic elements. The work uses complex parts that crash into each other. The texture of individual components may vary. The surface is painted in different colors using stains, varnishes, and dyes.
Glamorous option
A glamorous bedside table in a delicate shade is suitable for a girl’s bedroom. To make such furniture you need to take:
- Glaze with glitter or light satin paint in a soft blue color.
- To decorate the door leaf, you need to take straws or light fabric in a small floral pattern. Tapestry, velvet, and brocade are perfect for this.
- Elegant metal door handle.
- For the outer part of the bedside table, you need to take 3 special elements that will play the role of a parapet.
For the cabinet you can use a variety of design elements:
- Instead of blue, it is good to use a pale pink or lilac version, but a rich burgundy or fuchsia shade also looks great. It all depends on the overall interior and its color scheme;
- To decorate the door, it is allowed to use gold or silver paint, but in this case, a subtle contrasting pattern must be applied to its background. This is done using a stencil;
- For the top, which can be used as a tray, frosted glass with a pattern works well.
Complete restoration
You can give new life to various pieces of furniture with complete restoration. It’s difficult to part with your favorite things, so a complete remodel will be a relevant solution when creating a new interior. They will please the eye for a long time, preserve traditions and history, if you follow the restoration steps outlined in the master class step by step. You should approach the choice of materials for work responsibly, prepare the surfaces well, and think about the style in advance.
Required materials and tools
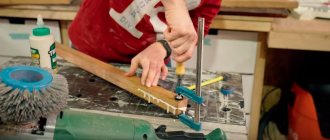
To carry out high-quality restoration of a bedside table, chair, table, you must have certain skills and knowledge. It is necessary to learn how to work with wood, fabrics, metal, and how to properly use auxiliary equipment, for example, a glass cutter, a hacksaw. You will need to stock up on the following tools:
- Chisels (from 4 to 40 mm);
- Set of clamps;
- Plane;
- Drill, drill bits;
- Sander;
- Various screwdrivers;
- Hacksaw for metal;
- Jigsaw;
- Furniture stapler;
- Materials for cleaning (sandpaper, piece of leather, felt).
If you do not have specific skills in working with materials for restoration, it is better to start training with simple and inexpensive pieces of furniture. The damaged surface of expensive structures will be very difficult to restore.
Disassembling furniture and removing fittings
When repairing surfaces, old furniture should only be disassembled as a last resort. One of the options for the need for disassembly is damage to the internal parts by fungus or rodents. Separation begins with the least fixed parts, which are easily removed and unscrewed. These can be metal plates, locks, doors, legs, shelves and other sliding parts.
The upholstery and soft parts are removed if the tenon joints have become loose. The upholstery of an antique sofa or chair can be quite valuable, especially if original fastenings are used. Its dismantling should be carried out with extreme caution. Complex, large-sized connections are disassembled on the floor, medium and small ones on a workbench, placing fabric or foam rubber under them. Before applying force to separate the elements, you must make sure that there are no fastening parts. Nails and screws are removed with special tools; glue can be removed by applying a little alcohol to the joint.
Removing paintwork
At home, you can rid restored furniture of old varnish using special means. Solutions with high penetrating power and a metal spatula will help you quickly clean a surface of any shape. Please note that furniture can be treated with different types of varnish; to remove it safely, you will need to select a suitable solvent.
A thick layer of cracked varnish is removed by sanding. You can use simple sandpaper or a special tool. The paintwork will quickly come off under the influence of hot air from a hair dryer.
Elimination of external damage
Quite often, furniture requires repair due to defects in the front surfaces. The cause of external defects may be careless handling during operation, transportation, improper use, natural wear and tear, etc. To eliminate various types of damage, solutions suitable for a particular case are used:
- Dents without damaging the wood. On the surface, the indentations are made with force with a chisel or knife several times along the fibers. After cleaning, cover the dent with a damp cloth and dry it with an iron.
- Gouges with destruction of wood. The defective area of the cabinet is cleared with a chisel and covered with a pre-prepared patch made of solid plywood. For bonding, you can use resin glue and urea resins. After 2-3 hours, the repaired area can be prepared for the finishing coat.
- Elimination of peeling of plywood from the base. Repair is very difficult, especially if the veneer is made with urea resins. You will need to trim the planed part and clean off the old adhesive solution, then add resin and hardener. When using bone or flesh glue, pressing and heating with a power tool will be sufficient.
- Sealing through cracks in wood. Degrease the contaminated surface of the crack and inject a 10% solution of oxalic acid. After 30 minutes, pour the resin and tighten it with a clamp.
- Elimination of small holes, roughness, scratches. Adhesive putty is more often used. Before application, clean the area with the defect, then leave for 30 minutes and grind;
- Repair of surfaces affected by pests. To eliminate such defects, sodium fluoride is used. The solution is injected into the affected areas and wiped the surface. After exposure, the affected areas are sealed with paraffin.
Preparing for the final coating
Applying the topcoat is not a difficult job at all, but it must take place in several stages, starting with preparing the surfaces. If the work will take place at home, the room should be prepared for such a procedure. There should be no debris or dust, since during coating small particles can settle on the varnished surface and ruin the appearance of the product.
Once the room is prepared, you can move on to the wood itself. All walls of the parts should be sanded well. You can remove the resulting dust with a rag or vacuum cleaner. For better adhesion of the varnish, use a primer.
Applying the finishing coat
There are many types of paints and varnishes. They differ in composition and drying time. Any tool can be used for application. Depending on the type of material and its properties, choose one of the following tools:
- Brush. Used when working with oil compositions. The layer should be as thin as possible, so the brush must be squeezed out periodically. To prevent air bubbles from appearing, polishing should be done smoothly.
- Tampon. Suitable for alcohol-containing varnishes. The material is applied with quick movements along the fibers. It is necessary to ensure that the edges of the strokes do not overlap each other, otherwise the color will be uneven.
- Spray gun. Suitable for any composition. Allows you to efficiently process surfaces of any shape with minimal time. The device should be kept at the same distance from the wood and move at the same speed.
Installation of accessories and product assembly
After restoration of the elements and technical endurance, assembly begins. At the initial stage, preliminary installation is carried out. Check the density of the tenon joints, prepare wooden spacers, clamps, and clamping belts.
Final assembly is carried out by gluing all structural elements with wood mixture. Hot glue is applied with a brush, the wood is joined and tightened. Excess glue must protrude from the joints. The furniture is left under pressure for 12 hours, then another day. Only now can you start applying decor, installing fittings, and hanging doors.
Fittings responsible for the ease of use of furniture and functionality are installed last. If the old holes are loose, you need to update them, seal them and drill new ones.
Preparing furniture for restoration work
It is necessary to conduct a thorough inspection of the bedside table before proceeding with repairs and restoration of its appearance. Remember that only high-quality furniture made from solid wood can be restored. But if the wood is hopelessly dry and covered with cracks, then it would be wiser to send the bedside table to a landfill.
However, some furniture parts can be replaced. For example, remove the door and put drawers instead of shelves. The result depends entirely on your skills and imagination.
First, the furniture must be completely disassembled and cleaned of any remaining decorative coating. To do this you will need the following tools:
- a set of screwdrivers (both Phillips and flat blade);
- spanners;
- carpenter's knife;
- flat metal spatula;
- hammer.
For a children's room, when restoring a bedside table, you can use bright colors, drawings with animals, birds or the child's favorite characters.
If you do not trust modern means, you can use the old recipe. For it, take 4 parts of natural beeswax, melt it over low heat and add 3 parts of turpentine. The resulting mastic is thoroughly stirred and, without waiting for it to cool, rubbed into the furniture. But it is worth remembering that such a product has a strong and very pungent odor. Therefore, it is not recommended to cook it in the kitchen.
Small scratches can be removed with iodine. In addition, you can now find a special marker in stores that visually smoothes out minor defects. But this method is only suitable for restoring furniture made of dark wood.
All chips and gouges must be carefully filled with a compound intended for working with wood. Now you can buy putty in different colors. If you plan to cover the bedside table with dark opaque paint or veneer, then you can use an ordinary white product. Otherwise, it is better to choose a putty that matches the surface of the cabinet.
The composition can be tinted yourself if you add a few drops of water-based paint. After the putty has completely dried, the surface is once again treated with fine-grained sandpaper.
Secrets of eliminating minor flaws
When restoring a cabinet, you can combine several techniques, for example, craquelure and decoupage.
If the veneer on the surface of the cabinet is still suitable for use and is swollen only in one place, this defect can be eliminated without changing the entire decorative coating. Puncture the bubble and inject wood glue underneath it. A medical syringe with a fairly thick needle is suitable for this. Then iron the surface through a sheet of paper folded several times. Without allowing the bedside table to cool, place a weight on the damaged area and leave it for about a day. But this restoration method is not suitable for varnished furniture. Under the influence of temperature it can swell, and under pressure it can crack.
But if a whitish stain appears on your bedside table, for example, from a hot cup, it can be removed using car polish. Take a little mastic onto a soft rag and rub it into the stain with light circular movements. The abrasive substances included in such products remove a thin layer of deteriorated varnish. And fatty waxes will polish the surface. You just need to act extremely carefully so as not to cause even more damage to the furniture.
Old wooden drawer guides can be lubricated with paraffin, wax or ordinary soap. This method will make it easier for them to move in the grooves.
Features of restoration with replacement of elements
It is advisable to restore only high-quality wooden furniture. In some cases, surface repairs are not enough; one or more structural elements must be completely replaced. This could be the leg of a chair, chest of drawers, a damaged kitchen door, or a crumbling drawer. If the part is intact and has at least part of the fastening, it can be extended and glued with epoxy glue.
When the furniture cannot be saved by gluing, you will have to make a new, identical part of the structure. More often, armchairs, chairs, tables, bookcases, and cabinets need complete replacement of parts. It is necessary to select wood of identical structure and make new fasteners yourself.
DIY decoupage of Soviet furniture
Mastering the decoupage technique will help you turn old Soviet furniture into a real designer masterpiece. Decoupage of old furniture is performed using the following tools:
- Fine-grit sandpaper;
- Alcohol;
- Primer;
- Brush and glue for decoupage;
- Roller or sponge;
- Material for decoupage - newspaper clippings, old postcards, letters, drawings, book pages, etc.
The Internet will help you find inspiring ideas and materials for decoupage. For example, we especially like these 2 examples of how to update an old chest of drawers using decoupage:
Have you chosen the right pictures? Next, you can start updating Soviet furniture with your own hands using decoupage. This process consists of the following steps:
- Surface preparation with sandpaper;
- Cleaning with a cloth soaked in alcohol;
- After the surface has dried, apply a primer (3-4 layers);
- If materials for decoupage will be used only in places, then the furniture must first be painted to create a background;
- If the furniture will be completely covered (for example, with newspapers), then you can immediately begin applying glue after the primer has dried;
- Thin paper can be immediately applied to the glue, while thicker paper should first be thinned with sandpaper and soaked in water;
- The wet paper is blotted with a towel on both sides and applied to the glue;
- After gluing all the materials, you should walk over the surface with a roller or sponge to remove any remaining glue;
- The last stage is applying varnish to the dry surface.
Original furniture in Provence or vintage styles is ready!
Photos of old furniture before and after decoupage:
How to update an old wall
Those who are interested in remodeling furniture with their own hands - here are ideas on how to update an old Soviet wall with decoupage and new paint:
Nuances of restoration of upholstered furniture
Most often, repairs involve replacing the upholstery. You can choose identical material or replace it with any other, for example, natural or artificial leather. They remove the old covering, check the condition of the padding material, cut out the new covering and install it in place.
Most models of sofas and armchairs have sliding mechanisms. Their breakdown sometimes requires complete disassembly of upholstered furniture for appropriate repairs. Repair of bars and reinforcement may also be required. If frame repairs are necessary, the entire structure must also be disconnected.
Remaking old furniture through varnishing
If Soviet furniture is made of valuable wood, then, as we said above, it is better to cover it with a fresh layer of varnish than to paint it over. How to update old furniture through varnishing?
Firstly, when remaking or restoring Soviet furniture with your own hands, it is best to use oil varnishes. They are suitable for all types of wood and form very durable, shiny and moisture-resistant coatings. The only negative is the long drying period (up to 12 hours). For comparison: shellac varnish dries in 1-2 hours, and nitro varnishes dry in 30-40 minutes.
General rules for remaking old furniture:
- The varnish can be applied with a brush or a piece of thick, lint-free cloth folded 2-3 times;
- The varnish is applied in 3-5 layers, and after applying each new layer, the drying time should be increased;
- Excess varnish should be squeezed out on the edges of the jar, and the brush can sometimes be washed in an alcohol solution.
Remaking Soviet furniture with your own hands in the photo:
How to update old furniture with craquelure varnish
We also want to give you an example of a special varnishing method, which is performed using a special varnish - craquelure.
Today, for remodeling old furniture, there are many varieties of craquelure varnish: with a patina effect, gilding, etc. The most common one is applied in a thick layer over the base layer of paint, after which it is coated with a different color to highlight cracks. Also, craquelure varnish can consist of two components: the first is applied to age the surface being treated, the second is applied to create decorative cracks.
Restoring Soviet furniture using craquelure is perfect for lovers of antiquity and country style. As, indeed, our next method is decoupage.
Tips for caring for furniture
You can delay the need for restoration as much as possible if you properly and promptly care for your furniture. Structures made of various materials require certain care:
- Cushioned furniture. Objects covered with fabric are cleaned using a vacuum cleaner, steam cleaner, and special chemicals. Leather upholstery is wiped with a damp cloth, then treated with water-repellent impregnations;
- Wooden. You can only wipe off dust with a dry cloth. You can restore shine with lemon oil. Small scratches are rubbed with colored wax chalk or a special pencil;
- Polished. Requires especially careful care, wiping with a felt cloth and applying polish. You can replace the product with simple burdock oil;
- Cabinet made of MDF, chipboard. The wood is protected by a decorative waterproof layer, so the furniture tolerates contact with moisture and cleaning agents well. Do not use powders or brushes to clean glossy surfaces or iron fittings.
Japanese style nightstand
Oriental-style decor is popular today; you can turn an ordinary old nightstand into an elegant table with a drawer underneath; it will decorate any bedroom. To make such a piece of furniture, you need to prepare the following materials:
- Dark stain, suitable cherry color, reddish, burgundy shade. Red stain will also look good, but the color must be deep.
- A piece of rice paper with a pattern for door decoration. The background should be light, and the drawing should be dark and stylized. Hieroglyphs, images of bamboo, birds, and fish are excellent.
- For the upper part, which will serve as a table, you need to take a piece of bamboo fabric of a light shade.
- Glue for canvas and decorative handles.
To decorate in Japanese style, you can use various options:
Using a stencil, you can decorate the door leaf with bright motifs in oriental style.
- You can apply a design to the door leaf yourself using a stencil. Bright colored motifs in oriental style are perfect. If you don’t have rice paper, you can also use a piece of natural silk or brocade. The fabric is attached to the surface using a conventional stapler. This option can be selected in accordance with the rest of the bedroom upholstery to make the interior harmonious and stylish. An example is shown in Figure 1.
- Small hidden lamps are often used for such a bedside table; they are made of LEDs. From an old and time-worn cabinet you can get a modern, stylish piece of furniture that can also be used as a lighting element.
Dresser update
The old chest of drawers had stood for who knows how many years in the attic, but it was very strong and reliable, it had not dried out one bit, only the polish was cracked. It is much stronger than modern products. This is a feature that is inherent in old, Soviet-era furniture. It's not very detailed (to put it mildly), but after standing in poor conditions for several decades, it remains strong. Remaking a chest of drawers is more complex: two techniques were used: painting, and then decorating using polyurethane moldings and wallpaper.
This is what it was in the beginning: an old thing that had been collecting dust in the attic for a long time
Step 1. Remove the fittings and remove the old coating. In some places the polishing was scraped off, in others it was sanded with sandpaper. The chips were covered with wood putty and waited until it dried. At the final stage, everything was cleaned with fine-grain sandpaper. At the same time, the chest of drawers became the same as in the photo below.
This is after it was puttied and leveled with sandpaper
Step 2 . Installation of polyurethane moldings. When choosing moldings, make sure that they are not bulky: too thick ones will look very rough on a small chest of drawers. They should be no wider than 5 cm and as narrow as possible when looking at them in profile.
The purchased polyurethane moldings were carefully cut, the corners were filed at 45°. (Read here how to properly file the corners of moldings). The pattern match must be perfect. We glue them on PVA. For reliability, you can additionally secure it with screws with wide heads. A small recess is made under them, after the self-tapping screw is screwed in, the hole is covered with putty. Try to ensure that the putty immediately lays down perfectly (you can correct it with a wet finger), since it is problematic to clean off dried putty.
Moldings are glued and mounted on self-tapping screws
Step 3. Everything is treated with a primer. You can use PVA glue diluted with water in a ratio of 1:2. After the primer dries, paint (two layers). For this case, water-based acrylic paint was chosen. The color is coffee with milk, although it looks completely different in the photo. Color rendering is inaccurate.
This is after the second application of paint. Cute
Step 4. For decoration, wallpaper was selected whose coating was made using the silk-screen printing technique. Pieces are cut to the size of the inside of the frames from the moldings and glued to PVA. After the glue has dried, the entire chest of drawers is coated twice with water-based varnish.
This is the decor for the chest of drawers
Step 5. And the last to be installed are new legs (furniture wheels) and handles.
We install the handles and legs)) The updated chest of drawers is completely different from the one you saw in the first photo.
As you can see, there are no difficult jobs. Everything is really elementary. But all processes require accuracy - the appearance depends on it. You can also update an old wardrobe in the same way. Get a set for the room. Stylish and original.
When updating furniture, the worst thing is if the surface is varnished. The varnish takes a long time and is difficult to remove. If the surface is smooth and the polishing is not damaged, you can apply primer for complex surfaces and paint after drying. This greatly speeds up the process of painting lacquered furniture.
If you have children and a summer house or yard, you may be interested in reading how to make a playground with lots of photos. You can read about making a sandbox here.
How to update furniture with your own hands: changing the design
Soviet-era furniture - walls, cabinets, chests of drawers - is not beautiful, but reliable and strong. Well, I just can’t bring myself to take it to the landfill. And rightly so. It is very easy to update it, giving it a completely new sound and modern look. Remaking cabinet-type furniture may not be very difficult: there are materials that can significantly change the appearance with little effort. The easiest way is to change the color and accessories. Everything is clear with the fittings - choose what suits your style best, and the color can be changed in two ways - paint and glue film (or wallpaper).
Remaking an old wall: changing the design
Covering old furniture with self-adhesive film is the easiest option for changing the decor. Today, film is available both plain and colored, in different colors, textures and shades. There is no point in gluing a film with a wood pattern; otherwise, it is in trend today. But plain or patterned ones are what can turn an old wall into new furniture. The steps are simple, but the work requires accuracy. But the result is excellent. See two photos. The first one shows an old Soviet chipboard wall before renovation, the second one shows it after.
Updating an old furniture wall - before and after
Now about how it was updated. Compacted furniture self-adhesive film was used, cream color, matte surface. The open part of the old wall was closed with glass doors; a translucent matte film was used for the glass. The edging is furniture layout (also self-adhesive) chrome color. The order of work is as follows:
- Everything that can be removed, you remove and disassemble. Remove old fittings.
- Surfaces must be clean and free of grease. This is easier to achieve with a soft cloth soaked in dishwashing detergent. Then everything is washed off with warm water and a small amount of vinegar. Wipe with a dry cloth.
- Cut out the details. It is better to cut the film 8-10 mm larger. The remains are then cut off with a paper knife.
- Spray the part to be glued with water from a spray bottle. On a wet surface, the film can be moved if something goes wrong. You can even peel it off without damaging it.
- After removing the protective layer from the film, carefully lay it out. Having leveled it, begin to smooth it with a soft cloth from the middle to the edges. Try not to have any bubbles. To do this, you need to move gradually, without jumping from place to place.
- If there is still a bubble, you can pierce it with a thin needle approximately in the middle. Then expel air from the edges of the bubble to the hole and rub the puncture site.
- Having glued the film, take a clean thin cotton cloth, spread it on top and iron it with a warm iron (medium heat).
- We glue the trim and install new handles.
Table makeover
Using the same technology, a banal coffee table can be turned into a modern piece of furniture. In this case, it was covered with wrapping paper. It is dense, adheres well and does not become limp when applying varnish.
Before starting work on decorating the tabletop, the legs of the old table and the edges of the tabletop were painted in a light color: this way it fits better with the new design style. Then the process of its transformation began.
When pasting, the panel is cut out significantly larger than the dimensions of the tabletop. It's necessary. The paper is glued to PVA and rolled with a roller so that there are no lumps or blisters. The surface must be absolutely smooth.
The paper is glued gradually, roll it with a roller so that there are no bubbles
After gluing, take sandpaper with fine grain (it is more convenient to work if it is attached to a block). By running it along the edge, they bend and at the same time separate the excess paper.
How to make a beautiful edge
Even cutting with a guillotine will not give you a fairly even edge. And with this method, it turns out professionally designed. There is no smell of amateur activity.
This is what the edge looks like when all the excess has been removed
After the glue has dried, the surface is coated twice with a thin layer of varnish. It should be applied with a soft brush in a small amount. Layers are applied in different directions: first along the long side, then across.