After renovation work, finishing materials often remain that are a pity to throw away. For example, wallpaper that is sold in large rolls and always remains. How to use them? You can paste them over cabinets, bedside tables, doors, and other furniture.
With this simple action you will immediately kill two birds with one stone, use the remains of the finishing material and decorate old, battered furniture. To carry out such work you do not need any special skills, and we will now tell you how to do this.
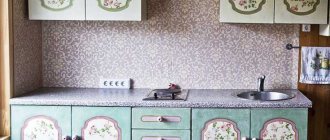
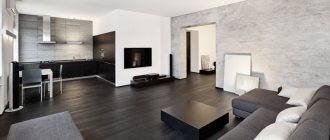
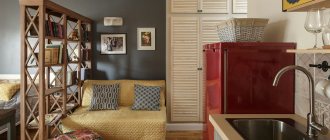
A bright accent in a calm kitchen
Wallpaper
You've probably heard more than once that various interior items are decorated with wallpaper. How many master classes have you seen on TV from designers of all stripes, because each of them considers it their duty to give a second life to some household item.
This is most often done with high-quality vinyl or non-woven wallpaper, since it is extremely difficult to work with paper options, and you have to work hard to get at least a satisfactory result.
Therefore, if you still have wallpaper, before you get involved in pasting surrounding objects, make sure of the quality of the finishing material.
Our choice of color and texture is also limited, since we work with residual material, but if you want to buy a new roll for these purposes, then proceed from the general design of the room and your taste guidelines.
Decorating kitchen furniture with wallpaper
It is quite acceptable to cover the furniture in the room with canvases with the same pattern as on the walls. Such an interior will look quite harmonious and holistic. If you need to use a different type of wallpaper, then do not forget about the overall design concept of the room.
The use of simple design solutions will create a more harmonious interior. For example, if the room is decorated in light colors, then it is best to use dark or bright options for covering the cabinets. If the walls in the room are covered with wallpaper with ornaments, then in order to avoid overloading the interior, the furniture is covered with plain canvases. The interior decoration of the cabinet, made to match the walls of the room, will look very cool.
A good option for decorating cabinets is imitation of other finishing materials, wood, brick, leather, stone. Such vinyl wallpapers are often used to decorate various rooms and they naturally remain. In addition, such canvases have significant relief and a repeating pattern, which will help hide defects on the surface of the furniture.
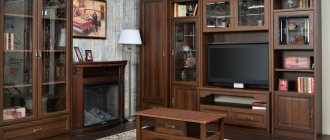
Classic wardrobe decoration
In construction stores you can find special photo wallpapers designed for covering doors and cabinets. Usually these are paper versions that depict non-trivial scenes, less often a banal imitation of a wooden covering.
In fact, the easiest way to cover a wood-effect cabinet is with self-adhesive film, which comes in just these colors. German and Dutch film is more expensive and of better quality, Chinese film is cheaper, but the edges of this film often come off due to the poor quality of the adhesive composition.
Note that self-adhesive wallpaper can be plain or stained glass, if this option suits you, use it.
If you are going to wallpaper a kitchen cabinet or a nightstand in the hallway, it is advisable that the wallpaper be moisture-resistant for wet cleaning. You need to think about this in advance. Self-adhesive film has moisture-resistant qualities, like most vinyl wallpaper, but paper is weak.
Use of green and white colors that fit into the interior
If you only have paper scraps, in principle you can use them, but after pasting you will need to apply a layer of varnish to them, which will add gloss and protect the canvas from moisture.
How to Update Kitchen Cabinets
The kitchen has a different microclimate from the rooms. Steam and moisture often occur here, furniture is exposed to aggressive temperatures and greasy fumes. Kitchen furniture, in such conditions, quickly loses its originality and requires washing or restoration.
You can update kitchen cabinets by painting, self-adhesive film or rattan fabric. The paint should be moisture-resistant acrylic or alkyd enamel, oil paint. These compounds have good coverage and give a glossy shine.
Before work, the doors are removed from their hinges; in the case of a compartment, they are dismantled, cleaned, and degreased. The primer is applied with a roller.
Start painting from the edge and back of the doors. You will need to create two layers. The first with a brush, the second with a paint pad or roller. If the color saturation does not satisfy you, paint a third time.
Painting always starts from the ends
In this way you can paint not only kitchen cabinets, but also room furniture (bedside tables, chests of drawers, wardrobes).
When painting in several layers, the coating must dry, see the instructions on the can. For an updated cabinet, new fittings, moldings, and rails are purchased.
Plain surface and pattern on the door - excellent design
Possible problems when using self-adhesive film
Small errors during the work process can be easily corrected using available means:
- We pierce the air bubbles on the surface of the film with a thin needle or cut it with a stationery knife. Rub with a soft cloth or plastic spatula.
- We fill the dents that appear with PVA glue using a syringe. Level it with a soft roller.
- In the rounded places and on the folds we make small cuts with a knife and paste in the desired direction.
- Use a hair dryer at maximum power to easily bend the film at the corners and stick it firmly along the edges.
Do not be afraid! Glue with confidence! Everything can be corrected. Covering a cabinet with self-adhesive film is much easier than tinting a car window.
Subscribe to our Social networks
Which style will highlight
Furniture decorated in this way is suitable for a limited number of styles. Because after this treatment it will have an aged appearance. Decoupage is also often used with various techniques that give the product an antique look. Thus, deliberately aged and shabby creations will take on Provence, vintage, retro, art deco.
Original decoupage cabinet in Provence style
Provence loves antiques, natural shades, various pieces of furniture and kitchen utensils. The latter can be decorated using the proposed technique. It is better to choose rustic motifs as a design: flowers, cockerels, chickens, images of the sun and herbs.
Types of technology
Decoupage is multifaceted. There are a number of methods that can be used to achieve original results on furniture. Each option allows you to get your own style and effect. Types of decoupage:
- classic, in which the entire surface or a separate part of the furniture is covered with wallpaper and varnished on top;
- reverse, used for clear glass. Cabinets, tables or other furniture elements may have glass areas. In this case, the wallpaper is treated with glue from the front side. After which the sheet is glued to the glass from the inside;
- volumetric, in which relief decor is made. An excellent option for the Baroque style;
- artistic decoupage is special because it is part of the composition. The canvases are glued to a surface that has been previously painted or decorated;
- Decopatch involves processing furniture using scraps and colored paper.
You can use a specific decoration option or combine all types to create an original and beautiful room design.
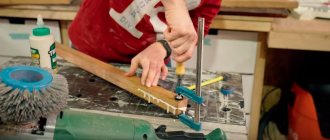
We produce pasting
Collecting the necessary materials
Before you start work, you need to take care of the tools and material. Here's what we'll need:
- sandpaper (sandpaper), an appropriate attachment for a drill or grinder, to prepare the surface for pasting;
- in some cases a hair dryer, but not necessarily;
- measuring instruments - ruler, tape measure, corner;
- tools for markings and markings - pencil, pen, marker;
- cutting tool - knife, scissors;
- primer and wood putty for preparatory work;
- tools for applying compounds - roller, brush, spatula;
- rags for smoothing and removing glue;
- PVA glue.
Using a grinder to sand surfaces
As you can see, the list is quite impressive. If you don't have some materials, buy them. By the way, if the fittings of your furniture are worn out, then you can change them too. For example, a handle, a new handle for a cabinet will not cost much, but will add color to your newly made wallpapered furniture.
Preparatory work
Before wallpapering furniture, you need to take care of the surface on which you will apply the material. We need to make it suitable for such work, so we will perform the following manipulations:
Typical domestic kitchen cabinet after decoration
- To make it easier to work with a cabinet or bedside table, you need to disassemble it and remove all the fittings from it.
- The next step is to sand the decorative surface and remove the entire layer of varnish from it. This can be done using sandpaper, which is very labor-intensive; it will be easier to put the appropriate attachment on a drill, grinder or screwdriver and go over the varnish.
You can also remove the varnish using a hair dryer. To do this, the surface is heated and the applied composition is scraped off with a spatula. But even in this case, you can’t do without sanding.
- If your furniture is made of solid wood and has not been treated with anything, then it is recommended to go over it with sandpaper to create some roughness.
- In the next step, we remove all dust from the skin using a damp cloth. Give the furniture some time to dry.
- After examining the dried surface for defects, we decide whether it needs to be puttied. If the cracks and grooves are not so large, and the wallpaper for pasting is embossed, you don’t have to do this. If the defects are deep, you will have to level the surface with putty, maybe even in several layers.
- As you probably already guessed, after the putty has dried, the putty areas must be treated and leveled with the general surface. This is also done with sandpaper.
- Now the surface of the cabinet is almost ready, all that remains is to prime it for better adhesion to the wallpaper.
Carrying out the preparatory work will ensure 80% of success, even if you cannot hang the wallpaper beautifully the first time, you will already have a basis for further experiments.
Pasting
Pasting furniture also takes place in several stages:
Furniture wallpapering work
- First of all, it’s worth making blanks from leftover wallpaper. To do this, the item is carefully measured and the dimensions are transferred to the wallpaper. Some patterns are cut out in accordance with the size of the closet or bedside table.
- Next, the prepared surfaces are coated with glue. You can use wallpaper glue, but it is better to use construction PVA, it will glue the materials together better. You need to carefully apply the cut pieces to the surface of the cabinet, trying to immediately level the canvas. This is not so difficult to do, since the patterns are small in size.
- It is recommended to stock up on a large number of dry rags or rags to smooth the sheets and remove any remaining glue from them. A special pressure roller will help to press the pieces more tightly.
- After wallpapering a cabinet or other furniture, you need to give the glue some time to dry, and only then screw on the fittings. Usually a few hours are enough, but in the case of large items, it may take a day.
As with standard wallpapering, try not to create drafts in the room; there is some chance that the sheets will not stick well.
Expression of imagination in the kitchen interior
Actually, this is the whole technology of decorating pieces of furniture with wallpaper. Definitely, after these manipulations, your cabinet will look better, certainly more interesting than if you painted it.
You can glue the cabinets yourself, as you can see, there is nothing complicated here, you just need to put in a little effort, patience and accuracy. In addition, restoring such items with your own hands will give you confidence in your own abilities and confirm your design abilities. Try it, maybe the world doesn’t yet know the name of the new, successful designer.
Interior decor in drawers and behind doors
There is another technique for decorating furniture with wallpaper, which is used extremely rarely. If the decoration on the facade of the furniture complements the interior, then the decor of the interior space is intended solely to please the user. Wallpaper can be used to cover the inside of drawers of a cabinet or chest of drawers, the back surface of doors, including radius doors, as well as shelves and the inner wall of the cabinet behind the doors. You can first purchase wardrobe doors and then decorate them. In this case, the choice of pattern and color of wallpaper depends on your wardrobe and your own preferences, and the color of the walls in the interior does not play any significance here. Again, experiment with contrast. If you have a lot of monochromatic items in your wardrobe, choose wallpaper with flowers and ornaments; if colorful dresses and skirts predominate, stick on striped wallpaper.
Did you like the article? Subscribe to the channel to stay up to date with the most interesting materials
Beginning of work
Do-it-yourself cabinet decoupage should begin with a thorough inspection of it. Be sure to pay attention to defects; they will need to be worked on separately and removed from the surface. The most convenient way would be to disassemble it, remove the doors and install updated fasteners. The inside of the cabinet is also inspected and processed. For fun, you can take photos before and after work, which you can later show to your friends and family.
Before decorating the cabinet, you need to sand off the old paintwork. This will help avoid detachment and unevenness in the future. A master class from famous carpenters advises covering the entire wooden surface with varnish so that subsequent shades of paint do not change their color as they are absorbed into the wood.
Definition of the task
The main problem is that old furniture, which seemingly served its owners for a long time and quite well, sooner or later becomes outdated, becomes unusable and does not fit into the updated and more modern interior of an apartment or country house. However, something else is interesting. In most cases, the cabinets, sideboards or bedside tables themselves remain quite strong and can last for quite a long time. It is for this reason that many owners are thinking about how to decorate inside and outside, performing partial and sometimes complete restoration of things that seem to have already fallen into disrepair.
This makes you think about how to wallpaper a closet and whether it is possible to finish it from some other material (fabric, paint, mosaic, self-adhesive film, photo wallpaper, and so on). Does it make sense to decorate the entire closet or can you update just the doors?
Advice! To complete the picture, you can also decorate chairs, armchairs, a coffee table and so on.
So, let’s try to look more closely at how to wallpaper a closet (photo examples show how this is implemented in practice), updating its design and transforming its appearance. The first thing I want to say is that you can use different colors, as well as different combinations of them. This finish will help diversify the finish. In any case, if we talk about the most common methods of decoration and decoration, we can highlight the following options:
- Actually, wallpaper for a closet (compartment, book, kitchen, etc.).
- The fabric is also an interesting covering.
- Framed photographs and wallpaper.
- Artistic mosaic.
- Beautiful mirrors that can also be used indoors.
- In addition, you can create a piece of furniture in the Provence style using pastel colors.
Of course, each of these techniques, which allows you to update furniture, has certain advantages and disadvantages. In any case, no matter what you prefer, you can be firmly confident that this will not only save you additional finances, but also create an extraordinary and attractive piece of furniture with your own hands. Be that as it may, today we will talk about how to wallpaper an old wardrobe, focusing on this particular method of decoration.
On a note! If you are interested in how to cover an old cabinet with film, then you can be sure that such self-adhesive tape is applied using approximately the same technology as wallpaper on a cabinet.
In fact, you can also use self-adhesive wallpaper, which, in fact, is a close analogue of self-adhesive film. So, first of all, let's find out how best to choose the right materials.
Photo
Next in the photo you will see how cabinets covered with wallpaper look in the interior.
Let's sum it up
This simple method can bring any furniture back to life. The decoupage process itself is simple, and the result will make the furniture original and expensive. And the remains of wallpaper can be used rationally. And to make the furniture a work of art, it is additionally processed with interesting effects, such as craquelure, patination, abraded effect, gold leaf and tinting.
Recommended Posts
Wall shelves for TV and equipment
DIY curtains with eyelets
Design project for a small dressing room
How to design a niche in the wall
Sliding mirror doors for dressing room
White wallpaper with a black pattern in the interior
Add-ons
To get interesting effects, for example, to artificially age furniture, after decoupage you can use one of the following techniques:
- Craquelure is the effect of cracked paint. It uses a special varnish, which is applied alternately with layers of acrylic paint. Due to different drying times, the coating cracks, which creates an antique effect.
- Patina also helps to “age” furniture. This is the darkening of certain areas, usually edges or metal parts.
- Scuffs - artificial abrasions can be created by applying wax to part of the surface, paint on top, and then sanding.
- Potal - decoration with gold, silver or other metallic paint. Use it carefully - too much gilding will look tacky.
- Tinting is adding a tint by adding a small amount of paint or glitter to the varnish.
Source: bouw.ru
Uncover
Self-adhesive film for furniture is protected on the back side by thick paper - it covers the adhesive composition. On this paper, lines and numbers are written every 5 mm. Using this marking it is easy to cut pieces of the required length.
When cutting, they always make more film. The amount of reserve depends on what surface you are covering, but always remember that you won’t be able to “grow” a piece unnoticed. So it’s better to make more stock. If you are pasting a flat surface and there is no need to glue the ends, the margin may be a couple of centimeters. It's enough. If you need to glue the ends, do not forget to add twice the height of the ends, plus the same couple of centimeters, but from each edge - just in case.
The reverse side looks like this
If the edges of the part to be glued are rounded, cut off a piece that covers the entire part and leaves another 3-4 cm. When making a curved cut, the film will have to be pulled, and, preferably, there will be something to grab onto. Otherwise, the plan will not work out.
When cutting films with a pattern, if you need to combine it, you have to cut from the front part. Then they immediately match the lines of the drawing, then apply marks along the required length with a knife or scissors. Then, turning it over to the reverse side, cut along the nearest line using these marks.
Criteria for choosing self-adhesive film
Before choosing film for a cabinet, you need to know what it consists of and what criteria to choose. The film has 3 layers:
- upper;
- with adhesive base;
- protective.
All layers play their role. The very first one is made from:
- Vinyl, PVC or polyester are the most durable materials, the use of which allows you to glue the film to the front sides of the cabinet and are not afraid of damage.
- Staniol is a material that is susceptible to damage, so gluing should be done on the surface of hanging cabinets.
- Paper is a fragile material, easily damaged, it is best used for pasting the end sides of racks.
The film can be single-layer or double-layer. Single-layer is more durable, formed into rolls. Two-layer is made of a base and a top layer, but is less durable.
When buying self-adhesive film, you need to take into account the moment on the surface of which furniture it will be used. If it is in the kitchen, where it is constantly exposed to temperature changes, or in a children's room, where there is always a threat of spoilage, a protective layer is needed. The protective layer has:
- moisture resistance;
- protects against ultraviolet radiation;
- thermally stable.
Cheap options do not contain a protective surface.
Painting polished furniture
Chipboard, a natural wood that has an aged, polished finish, can be painted. To do this, use matte acrylic paints. The top layer (coarse sandpaper) should be removed from the surface, chips/cracks should be filled with putty, and degreased with white spirit.
The paint is applied in 2-3 steps. After drying, each layer is polished with fine sandpaper. At the end of the work, if you want to get something exclusive, facade spot painting will be done. Use a thin marker to outline the design and paint it with acrylic paint (use a brush).
How to change the finish if there is a built-in wardrobe?
Why glue wallpaper behind a built-in wardrobe if this place is intended for this item and its functionality will not change? If, for example, a floor-to-ceiling compartment is used, then there is no point in doing expensive finishing behind it. But it is necessary to put the wall in order.
It is easiest to replace the canvas if the cabinet is not installed up to the ceiling and not from wall to wall. In this case, you cannot save money, i.e. you need to buy good wallpaper for gluing. To decorate the interior space, they usually use budget but wear-resistant wallpaper . The hardest thing in this matter is to choose a pattern and make the joints invisible (how to join wallpaper correctly?).
There is nothing complicated in such decoration, and the result will be significantly different from if the cabinet had been varnished or simply painted. There are many original ideas on how to update the appearance of furniture. The main thing is to take into account the rules for creating color compositions and rely on your wishes.
Decor for the back wall of shelving
A great way to decorate with wallpaper is to cover the back wall of open cabinets and shelving. Manufacturers of modern furniture almost never pay due attention to decorating interior surfaces. Agree, against such a background any souvenirs or dishes will seem festive and bright, and the furniture itself will sparkle with new colors. In this case, it is better to play with contrast and use wallpaper that differs from those with which the walls are covered. It is advisable to use wallpaper with patterns and patterns, especially for furniture with a light facade. By the way, you can take wallpaper that covers the walls in other rooms; this technique will help connect different rooms.
If the rack is divided into square or rectangular sections, then each can be covered with different wallpaper, again creating an analogue of patchwork.
The final stage
When all the work is finished and the paint has dried, you can put things back there. However, this is the time to reconsider what you put in your closet. After updating and all the hard work, it would be a shame to clutter this wonderful closet. So be ruthless and get rid of everything unnecessary and unnecessary without regret.
This closet makeover is an incentive to keep things organized, but most importantly, it will make you smile every time you open the door. Try to update an outdated piece of furniture yourself, with your own hands, use your imagination and ingenuity, and the result will definitely please you.
Found a violation? Report content
Cover with fabric
This method gives a smoother, more textured look than wallpaper. It is better to cover large elements such as wardrobe doors with fabric, fasten them with a furniture stapler or with glue. It is interesting to choose leatherette as a fabric for a luxurious look.
Fabrics made from pieces using the patchwork technique will make your closet more comfortable and will help you fit it into a child’s room or into styles such as Provence and country. The style can be embodied with wallpaper or film if you cover the panels of the drawers with materials with different patterns.
Decor of the facade, side walls and doors
You can wallpaper almost any surface of a closet, cabinet or chest of drawers. Most often, cabinet doors and drawer fronts are covered as the most important element of furniture, which is the center of attention. But you can do the opposite - wallpaper everything except drawers and doors.
Color and stylistic solutions may also vary. You can use the same wallpaper on all surfaces to be pasted, you can alternate different ones, or decorate using the patchwork technique, that is, paste them over with multi-colored squares. It is absolutely not necessary that the wallpaper on the furniture matches the wallpaper on the wall. Feel free to experiment with contrast, for example, for a room with pastel wallpaper, make a closet with bright colorful doors.