5562 0 0
Icer August 2, 2018Specialization: master in the construction of plasterboard structures, finishing work and laying floor coverings. Installation of door and window units, finishing of facades, installation of electrical, plumbing and heating - I can give detailed advice on all types of work.
Telescopic guides are the most reliable and convenient solution for drawers, baskets and other furniture elements today. But sometimes there is a need to remove a box from furniture, and many do not know how to do it correctly, which leads to damage to the furniture. In the review, we will tell you how to remove the element quickly and easily, and also briefly examine the main types of telescopic guides.
Telescopic guides are used in various furniture
How to disassemble ball guides
Previously, I honestly believed that ball slides were permanent, until I encountered a cabinet that was impossible to disassemble (for repairs) without removing the drawers.
It was logical to assume that the drawers were still pulled out and the guides were disassembled. And so it turned out... Ball guides consist of two separate halves, which are inserted into each other and secured with a special plastic latch. It is this latch that creates the illusion of inseparability.
In order to “unlock” the lock, you need to place your finger on the latch and, moving it down, pull out the inner part.
In order to remove a finished box mounted on ball guides, there is a little trick. The latch on the left rail moves down, and the right one moves up. After which the box can be easily removed from the body.
Installing such a box is even easier - first we combine one guide, then the second - push them into each other until it clicks. If resistance arises, then do not push with force - it is better to push it out all the way and try to push it in again.
Otherwise, you can bend the fastener with the elastic band, which will eventually fly off.
Repair tool
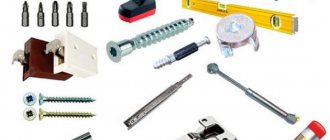
The required set of tools for working with a chest of drawers depends on the nature of the problem, therefore, first carefully inspect the product and make a list of breakdowns. But it’s a good idea to keep the following on hand:
Show hidden content
| Tools | Consumables |
|
|
How to remove a drawer from a modern kitchen unit
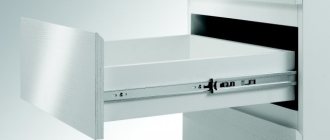
Today, so-called telescopic guides are installed on kitchen sets, cabinets and tables, which have replaced roller models. The new fittings consist of three parts sliding into each other, and at first glance it is not clear how to handle it. To remove drawers with telescopic guides, you need to press the stoppers on both sides.
How do telescope guides work?
The fittings consist of two U-shaped profiles. The outer one is attached from the inside to the wall of a cabinet, chest of drawers, etc. A plastic strip with bearings is inserted into the upper and lower grooves of the outer profile - they ensure the sliding of the inner profile. The plug on the back and the bent "whiskers" at the front prevent it from slipping out completely.
Profiles are nested within each other. In the inner part there is a carriage with ball bearings. It is this that ensures the movement of the bar that is attached to the box.
Thus, the profiles and the bar fold into each other, like the handle of an umbrella, for example, and when they are fully extended, the drawer completely comes out of the niche - this is convenient when you need to find or take an object from a far corner.
How to remove the drawer
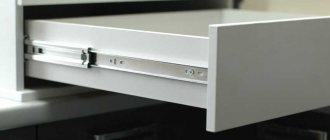
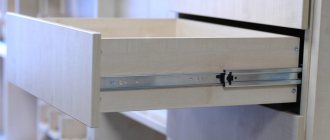
When the drawer is fully extended, “tabs”, usually black, become visible on the left and right sides of the slides. They are located between the outer and inner profile. If you completely disassemble the fittings, you can see that it is a clamp attached with a rivet to the outer profile.
To release the box, you need to simultaneously press the “tongues” on the left and right and pull the structure towards you.
For information In a number of models, the left stopper goes up, the right stopper goes down. It’s easy to determine: click on each one, it will give in, fold and spring back into place if you pressed in the right direction.
The main condition is to keep both tongues clamped. Thanks to the bearings and the U-shaped profiles, the bar will certainly go straight and not warp. Therefore, the box will easily come out of the fastenings.
Telescopic guides are superior to roller guides in many respects. They allow the drawer to be pulled out completely, are much less likely to become deformed and practically do not allow skewing. The main thing is to choose fittings designed for the expected weight of the box.
The second important condition is the quality of the metal. A cheap product will quickly break, so choose trusted manufacturers. Otherwise, telescopic guides are the best solution for retractable systems today.
How to remove a wall cabinet from the wall in the kitchen?
Help When starting to dismantle wall-mounted furniture, you first need to determine the design of the unit with which it is attached to the wall.
It can be:
- Furniture hinge . The oldest method - however, this is precisely the case when outdated does not mean bad. Cabinets are hung on them where the walls are not level: this is not important for the hinge, the main thing is that the dowels screwed into the wall are level.
- Hanging corner . A curved metal plate, one end of which is screwed to the cabinet, the other with a dowel to the wall. Also an old design with a rigid, reliable fastening, but without the possibility of adjustment: the way the corners are installed from the very beginning, so everything will be.
- Guide strips (mounting rail) . A metal strip with bent profiled edges screwed to the wall, on which a cabinet is hung with hooks. It is convenient because it is easy to change the position of individual furniture modules without adjusting hinges or drilling new holes. The plank is attached to the wall not at two, but at many points, the load is redistributed over a large area - this is convenient for walls made of cinder blocks or plasterboard.
- IKEA awnings . Used for hanging cabinets manufactured by this company. They consist of a fastening unit mounted on the wall with self-tapping screws and a canopy with an oval hole, which is attached to the rear wall of the cabinet. They provide a rigid fit, but are almost not adjustable.
There are other, less common types of fasteners.
Dismantling of mounted modules includes the following steps:
- First you need to empty the cabinet by removing the contents from it. Remove the doors so as not to damage them if something goes wrong and the cabinet falls.
- Then you need to remove the screed with the adjacent section, if there is one. If, for greater rigidity and structural strength, sections of hanging furniture are pulled together, you need to unscrew the connecting bolts or loosen the tension of the clamps.
- Carefully lift the body. The IKEA furniture hinge or canopy comes off the fastening element.
- If you use a corner, you must first unscrew the screw that secures the module to the wall.
From guide bars
If guide strips were used for installation, the removal procedure looks like this:
- The cabinet is emptied of dishes and other contents, the shelves are removed from it, and the door mounts are removed.
- The cabinet is carefully lifted so that the teeth of the canopy come off the top edge of the guide bar.
- The removed module is carefully placed on the floor.
- Use a screwdriver or reverse screwdriver to unscrew the screws that secure the plank to the wall.
- When the screws are removed, the strip itself is removed.
Attention
If the cabinets are being removed for renovation, it is not necessary to remove the guide strip. Its dismantling is necessary if work is planned on the wall where it is located (tile finishing, plastering), or when moving. In the latter case, it is necessary to remove it: without it, it will not be possible to hang cabinets in the new apartment.
How to remove a drawer with telescopic slides from a nightstand
Oil painting. You come home and the drawer on your nightstand won’t close. Something behind the drawer has fallen from other drawers and this “something” is preventing your drawer from closing properly.
You are trying to somehow get this box and remove it from the nightstand altogether, but you can’t do anything. The drawer has some kind of retractable slats on the sides that extend only to a certain length, but are not completely removed. And this whole situation only causes you extreme indignation.
How to remove a drawer with telescopic guides from a bedside table?! I'll tell you! Or rather, I’ll even show you (there will be a corresponding video at the end of the article).
There may not be many options.
Option 1. If the drawer has telescopic guides (not on wheels)
These are these long metal things that go around the sides of your box. As a rule, one telescopic guide extends out of the other. And to disconnect the drawer guide from the one that holds it, you just need to find and switch the corresponding lever. As a rule, the lever (antennae) is perfectly visible provided that the drawer is fully extended. It is often located at the junction of the guides on one side and the other and, in fact, holds them together.
Lower the lever (antennae) with the screwdriver down and the guide will freely move out of the other guide along with the drawer.
Option 2. If the box has telescopic guides on wheels
Everything is quite simple here. You just lift the cover a little so that the wheels come off the rack and the drawer pulls out perfectly.
Option 3. If the box has exit telescopic guides, but at the same time there are no antennae or wheels
This is the option that was in my case. The drawer had a rail without wheels and without “antennae”. She was just holding the box somehow.
After closer examination, it turned out that the bar was simply screwed to the sides of the box. To disconnect it, you need to unscrew the screws on one side and the other. And then the box will have complete freedom!
Here's a visual video for you.
Procedure
Before removing a drawer from telescopic slides, such as a kitchen unit, read these instructions:
- Each drawer is equipped with two guides. Pull it out as far as possible. In the window you will see plastic fasteners.
- Lower the plastic “tendril” down and pull it towards you so that it comes out. You need to know that there are different designs - with a symmetrical or mirror arrangement of the “whiskers”. In the first case, both antennae pull down, in the other, one down and the other up. Determining which option is “yours” can only be done by trial and error.
- Lower these outer “pieces” located on the right and left. Now it's time to take out the drawer. It comes out of the guides without difficulty.
- To install all the components in place, repeat the entire algorithm, only in reverse order.
- Insert the box into the runners and push until you hear a characteristic click.
FIT drawers
FIT drawers with steel sides and full extension slides with a soft closer and shock absorber are easy to install and adjust the drawer and front without tools.
The patented system of fastening the drawer on the guides ensures its strong fixation and allows you to remove the drawer without effort if necessary.
Sidewalls of reduced thickness allow more full use of the internal space. The design of the inner wall of the sidewall ensures that the sidewall fits tightly to the bottom of the box to protect against contamination. The drawer is extremely stable even when installed in wide modules.
The integrated double shock absorber and door closer work together in one system and are made in a monoblock form factor, which provides protection against contamination and deterioration in the movement of the drawer. A shock absorber in a metal casing with a long service life guarantees the absence of oil leaks. The effective shock absorption and soft closing distance of the FIT drawer is 53 mm, which is 12% higher than that of BLUM drawers.
FIT drawers have been successfully tested in the laboratories of the TÜV (Germany) and SGS (Switzerland) certification centers. After 50,000 opening and closing cycles with a load of 30 kg. no changes were found that would impair performance characteristics. Additionally, in the production of furniture fittings, samples of drawers from each batch are selectively subjected to similar tests. The production quality management system is certified by UKAS (Great Britain).
Furniture fittings under the Firmax brand
In 2006, when TBM began actively working on creating their own brands, increasing their awareness and reputation in the market, the Firmax brand was created. It is used to sell our own line of furniture fittings.
Interestingly, the company states that products under this brand are manufactured at factories in Europe, Asia, Russia and the CIS countries. Frankly, they are a little disingenuous, since almost all production is organized in China.
How to remove a drawer with a closer from a cabinet
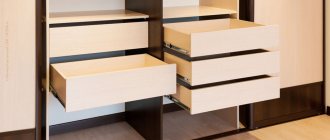
Designs with telescopic guides have become the most common solution for furniture, especially kitchen furniture. During operation, sometimes it becomes necessary to completely remove the furniture drawer from the cabinet. But you can’t do it just like that. Telescopic guides are the element that prevents the device from falling out during careless movement. This can be done without damaging the structure, with a minimum of knowledge and tools.
Design Features
Despite the variety of fittings, all guides are similar in their main principle - the presence of two strips, one of which is attached to the plane of the cabinet, and the other to the pull-out element. Inside the system, between the slats, there are small balls, which ensure smooth operation and durability of the structure. The main differences may be in the depth of extension:
- Systems where the fittings do not allow full extension.
- The mechanism can be fully extended.
- Super full extension. The storage system can be pulled out beyond the façade. Often used in archival shelving.
The guides also come in four standard sizes (the most common is 45 mm high). The presence of a closer, that is, a special block that itself presses the drawer until it is completely closed, makes the fittings more comfortable, but does not introduce revolutionary changes to the design.
How to remove the drawer completely
This operation may be necessary to service the fittings, but most often due to the fact that some object or rag has fallen inside and is preventing complete closure or extension.
Due to the fact that all telescopic guides are fundamentally similar in their design, there are no particular differences in their removal, regardless of the standard sizes, extension system, or the presence of a closer:
- You need to pull out the drawer completely, as far as the guides will allow.
- In the place where one of the hardware strips fits into the other there will be a plastic lock; you need to press or turn it. Here, the design of the lock may vary, so the method: to press or turn, in one or different directions, will need to be found experimentally.
- Having done this operation on both sides, pull the mechanism and it will easily extend completely.
Types of products
The second name for the hardware option we are considering is ball guides, since the system moves on small balls, which ensure smooth running and durability of the structures. Let's figure out what product options are available, and then consider the model range presented on the market.
Main types
All telescopic options are divided according to the following characteristics:
- Possibility of disassembly . There are both collapsible and non-dismountable options; the second option is not suitable, since the element in it cannot be disassembled and it is difficult to remove such a box. But the vast majority of options on the market are collapsible, so there will be no problems with repairs.
The design consists of three main components shown in the diagram
- Number of steps . Depending on the extension length, structures are divided into two-section and multi-section. If everything is clear with the first option, then the second is much more complex in design, so you should disassemble it more carefully. But as for the installation and removal process, there is no fundamental difference; if you understand the topic, you will be able to service all types.
Multi-section options extend to a much greater distance than two-section options
- Presence of a closer . This element makes the use of furniture more convenient, because the drawers themselves are pressed to the end and become the way they need to be. Of course, models with a closer are noticeably more expensive than simple options without this element. What you choose in the end is up to you, both solutions are quite reliable, there is not much difference in quality.
The closer is a special plastic block on the outer edge of the structure
The most modern solution is guides that open the drawer when you press it; they are often called “Push to open,” which characterizes the principle of operation. The design is similar to the version with a closer, only it has an additional block that slightly pulls out the drawer when pressed.
The guides also differ in the degree of extension of the elements; there are three main options:
| Illustration | Description |
| Partial extension systems . A standard solution in which the element does not come out completely; a small part of it remains inside the housing, as shown in the photo. These are the cheapest products, which are similar in operating principle to standard roller products, although in terms of reliability they are significantly superior to this analogue. Their use is justified if you do not need full access to the internal cavity. | |
| Full extension designs . This type allows full access to the contents of the drawer, which is very convenient. Naturally, the reliability of the system is an order of magnitude higher than that of the first option, since it must withstand higher loads. Most often this is a multi-stage system, since it is impossible to ensure a large guide stroke using two units. | |
| Super full extension telescopic guides . This option allows the drawers to extend beyond the surface of the furniture façade, providing the best access to the contents. Such fittings are usually used in high-capacity elements; they can withstand high loads, but are also significantly more expensive than the analogues described above. |
Guide dimensions
On sale you can find different sizes of telescopic systems:
| Illustration | Description |
| Height 17 mm . The most compact option with the following characteristics: |
- Length from 182 to 438 mm. Used for small drawers in cabinets and chests of drawers.
- Permissible load - 8-10 kg.
- For installation, the manufacturer recommends making a groove in the furniture wall with a depth of 10 mm and a height of 17 mm.
- Installation begins with the wall of the furniture, only then the element is screwed to the side of the drawer.
- The partial extension option, non-separable, is not the most convenient solution, which is rarely used these days.
Why is the system convenient to use?
Due to their list of advantages, these models are in greatest demand among potential users.
- When compared, for example, with roller mechanisms, telescopic fittings have a long service life.
- This is due to the fact that the design is resistant to stressful situations and high quality production.
- It is also capable of withstanding the heaviest loads.
- As can already be understood based on the instructions, the structure is easy to use.
- In addition, such guides cannot be installed incorrectly.
- They can be placed at a variety of heights.
How to easily make compartment doors with your own hands at home
The creator and direct owner of the Firmax brand is the TBM company. This is a domestic, that is, Russian company that supplies components, fittings, double-glazed windows, doors and windows to the CIS countries, Europe, Asia, etc. Moreover, the company’s main facilities are located in China. There are also several factories in Europe and Indonesia.
The company was founded in Moscow in the summer of 1993. Initially, the organization consisted of only 5 people. But in 2 years they managed to create a whole network of their branches, warehouses and representative offices, going beyond Russia and also moving to the CIS. Subsidiary companies were created operating in Samara and the capital of Belarus.
Currently, TBM has more than 60 branches and about 100 representative offices in regions in 7 countries, including:
As of last summer, the company's staff included 2.5 thousand people. And their warehouses occupy a total area of 130 thousand square meters.
