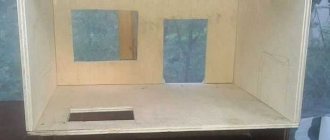
External panels of kitchen cabinets and tables, cabinet doors and wall shelves - everything that is the facade of the kitchen can be made independently. Of course, homemade furniture is in some ways inferior to factory furniture, but it always looks original and is cheaper. To make kitchen fronts with your own hands, you will need skilled hands, carpentry skills and appropriate tools.
The most common materials for making facades are:
At home, the easiest way is to make a facade from wood. Wooden facades come in two types - solid and paneled. Solid products are made from solid pine, oak, alder, cherry and other species. To make such a facade, you do not need a milling machine; a plane, circular saw or jigsaw is enough. Wooden surfaces strongly absorb odors and require careful maintenance, but they are not afraid of mechanical stress and last a long time.
A cheaper option is facades made of wood panels covered with veneer. This material looks very attractive, is light in weight, and easy to process, making it possible to assemble a façade of an unusual shape. It should be taken into account that wood boards quickly absorb water, swell and deteriorate, and thin veneer cannot withstand mechanical damage.
Plastic facades have a base made of chipboard, onto which decorative panels made of durable plastic are attached. It is impossible to make panels at home, so for assembly they purchase ready-made ones, cut them according to measurements and glue them to the frame. Such products tolerate high humidity, temperature changes, mechanical stress and look great. Caring for them is quite simple: wipe the surface with a damp cloth and a small amount of detergent.
Glass facades can be assembled yourself, but this process is quite labor-intensive and requires maximum care and skills in working with glass. Not everyone can cut and drill glass correctly; it requires a steady hand, high-quality tools and a supply of material in case of damage. In addition, facades made of ordinary glass look completely different from factory models, which use impact-resistant glass with a relief surface.
Production of solid facades
Solid wood facade
To create a kitchen facade from solid wood you will need:
- edged pine boards with a section of 30x200 mm;
- jigsaw;
- jointer;
- self-tapping screws;
- drill;
- screwdriver;
- clamps;
- accessories;
- primer;
- wood varnish;
- glue;
- plane;
- sandpaper.
First, measurements are taken and a drawing of the kitchen furniture is drawn up. Based on the drawing, the number of front and side panels, drawers and shelves is calculated. The largest structures are manufactured first to minimize the amount of waste. To mark, the boards are laid out on a flat, wide table; transfer measurements from the drawing to the tree and mark cut lines with a pencil.
The easiest way to cut out parts is with a circular saw, firmly fixing the boards on the table. All cuts must be straight, otherwise it will not be possible to connect the parts tightly. When all the elements for the facade are ready, the wood is sanded with a special attachment, and the ends are cleaned with sandpaper. Then holes are drilled for fasteners and the workpieces are coated with an antiseptic primer.
Assembly begins: the ends of the blanks are covered with glue, the parts are connected, the corners are aligned, and then clamped with clamps and left to dry completely. Finally, hinges are attached to the doors, slats are screwed in with self-tapping screws for installing internal shelves, and fittings are hung. After this, the finished facade is treated with varnish or oil impregnations with wax.
Chipboard facade
If chipboard is used instead of solid wood, cutting is done in exactly the same way, but before assembly, the sections of the parts are covered with a special polyvinyl chloride tape. This process is called hemming; the film protects the ends from moisture penetration and fraying, making the appearance attractive and neat. In addition, the PVC edge prevents the evaporation of formaldehyde resins, which are used to impregnate chipboard and are harmful to health.
During the work you will need:
- roll of edge film;
- iron;
- a sheet of thick white paper;
- two clamps;
- guide rail;
- sharp knife.
The guide rail is attached to the work table using clamps. Instead of a slat, you can take any flat board, a piece of timber, the main thing is that it is convenient to support the chipboard workpiece. Take the facade part, lay it on the table and rest one edge against the guide so that the side cut protrudes 5-7 cm above the edge of the table. The edge is measured along the length of the cut and cut off. Apply the edge to the surface, leaving overhangs about 5-10 mm wide on both sides of the cut, and then lightly fix it at one end by touching the iron.
Next, cover the edge with a sheet of paper and use an iron to heat the surface with even, measured movements. If you iron the film without paper, the material may overheat and deformation may occur. The iron is pressed firmly against the cut so that the edge sticks over the entire surface. After this, the workpiece is turned over with the cut side down, pressed against the tabletop and held for several minutes. When the glue has hardened, carefully trim the protruding edges of the film with a sharp knife.
Excess glue is immediately wiped off with a clean rag, and the seams are sanded with fine-grained sandpaper. The ends of the remaining workpieces are processed in the same way. Next, the elements are connected to each other using glue and self-tapping screws, shelves are installed, hinges and locks are attached, and fittings are screwed on.
Loops - frogs
The main elements of paneled facades are frames and panels. A frame made of boards with longitudinal grooves is called a frame; The panel is an internal panel with figured cutters around the perimeter. When assembling, the panels are inserted into the grooves of the strapping and secured with glue and self-tapping screws. This design avoids surface deformation during temperature fluctuations.
To make paneled doors for a kitchen cabinet you will need:
Step 1. Calculation of workpiece parameters
Measure the cabinet opening vertically and horizontally and draw up a drawing. Subtract 3 mm from the height and width of the opening - these are the dimensions of the door frame. The width of the racks and horizontal crossbars depends on the width of the board. The parameters of the panel are calculated as follows: subtract the total width of the crossbars from the height of the frame and add 2 cm; The width of the panel corresponds to the length of the crossbars. For one door you should get 5 elements - 1 panel, 2 crossbars and 2 vertical posts.
Step 2. Cutting out the parts
Using a jigsaw, the pine board is cut into posts and crossbars according to the drawing. On a milling machine, a groove 6 mm wide and 10 mm deep is cut into the side cut of each part. Then, 10x6 mm longitudinal spikes are formed at the ends of the crossbars. Make marks on a sheet of plywood with a pencil and cut out a panel. The edges of each element are treated with sandpaper, and the surface of the boards is sanded.
Step 3. Assembling the product
The edges of the panel are inserted into the grooves of the vertical posts, the bottom crossbar is put on the plywood and the tenons of the crossbar are connected to the sidewalls. The top crossbar is attached next. If all the elements fit smoothly, without gaps or distortions, and quite tightly, then everything is done correctly. Now the door is disassembled, the grooves, tenons and edges of the panel are coated with glue, everything is put back together again and the joints are pressed tightly. Exposed glue is immediately wiped off with a damp, clean cloth. It is recommended to use clamps for fixation, then the product will not deform during the drying process.
Step 4: Finishing
When the glue dries, the joints are carefully sanded, and then the door is treated with an antiseptic compound. The next layer is paint or varnish; you can also use stain, special oil impregnations, or self-adhesive film. Curly carving is often used as decoration for a frame, but not everyone can do it without the appropriate skills. Plywood can be completely replaced by a thin board, glass, shaped forged lattice, colored polycarbonate or plastic panel.
Hinges and fittings are attached after finishing work is completed. First, determine the location of the loops on the walls of the box; Mark the fastening points on the facade frame and drill holes. Screw the hinges to the frame, insert the door into the frame and fix the hinges on the cabinet wall. Check the movement of the hinges by closing and opening the door. When closed, there should be no gaps or irregularities around the perimeter of the façade. Other elements of the kitchen façade are performed in a similar manner. If you don’t have a milling machine, you should choose options with the least number of shelves and panels, since cutting grooves by hand is quite difficult.
Also read the article - how to assemble a kitchen with your own hands.
Video - DIY kitchen facades
The first thing that catches your eye when entering the kitchen is the furniture fronts. Therefore, depending on the condition they are in, the overall impression of the kitchen as a whole is formed. In order to give the room a well-groomed look, sometimes it is enough to update the furniture.
However, purchasing new furniture is too expensive and sometimes pointless. If the furniture cabinets are durable, then you can significantly save on costs by making new facades for the kitchen with your own hands.
Of course, making doors yourself makes sense only if they look no worse than those made by craftsmen at a furniture factory.
Having decided to update your kitchen yourself, you first need to become familiar with the basic principles of facade design and have the skills to work with carpentry tools. If you already have the necessary skills, then surely, by taking our recommendations into account, you will do everything correctly.
You can change the interior of your kitchen by choosing one of the following methods:
- Production of new facades;
- Updating old doors with your own hands.
Types of kitchen facades
The front panels of the kitchen set are made of solid wood, laminated chipboard (chipboard), MDF, glass, aluminum or plastic.
Door Style for Kitchen Cabinets
Chipboard facade
For facades, laminated chipboard is used, both with
the sides of which are covered with durable decorative film. This option for decorating the front elements of the kitchen is considered the cheapest, due to the comparative ease of processing and the affordable price of the material.
Laminated chipboard comes in different colors, textures, imitates valuable types of wood, artificial and natural stone. Laminated decorative coating is not destroyed by household detergents and is relatively easy to clean.
Wood particle board for kitchen doors
However, in addition to the strengths, there are many weaknesses:
- It is impossible to make laminated chipboard facades in relief, which is why the kitchen interior turns out monotonously flat.
- Contact with moisture, even insignificant, over time leads to swelling of the slab and after two to three years the deformation of the elements of the set becomes very noticeable. The edges peel off at the ends and the aluminum linings shift.
- Proximity to the oven also negatively affects the thermoplastic adhesive of chipboard and plastic edging.
It is quite easy to make folding structures like a book facade from it, but it will not be possible to make any curved elements. Despite the fact that this material is currently considered the cheapest, it is not as popular as MDF.
MDF facade
MDF is a modified analogue of fibreboard (fibreboard). As a binder for wood fibers, natural raw materials are used - lignin, which is also of plant origin.
MDF kitchen drawer doors
Advantages:
- MDF is comparable in strength to solid wood, but much cheaper.
- It tolerates contact with moisture better than chipboard.
- Resistant to temperature fluctuations.
- It can be easily processed, including milling, which makes it possible to produce radius elements and relief surfaces.
The main disadvantage of MDF facades is the high price, when compared with laminated chipboard, the difference is approximately two times.
Solid wood facade
The most expensive option available among modern furniture. Most often, valuable hard wood species that are resistant to variable humidity are used: oak, ash, maple, walnut, mahogany, acacia.
Doors made of natural wood
Advantages:
- Solid wood facades are more durable than similar ones made from wood derivatives (chipboard, MDF). The service life (at least 30 years) depends on the material used, the strength of the coating and operating conditions.
- Made from natural raw materials, without the use of polymer adhesives. Often this advantage is offset by dyes, but the harm from them is significantly lower than from coating MDF, laminated chipboard or plastic linings.
- Classic wooden facades look original in any interior, creating an atmosphere of warmth and comfort.
Production of new facades
Fronts for kitchen furniture can be ordered from professional furniture makers, but they will lack that special zest that things made with your own hands from scrap materials have. In addition, today there are all conditions for home craftsmen:
- You don’t need to have sophisticated equipment to make kitchen facades with your own hands - all fittings, fasteners and consumables can be bought at a nearby hardware store;
- Almost every man has a minimum set of tools in his arsenal, and if necessary, you can temporarily borrow a jigsaw or a screwdriver from a more homely neighbor;
- The tools that will be needed in the manufacture of facades do not require special skills - even a teenager can work with them;
- The necessary theoretical knowledge, useful tips and suggestions from designers can be found on specialized websites;
- You can assemble the doors yourself from individual parts made in the workshop according to your drawings.
The advantage of making facades yourself is significant savings on the family budget, and the result will be a completely new kitchen - after all, by changing the facades, you practically update the entire visible part of the kitchen furniture.
Making kitchen facades with your own hands should begin with the choice of material. Since they have a decorative rather than practical role, the choice of materials can be made based on the capabilities of your wallet.
The most popular materials for kitchen facades are:
- Natural wood – solid wood or multiplex;
- Chipboards or MDF;
- Strained glass;
- Plastic panels.
Each of the listed materials has its own advantages and disadvantages:
- Wood is the favorite among all materials for its environmental and decorative qualities, however, its cost is quite high;
- MDF or chipboard are the most affordable, they are quite easy to process and maintain, but are afraid of moisture and temperature changes;
- Glass gives the kitchen an elegant look, it is easy to clean, but at the same time it requires regular careful maintenance, and there is a high risk of breaking even with a slight blow;
- The plastic is covered with the same chipboard or MDF, it is quite durable, not afraid of moisture and temperature changes, but all traces are easily imprinted on glossy plastic, and matte plastic is difficult to wash.
It’s up to you to decide which material, taking into account the listed qualities, is better to choose.
We make facades from wood
You can make kitchen facades with your own hands entirely from solid wood or edged boards. Let's consider a more affordable option for making facades from edged boards.
In addition to a 20 mm thick edged board, stain, varnish, and self-tapping screws, you will need the following tools:
- Hammer with rubber tip;
- Bench hammer;
- Fraser;
- Hacksaw;
- Clamps;
- Ruler, tape measure and square;
- Set of screwdrivers, screwdriver;
- Grinder with a set of discs.
Working with wood requires certain skills and accuracy. The work itself on the implementation of wooden facades should be carried out in several stages:
- Making a wooden frame;
- We are preparing an insert for it;
- We polish the parts;
- Assembling the facade;
- We carry out painting or varnishing.
To make the frame, a wooden strip is taken, the width of which must correspond to the measurements taken. Four segments are cut from it, forming the basis of the future frame.
At the ends of each section, grooves are selected using a hand router to create a tongue-and-groove joint. Then, after the frame is assembled, a groove is selected from the inside of its perimeter, which is necessary for attaching the insert.
After preliminary assembly, the frame must be measured to ensure compliance with the required dimensions. Only after making sure that there are no discrepancies can you continue assembling the facade.
If the parts are made precisely to size, they are disassembled and each part is sanded separately by hand or using a grinder with a grinding disc. Using a grinder will greatly facilitate the work and reduce the time it takes to complete it.
After sanding is completed, the parts of the facade are reassembled into a single whole, fastened with wood glue and tightened with clamps.
The final stage is paintwork. It is quite difficult to apply an even, beautiful layer of paint without a spray gun. It is better to tint a kitchen façade assembled from wood with your own hands using stain to accentuate the wood texture, and then varnish it with furniture varnish.
As an option, the finished door can be covered with self-adhesive film instead of painting. Or you can embed decorative glass into a finished and varnished frame instead of a wooden insert.
When the facade is ready, you can equip it with hinges, screw on the fittings and install it in the opening. Making the first facade will take a lot of time until you get the hang of it and get the desired result. But you can make each subsequent door much faster.
Watch the video Do-it-yourself furniture radius facade made of wood. Part 1 on v4k for free
788 | 25 Dom_Mebli | 3rd year.
In the home workshop
SUBSCRIBE to our channel: https://www.youtube.com/channel/UC9zSjkAe2FFn4aXUVXjGu6Q/
THE MOST POPULAR AND CURRENT MASTER CLASSES ON MANUFACTURING WOODEN FURNITURE: ***MASTER CLASS ON MANUFACTURING RADIUS FACADES. – Film1.
– Film 2.
– Movie 3.
– Film 4.
– Film 5.
https://youtu.be/qz8uu7lqBY
– Film 6.
– Film 7.
– Film 8.
– Film 9.
– Film 10.
– Film 11.
– ————————————————————— MASTER CLASSES ON MAKING TABLES:
Extendable table. Solid ash. Veneer. Plywood. Part 1.
. Extendable table. Part 2.
. Furniture for the living room. Large extendable table.
. Table, chairs. Non-standard approach to the task.
——————————————————————
PREVIOUS VIDEOS ABOUT MILLING USING SIMPLE TEMPLATES: 1. Milling geometric shapes with a hand router.
2. Milling plus imitation of antiquity.
3. Milling a simple but original pattern using a hand router. https://youtu.be/NN2–CmdCao 4. Milling using the simplest templates.
5. DIY decorative glazing bead. Simple and cheerful.
6. Milling. And so that no one guesses.
7. Milling the pattern according to a template with an insert.
8. Milling without chips using a simple strip.
9. Milling of a furniture facade from plywood using a collapsible template.
10. Milling furniture bead according to a template using a hand router.
11. Milling the pattern using a hand router without a template.
12. Milling with a hand router is against the rules.
13. DIY decorative trim on the door.
– ——————————————————————— SUBSCRIBE TO OUR CHANNEL SO YOU DON’T MISS NEW VIDEOS! Write in the comments your reviews, about your work experience, your advice, because this can also help someone!
Regarding Advertising and Cooperation, our E-mail: [email protected]
THANK YOU FOR WATCHING FEEL FREE TO CLICK LIKE AND SUBSCRIBE FOR MORE VIDEOS! --------------------- •••••••••••••••••••••••••• If you want to make a donation for the development of the channel, this can be done through Privatbank: 5168 7554 1631 8679
Alternative materials for facades
Recently, it has become very fashionable to make kitchen fronts from aluminum.
Such surfaces are best suited for kitchens designed in modern, high-tech, and loft styles. Aluminum in the kitchen has a number of advantages and disadvantages. Among the advantages are:
- Exquisite style;
- Excellent combination with other materials;
- Resistance to fading due to exposure to UV rays;
- Moisture resistance and resistance to sudden temperature changes;
- Light weight;
- Environmental Safety;
- Long service life;
- Possibility of manufacturing both swing and sliding elements.
The main disadvantages of aluminum facades:
- Relatively high price;
- Tarnishing of the surface;
- Impossibility of using cleaning products with abrasive particles;
- Susceptibility to scratches and damage, since aluminum is a soft material.
Aluminum facades can be solid or framed. Solid doors are made from solid polished aluminum sheets, and frame doors are made from a prefabricated aluminum frame that is filled with inserts of any suitable materials. The aluminum frame can be disassembled. This allows you to update the kitchen facade by simply changing the filling of the aluminum frames.
How to update old facades
Since not every person has carpentry skills, and it is not always possible to completely replace furniture doors and cornices, you can update the kitchen facade in simpler ways.
If the doors are in good condition, and only their surfaces require updating, then you can use the old fashioned method and simply paint the furniture in some fashionable color.
Important components depend on the facade of the furniture: appearance, functionality and cost of the entire product. The area of the parts of the external front side of cabinet furniture, relative to the entire product, is small. But despite this, the production of furniture facades requires a lot of time and effort. This is the front side of the design, every flaw will be evident.
In order to independently make a furniture facade that does not differ in quality from the factory product, you need to purchase the necessary tools in advance:
- Boards from which frames will be cut - it is important to select elements with a smooth surface, without knots or chips;
- Sheets of plywood, plastic or glass, no more than 6 mm thick - they are needed to create a panel - an important decorative element;
- Metal ruler with 30-40 cm markings;
- Pencil;
- Electric jigsaw with a set of wood files;
- Roulette;
- Wood glue;
- Brush for glue work;
- Discs for cutting boards, it is convenient to use a milling cutter.
To maintain order while working, prepare a bucket of water and a rag.
Contact us for high-quality installation of furniture facades
Assembly and installation of furniture facades must be carried out by a specialist. Because an experienced assembler knows the nuances of work and the quality characteristics of each type of material. All products have their own tension limit, failure to comply with which can lead to breakage or deformation of the product. A professional will do the job thoroughly with a guarantee of quality.
The assembler will not allow unpleasant consequences of poor quality work, such as distortion of the facade frame, protrusions of doorways, gaps between products, damage to fastening mechanisms, and so on.
Are you interested in reliable assembly of furniture facades by a competent specialist? In that case, welcome to the good faith. It employs highly qualified and responsible employees who perform their work to the highest standard. Service can be booked by phone. All applications are processed in a short time with a specialist visiting the specified address.
Creating beautiful inserts
When making furniture facades, you can use your imagination and create a unique design. There are several options on how to make facades beautiful and unusual.
- Combination -
you can make an insert into the façade of furniture from any material. By combining two dissimilar materials, you can get a unique style. It is important to understand that unusual materials on the facades should be at least slightly in harmony with the decor of the room. Most often they combine wood and textiles, plastic and aluminum, leather and glass. Bamboo and rattan inserts look very unusual, but look beautiful; - Drawings are an original way to decorate the facade of furniture. It is suitable if the insert on the door is glass or plastic. You can paint using different media, but acrylic paints are most often used. With their help you can draw anything you want. For accuracy, you can use a stencil. After complete drying, the surface with the pattern can be washed with water and detergents. Making furniture facades has become very popular, so new methods of decoration are being created. The sandblasted image is one of the latter. It is difficult to create something like this at home, because the process requires special equipment. As a result, a neat matte pattern appears on the mirror surface. If you lack the desire and ability to draw, then you can stick a self-adhesive film over the glossy surface. You can also use ready-made stickers for furniture;
- Stained glass and mosaics - do-it-yourself furniture facades that use glass as inserts look very beautiful and expensive. With imagination and patience, you can create an original design. To do this, you will need several multi-colored sheets of glass, a glue gun and a glass cutter. In the process, it is necessary to cut the glass into pieces so that when sticking to the facade there are no gaps between them. And if you try really hard, you can create a small picture like a mosaic from small parts on the surface of the facade.
By showing imagination, perseverance and accuracy, you can independently create furniture that will look more beautiful than models from magazines. The main thing is to think through the project well and select all the necessary materials according to color and texture.
In this article we will continue our master class on making kitchen furniture from solid wood yourself with detailed photographs. You can make paneled doors for the cabinet and finish assembling it.
In the previous article, we made a furniture panel and assembled a cabinet frame from it. Now we will make panel doors from solid wood and finally assemble the cabinet for final painting.
A few words about what we will do
Frame facades made of MDF profile are a prefabricated structure consisting of a frame and a shield that is inserted into this frame. Frame structures can be manufactured to any size and in various configurations, which is very important when producing custom-made furniture components.
Exterior view of a kitchen made from framed MDF
Facades covered with film or plastic do not have this advantage. Thanks to the presence of profiles with different sections, it is possible to produce facades of different configurations, colors and overall appearance.
Frame façade design
The frame-type facade consists of a panel - a panel and an overhead trim made from a profile. The appearance of the finished product mainly depends on the cross-sectional shape of the applied girth.
Assembly of a furniture frame facade
This is how frame kitchens are assembled from MDF with a straight tenon corner connection
The assembly process instructions are shown in the following diagram.
Let's consider the above points in more detail.
Methods for cutting the popular compound “on the mustache”
This is what a cross section of a frame with filling looks like:
In order to connect the profile for MDF frame facades at the corners, a miter connection is used - in this case at an angle of 45 degrees for rectangular facades. Let's look at how to cut a profile at an angle of 45 degrees and ensure high-quality joining of profiles without visible gaps.
Among the most popular methods, I will mention three:
Each of these methods, when done correctly with your own hands, ensures high connection accuracy. The choice of one of the listed methods is carried out in accordance with the level of equipment of your workshop.
Metal miter box for professional cutting
Cutting on a miter box is performed as follows:
Very important! To cut the profile, use only metal miter boxes, since wooden, and even more so plastic tools, develop from long-term use and do not provide accurate positioning of the hacksaw and, as a result, do not guarantee accurate cutting.
The easiest way to cut a profile involves using a miter saw.
Cutting a block on a miter saw
The cutting instructions are as follows:
The quality of the cut on the combined bars is ideal
The advantage of this method is that the disk is lowered at a strictly adjusted angle without vibration and without play from side to side. Consequently, the cut is as precise as possible and the connection to the frame will be made without gaps.
Cutting timber on a sawmill
I recommend the third method if you have a high-quality sawmill, as in the photo, but do not have a miter saw. In this case, the profile is fixed at an angle of 45 degrees relative to the sawmill disk and the cut is made.
Checking the joint using a square
Important! After cutting is completed, we place a square on the table and join the workpieces along it to determine the accuracy of the joints and the presence of gaps. If there are no gaps, you can start gluing.
Assembling blanks into a finished product
Now you know how to cut a profile at the desired angle. All that remains is to find out how to assemble the blanks into a single façade.
The assembly instructions are as follows:
Equipment for milling gaps for dowels
Milling of combined parts
Combining parts with a dowel
Cleaning the surface from glue
In some cases, the filling of the facade, or the panel as it is also called, is not inserted during assembly into a groove specially cut during manufacturing, but is glued from the reverse side.
Production of paneled facades
We begin constructing the facades with vertical framing elements. We cut them to size according to the drawing.
For the panel we glue the shield from a piece of board without knots. In our case, we used a piece of well-dried board 50 mm thick. We run it through a thicknesser.
On the jointer we make one longitudinal edge perpendicular.
We cut lamellas (sections) for gluing the shield. Cutting width 20 mm.
A pencil mark helps in the future to orient the plots in pairs so that the fibers on the cross section go in opposite directions - such a shield will be more stable during changes in humidity.
Before gluing the lamellas, we fit them tightly to each other using a jointer with a planing thickness of no more than 0.1-0.2 mm.
We remove excess glue with a damp cloth, and level the shield on both sides by thicknessing. We bring the final thickness to 15-16 mm.
To assemble the façade, we use “framework” and “figurine” (paneled) cutters.
We set the stop on the bearing.
We mill the internal longitudinal edges of the future doors.
We place them on the cabinet, ensuring a future gap between the doors of 3-4 mm. We measure the length of the strapping crossbars along the inner edges of the grooves.
Cut the crossbars to size.
Without changing the position of the cutter and ruler, we mill.
Let's disassemble the cutter.
We assemble the counter-profile in order - the flat part of the cutter, the bearing, the spacer washer, the figured part, the nut.
We again set the stop on the bearing.
We mill the ends of the strapping crossbars. We feed using a piece of wood.
We clean the workpieces with a sharp knife.
We assemble the facades without glue for fitting.
The presence of leaks in the connections indicates that the cutter is not fine-tuned enough. To avoid this, you need to more accurately select the thickness of the spacer washer individually for each cutter.
We measure the size of the future panel along the inner edges of the grooves of the trim.
Subtract 2 mm from each side. We cut the panel panels to the resulting size.
We install the figurine cutter.
We remove the material in stages, in 6-8 passes.
It is more convenient to sand curved areas before assembly.
A gap of 2 mm around the perimeter of the panel is needed to compensate for changes in its size due to changes in humidity. To prevent the panel from dangling, we put pieces of foamed polyethylene into the grooves.
We assemble the facades using glue, coating both the tenon and the groove.
We do not apply glue to the panel.
We tighten the facade with clamps, controlling the corners with a square.
After the glue has dried, we sand the ends.
Using a medium-sized moulding cutter, we remove the chamfer from the front part of the facade. To avoid scorching, we reduce the speed of the router.
Assembly of MDF profile frame facades at home
Hello dear friends!
Do you like furniture whose fronts are made of profiles? For example, how do you like these facades in the kitchen?
I know that there are supporters and opponents of this version of facades. As for me, this is a good option for an economy class kitchen.
These facades are practical, easily replaceable, allowing you to “play” with the color scheme of the product. And today we will look at the manufacture of such fronts.
So…
Judge for yourself: For example, such a facade failed (broke for some reason). You simply throw it away (leaving the handle and hinges), go to the base, buy a stick (or two) of the profile, order it cut into the sizes you need, find from familiar furniture makers (or buy at the same base) the rest of the PAN (inserts in profile), if necessary, cut it with a jigsaw to the required size, buy surah, come home, assemble the facade and that’s it, the problem is solved.
You don't need a special tool for this.
Yes, by the way, the thickness of frame facades (at their center) is almost always more than 16 millimeters, so you can be calm when manually inserting furniture hinges.
And if the MDF facade you ordered “barked” (mini-factories are usually made from it), then you need to place an order (these orders are usually limited to minimum volumes), and only when such a plant will make facades like your profile and color - they will do it for you too. They will do it, maybe in two days, maybe in two weeks, maybe in two months, maybe... well, I think it’s clear. It’s good if there is such a plant in your city, but what if not?
Profile fronts are good because, for example, you can choose the profile dark and the insert light, and vice versa. In short, you can “play around” with colors.
Well, okay, I won’t describe all the advantages (or disadvantages) of profile facades. This will make any sane manager at any sane furniture base better than me. I’ll just show you how you can assemble such facades yourself, rather than paying money for it.
Of course, if you have a lot of orders, then it is better to order assembly, lose a little money, but gain time and save your energy. Well, if there are few orders (or you are doing it for yourself), it makes sense to assemble such facades yourself, it’s very simple.
What is needed to assemble such facades?
First, you need to know the dimensions of all the facades that need to be made (I think this goes without saying).
Secondly, you need to understand how long MDF “sticks” are sold, and how to cut them correctly, so that you don’t buy too much and get all the parts. To do this, you need to make a profile cutting map in a sheet material cutting program (for example, Catting).
In the same program you need to calculate how many sheets of PAN (sheet MDF that goes into the insert) you need to buy. Without a cutting program, calculating all this manually is very difficult and inconvenient (no, of course, if you have a lot of free time and a great desire, you can do it manually).
As a last resort, you can go to the same furniture base, and they will calculate everything for you.
So, having estimated in the program how many sheets of PAN and how many MDF “sticks” you need to buy, you place an order. According to your cutting chart, they will “cut” the profile to your dimensions, and, if you want, they will also cut the PAN.
Each profile has its own tolerances for internal inserts. Therefore, knowing the size of the facade (in a certain profile), using these tolerances, you can calculate the dimensions of the inserts, enter them into the cutting program, cut the sheet and put it into production. Here you can win in leftovers - the program makes it easy to arrange the details so as to get the largest possible leftovers.
But if time is pressed for, and you want to tinker, you can “live” measure the dimensions of the inserts (with a ruler), draw out a sheet of PAN, cut out these inserts with a jigsaw, and assemble the facades (by the way, this is sometimes what you have to do when waste is used for inserts ). The photographs show exactly this type of assembly.
But I still recommend immediately cutting out the PAN in the program, ordering its cutting, and only assembling the facades yourself.
The facades themselves are assembled quite simply. To assemble them, you need suras (special plastic “pegs” that fasten two parts of the facade, “cut” at an angle of 90 degrees). You also need PVA glue, which needs to be used to coat the joints of the parts, and silicone, which is applied to the grooves of the profiles (into which the PAN insert is inserted).
So, we coat the ends of the profiles with PVA glue, join them together, and hammer the suras into special grooves (they are symmetrical with each other).
The parts may not “fit” perfectly to each other, so using a piece of felt (so as not to spoil the profile), you need to carefully align them with a hammer.
Two parts are joined on one side , then the facades themselves are assembled from two parts, which in turn consist of two parts (after inserting PAN on silicone). Again, at the end we align all the joints.
Also, instead of PAN, you can insert glass into the profile. In this case, the profiles themselves are assembled in the same way as in the first case, only to fix the glass, a special seal is used. This sealant is applied to the back of the facade (and glass).
Yes, when choosing a profile, you immediately need to find out its insertion tolerance in order to calculate the dimensions of the inserted glass using it.
This is how such facades are assembled, easily and quickly.
And I'll wrap it up here, see you later.
Installation of facades and handles
We apply the facades one by one to the body. Mark the hinge axes.
We mark the centers of the loops on the facades at a distance of 22 mm from the edge.
On the case - 37 mm.
Use a Forstner drill to select a hole for the hinge.
Use an awl to mark the centers of the holes in the loops.
We perform final sanding with P180 grit sandpaper.
At the same height in the center of the vertical frames of the facades, we drill holes with a 3 mm drill.
We fasten the handles in the area of their upper support heels with self-tapping screws with a 4.2x50 mm press washer. By rotating the handles, we set them parallel to each other. We make a drill in the area of the lower heels and tighten the second pair of screws.
Finishing
We remove the facade from its hinges. Remove the hinges from the body.
The simplest and most affordable finishing option is impregnation with natural linseed oil. We apply it with a brush. After 15-20 minutes, wipe off the excess with a rag. After a day, apply the next layer. In total you need 3-4 layers.
After complete drying, we perform final assembly.
You can make furniture facades with your own hands, using affordable tools - and the quality of such products will not be inferior to factory facades. The technology itself for making furniture facades is not new, but it would be a good idea for novice craftsmen to learn some of the intricacies of this process.
Moldings, fittings and other decorations for the kitchen facade
When restoring kitchen facades with chipboard, you have to create volume with decorative elements. The surface of particle board is difficult to process. That's why I use overlay decorative elements. I imitate the protruding frame with an overhead molding. I glue figured patterns from polystyrene foam. They are made to look like stucco and are easy to stick on. After painting, the appearance of the facade corresponds to antique furniture in the rococo and classical styles. It all depends on the choice of decorative elements.
Tools are needed to restore the kitchen facade. They are available to those who love working with wood and making things with their own hands. If you are just starting to make repairs yourself, use plastic, wallpaper, film and paint. Imagine, experiment and get great results.
You can make furniture facades with your own hands, using affordable tools - and the quality of such products will not be inferior to factory facades. The technology itself for making furniture facades is not new, but it would be a good idea for novice craftsmen to learn some of the intricacies of this process.
DIY furniture facades
First of all, the base part is made - for this, a profile of wood 65x45 mm with a quarter of 10x5 mm and a depth of 20 mm is first made. The corners are filed at 45 degrees, and then the base is glued in one pass. The quarter and corners are coated with glue, after which everything is tightened with carpentry clamps (they are also called long clamps for tying panels).
The plinth is mounted on four legs, which are turned on a lathe. Pine can be used as a material, but the wood must be dense enough. Next, you need to make wooden racks for the body, racks for large and small facades, drawers for the body and facades, as well as wide blanks for the upper arched drawers.
At the next stage, all workpieces are trimmed to the final size, and after that you need to do additional end and longitudinal milling. It is convenient to trim long workpieces on a miter saw, and short ones with a circular saw, since the quality of the geometry of the parts is noticeably higher.
Features of facade manufacturing
To make arches on the upper facades, it is not at all necessary to use any templates - this work can be done arbitrarily by hand, and if you need a lot of such arches, then we use the first part as a template.
As a rule, it is almost never possible to completely avoid small chips when milling blanks for making facades. However, there is nothing wrong with that - we just take sandpaper and smooth out the resulting chips a little so that they are not noticeable.
Advantages and disadvantages
Furniture made from any material has its own advantages and disadvantages. Therefore, I suggest you familiarize yourself with the pros and cons of MDF cabinets.
Advantages:
- Durable if used properly.
- Environmentally friendly, which allows it to be used in a children's room.
- Low cost compared to analogues made from solid wood.
- Easy to assemble, thanks to the fact that the fasteners hold securely.
- Possibility of restoration - even if MDF is laminated with a film, over time it can be removed and another coating can be applied, for example enamel or even veneer.
MDF products can be painted
Flaws:
- They require careful handling, as impacts may damage the surface.
- As I already said, the weight of such cabinets is quite large, which makes them difficult to carry and transport.
In order for the furniture to serve you longer, it must be installed away from radiators and other heating devices.