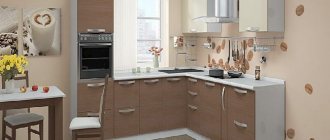
Regardless of the size, kitchens are certainly divided into two zones. The first is used for cooking, and the second is considered lunch. The work area must certainly have a sink, a stove, an extractor hood and a couple of tables for comfort. Many people try to complement this area with other elements: a dishwasher, microwave and other kitchen appliances to simplify the cooking process.
Of course, there are a lot of items and all of this should be comfortably placed in a very limited area. In this case, the salvation will be the installation of a corner kitchen, which makes it possible to rationally use the space. Assembling a corner kitchen is not an easy task, but you can still install it yourself.
Kitchen installation
It is best to install the headset after all the cabinets have been assembled. For convenience, it is better to fasten the doors last - this will simplify the installation process. The installation process begins with preparing all the holes in the walls.
Care should be taken during the installation process regarding placement. If it is installed incorrectly, the kitchen will look unsuitable in the future.
Keep all outer and lower cabinets level so they are level. If you do not install carefully, the doors may not close or may not be level, so make sure to adjust them well before attaching all the drawers together.
Step by step installation
Assembling a kitchen set with your own hands requires careful preparation. To avoid mistakes, you should plan everything carefully and only then begin the installation process.
- The first step is to make a drawing, where to think through the design, dimensions and layout of the corner kitchen down to the smallest detail. An L-shaped kitchen set will be an excellent solution for both small-sized kitchens and large areas.
- Purchase of materials and cutting. When choosing a material, you should pay attention not only to beauty, but also to quality. Cutting and detailing are necessary to clearly understand which parts should be cut. Only after this can you begin to install the furniture itself.
- Preparation of tools and surface. Naturally, you will need tools for assembly, but in addition to this, when installing a corner kitchen you need to prepare the walls and make them smooth. After all, all joints of the headset must be connected exclusively at an angle of 90 degrees.
- After all the preparations, you need to assemble the corner cabinet. This part is always assembled first, because it is the main one.
- After installing the corner, you can begin assembling the remaining elements of the headset.
Assembly sequence
Each detail of the headset is nothing more than a box made of wood (they differ only in size and shape). In order to assemble a complete kitchen, it is enough to learn how to assemble one cabinet, and you can assemble the rest using the technology you have learned.
If you are new to this business, be sure to study the standard assembly instructions - the use of each part is clearly stated there.
After all the cabinets and drawers have been assembled, you need to install it all, but this matter also has its own characteristics and you need to follow the sequence.
- The corner cabinet is installed first; in most cases it comes with a sink.
- Then, focusing on the corner cabinet, install all the floor drawers. Immediately adjust their height and connection angle.
- After adjustment, the cabinets are fastened together using self-tapping screws or ties.
- Secure the countertop and sink.
- Proceed to assembling and fastening the hanging boxes. Before attaching them, adjust the height for comfortable use.
- Attach all the doors and screw the baseboard.
Completing the installation
To reduce the number of complaints about their products, manufacturers put a slightly larger amount of fasteners, fittings and blanks into each set of furniture. If everything is done correctly and carefully, then they remain. What to do with them? You can keep it just in case for possible future repairs, or you can take it to the store.
There is no guarantee for assembling furniture yourself. Even if you order kitchen assembly, individual craftsmen or companies are very reluctant to sign an official paper guarantee. Valuing their reputation, assembly specialists try to correct mistakes or deficiencies quickly and without unnecessary publicity.
You can calculate the cost of assembling a kitchen yourself. On the websites of companies providing such services, there is a list of works with an indication of cost. You can find out both the cost of individual work (for example, assembling a drawer, installing a sink), and the cost of assembling and installing a turnkey kitchen.
Corner installation
The correct installation of a corner cabinet with a sink involves precise calculations, which is why it is installed in the first place. An important feature is the hole for the sink and the layout of the piping that supplies water to the sink and drains. With this layout, it is best to use a pipe without a back wall to provide access to the pipes. Then the rigidity of the structure is provided by special ties.
As for the upper corner cabinet, the assembly of this drawer is no different from the standard assembly of ordinary cabinets with doors. The main thing is to maintain a right angle when installing - this will make it much easier for you to install the remaining cabinets.
Errors and issues to consider during installation
One of the mistakes is to start assembly with large parts. A beginner should install small elements first and then move on to larger ones. It happens that the owner incorrectly calculates the height of the tabletop, forgetting about adjusting the legs and the floor covering, and the tabletop rests on the window sill. If this happens, part of it can be cut off. It also happens that power tools are used to assemble MDF elements. This is unnecessary because the fasteners are easily screwed into the sheets with a screwdriver.
Sometimes problems arise with the surfaces of the room. A fragile plasterboard wall can be partially dismantled and reinforced with timber. An uneven floor can also lead to difficulties, primarily in calculating the height of the tabletop and the distance to the top row, as well as creating unevenness. The problem is solved with the help of adjustable legs. Other important aspects:
- It is necessary to provide access to gas pipes in order to shut off the gas supply in case of emergency, as well as to meters to monitor indicators.
- Often, owners do not attach importance to the reliability of fastening the rear wall. If it lags behind the headset, it will cause a lot of inconvenience, and it is very difficult to correct such a defect.
Cabinet assembly
Let's look at the order of assembling the cabinet.
- You need to screw the mount onto the side wall of the cabinet. You need to drill small holes for the screws and use them to screw the mount.
- In addition, you also need to drill holes on the walls of the drawers - it is on them that the rail will be attached. If you do not do this in advance, then when installing the kitchen unit, difficulties may arise with this process.
- Where the box has a blind hole, a wooden dowel should be inserted. This will help assemble the box frame evenly and significantly increase the strength of the structure.
- Only after a thorough inspection and assurance that the structure is assembled smoothly can the parts be secured using a screw and a hexagon. To hide the screw head and give the set an aesthetic appearance, a plug is placed on top to match the kitchen.
- If the cabinets have legs, they should be screwed on and set to the required level.
- After the assembly of the box is completed, a sheet of fiberboard is nailed to the side wall using small nails.
- As for hanging drawers, you need to attach fittings to them, with which they will cling to the wall. It is best to use adjustable awnings.
Advantages
Of course, buying a kitchen set will save you from unnecessary hassle, but it will not meet all your requirements. Standard sets are available for sale - they are not designed for some of the features of your kitchen. Advantages of making it yourself:
- the main advantage will be the cost of the kitchen, which will cost half as much as a ready-made or made-to-order one;
- the ability to make a non-standard model - you can take into account all the features;
- with proper calculations and assembly, the headsets will last for many years;
- you can choose a very original design that goes beyond the standard perception.
Flaws
When making it yourself, you take a risk, because a lack of experience and certain skills can lead to deterioration in quality. At the same time, today there is a lot of literature that describes the entire manufacturing process in detail - if you study all the nuances, even a beginner will be able to cope with the task. As a reward for the work done, you will receive not only excellent kitchen furniture, but also pride for such hard work.
For information on how to assemble a lower corner cabinet for the kitchen, see below.
Corner cabinets are popular pieces of furniture that allow you to take up space that is not usually used for any purpose. They can be created from different materials and in a variety of styles, which allows you to choose a great option for any kitchen. The installed corner kitchen cabinet has different types, sizes, drawings that you can choose at your discretion.
Design Features
The positive parameters of using a corner cabinet include:
- due to its use, the usable area of the room is significantly increased, since the installation is carried out in a place that is not used for any other purposes or installation of other furnishings;
- although the kitchen floor cabinet intended for the corner is visually small in size, in fact it is distinguished by its excellent spaciousness and versatility, as it is equipped with different shelves, drawers or compartments for storing a variety of products or utensils;
- The sizes of kitchen cabinets can be different, which makes it possible to choose the best option for the room;
- Various methods can be used to decorate the facade, so they can be equipped with different decor or even made of glass, which has a positive effect on the appearance of the kitchen;
- if you choose a corner kitchen, then the kitchen set already includes corner cabinets for installation on the floor or for hanging on the wall, so they fit perfectly with other elements;
- In the kitchen, such a design always looks interesting, harmonious and stylish.
To create an interesting appearance for a room, a floor-mounted corner piece of furniture is usually combined with a wall cabinet.
Other features of such furniture include:
- the corner design is equipped with doors or created without them, and only attractive and beautiful dishes should be stored in open models;
- the shape of such a cabinet can be triangular, trapezoidal or L-shaped, and the choice depends on the preferences of the property owners;
- certain models are equipped with drawers in which small items can be stored, therefore combining a compact design with good capacity;
- usually the lower element is used under the sink;
- Often, various large household appliances can be installed in such a cabinet, which allows you to use them effectively in the kitchen;
- To decorate the facade, different methods can be used, for example, using a sandblasting machine or upholstery with leather or fabric;
- the lower elements can be equipped with legs or produced without them, and in the first case the ease of cleaning the room is ensured.
Cabinets equipped with carousel shelves are considered interesting, as they are an ideal solution for storing dishes.
Types of suspended structures
Mounted structures can be divided into several groups according to their purpose, design features, and operating conditions:
- Cupboards for dishes. They are used to store various items - from dishes to food, spices. There are shelves inside such structures. Doors can be made of wood, MDF, and other opaque materials.
- Drying cabinets. Such DIY structures are located above or next to the sink, with dish dryers installed inside them.
- End structures. Corner products are the best solution for small-sized kitchens, where it is necessary to rationally use every centimeter. The end structures are suspended in the corner of the room using special hangers.
- Open type products. Cabinets with open shelves are used to store various decorative elements, beautiful dishes, and jars of spices. Such furniture is equipped with hinged, sliding or tilting transparent doors, which ensure the safety of using the cabinet and do not allow objects located on the shelves to fall down.
Before you make a cabinet with your own hands, you need to decide on the type of construction; the choice depends on the dimensions of the room and the needs of the people living in the apartment.
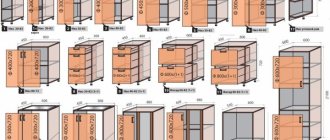
Dimensions depending on type
The dimensions of these structures may vary. If they are part of a headset, they are the ideal size for connecting with other elements. If selected separately, they must match other straight cabinets. The dimensions of a corner piece of furniture may differ depending on whether it is floor-mounted or wall-mounted.
Mounted
If you select a corner-type top cabinet, then its dimensions are equal to:
- usually these elements are not used for installing large-sized household appliances; it is allowed to make them not too durable and spacious;
- the width can vary from 15 to 80 cm, and this parameter depends on the shape of the cabinet, since it can be triangular, trapezoidal, L-shaped or some other;
- the standard depth is 35 cm, but when choosing it, the depth of the lower drawers is taken into account, since these elements must fit perfectly with each other, otherwise the kitchen will not look harmonious;
- It is recommended to attach a corner wall cabinet for the kitchen at a distance of about 50 cm from the lower cabinets, but a deviation of 5 cm in different directions is allowed.
The above dimensions are considered standard and frequently encountered, but it is possible to choose designs with completely different dimensions, since the main factor is that they should be spacious, easy to use and attractive. The corner structure can be so small in size that it can be placed in a small niche, if there is one in the room. Often attached above the hob, it will therefore be used to store various spoons or spatulas used in preparing various dishes. When choosing a facade, it is taken into account that there may be one door or several of these elements. You can choose models that are not equipped with doors.
Floor
If you choose a lower cabinet, then the standard dimensions will be:
- Dimensions are selected depending on the parameters of the selected kitchen unit, and it is recommended to take into account the dimensions, height and other parameters of the stove, which can be gas or electric;
- if the kitchen is small in size, then it is advisable to choose a depth not exceeding 50 cm;
- the standard height is 85 cm, but this parameter can be adjusted in certain cabinets, since for many people this height is considered too significant;
- The width varies from 15 to 80 cm, with 60 cm being considered optimal.
An interesting solution would be to purchase a corner structure with dimensions of 600x600 mm, which will have optimal dimensions, so it will be really convenient to use.
Usually the lower element is installed after the upper one is attached. The lower structure should be symmetrical to the upper one. You can choose an element with or without legs.
Under the sink
Quite often, corner floor products are chosen for the sink. Their sizes can vary significantly, as they depend on the dimensions of the sink itself. It is taken into account how the structure will be fixed, since you can buy a mortise or overhead sink. Due to the large number of different sinks, there are certain difficulties with the correct choice of the optimal cabinet, so it is advisable to first select the sink, and then the piece of furniture.
For such cabinets, standard dimensions are considered optimal, but if you need to obtain any unusual design, then all parameters are calculated individually. The width can exceed 60 cm, and the depth can even reach 80 cm, although using such a cabinet will be difficult. Usually, for large products, two facades are chosen for the sink, but you can choose a model with one door. An excellent choice for any room would be the Madeleine kitchen, which has an interesting look, affordable cost and high quality.
Angular
A standard corner piece of furniture has different parameters. It can be mounted or floor-mounted, and is also created from a variety of materials. The most popular is a corner structure made of natural wood, but its cost will be extremely high. It is necessary to constantly protect the wooden product from moisture, which is not always optimal for the kitchen.
An excellent choice would be products made from laminated MDF or plastic. When determining the optimal dimensions, the recommendations of professionals are taken into account:
- the width of the base, which varies from 10 to 12 cm, and this indicator is not affected by the selected type of stand, so you can choose either a design with legs or a solid cabinet;
- the height is usually chosen within 70 cm, but if the product is equipped with a sink, then it is advisable to choose a lower design so that the sink achieves a single level with all the other cabinets that are part of the kitchen unit, and the lower element ensures ease of washing dishes;
- the height of the tabletop can be from 2 to 4 cm, and this parameter depends on what material was used for its production, as well as what structure it has;
- the width also varies from 40 to 80 cm, and this parameter is influenced by the shape of the corner cabinet, the filling of the element, since it may have not only shelves, but also drawers, as well as other storage systems;
- the depth varies from 30 to 50 cm, and it is selected depending on the same parameter of other straight cabinets installed nearby.
Stages of assembling a kitchen set
It is worth highlighting the following main steps:
- Preparing tools.
- Assembly of cabinets and cabinets.
- Bottom row wall mounting.
- Installation of countertops, sinks and hobs.
- Attaching wall cabinets.
- Installation of doors, as well as baseboards and decorative elements.
- Organization of local lighting.
Installing a kitchen wall is a process with a lot of manipulation. The assembly looks quite monotonous, but at this moment it is necessary to take into account many nuances. The main ones are the size of the sections and their purpose, which mutually affect each other, as well as the type of opening. Once the modules have been assembled, it is time for installation. If the person collecting does not have professional skills, then it is better to place the bottom row first. The doors can be attached immediately or after installing the hanging tier. The top row is attached either to a guide (rail) or to hinges.
The first method can be described as simpler. The second allows you to save money. It is important to choose the correct height for wall cabinets, as well as make informed decisions regarding the installation of communications and kitchen appliances - the comfort and efficiency of work in the kitchen depends on this.
Required materials and tools
You will need a lot of equipment, ranging from power tools to fasteners. Firstly, this is a hammer drill with 6 and 8 mm drills, a screwdriver, a drill, as well as an adapter and drills for it. To work with the tabletop you will need a hacksaw or jigsaw. You should get a hex wrench, pliers, hammer, tape measure, level and square.
You will need to prepare a large number of fasteners. Anchor bolts, dowels and angles are usually included in the package. You will need to purchase self-tapping screws, namely 70 mm for wall cabinets and 15-16 mm for fittings. Other elements that need to be purchased: ties for fastening the modules, silicone sealant, fastening rail for hanging, euroscrews (confirmations), furniture nails. It is recommended to purchase dowel conductors.
Assembly of floor cabinets and wall cabinets
It is better to start assembling kitchen furniture from the bottom tier. First, we fasten the bottom with the side surfaces with confirmations. Next we place the top strips. The diagonals of the lockers are checked with a tape measure. The normal mismatch is up to 3 mm. If everything is normal, then proceed to the next step. The relatively thin back wall is secured with small nails or a staple gun. The step between them is no more than 1 cm. We mount the legs on the bottom of the cabinets, securing them with self-tapping screws. We install hinges in the pre-made holes. We attach the lower sections to them. All that remains is to align the doors and install the handles.
Then comes the turn of the top row of furniture. It is mounted in a similar way, but there are some differences. Adjustable canopies are needed in the upper corners. We provide cutouts at the back for them. Drawers are not installed in upper cabinets.
Features of assembling cabinets with drawers
The walls are assembled in the same way as cabinets with shelves - they are fastened with screws. The three surfaces are assembled, and a sheet of fiberboard is placed in the bottom. Then the front of the box is secured using an eccentric tie. To fix the latter, you need to screw the screw into the front surface, and then insert the side with the cap into the hole in the side wall. There is a large hole on the side elements for a bushing. You need to insert it there and turn it to grab the screw head. She will go to the side.
Then the roller guides are screwed at the bottom of the bedside table. The roller on the drawer rail should be located at the back, and on the corresponding element of the bedside table - at the front. To complete the assembly, you will need to insert the guides into each other - this is done at an angle. When assembling a combined cabinet yourself, the first task is to correctly install the guides.
How to assemble cabinets for built-in appliances
Installation of built-in equipment causes certain difficulties, but it is now more relevant. Dimensions must match to complete installation tasks. This is possible thanks to standardization. In addition, sections for such household appliances should not be equipped with doors. No protrusions, curvature or sloppy assembly is acceptable.
For built-in ovens, a niche size on the front side of 60×60 cm is provided. In cross-section, the ovens have parameters of 59.4×59.4 or 59.5×59.5 cm. The gap will remain 0.5-0.6 cm. Minimum The depth of the furniture should be 55 cm. For building in microwave ovens, the same principle works, but with different parameters. The standard niche width, however, is the same 60 cm. The section height should be selected from 380-382 mm and below, depending on the model. The optimal depth is 320 mm. You also need to use the individual installation diagram, which is available with the kit.
Installation of the lower tier headset
To conveniently calculate distances, you first need to install the lower bedside tables. Work must be carried out from the corner of the room. If you plan to occupy the entire length of the wall with the lower tier, you need to start from the side surface that is shorter. The legs/wheels of the cabinets must be adjustable. If the kitchen wall is installed on a floor with an uneven surface, you will need adjustable legs within 12-17 centimeters. You will need to draw markings on the wall. It is recommended to set the height so that there is a gap of at least 10 cm between the base and the floor. The gaps between individual furniture elements are kept to a minimum.
All cabinets are installed and height adjustable. Adjacent cabinets are tightened with a clamp and a furniture tie. In the bottom row you will need to make recesses and holes for gas and sewer pipes and electrical appliance wires.
Other nuances:
- In small kitchens, it is justified to create drawers instead of plinths.
- For correct installation of the tabletop, the planes of all bedside tables must be checked with a level.
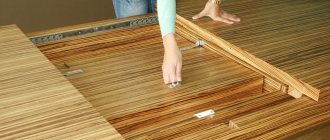
Fastening the table top
After installing the lower cabinets, it’s time for the tabletop. The first step is to cut a hole in it for the washbasin. To do this, the tabletop must be placed in the same way as it will be located after installation. The space for the sink is marked with a pencil. It is necessary to work along this line with a jigsaw. The cut is treated with sealant. As a rule, the countertop also requires openings for communications (pipes, hoses) and the hob. After completing the associated work steps, you can attach the cover.
One of the methods is using furniture corners on the walls of the cabinets. The table top is then leveled. If the lid consists of several parts, then the fastening between them is formed with metal strips. First, they are cut with a hacksaw to the width of the lid. Then one of the surfaces of the first strip is lubricated with sealant. It is attached to the cut of the tabletop with screws. Then they lubricate the back side and attach it to the other part of the lid. When the tabletop is ready, it is installed: screws are screwed into the furniture corners.
Sink installation
First you need to choose the best sink and faucet option. The most convenient ratio is considered to be a deep sink and a relatively low faucet - then there will be little splashing. Among the materials used, preference is often given to stainless or enameled steel. Only after taking into account these nuances can you begin installation.
For installation you will need fasteners (usually included in the kit), a jigsaw, screwdrivers, self-tapping screws and sealant for processing the sink seats. During the work, communications are first carried out and the mixer is connected. To attach the sink you need 4-5 L-shaped elements. They are applied to the inside of the cabinet. Then marks are made and screws are screwed onto them. There should be at least 5 mm above the marks. Next, the cutout is covered with a sealant that will hold the sink in place and protect the furniture. After this, the washbasin is installed on the screws and moved until it is perfectly fixed. At the end, the parts are secured.
Installing the hob
The most important stage of work is marking. First, the inner boundaries of the cabinet under the hob are transferred to the countertop. Then, by laying diagonals, the center is found. It will help you make more accurate calculations. The parameters of the embedded part of the weld are deposited on the surface with a small margin for centering. Then you should drill a hole with a drill for working with a file (jigsaw). Cutting should be done on a stand.
When the opening is ready, it’s time for waterproofing. Just before installation, a few more steps are taken. First, a gas hose is connected to the panel. Then sealing tape is used. It is glued in one piece. The two free ends are joined as tightly as possible. Then the hob itself is installed. It is immediately centered to lie as symmetrically as possible. After this, you need to attach the plates in the cabinet in all four corners so that the hob fits tightly to the surface.
Methods for attaching the hanging tier of the headset
The two main methods of fastening are on furniture hinges and on a rail (mounting strip). In the process of installing the “second floor” of the kitchen wall, the most important issue is the height of the hanging sections. The decision is made based on indicators such as ceiling heights and cabinet sizes. Between the tabletop and the bottom of the upper tier there is usually enough space of 50-60 cm. However, the growth of family members is also important. If the housewife is short, then 45 cm to the top cabinet is the best option. Making the gap even smaller is not recommended.
It is permissible to install boxes with an error of up to 10 mm, provided that a special rail is used. If installation is carried out on a plasterboard wall, you will need to use butterfly dowels. It is also possible to install timber under the gypsum board sheet at the location where the box is attached. If the kitchen wall has an angular shape, installation is done first on one wall and then on the other.
When hanging the upper tiers, a 3mm gap around the perimeter must be maintained.
Tire mount
It is much easier to attach the sections to the tire. With this fixation method, a mounting strip is used. One part of it is fixed to the wall, and the other to the wall drawers. The fastening is based on a hook-and-groove system, which ensures reliable fixation. To hang a cabinet in this way, the work of one person is enough. The rail is installed along a horizontal mark on the wall. After this, you can start assembling the case on the floor. Instead of hinges, hinges are attached to the furniture. In the process you will need to make small holes in the back surface for the mounting hooks. Sections treated with this method can be immediately mounted on a mounting rail. The position of the body is regulated by special screws in the body of the hinges themselves. They make it possible to move the modular structure to the right, left, and also a few millimeters from the load-bearing wall, if there is already a thick kitchen apron below.
Fastening to furniture hinges
A more common installation method is to mount it on furniture hinges: after hanging there should be no gap left between the wall and the back wall of the furniture. This fixation method is best used exclusively after installing the lower tier of cabinets. In the process, you will need to draw the vertical parameters of the modules on the wall, using a level. One of the cabinets must be attached to the wall at a certain height to mark the hanging point through the eyelet.
Next, using a level, a line is drawn from this place along the perimeter at the locations of the headset elements. Using a tape measure, the gap between the centers of the suspensions is determined. The result is transferred to the wall horizontally between 2 vertical lines of parameters of the lower modules. In these places, holes are drilled, dowels are driven in and self-tapping screws are screwed in. The modules are attached to them, and after that all that remains is to equip them with shelves and screw the doors. These works require the participation of two people, because one person cannot cope with the mass of the structure.
Due to the high price of modern fastening slats, many furniture sets use ready-made hinges.
Door fastening
At the very beginning, cross-shaped plates are screwed to the inner walls of the modules. After installing the sections on the wall and installing shelves in them, you can start attaching the doors. Hinges are placed in the round recesses on the doors. They are secured with self-tapping screws. Then each door is attached to the cabinet so that the fastenings fall on the cross-shaped parts. The hinges are connected to these parts, the bolts are tightened. The door must be closed to check the position. If it “moves” upward or, as is more often the case, downward, adjustment is needed using 2 bolts on the connection. In order to initially secure everything normally, it is recommended to hold the door firmly with one hand and use the other to tighten the fastener with a power tool. The procedure is repeated with the remaining modules. In addition to the usual inset loops, you can use some other varieties:
- invoices;
- semi-overhead.
Installation of skirting boards
After installing the elements of the headset, gaps remain between its surfaces and the wall. The void must be closed to prevent water and food fragments from entering. The gap near the table top is sealed using a thin plastic plinth. Its lower part is attached to the wall with self-tapping screws, and a decorative element (the plinth itself) is placed on top. There is a groove in the design of the guide into which the upper element should fit, snapping into place like a lock. There are seals on the end parts of the plinth. They are easy to cut for subsequent installation of additional elements. These ends are decorated with furniture plugs and corners. These devices are designed to protect against the accumulation of crumbs and dirt. The whole structure is an excellent sealant; it can be attached even to uneven walls. Hidden wiring can be installed inside the baseboard.
Backlight headset
There are two main methods of lighting in the kitchen, in addition to central lighting. These are spotlights and strips up to several meters long. The first option involves installation at the top of the headset. Spot lights have worked well, but installing strips directly on the apron of the work surface improves the illumination many times over.
Modern furniture sets are also equipped with internal lighting. In this case, the necessary things are found much faster. A good option for arranging a kitchen unit is LED lighting. It can last for more than ten years when used for 15 hours a day. LED strips can have different emission angles, which is very convenient for the kitchen. In addition, LED lighting is relatively inexpensive. When placing lighting fixtures, you should plan everything carefully, otherwise repairs or replacement of parts of the set may be required.
Measurements and drawing
Corner kitchen cabinets can have different sizes, are presented in numerous types, and there are also various drawings according to which they can be made. When choosing dimensions, you need to take the correct measurements, and it is also advisable to make a diagram of the kitchen so as not to make a mistake with the choice. In this case, the recommendations taken into account when drawing up the drawing and taking measurements are taken into account:
- The thickness of the shelves is selected depending on what items will be stored on them. It is advisable to show on the diagram whether the corner structure will accommodate household appliances or light spices. Standard shelves are 18 cm thick, but if heavy objects are stored, it is advisable to choose a thickness of 21 cm or more.
- The depth of hanging boxes should not exceed 40 cm. It is taken into account that in the corner there are usually elements for connecting to communication systems, so it is often impossible to place any large objects in corner cabinets, since various pipes or wires are laid here.
- It is not allowed to hang a wall cabinet low if there is a stove underneath it. This is especially important if the structure is made of plastic, since under the influence of high temperatures the material begins to melt.
- The standard size of a corner cabinet is 60x60 cm, and the width of the facade is 42 cm, and the depth with such dimensions is equal to 30 cm.
Corner cabinets are considered an excellent choice for any kitchen. They are presented in many models, so the corner kitchen cabinet and the types of sizes and drawings are different. When choosing, especially much attention is paid to the dimensions so that the products are convenient to use and spacious. It is first recommended to create a special drawing of the kitchen, according to which all elements for installation in this room are selected, as well as a cabinet for the kitchen.
What are the benefits of corner cabinets?
A wall-mounted corner cabinet has a number of advantages:
- Occupies a corner - a place that is difficult to use rationally.
- Visually small, but roomy.
- The size and shape of the structure are selected depending on the needs of the owner.
- The facade is decorated in various ways. Doors are often a decorative element of kitchen design.
- The doors are made from any material, including glass.
- Pairs perfectly with U- and L-shaped kitchen sets.
Video
The most suitable furniture option for a small kitchen is a corner set. It is compact, takes up minimal space, and looks neat. Some owners cannot decide which part of the headset to put in the corner. Usually a sink is placed there. A cabinet for a sink is often purchased complete with other furniture modules. If some elements of the set do not fit into the room, they can be ordered separately or made independently. With a little time and the necessary materials, you can easily assemble a corner cabinet for a sink in the kitchen.
The sink, located in the corner of the kitchen unit, saves usable space and fits perfectly into the interior
Where to begin?
First of all, make sure that all parts of the headset are at the assembly site, nothing is lost. You can check the list, which indicates the composition of the kit. Inspect the packaging: not torn anywhere, corners not damaged. Instructions for assembling the kitchen may be in one of the boxes, or may be included separately.
In addition to a list of all parts and fasteners, it contains a kitchen assembly diagram and a recommended assembly sequence. It would be a good idea to take care of safety precautions: gloves, glasses, good lighting, enough free space.
Features of using a corner cabinet with a sink
Corner furniture can be stylish and comfortable, but before installation you should find out its advantages and disadvantages, familiarize yourself with the types of corner elements in order to choose the best model.
Advantages
The obvious advantages of installing a set with a corner cabinet and sink include:
- Rational use of space. In most rooms, a corner is an unoccupied area. A cabinet with a sink will become a useful and functional element of the kitchen.
- Neat appearance,
- Capacity. You can place many more items under the sink next to the pipe.
- A corner is the most suitable place for a sink, since this is usually where communications pass.
- Convenient location. The sink, located almost in the center of the set, allows you to quickly reach it, which saves a lot of time during the cooking process.
There is a huge selection of all kinds of corner cabinets with kitchen sinks on the market.
Advice! Located in a corner, away from the window, the space by the sink lacks light. It is recommended to install a spotlight or LED strip above the sink. The lighting fixture is attached to the bottom of the corner wall cabinet.
Pendant lamps designed to illuminate the sink area look stylish and original.
Flaws
The disadvantages of using corner cabinets with sinks include:
- Inconvenient to use. Getting to the contents of a standard corner cabinet can be difficult. This situation can be corrected using modern storage systems.
- Low reliability. Corner furniture is more susceptible to breakage than straight furniture.
You can use convenient storage sections at the bottom of the corner cabinet in the kitchen
Advice! When choosing or making your own cabinet, you must take into account the material from which the sink is made. So, a stylish sink made of decorative stone has a lot of weight, which means the cabinet underneath must be strong and reliable.
A cabinet with a sink in the kitchen can be placed not against a load-bearing wall
How to use a corner cabinet
Inside the corner cabinet in the kitchen you can place:
- A trash can is a necessary item in the kitchen. Hidden behind the doors of the base cabinet, it will not attract the attention of guests. Today, it is popular to use containers that allow you to sort waste: paper, glass, organics.
- Part of kitchen appliances, for example, water filter, food waste disposer.
- Boiler. We are talking about a flow model. Only a compact heating device will fit under the sink.
- Kitchen utensils, cleaning products, pet food, etc.
The corner cabinet under the sink can be equipped with two shelves for storing household chemicals
To increase the capacity of a corner cabinet in the kitchen, you should install in it:
- A pull-out basket that holds many items and rolls out gently when the handle is pulled;
- Carousel shelves that make it easy to reach all the items placed on them;
- Ordinary wooden shelves that should be installed on the side walls of the cabinet;
- The boxes are of an unusual shape, with a cut-out center through which a sewer pipe passes.
Installing shelf holders
To install shelves, special holes are made in the side walls. They are not end-to-end, they have a certain depth. The height of the holes is evenly spaced every 10-15 cm. This is done so that the shelf can be installed at different heights for a more convenient arrangement of high and low vessels.
Wooden or plastic pins are inserted into the holes. They have a cylindrical shape and a corrugated surface. Metal stops are installed in the same way; they are more preferable as they can withstand greater loads.
Types of corner cabinets
When choosing a corner base cabinet for a kitchen sink, you should keep in mind that they come in two types:
- With a right angle (L-shaped). These are the simplest models and are easy to manufacture. Usually they are two-door. When opening the door, the entire inside of the cabinet is clearly visible.
- With a beveled angle (trapezoidal). This is a practical option, more spacious than a corner one, but such furniture looks massive. It is suitable for kitchens with two or more sinks. Trapezoidal models are more expensive than L-shaped ones.
Beveled model
Right angle model
The standard dimensions of a corner cabinet for a kitchen sink are 90 by 90 cm. These dimensions are suitable for the following cabinets:
- With hexagonal bottom. The size of the outer sides is 52 cm, the inner ones are 45 cm. The module does not have a back wall or shelves.
- With a pentagonal bottom. The size of the outer sides of the corner cabinet for the kitchen is 52 cm, and the inner ones are 83 and 85 cm.
Trapezoidal model of a corner cabinet with a kitchen sink in the kitchen interior
The height of the cabinet under the sink should be the same as that of all other elements of the set, since they are united by a single work surface. When calculating the width and length of furniture, it is necessary to take into account the dimensions of the sink.
Corner cabinet under the sink, combined with one countertop with the rest of the cabinets
Cabinet components
A standard floor cabinet designed for installing a kitchen sink consists of the following elements:
- Bottom. It is made in one copy. Depending on the selected type of cabinet, it may have a corner shape or a rectangle shape with a cut off corner. It is from cutting out the bottom that the manufacture of the cabinet begins. This component element determines the dimensions of the product. It is necessary to seal the cut corner or two ends that are adjacent to the inner corner with edge tape.
- Sidewalls. Manufactured in quantities of 2 pieces. They determine the height of the product. Processing with edge tape is carried out only on one side of each sidewall - the long front one.
- Back wall. Installed on the communication input side. If pipes are supplied from both sides, then install a corner element - two chipboard strips twisted together, 10 cm wide. They are finished with an edge tape, which will protect the material from swelling as a result of exposure to moisture.
- Connecting elements. They are strips of chipboard 5-8 cm wide. Their number depends on the type of cabinet. For an L-shaped product, 2 front and 1 back element are required, and for a trapezoidal one, 1 front and 1 back element are required. Each element is taped along one long side.
- Door. There can be two of them in an L-shaped cabinet. They are covered with tape on all sides.
If you use a mortise sink rather than an overhead sink, then you will additionally need one more part - a countertop. The hole in the countertop under the sink is cut using a jigsaw. The dimensions of the hole should be identical to the contours of the sink. The required size is determined using a template made from cardboard: applied to the sink, traced and cut out. The hole for installation in the jigsaw tabletop is created using a drill.
Tools and Fasteners
Even if a set of furniture modules seems like an ordinary construction set to you, where you just need to connect all the parts together, you cannot do without a serious tool. To work you will need:
- A hammer drill if you have concrete or brick walls, or a good drill for a wooden house.
- A screwdriver - even the simplest and cheapest one. Just don’t use a screwdriver, otherwise the process of assembling the cabinets will take you too much time.
- Jigsaw – you will use it to cut holes in the countertop for the sink and hob.
If you don’t have any of the above, you can ask your friends for a suitable tool or rent it yourself.
In addition, prepare a standard set: hammer, key wrench, level and angle, tape measure, pliers. Also carefully check the completeness of the kitchen set and, if necessary, purchase fasteners and accessories:
- Pens;
- Loops;
- Pull-out mechanisms for drawers;
- Tires and canopies for the upper modules;
- Legs for cabinets;
- Furniture ties.
Making a corner sink cabinet with your own hands
To make a corner cabinet with a kitchen sink, no special knowledge is required. You just need time and desire. To get a piece of furniture that fits perfectly in size, all work should be divided into stages.
Preparatory stage
Before starting work, it is recommended to calculate the dimensions of the cabinet, make a drawing, select manufacturing materials, order parts or make them yourself. To assemble the cabinet you will need: self-tapping screws, a set of screwdrivers, hinges, closers (if you plan to install them), a drill, confirmations, hinges, pins, legs, handles.
Assembly
After preparing all the parts, you can begin assembly:
- Attaching two sides to the bottom. The lower part of the cabinet and the sides are installed on the floor and located at an angle of 90 degrees to each other. In the lower part of the bottom, at a distance of 5 cm from the edge of the product, they begin to drill a hole for confirmations. The drill goes through the bottom and bottom of the side. The confirmat is immediately inserted into the resulting hole and screwed tightly with a hex screwdriver. Next, drill a hole for attaching the side panel on the other side. Do the same with the second sidewall.
- Assembly and fastening of the corner element. It is carried out according to the same principle as the installation of sidewalls.
- Installation of connecting elements. It is carried out in the same way as the previous actions; fastening is carried out using confirmations.
- Attaching the legs. To do this, place the cabinet upside down and attach the legs using self-tapping screws.
- Door installation. The cabinet is placed on the back. The door facade is milled for hinges. To do this, take a feather drill or cutter with a diameter of 3.5 mm. When creating holes, it is necessary to deviate from the top or bottom of the door leaf by 10 cm and from the sides by 2.5 cm. After milling, screw 2 hinges to the door and attach it to the cabinet.
Final stage
After assembling the furniture frame, minor modifications are made:
- Installing door closers so that they close softly;
- Attaching door handles;
- Adjusting canopies;
After this, the cabinet is installed in its designated place and connected to other elements of the headset.
Advice! The gap between the floor and the base cabinet can be covered with a decorative panel. It is purchased separately and attached to the legs of the bedside table.
Care must be taken not only in assembling the frame, but also in installing the sink. The metal sink is simply inserted into the cabinet, but it must be secured, otherwise the cabinet may soon fall apart. There are two ways to secure the sink:
- Using silicone. It is applied to the top of the body along its entire perimeter. After this, a sink is attached to the top. In such a situation, silicone plays the role of a sealant and imparts rigidity to the structure.
- Using self-tapping screws. This fastening option is more reliable, but silicone will still have to be applied to ensure tightness.
By making a corner cabinet for a kitchen sink with your own hands, you can save money and create an exclusive piece of furniture that fits perfectly into the space of the room. The collection process itself is not particularly difficult; the main thing is to accurately measure and calculate everything. Then the assembled cabinet with sink will look attractive and have high performance qualities.