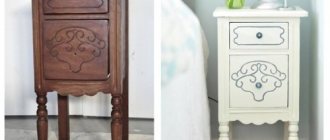
Do-it-yourself restoration of old furniture
This is what FORUMHOUSE users get at home, where instead of a carpentry workshop there is a small kitchen, and the set of tools is the most common one that everyone has.
To make a furniture masterpiece out of an old bedside table, you need:
Cleaning old surface
One of the most difficult processes is removing layers of old paint or varnish from furniture.
If the paint is in good condition (not chipped, not a toxic color), then you can paint the top with fresh paint. But the catch is that the old paint can fall off.
Old paint is washed off with special removers (you can buy them in hardware stores). The manufacturer's instructions indicate for which materials it can be used. Before applying the remover, it is recommended to disturb the structure of the coating - scratch it with a nail or other sharp object. You need to apply the remover with a wide but thin brush. After this, the furniture should be covered with waxed paper and left for half an hour to two hours (if the old furniture was covered with polyester compounds). This work is performed with gloves and a mask, in a well-ventilated area.
After keeping the furniture covered with the remover under the paper for the required amount of time, you can proceed to removing the exfoliated surface with a spatula.
Then the furniture needs to be sanded with a soft disc sander, or just sandpaper. The goal is to get a clean and necessarily slightly rough surface.
Restoration of old furniture: giving new life to wood
Restoring wooden furniture is a process that requires a careful approach and a lot of patience. An old tree can be eaten into dust by worms. But if you want to revive a neat table with unique inlay or a bureau with tons of secret compartments, try getting creative.
Decoupage of an old chair, as well as replacing the upholstery
You can make real masterpieces from old furniture
Wooden furniture is quite durable. But before starting the restoration, you need to carefully remove all the drawers, shake off the dust, and remove moldy areas with sandpaper. This applies not only to living room slides and bedroom sets. Restoring kitchen furniture is a process that will bring no less pleasure.
You can apply a design to restored furniture using a stencil.
Country style interiors are in particular trend today. So don’t throw grandma’s closets in the trash. Remove old paint or varnish. Carefully treat the wood with special compounds that protect against insect pests.
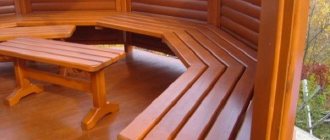
Beautiful country style furniture with a lightly worn effect
Country style furniture is very popular today
Kitchen cabinet doors can be painted and lightly blackened to give a touch of elegant age. If the wood is valuable, carefully remove the varnish and coat it with a new compound. You can bring old varnish back to life if it is not affected by mold. There is a wonderful recipe: wax! This is a magical remedy that will revive a tree 1-2 centuries old.
Thanks to a little restoration, old, good furniture will serve you for a very long time.
Decorating the bookcase
This spring I was blessed with a bookcase! In the photo it has already been restored by a carpenter. I had to replace all the shelves, cut out the missing leg and thoroughly sand the top layer. No way without a carpenter. And it would have stood for a long, long time due to my busyness, if not for the textile festival in October of this year, which I showed up for. I showed up at the festival and they gave me 4 square meters. What should I fill in? Of course, with whatnot! It will be possible to put my toys, boxes, flowers and a lot of other beauty on it! In addition, it fits perfectly into the niche of my studio, both in size and in the interior.
In general, I had this idea. So that on the shelves, as if there were lace napkins. Our grandmothers. Crocheted. Wipe off the dust and it's good. There is no need to wash anything). Of course, I couldn’t find any decoupage napkins like that. But I found some cute pictures and printed them out at the copy center. I decided to make the main color dark brown, and paint the shelves on top of the main color to match the print. Then age it so that the main brown color shows through from under the colored shelves. I’ll confuse you now, it’s probably better with pictures, it will be clearer.
I started from the top shelf. Logical, right? I covered the surface where the torn out motif would be approximately located with primer. After drying, I sanded it.
I placed the torn lace motif on the cellophane and applied universal waterproof glue with a brush in two layers.
The process is certainly not for the faint of heart. A little later I tried another method. It seemed easier to me. But not by much. In general, you need to thin the motif as thinly as possible so that the transition of paper into wood is less noticeable.
I got busy here and didn’t shoot the intermediate frame, but I’ll tell you everything! :)
This is a napkin already glued to the shelf.
It's simple. I spread PVA onto the sanded primed surface and placed the napkin with the cellophane facing up. And then, using a dry cloth, I removed excess PVA and air from the center to the edges. Then I carefully removed the cellophane. Almost ordinary decoupage. Many people do this with files.
The holes that formed did not bother me at all, but on the contrary, they later added some piquancy to my bookcase, which was going to get old anyway. And in general, I have long caught myself thinking that some moments-flaws in creativity, in the future, lead to some new ideas.
This shot was taken much later, but I’m showing it to you because I didn’t take it in time.
But I decided to make this shelf differently. I immediately glued the torn motif onto PVA, face down, onto the primed surface. And after drying well it became thinner.
For some reason it turned out strange. As the green color thinned, it turned into turquoise, and I just needed a green shelf. I had to draw on it.
And then, according to the same scheme. Main color. Applying wax to the edges of the shelves.
Bedspreads for 2 times. And with the main brown, it turned out to be 3 layers.
Sanded it. In those places where the wax was applied, brown paint is visible, which was what needed to be proven :)
And so on for all five shelves.
As you already understood, I painted the balusters at the same time as the shelves. But they turned out so perfect and deep brown that I decided to work with them some more. Since I didn’t have bronze paint, and gold wasn’t suitable, I took a bronze outline. And using an almost dry brush I rubbed the protruding areas.
The balusters then became more voluminous.
And for even greater volume, I scraped a black pastel with a stationery knife and rubbed it, rubbing all the indentations with my fingers.
I took it outside and applied the spray twice. The spray is matte. Thank God there is no wind today and the weather is whispering.
And here is the whole bookcase! Not a bookcase, but an art object! I think it turned out great!
A little later, I want the napkins to remain matte and the shelves themselves to be slightly glossy. There will be a 3D effect. It's a matter of varnish :)
Thank you for being with me and, of course, I will be glad to see your comments!
Source
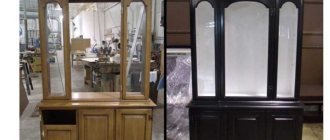
Restoring an old bookcase
I want to talk about my first restoration experience. I know that there are many professional artists, but the good thing about the Theme Fair is that here absolutely everyone can talk about their own personal experience.
And so my friend’s eldest son brought this bookcase, called and left. I go out, and she, my dear, is standing by the garbage chute. A friend later said that her family scolded her for giving away such rubbish - it was a shame. Thank you for agreeing to take her in your cool car!
This is how she was at the beginning of our “acquaintance”.
Mold, dust, cracks, some dark circles. The plywood peeled off due to dampness, and the dog gnawed the corners of the lower shelves. The legs were rotten from dampness.
First, I washed my beauty from dust and mold. I put it in the bathroom, turned on the shower and washed and washed. The flowing water was very black. Then I put it on the open balcony to dry. Since last year’s summer, unlike this one, was hot, the whatnot dried out quite quickly. I decided to remove the plywood from those shelves where it had completely peeled off.
Restoration of wooden surfaces
No matter how carefully you handle the furniture, abrasions, scratches, and stains still appear. They are easy to eliminate. The main thing is to know how and with what.
A hot sponge and orange oil will restore the shine of wooden furniture
Such transformations are possible using a marker, alcohol and wax.
Step-by-step master class on aging furniture
- Applying a base coat of paint.
- Drying. You can use a hair dryer to speed up the process.
- Treatment of aging areas with paraffin.
- Adding putty for relief and creating the effect of a multi-layer coating.
- Creating a worn effect. This is achieved by friction with sandpaper, a stiff brush or iron wool... or by applying paint with a sponge, then the previous layer will be perceived as abrasion.
- Painting in several layers.
- Sanding.
- Patination.
- Drying.
After complete drying, you can begin sanding the area to be treated, then begin decorating.
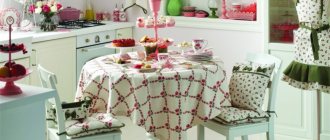
If you have decorating skills, you can additionally paint furniture in the Provence style with your own hands. Floral ornaments and images with rural motifs will look especially organic.
You can use decoupage napkins with designs in the Provence style, which are transferred to furniture.
Restoring polishing
Restoring a layer of varnish is a complicated matter. Any furniture restoration begins with cleaning and degreasing, and repairing the varnish coating too. We use dishwashing detergent diluted in water: safe and reliable. After drying, we proceed to refinishing the polish.
Scratches are painted over, then the coating is restored
You can simply refresh the faded polish on furniture using mixtures you prepare yourself:
Do-it-yourself restoration of Soviet furniture
Did your grandmother leave you antique Soviet furniture from the 30s? Did your parents reward you with an old wardrobe from the 60s? Don't rush to get rid of them! In this article you will learn how to restore Soviet furniture with your own hands, or more precisely, how to update old furniture so that it again begins to please your eyes. Photos of successful experiments are attached. So…
How to restore veneer
Veneered furniture requires a special approach. The means are basically the same, the methods are different. For example, if after getting hit the veneer is swollen, fill a disposable syringe with PVA glue, pierce the bubble, and inject glue into the cavity. Place a piece of thick fabric on top and place a weight. If the surface is uneven (convex or concave), use a thick fabric bag with heated sand as a load.
Such veneer damage is restored in two stages. First, the swelling is eliminated, then the scratch is painted over and the coating is restored.
If the veneer is glued with alcohol glue, you can return the swollen part to its place by ironing it through a rag with a hot iron. But do not overheat the iron: the veneer may stretch. Heating level is medium.
If ironing with a dry cloth does not help, try repeating the operation with a damp cloth (wet it and wring it out well). There is a chance that the wood will swell and become more elastic. To reliably fix the swelling, you can introduce PVA there and then heat it with an iron.
If the swelling is cracked, you can also try to seal it with heating (through a rag). If it doesn’t work, tear off the peeled piece. You don’t cut it, but rather break it off: on veneer, breaks after restoration are less noticeable than cuts. Therefore, you break off the lagging piece. Remove the old glue from the damaged area and the piece of veneer (with sandpaper or a nail file, depending on the size). Next, the repair of veneer on furniture is standard: spread it with PVA glue, lay it down, aligning the fault lines, lay a thick fabric on top and place a weight until it dries.
Such veneer peeling can most likely be eliminated simply by ironing it with an iron.
Scratches and traces of restoration on veneer are removed in the same way as on wood: they are painted over with a furniture marker of a suitable shade. If the scratch is deep, a little melted furniture restoration wax is applied to it (with a spatula). After drying, the wax is ground, and if necessary, fine-grain sandpaper is used, but after this treatment, the restored piece is covered with a layer of varnish.
Do-it-yourself furniture restoration requires patience and accuracy. You have to act gradually and methodically: smear it, wait for it to dry, level it, smear it again, etc. Sometimes you have to try several methods: damage varies, as do the materials used in production (glue, varnish, etc.). But as a result, the furniture will look much better.
Source
Furniture restoration. What does it mean?
Restoration will help save the situation. The word is familiar to many, but people associated with culture and art understand it best. However, isn’t it an art to give old chairs and stools their former beautiful appearance, to tidy up a sideboard or closet? Carry out a few simple procedures and make them look as if you just bought them in a store.
Moreover, if you think about a new purchase, then even with the most conservative calculations it will be quite a decent amount. So is it worth spending money if you just use inexpensive materials and spend very little time restoring furniture with your own hands?
As a result, you can become the owner of exclusive, original furniture that fits perfectly with the new design of your room or kitchen.