Choosing the right drill
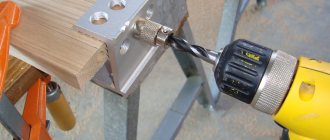
Regular twist drills are inexpensive. They are considered universal and are designed for drilling wood, metal and plastic. Typically, their tips sharpen the floor at a 118° angle for most applications.
But due to such an obtuse angle, the drill can deviate to the side at the beginning and tear out wood fibers at the exit, so reserve these drills for plastic and metal, as well as for holes with a diameter of less than 3 mm in wood (thin drills have less pronounced drawbacks). For holes with a diameter of 3 to 13 mm, choose drills with a central point designed specifically for wood. The tip of such a drill prevents it from moving to the side at the beginning of drilling, and the side cutting projections (the so-called trimmers) help reduce chipping.
To make holes with a diameter of more than 13 mm, use Forster drills. Like center point drills, they have a guide tip in the middle and cut very cleanly. Forster drills with a serrated cutting rim work much more aggressively, but the result of their work is no worse. When using such drills, you should reduce the feed and securely fix the workpiece with clamps.
Support the workpiece from the reverse side
Regardless of the type of drill bit, when metal penetrates wood, the unsupported wood fibers on the back of the workpiece are torn, resulting in chips. Therefore, you should not forget to support the back side of the material with a trim
boards. The backing scrap supports the fibers where the drill exits and prevents a sharp increase in feed at the end. When making holes on a drilling machine, simply place the scrap under the workpiece, and when using an electric drill, secure it with clamps. If at the beginning of drilling the fibers around the hole rise or small chips form, apply masking tape to the surface, and then mark the center and start drilling.
Drill on both sides
If the location of the hole makes it difficult to install the support trim (for example, when drilling holes for wires in the back wall of a cabinet), the counter drilling method will help, when the hole is made from opposite sides so that there are no chips on the edges.
- To make clean holes of different diameters, you need all three types of drills - twist, center point and Forstner.
Make a through hole with a diameter of 1.5-2 mm, which will guide a Forstner drill or a center point drill to the middle of the thickness of the part.
Continue drilling from the back side by reinserting the tip of the drill bit into the pilot hole. The two large holes should meet in the middle.
On a note:
Instead of a compass
A school compass can also be useful in a home workshop, but its range of action is small. What if you need to draw a circle of large diameter?
An easy way is to do this with string, a nail and a pencil. The nail is carefully driven into the workpiece, the rope is secured to it at one end, and a pin is secured to the other end. The length of the rope determines the radius of the circle being drawn. The only condition is that the rope must be taut along the entire path of the pencil. Then the distance from the center (nail) to the circle in all sections of the marking will be the same.
Strip of cardboard or slats
An equally simple, but more reliable way is to use a strip of cardboard or, even better, a wooden plank instead of a rope. Drill two holes in this bar (strip) - one, smaller, for a nail, the other, larger, for a pencil. The distance between their tips should correspond to the radius of the desired circle. All that remains is to install the nail in the right place and rotate the bar around its axis.
Read also: Three-piston compressor on wheels
Two sharpened nails and a wooden strip or a strip of thick cardboard can replace a compass.
Milling without chipping
At the exit from the material, the tooth of a saw blade or cutter often forms chips - in wood, plywood or laminated chipboard. The most common way to combat this phenomenon is to have the cutting tooth emerge from the material inside the groove. For example, if you move the workpiece as the disk rotates. But it is absolutely impossible to select grooves to their full depth in this way. The energy of the rotating cutter is enough to tear the workpiece out of your hands. After which it will fly with great speed in the direction of rotation. The consequences can be the most unpredictable!
But nevertheless, this principle is used in some machines for cutting laminated chipboards. Only in them the disk, which rotates as the material is fed, makes only a shallow cut. When forming it, the impact of the scoring disk on the part is insignificant, so the work is safe. Following the scoring disk is the main working disk, which rotates, as expected, towards the feed of the part. The disc cuts the material cleanly, without chipping, since it uses an already selected shallow groove (the cutting tooth comes out of the material inside the groove). I use this principle in my work. For those who decide to try my method, I would like to remind you that a milling machine installed in a table is a highly dangerous tool. And when working with it, it is necessary to strictly follow safety rules - use protective screens and clamps and not exceed the recommended workpiece feed speed and cutter rotation speed. The table should be free of foreign objects and well lit.
1. If you put a groove cutter on a router and skip the workpiece, there will definitely be chips!
2. So first I attach the plywood trim to the router table guide so that the router protrudes just 2mm beyond the surface of the trim. And I skip the parts in the direction of rotation of the cutter. This results in a shallow groove without chipping.
3. Then I remove the cover - now the cutter protrudes to the specified depth. And I pass the workpieces, as expected, towards the rotating cutter.
4. There are no chips!
Small diameter holes (up to 10-12 mm) in wood and chipboard are most often drilled with ordinary metal drills. They cope with their task quite successfully. But if every millimeter is important for the position of the hole, then you need to use special drills.
When entering wood, a metal drill may deviate slightly to the side, even if a recess is made with an awl at the site of the future hole.
In general, drilling wood can be done even with an ordinary nail or a piece of wire with a flattened end. Special drills for wood have to be resorted to only when it is necessary to drill a hole of large diameter, or when increased demands are placed on surface cleanliness and accuracy. There are several types of such drills:
- spiral (a);
- twisted or single-spiral (it is sometimes also called spiral) (b);
- feather (in);
- annular (crown) (d);
- Forstner cylindrical drill (d).
Wood drills are made from alloy tool and carbon tool steels; metal cannot be processed with them.
Twist drill
drill holes of small and medium diameter. It can easily be replaced with a metal drill bit, although the hole will be cleaner if you use a wood twist drill bit.
Single twist drill
It has a sharp cutting edge and a screw shape that removes chips well. It is used when you need to get an accurate deep hole with a clean surface of the walls.
Feather drill
They are usually used when drilling holes with a diameter of 10 to 25 mm, although there are drills with a diameter smaller than 10 and larger than 25 mm. This drill is the simplest in design and the cheapest, so it is reasonable to use it in all cases where high demands are not placed on the quality of the hole. The disadvantages of a feather drill include poor direction, low diameter accuracy, rough surface of the hole walls, and the need to periodically remove chips by stopping drilling and removing the drill from the hole. The advantages are simplicity and low cost.
Crowns
used when drilling large diameter holes - up to 100 mm or more. The kits contain one mandrel with a shank and a centering drill and several bits that are inserted into the mandrel.
Forstner drill
has a centering point and a sharp scorer. Thanks to the latter, it is distinguished by precise cutting geometry. Typically used for drilling blind holes to precise dimensions in softwood, chipboard or laminate for the installation of furniture canopies.
Forstner drill bits can be short or long pointed.
It is more difficult to make a blind hole for a hinge in a thin door with a Forstner drill with a long point, since the point can make a through hole. But a drill with a short tip is more prone to moving to the side. In addition to differences in the length of the tip, the Forstner drills shown in the photo above differ in their maximum rotation speed. So a drill with a short tip has welded knives made of high-speed steel and is suitable for working at high speeds, and a drill with a long tip has a maximum rotation speed when working with soft wood equal to 1000 rpm.
There is another device for cutting large holes - this is a ballerina
, designed for cutting large (up to 300 mm) holes in thin pieces of wood, chipboard, fiberboard and other materials.
The ballerina consists of a centering drill and two cutters that are used to cut out a circle. The displacement of the cutters along the guide sets the diameter of the circle being cut. To rotate the ballerina, use a brace or drill with a low speed. You can also rotate it manually.
How to drill wood and chipboard
To prevent the drill from going to the side at the very beginning of drilling, you need to make a small depression in the center of the future hole with an awl.
Drilling wood is carried out at low and medium speeds of the drill. The main problem when drilling through holes is chipping at the drill exit. There are two ways to deal with them. First drill a thin hole and drill along it from both sides of the part to the middle with a drill of the final diameter. In this way, it will be possible to avoid chips that occur at the exit. The second method is to firmly press a piece of wood onto the side where the drill comes out, which is removed after drilling. To make the drill perpendicular, jigs are used. The latter are especially convenient for making holes in cylindrical parts.
Drilling chipboard requires special attention due to its fragile structure. The presence of laminated or veneer coating complicates the task. To avoid their peeling, use drills with a sharp edge (in particular, a cylindrical Forstner drill) and a backing plate at the exit. To mark holes, be sure to use an awl.
When using the content of this site, you need to put active links to this site, visible to users and search robots.
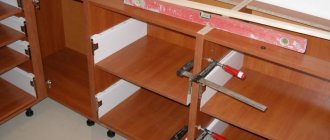
The main fastening element in furniture assembly is the confirmat. It is screwed in with pre-drilled holes. It is the drilling of assembly holes in chipboard for confirmations that we will consider in this article.
To assemble the chipboard parts we will need:
- Screwdriver
- Confirmation bat
- Ruler or tape measure
- Pencil and awl
Hole depth and width
Usually a confirmat size of 6.4*50 is used. Because the thread diameter is 6.4 mm, and the diameter of the confirmation body is 4.4 mm, then for high-quality fastening of parts, the hole diameter must be in the range of 4.5-5 mm and a depth of at least 50 mm.
If the thickness of the hole is greater than the specified one, the confirmat will not hold the parts well; if it is less, its thickness can tear the chipboard.
For drilling, use a confirmat drill with a diameter of 4.5 mm, which is equipped with an additional head for drilling an enlarged hole for the neck of the confirmat, which also makes a countersink for its head.
Of course, you can use a regular drill with a diameter of 5 mm, but for high-quality fastening in the hole you will additionally need to make space for the neck of the confirmat and its head.
In order to perfectly fasten two parts, it is necessary to mark the places of their fastenings as accurately as possible.
On the part that will be applied to the end (the one on which there will be a through hole), you need to make two measurements - along the length (usually 5-10 cm) and from the edge - exactly 8 mm (this is if the thickness of the plate is 16 mm).
On a part that lies perpendicular, mark the drilling point at the end. Here you need to maintain the same distance in length (5-10 cm from the beginning), and in width - strictly in the center (8 mm from the edge).
Markings must be done as accurately as possible, especially along the length, because If the markings are incorrect, your parts may have extra gaps or protrusions when joined.
It is better to make a through hole in the first part, attach it to the second - and immediately use a drill to mark the drilling location at the end of the second part. And then, separately, calmly drill the hole.
We make a hole at a distance of 8 mm from the edge.
The drill should ALWAYS be held strictly perpendicular to the surface.
Before making a through hole, place a piece of unnecessary chipboard under the part. This will prevent chips from appearing on the reverse side.
When the through hole is made, the part can be drilled on the fly to drill holes for the neck and head of the confirmat.
The main rule is that when drilling at the end, the drill must be strictly perpendicular to the end of the part. If you don't hold the drill straight, the drill bit may go sideways and come out, ruining the part.
When drilling, you need to pull the drill out several times so that chips do not clog in the hole.
This option is considered the most accurate and, moreover, the fastest. But in order to make a hole in two parts at the same time, you will need to fix them before drilling. To do this, you may need special clamps, clamps and other devices.
Hole Drilling Tools
In order not to mark 8 mm from the edge each time both into the layer and at the end, you can use a special device, which, by the way, is easy to make yourself.
It is a kind of wooden template with a metal sleeve for a drill inside.
It looks like this, see photo:
And this is a more professional thing:
Watch a short video on how to accurately drill holes in chipboard for confirmations and assemble furniture parts:
How to _carefully_ drill through chipboard?
Hi all.
I am currently assembling furniture according to my own design from ordered chipboard panels. There are no holes for fasteners in the chipboard; you have to make them yourself. At this stage I was faced with a problem: how to drill through the chipboard so that it looks neat on both sides? So far, I have managed to get it to look neat only on one side (where I start drilling). On the other hand, when the drill exits, it tears out pieces of the laminated coating approximately 3-4 mm from all sides of the hole. As long as I'm drilling the bottom panels, it's not scary: anyway, this side of the panel will lie on the floor, so nothing will be visible. But soon I will reach the upper panels, where everything will be visible. What to do? maybe, having marked it, drill from both sides to half the thickness? Or drill on a piece of unnecessary chipboard, attaching it with clamps. so that it would be like a single thick slab
I drilled with a thin drill and then with a thicker one on both sides towards each other. I just couldn't think of anything else. And it takes longer :-(((
Clamp it between two pieces of plywood and safely drill through
2Dimitrij Why two pieces so as not to see the markings?
To prevent the laminate from being pulled up from the front side
2Dimitrij A normally sharpened drill, especially for wood, does not lift up.
A piece of chipboard/thick plywood/other debris on the back side helps. Just need to press tightly. Proven method.
2 Viktorych If you drill on a machine and reduce the pressure when finished, it will not lift up (with some practice). And if you use a drill on your hands, then there will probably be chips. Therefore, a tightly pressed lining on the reverse side will save you.
2 Gregory But the question is: why? At least on one side there will be a fastening system or the end of a perpendicular piece of furniture (otherwise why would there be a hole?), and everything will be closed. What's the point of worrying about chips? A sharp drill bit, sharpened for drilling wood, and a low feed rate at the exit will keep chipping to a minimum. This is quite enough. The linings will save you, but the manufacturing speed will be lost. If you hold a piece of chipboard, press it with your hand. The effort is quite enough, but you will have to drill not with a drill, but with a screwdriver. Holding the drill straight with one hand is difficult.
iosif wrote: 2 Viktorych If you drill on a machine and reduce the pressure when finished, it will not lift up (with some practice). And if you use a drill on your hands, then there will probably be chips. Therefore, a tightly pressed lining on the reverse side will save you.
Who could argue? I asked why there were TWO pads and said that they don’t chip at the entrance.
Bhead wrote: Holding the drill straight with one hand is difficult.
It depends on the drill.
Wazawai wrote: It depends on the drill.
It depends on what kind of hand it is.
Bhead wrote: But the question is: why? At least on one side there will be a fastening system or the end of a perpendicular piece of furniture (otherwise why would there be a hole?), and everything will be closed. What's the point of worrying about chips? A sharp drill bit, sharpened for drilling wood, and a low feed rate at the exit will keep chipping to a minimum. This is quite enough. The linings will save you, but the manufacturing speed will be lost. If you hold a piece of chipboard, press it with your hand. The effort is quite enough, but you will have to drill not with a drill, but with a screwdriver. Holding the drill straight with one hand is difficult.
In general, everything is correct. The only problem is that the connection marking is done exactly from the connection side. And if you immediately punch a hole for the head of the confirmat with a 7 mm drill from the marking side, then at the exit of the drill about 2-3 more mm of laminate will be torn off on each side. In the end, I adapted as follows. First I go through the hole with a 3 mm drill from the marking side. In this case, the laminate still chips at the exit, but only a little - a millimeter in each direction. And then I go through this hole in the opposite direction with a 7 mm drill. At the exit, of course, chips form, but, firstly, not as large as when drilling in one step, and, secondly, these chips are located inside the joint, i.e. not visible on the finished product.
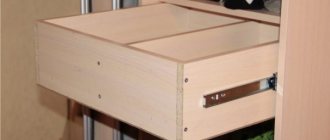
Drilling for dowels
The hole for the dowels is made with an 8 mm drill. Also, in order not to drill through the part, it is advisable to equip it with a depth limiter.
At the end we drill with the same drill to a depth of 20 mm. Do not forget that during any work the drill must be strictly perpendicular to the plane of the part.
Of course, if you picked up a drill for the first time in your life, you won’t do very well. But this activity can be learned quite quickly.
Chips are the main problem of chipboard. Either cut it or drill it. To get neat holes I used the following tactics:
If, of course, you can get the hang of it and drill right through the first time, without pressing at all at the very end. But with my chipboard it was not possible to do such a trick - there were still chips.
An example of unsuccessful drilling.
Also note that there are confirmed drills. Special drills for confirmation (Euroscrews). In one pass, not only the hole itself is drilled in the chipboard or in the wood, but also a “hole” is framed for deepening the Euroscrew. Finally, I happened to come across Archimedes drills for sale and buy them. A certain skill is required, however, these are nuances.
Alexander , Access date: 2015-11-19 20:42:07
The specified Archimedes drills are of poor quality - the alignment is off, there is strong runout, even replacing the situation with a normal drill bushing is also crooked, China is low-quality!
Alexey, Access date: 2009-07-01 14:18:46
To avoid chips, or to make them less noticeable, in through holes, use regular metal drills, or even better, if possible, resharpen the metal drill at a sharper angle
Alexander , Access date: 2009-02-23 14:36:21
I can make through holes without chipping easier.
It is necessary to place another chipboard panel under the drilled panel. When drilling, press both parts tightly against each other. The drill should go completely through the top panel and partially through the bottom. Then the coating simply has nowhere to chip. sdelal-sam answers:
I agree, Alexander! The tactics I presented were used for drilling on assembled parts “in place”, when disassembling did not make sense due to the loss of time.
Such a convenient device as a jig allows you to accurately and efficiently make holes in products made of natural wood, chipboard, MDF, metal and other materials. This device, in particular, is actively used by specialists involved in the production of furniture. At the same time, the conductor can either be purchased in a serial version or made with your own hands.
Conclusion
We hope that thanks to the information presented above, the question of how to cut a figure from plywood will not cause you any difficulties. Of course, figured carving on sheet material requires a certain skill and accuracy, but if you have a suitable tool, even a beginner should not encounter any particular difficulties. In the video presented in this article you will find additional information on this topic (also find out how to make a box from plywood with your own hands).
Source: fanera-info.ru
Design features and types
A jig, in essence, is a template for drilling holes, allowing you to make them as accurately as possible. It is used both to create holes, the axis of which is perpendicular to the surface of the part, and for drilling at an angle.
Due to their versatility and simplicity, drilling jigs are widely used in various fields. In particular, in the mechanical engineering industry they have long been used to successfully drill holes in workpieces of various configurations and made of different materials. You cannot work without a conductor in furniture production, where such a device is actively used when assembling furniture, installing accessories on it and performing a number of other technological operations. Construction is another area where conductors are widely used. They are used, in particular, to drill holes in building structures. Conductors are also needed for drilling pipes and solving other tasks.
As furniture jigs, overhead models made of lightweight materials are most often used to make them more convenient to manipulate. You can purchase such devices prefabricated or make a furniture jig with your own hands. Qualified furniture makers may not use a jig to accurately and accurately drill holes in furniture structural elements, but to do this they must have extensive experience in their field.
The most significant advantage of the jig is that with its help, even a person who is not highly qualified can perform high-quality and accurate drilling of both a hole perpendicular to the surface of the part and an inclined hole. The use of jigs eliminates the need for complex preliminary calculations and marking the locations of future holes, which reduces the labor intensity of assembling a furniture structure and allows such work to be completed in a shorter period of time. Even a novice specialist can understand the use of a jig for drilling for dowels and solving other technological problems.
Before purchasing or making your own homemade jig, determine what tasks you need to use it for, and based on this data, select its type and design.
Among the jigs for drilling holes, a number of categories can be distinguished by type of design and functionality.
Overhead
These jigs are so called because they are placed on the workpiece and secured to it or simply fixed by hand. Using jigs of this type, in particular, they drill holes in chipboard, MDF boards and other flat parts.
Rotary
Such templates can be used to make holes on cylindrical parts. Conductors of this type are equipped with vertical and horizontal axes of rotation, which makes it possible to make holes at different angles with their help.
Universal
These are devices that are especially relevant for small batch production, where the ability to quickly change over the equipment used is important. This type of conductor is endowed with just such functions.
Tiltable
These devices for drilling holes are required in cases where such a technological operation has to be performed in several planes.
Sliding and pinning
The sliding jig, in full accordance with its name, does not require fastening: it is simply applied to the area of the surface of the part where the hole needs to be drilled. Fixed jig devices, although more convenient, somewhat limit the freedom of action of the specialist, which is especially critical when performing drilling work on machines equipped with only one spindle.
Areas of use
Furniture jigs and templates are devices that are practically indispensable when assembling furniture structures. The use of jigs allows you to avoid the main problem that arises when drilling holes - the drill entering the workpiece at the wrong angle. Correcting this error takes a lot of time and effort, and it is not always possible to fix it at all. The jig used for drilling holes not only allows the drill to be correctly oriented at the processing site, but also prevents the tool from straying from the specified trajectory.
Devices such as furniture jigs and templates are used both in the production and assembly of furniture, when holes must be made in the elements being connected to accommodate fasteners. In such cases, a jig for dowels or a jig for drilling for confirmation is often used, without which it is not possible to make high-quality holes for fasteners. Such a device is indispensable in cases where it is necessary to make holes, including at an angle, in thin slabs (in particular, when making holes in chipboard or MDF).
When using a jig to drill holes, the process of assembling furniture is simple and fast. Using such a device, holes can be drilled at any distance from the edge of the part, regardless of its width.
Modern furniture actively uses dowels, which at the same time are a rather outdated fastening element. That is why the doweling jig is used in the production of furniture structures. The main difficulty when using such fasteners is that the axes of the holes made in the parts being connected have a right angle to each other. Accordingly, such holes should be located strictly perpendicular to each other. Without the use of such a device as a dowel jig, it is difficult to perform them.
Furniture production is not the only area in which jigs designed for drilling holes are used. Templates are no less often used to drill a hole in a pipe and other cylindrical parts. Conductors allow you to make high-quality holes even in small-diameter pipes.
The size and operating principle of modern conductors may vary. Some of the models of such devices are much easier to buy, and some are easy to make with your own hands. The fact that serial devices, especially those for universal use, are not cheap, also speaks in favor of making a furniture jig for drilling holes with your own hands.
Shape cutting technologies
Selecting a tool
When starting to work with sheet materials, many craftsmen only have an idea of how to cut along a straight line. Therefore, the question of how to cut an even circle from plywood can confuse many. And indeed, a regular or circular saw cannot cope with the task. Figure cutting is most often done using the following tools: Hand jigsaw
- Hand jigsaw . The simplest device used for sawing. With the help of a jigsaw, even the most delicate work can be done with your own hands, but for thick material or long cuts it is practically not suitable.
- Jigsaws. There are two types of devices you can use here:
- regular, with a vertical file;
- artistic, in which the role of the cutting element is performed by a steel blade.
READ How to Restore a Screwdriver Battery
Ordinary jigsaws will come in handy when working with thick plywood, for example, when making a bed with your own hands. But if you are looking for a way to cut letters out of plywood or make other complex elements (for example, parts of a children's construction set), then it is best to use a model with a band saw. Model for artistic cutting
Advice! Naturally, for each type of jigsaw there are several types of files and blades. The correct choice of cutting element is a necessary condition for high quality of the product.
- In addition to jigsaws, you can use a furniture router for curved cutting. Despite how difficult it is to operate, it is many times superior to most models of plywood saws in terms of the quality of the holes it makes. Using a router, you can make a wonderful rocking chair from sheets of plywood with your own hands.
Also, do not forget about available devices, but we will talk about their use in the appropriate section.
Jigsaw
As we noted above, a jigsaw will come in handy if we are looking for how to cut a word out of plywood or make other parts of complex shapes:
- We transfer pre-printed drawings or templates onto the workpiece using carbon paper.
Figured carving with a jigsaw: photo of the finished product
How to cut a large round hole in chipboard, plywood
- If the structure has through sections, we make starting holes with a thin drill.
- Insert a file or jigsaw blade into the hole. Secure the free end of the file with a fastening screw or clamp.
- We make a cut along the intended mowing line, pressing the workpiece to the workbench. The saw moves either automatically (for electric jigsaws) or manually.
After all the arc elements have been sawn, we remove unnecessary areas and process the finished part with a file or sandpaper. Finished hole
Theme Options
Sources:
https://mebluxe.ru/poleznaya-informatsiya/kak-vyrezat-krugloe-otverstie-v-dsp.html