Features of the material
The advantages of using plywood sheets include:
- Good environmental performance. Plywood is a natural material that is safe for others.
- Possibility of pre-impregnation of plywood with antiseptic and moisture-resistant solutions. This approach will protect the product from moisture and pests.
- Ease of operation. Creating crafts requires only minimal skills from the master to work with tools.
Photos of plywood crafts presented in magazines or web resources can help you decide on a model. There you can also find ready-made drawings, diagrams and detailed descriptions of the work process.
How to choose plywood
To choose the right plywood for crafts, you need to evaluate the following material parameters:
- grade - is of great importance for creating an attractive appearance of the finished product. It is desirable that the chipboard sheet have as few defects as possible. Therefore, for such work it is better to choose grade 1 or 2 plywood;
If in the future the souvenir will be pasted over or painted, it makes sense to save money and purchase less expensive types of material.
- thickness - its choice depends on what product you plan to make. For various figures and decorations, a thin plate with a thickness of up to 5 mm is better suited. For the construction of furniture structures, it is advisable to choose thick sheets - up to 40 mm;
- moisture resistance - when making crafts that will be located in the open air - in a country house or on an unglazed balcony, you should choose a material that has a high degree of resistance to moisture. Plywood marked FB or BS is suitable - materials impregnated with bakelite varnish or glue;
- environmental friendliness - to create interior crafts, you should use safe plywood marked FBA or FK. The first material is glued with albumin casein glue, which is natural and environmentally friendly. The layers of the second are connected using a urea composition, which does not contain phenolic compounds and therefore does not harm health.
Tools and additional materials
To create original crafts, you may need the following materials and auxiliary kits:
- Electric file.
- Compasses and construction pencil.
- Ruler, pattern.
- Sharp knife.
- Sanding paper.
- Materials for painting the product.
- Solutions for pre-treatment of plywood sheets.
- Decorative elements (at the request of the master).
In the world of modern handicrafts, it is increasingly common to create structures from a combination of various types of materials: plywood and fabric flaps, metal structures.
Technology of working with plywood
A sheet of plywood is a multi-layer material. It consists of several wooden sheets glued together. The wood used is beech, pine and birch. They have different colors and structures, so when choosing a type of wood, it is necessary to take into account the peculiarities of its processing.
The higher the quality of the material, the easier it is to work with and the higher the strength of the finished crafts.
You should start work only with dried plywood. Under-dried wood can dull or break the blade of cutting tools.
You may need the following woodworking tools:
- jigsaw;
- drill;
- awl;
- wood burning tool;
- grinding machine.
Finished products are cleaned with sandpaper, varnished or painted with multi-colored paints.
Step-by-step making of crafts
Despite the huge range of finished products, their shapes, sizes and textures, all stages of creating crafts are similar to each other. The whole process can be divided into stages:
- Preparation of the drawing.
- Cutting out parts.
- Polishing and pre-processing of the product.
- Decorating crafts.
Each stage is carried out consistently and carefully, because it is necessary to avoid injuries, cuts, and rapid damage to the craft.
CNC plywood cutting
An important function of modern CNC machines is cutting plywood. Computer numerical control equipment performs all operations based on commands issued by special programs. The machine connects to a computer and performs work quickly and with the highest possible quality.
Milling plywood cutting using CNC machines allows you to complete orders in the shortest possible time, even with complex layout shapes, since the necessary tools are replaced without stopping the equipment. The program itself selects the most optimal version of the cutter, sets it the desired speed, direction of movement, and depth of rotation.
Thanks to the high speed and number of revolutions of the cutter per minute, it is possible to perform high-quality cuts of plywood up to 70 mm thick. In this case, the cuts are smooth, without protruding fibers. There are no cracks or chips on the surface of the material, even on laminated plywood.
Order CNC plywood cutting in Moscow from our company and quickly receive excellent blanks and finished products!
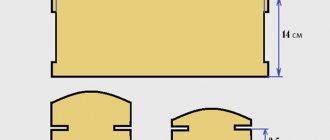
Preparation of the drawing
Drawings of almost any plywood craft can be found in the public domain. However, if desired, the master can make them himself. The diagram must reflect:
- The size of the future figure.
- The thickness of the plywood sheet.
- Basic and additional details.
- Mounting diagram (if provided for in this model).
The drawing reflects the entire sequence of actions of the master, and helps to create the product accurately, without errors.
Cutting out parts
On a sheet of plywood, according to the drawing, the main and additional elements of the future craft are first drawn. The work uses a compass, a construction pencil, a ruler or a pattern to depict curly lines. Follow the instructions below:
We recommend reading:
Crafts from plasticine: the best master class for children at school or kindergarten. 90 photos of the best ideas for creating plasticine figuresFelt crafts - the best patterns and templates. Step-by-step instructions and master class for beginners (130 photo ideas)
DIY crafts from egg trays - the best step-by-step master class, with description. TOP 100 photos of original ideas for crafts
- The plywood sheet is firmly fixed.
- The parts of the craft are cut out of plywood using a jigsaw.
- In hard-to-reach places, use a sharp knife or file.
The work should be carried out carefully, trying not to damage the working surface and not to cut off the edges of the parts.
Step-by-step instructions for making a Christmas tree
If you are tired of ordinary PVC Christmas trees, make a New Year's “beauty” from plywood, designing and decorating it to your liking. On the Internet you can find a variety of ideas for such crafts. Choose one of the existing options or create your own original design.
The Christmas tree can be flat or voluminous. It may look quite realistic or only vaguely resemble everyone’s favorite New Year’s tree. Can fit in the palm of your hand or reach the ceiling with its top. The choice of size, design and construction is yours.
We present a method for making one of the popular options for a New Year tree.
Step-by-step instruction:
- We make a pattern. The drawing can be simple or intricate, ornate. The fewer carved elements, the easier it will be to cut out parts from plywood. If your skill with a jigsaw allows, choose templates with openwork patterns. Such a tree will look fabulous and truly festive.
- Cut out 6 identical parts. This number of elements will allow you to make a voluminous, “lush” Christmas tree.
- We sand the edges and cutouts of the fragments, achieving maximum smoothness.
- We paint individual elements and leave to dry.
- We assemble the structure using self-tapping screws and mounting angles. Fastening should be done in two places so that the load is distributed evenly.
- We decorate the Christmas tree - we draw balls, beads, snowflakes on it, you can attach real garlands and Christmas tree decorations.
Such a Christmas tree will delight you for many years, because after the end of the holiday it can be very quickly disassembled and stored.
Sanding and pre-treatment
The edges of the cuts are carefully cut down and sanded using sandpaper. This process is very important for plywood crafts for kindergarten - sharp and jagged edges can damage the baby’s skin.
Also, great attention is paid to pre-processing of the workpiece, which includes:
- Impregnation with antipyretic and antiseptic. This procedure will help prevent the fire of the craft and ensure its safety.
- Treatment with antifungal solutions.
- Treatment with moisture-resistant preparations.
After drying the blanks, you can begin assembling the product and decorating it.
Affordable prices
Buying plywood at low prices in Moscow, St. Petersburg, Ekb or Nizhny Novgorod and not losing the quality of the product is not an easy task. Typically, the lower the price, the much lower the quality of the lumber. Often you can find an obvious defect that is sold at a “low” price, and in the end the buyer throws money down the drain.
Twinwood company maintains adequate pricing for materials and products. You can buy plywood inexpensively from us, and the quality and grade characteristics strictly correspond to the price.
You can buy plywood in Moscow, St. Petersburg, Ekb and Nizhny Novgorod at retail and wholesale with CNC cutting right now online. You can order the production of plywood products and blanks by calling 8 800 222-68-01. You can also leave a request on the website and we will call you back as soon as possible.
Assembly and decoration
Lighter plywood crafts can be painted right away, but complex ones need to be assembled.
You can use strong glue to attach small parts. For house models or complex structures, you will need to use screws - they are safer than nails.
Decoration of finished products includes the following options:
We recommend reading:
DIY crafts from Kinder surprise eggs - 125 photos of exclusive options with step-by-step instructions, master class and videoCrafts made from twine - an overview of original design solutions. More than 100 photos of new products + step-by-step instructions for creating crafts with your own hands
DIY crafts from candy wrappers: 150 photos of the best ideas from craftswomen. Simple instructions, master class, diagrams and video tutorials on creating crafts from candy wrappers
- Painting.
- Applying a transparent varnish that will create a glossy surface for the product.
- Decoration with beads, ribbons, beads.
Also used is the application of a decorative border and the creation of sides.
Decoration, decoration and care of plywood products
The finished plywood product can be decorated in a variety of ways. Even if you limit yourself to applying varnish, such a thing will already look very impressive. If it's too boring for you, choose the technique you like. Any techniques from patination and pyrography to artistic painting are appropriate here.
Burnout
Among the techniques used for artistic wood processing, one cannot help but recall burning. This is one of the traditional types of Russian handmade craftsmanship. The art of painting on wood with hot metal rods developed along with turning, carving, inlay, mosaics and painting. It could exist as an independent type of design or be woven into other techniques, complementing them and making the decor more expressive.
Ancient craftsmen burned out patterns using red-hot iron rods or relief stamps. Today, the most common way to obtain a burnt image is to use a special electrical device equipped with a thin metal wire or a soldering iron with a set of various attachments.
It is also worth mentioning the pyrotyping technique - hot printing, burning in sand, in fire, using a magnifying glass in the sun, using acids, friction on a lathe.
Burning is a great way to decorate furniture, accessories, souvenirs and other plywood products.
Painting and varnishing
If you are not satisfied with the monochrome nature of the previous method, arm yourself with paints. Any plywood product can be made bright and picturesque by dyeing and painting. A cutting board, a birdhouse, a children's house - rich colors will make any of these items spectacular and colorful. If you don’t need any special skills for painting—dip a brush or roller into the paint and go ahead—then painting requires at least minimal artistic abilities. The choice of technique depends on the talent of the artist, on his level of proficiency in his skill.
Three painting options:
- Stencil - the simplest method, subject to people who are far from fine art, but have a sense of taste. All you need to do at the preparatory stage is to select an interesting pattern or image, print it on paper and cut it out. After this, we apply the template to the product and, using a foam sponge or brush, transfer the pattern to the surface. You can outline the outline with a simple pencil and then color it.
- Dot technology for creating a pattern is the connection of many dots transferred to the surface to be decorated. This technique is also available to those who do not have artistic skills.
- Drawing from a sketch - the method is suitable for both professional artists who can depict elements of famous paintings, and those who do not master the art of drawing, but can come up with their own original pattern using sketches. Such a painting may contain geometric shapes, flowers, leaves, curls. An example of such painting is the products of folk crafts - Khokhloma, Gorodets, Gzhel.
The finished image should be thoroughly dried and varnished. The finishing layer will protect the paint from moisture and mechanical damage. Hand-painted products will make your interior unique.
To keep products in their original form, it is necessary to protect them from prolonged exposure to moisture and temperature changes. They should be placed away from heating appliances, and after washing they should be immediately wiped with a dry cloth.
Alphabet letters for learning
Bright and light letters are perfect for an educational game. You can use both Russian alphabet layouts and templates for foreign languages. They are made in one piece and no further fastening is required.
It is recommended to paint items in contrasting colors to stimulate the baby's visual memory.
Christmas tree decoration
The working material is very light, so a Christmas tree craft made from plywood is perfect for decorating a festive interior.
The toys are made bright, varnished to add shine, and also decorated with an abundance of beads and rhinestones. Finish the work by making a hook or loop on the back of the toy.
Figures for a summer cottage
In this model, great attention is paid to the pre-processing of the material, because garden figures can get caught in heavy rain. Careful processing will significantly extend the life of the product.
Most often they create swan figures, three-dimensional fairy-tale characters for children's playgrounds, or decorative figures for flower palisades.
We recommend reading:
Crafts flowers - 125 photos of the best ideas from craftswomen. Instructions on how to make it yourself from A to Z. Simple and complex options for crafts + video tutorial- DIY crafts: TOP-200 photos of the best ideas. Schemes, master classes, modern design, new products, instructions with descriptions
Crafts from plaster - 120 photos of the best ideas for creating original crafts with your own hands. Master class for beginners with examples and video lessons
Working with plywood is quite easy; all that is required is the precision and creativity of the craftsman.
Types of plywood
Plywood is divided into 5 grades depending on the appearance of the veneer, the number of defects, and knots. Categories are indicated by Latin letters and numbers. The elite variety, marked E, is subject to the greatest number of requirements. Grade 1 is designated by the letter B. Further markings are designated as BB (2), CP (3), C (4). For each grade, the standard specifies the maximum value of possible defects.
Depending on the degree of processing, the material can be polished or untreated. The first option involves changes on one or both sides. Another processing option is lamination.
Knowing the purpose of the craft, choose the level of moisture resistance. The FSV brand is suitable for use outdoors, FC - for placement indoors with low humidity levels. If the requirements are not met, the product burns out and swells with water.
Plywood is made from hardwood and coniferous veneers. The first include birch, beech, maple, aspen and poplar. The second category includes spruce, cedar, larch, fir and pine. The sheet of material can be made from one type of wood or a combination of hardwood and softwood.
If it is assumed that the craft will have a natural color, then it is better to choose a birch base. When they plan to paint the surface, use pine plywood. For crafts, use acrylic or oil paint.
Photos of plywood crafts
Did you like the article?
1+