What are the advantages of making a chair with your own hands?
Important components when making a chair with your own hands include:
- Selection of high-quality, natural materials;
- Adjusting the chair to your size and preferences;
- The choice of color scheme is yours;
- Possibility to fit into your interior;
- Financial savings;
- Improving your own skills in working with building materials;
- Formation of design skills;
- Have a nice time;
- Development of imagination, thinking, attention;
- Development of design taste.
The process of designing and creating a chair is in itself fascinating and interesting, primarily for its creativity and novelty of doing the work.
When buying a chair in a store, you cannot know 100% what materials were used to make it, or what adhesive components the manufacturer used. Most likely, to reduce the cost of production, they could have used low-quality and toxic analogues. You will not have the opportunity to detect this when purchasing, since everything is skillfully disguised, and only what is beneficial will be listed in the composition.
For high-quality execution, you need minimal experience working with plywood products and wood.
Varieties of plywood chair designs
There are a large number of modifications of plywood chairs, but they are mainly divided into two types:
- Rocking chair;
- An armchair in the form of a chair or stool.
The British take credit for the design of the rocking chair. It is believed that one of the craftsmen created it based on a crib on runners.
Experience can be gained by following step-by-step instructions.
Americans dispute this version, believing that it was Benjamin Franklin who invented this interior element. By the way, he is the owner of a patent for a rocking chair.
It happens:
- on skids;
- on a spring mechanism;
- on a pendulum mechanism.
Armchairs like a chair or stool may differ in the presence or absence of armrests and a backrest.
The most important advantage of a DIY plywood chair is its price, which is much lower than the store price.
Every year, designers come up with many variations of this furniture, sometimes not always suitable for its intended use.
Hand-made chairs are in no way inferior to expensive factory ones, and sometimes even better - more original and reliable.
Finishing
When the product is assembled, you need to give it a decent appearance. There are several options for finishing plywood furniture:
- varnishing;
- coloring;
- pasting with PVC film;
- finishing with plastic panels.
Varnishing is a simple, but at the same time beautiful treatment. It is suitable only if the surface of the plywood is smooth, without knots, and with an interesting pattern. The decorating process is very simple - the cleaned material is treated with a degreasing solvent, and then 2-3 layers of varnish are evenly applied. Before this, you can go over the furniture with stain - this will give it a darker, richer color.
Painting involves applying 2-3 layers of paint
It is best to use oil, enamel or alkyd - they do not moisten the surface to be painted during work, and this is important for plywood. After painting, the furniture can be varnished
This will make its appearance more attractive and its service life longer. There is no need to varnish alkyd paint, as it itself forms a beautiful and durable layer like resin.
Plywood furniture can also be covered with PVC film. The surface of the product must also be cleaned and degreased. Otherwise, the film will not stick. The disadvantage of this treatment is that under strong mechanical stress the coating may tear or deform. And the main advantages are the simplicity and low price of the film.
Finally, plywood furniture can be finished with thin plastic panels. They are glued to acrylic sealant or other glue. As a result, the appearance of the furniture becomes similar to that finished with PVC film. However, the panels are thicker and therefore stronger.
What tools and materials will you need to make it yourself?
If you have a desire to try yourself as a furniture carpenter and decide to make your own chair, prepare the following materials and tools:
- Plywood. For reliability, it is better to make the frame and load-bearing elements from plywood with a thickness of at least 18mm, and for backrests with a seat you can use 15mm sheets;
- Hand saw and electric jigsaw. If available, you can use a circular saw;
- Screwdriver, drills, screws;
- Hammer, small nails;
- Grinding machine, or regular sandpaper and file;
- Tape measure, pencil, scissors, corner;
- Wood glue, if possible, use transparent glue so that you don’t have to sand off yellow streaks later;
- Paint, varnish, stain;
- Materials for decoration (various fillings, fabric for making pillows, or for upholstering the chair itself).
In the world of furniture design, there are famous names of designers who have made a name for themselves by making furniture from plywood.
Decorating the soft part of the chair
Tools for plumbing work: 1 - steel ruler; 2 - protractor; 3 - compass; 4 - scriber; 5 — table vice; 6 — hand vice; 7 - files; 8 - hammer; 9 — hand scissors; 10 - hacksaw; 11 — adjustable wrenches; 12 - pliers; 13 - soldering iron; 14 - hand drill; 15 — table anvil; 16 — table sharpener; 17 - chisel; 18 — punch; 19 - center punch.
To make the chair look nice and interesting, you need to cover it with fabric. Don't forget about the plywood parts that need to be painted. The side parts can be treated with stain of any tone. To give the surface a deeper shade, you should go through this composition 2 times. The inside of the sidewalls is painted with black paint with a glossy base. In order to reliably ensure and protect unnecessary parts from painting, you can use special masking tape. The ends of the sidewalls should be reinforced with metal rims.
Related article: Expanded clay consumption for floor screed per 1m2: calculator
Their dimensions must correspond to the dimensions of these parts of the chair. They are attached to points that will come into contact with the floor surface. The rims are fixed with screws, and the holes must be made with an electric drill. The diameter of the drill must be equal to the size of the screw thread. It is best to close the screw caps with plugs. They are sold in specialized stores in large quantities and in different colors.
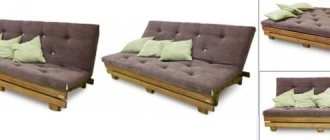
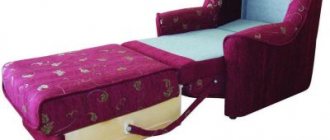
To make the rocking chair soft, you can make a faux leather cover. It will be pleasant to sit and sit on it. The leather substitute can be selected in any color. First, they finish the back of the chair from the back. The fabric is secured to the frame with small nails with voluminous heads. In the rear part, the upholstery is fixed along the edges of the transverse parts; in the front it covers the strips at the top and bottom. To make the base as durable as possible, the attachment points should be reinforced with wood glue. The mattress, that is, the soft part of the chair, is made of foam rubber 8 cm thick. The outer part of the seat can be trimmed with the same leatherette.
How to choose the right plywood sheet
Plywood is thin panels of wood glued together. The number of layers varies. It is durable, flexible, lightweight and, unlike wood, does not require complex processing, and its price is quite attractive.
Plywood today is one of the most popular materials in the construction and finishing industries.
In most cases, manufacturers choose plywood sheets for making furniture. This is a fairly popular material, strong and durable.
To choose the right FL, let’s look at what types and varieties it has. Types are classified according to the wood used in their manufacture.
| Deciduous They have a light shade and smooth texture. It is most often made from birch, but poplar, aspen, alder and maple can also be used. | Combined It is highly moisture resistant. Made from softwoods such as spruce, cedar, pine and larch. | Coniferous The outer layers of combined plywood are made from hardwood, and the inner ones from coniferous, which provides a pleasant structure and high moisture resistance. |
Strong and durable plywood, the price of which is lower than that of natural wood, is used in the production of furniture in the cheap and medium price segment.
Plywood sheets are also divided into grades:
- Elite plywood:
- free from chips, cracks, knots, residues and smudges of glue;
- almost impossible to find in stores, since all products from factories are bought by furniture factories;
- has a minimal number of flaws, suitable for making furniture at home.
- First grade.
- Second grade.
- Third grade.
- Fourth grade.
Plywood is a multilayer building material that is made by gluing together several layers of veneer.
Plywood is also classified into:
- unpolished;
- polished on one side;
- polished on both sides.
To make furniture at home with your own hands, it is better to use plywood of the FBA or BV brand, sanded on both sides. Natural adhesive components are used in their production; they are non-toxic and highly durable. Unfortunately, interior items made from such materials are not suitable for outdoor use, as they have a low level of moisture resistance.
If you don't want the veneer layers to be visible on the ends, they can be sealed or coated with several layers of dark varnish.
FBS, FB and BS grades are durable and moisture resistant.
There is a universal option that is suitable for both indoors and outdoors - this is laminated plywood. It is not afraid of mechanical loads, aggressive external factors and does not require finishing.
Plywood is an excellent material for making furniture.
Based on the purpose for which you will make your furniture, choose the plywood that suits you best.
How to restore
If you have an old, shabby rocking chair, you don’t have to throw it away. With the exception of the most “severe” cases, any structure can be repaired with your own hands. The repair itself consists of assessing the general condition of the item, replacing completely worn parts with similar but new ones, replacing the padding, and reupholstering with a suitable fabric.
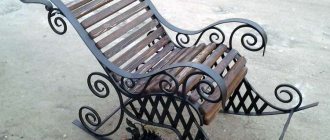
Metal rockers break much less often, due to their inherently high strength. But if necessary, welding of individual parts is done if they suddenly break off from each other, replacement of wooden, soft surfaces for sitting. Items made of plastic cannot be restored, but in those woven from wicker it is easy to replace part of the braid.
Necessary materials, tools
Since rocking chairs are usually made from a variety of lumber, you will need some woodworking tools. These include a jigsaw, drill, screwdriver, hammer, ruler, tape measure, screwdriver, brushes for varnishes and paints, a grinder or sandpaper of various grain sizes, and spatulas. The materials you will need are stains, transparent varnish, pieces of plywood, timber, boards, screws, PVA or other furniture glue, foam rubber (sintepon, other materials for padding), thick fabric (velor, tapestry, chenille, jacquard, leather, etc.)
Procedure
First, an external inspection of the item is carried out to see whether it can be repaired at all. If the chair has not yet crumbled into dust, rotted or been eaten by beetles, then everything will work out. Most often, the armrests require repair, and the seat, runners, and backrest require complete replacement. The chair is completely disassembled using a screwdriver. If there are completely “incompetent” parts, instead of them, others are cut out with a jigsaw, indistinguishable in shape from the old ones.
When the frame is completely intact, the runners are not worn out, only the coating needs to be renewed. To begin with, the structure, using special attachments on a drill, is removed from old paint and varnish coatings, and places where there are cracks and chips are puttied. The parts sanded down to the wood are covered with stain, dried for four to six hours, and one or two layers of furniture varnish are applied. Each layer of the latter is dried for at least 20 hours.
Replacing seats and backrests
The method of replacing seat parts depends on their design and material of manufacture. Wooden parts are unscrewed, partially replaced, tinted, varnished. With soft seats and backs it is a little more difficult - the covering is completely removed from them by removing all the nails and staples, while trying not to damage the frame. If the frame or plywood to which the “filling” and the textile covering it is attached is cracked, they are also replaced with new ones.
When the packing is still “in order”, it is left, otherwise it is completely replaced with a new one. Suitable parts are cut to size from foam rubber, the corners of which are carefully cut off to make it more beautiful. The padding is secured along the edge with staples from a construction stapler. Next, you need to cut the fabric - usually a rectangle is cut out of it, the corners of which, falling on the corresponding corners of the furniture, are neatly folded, secured with a thread and a needle. All edges must be turned in at least one cm so that they do not fray, and secured with a stapler on the wrong side of the product.
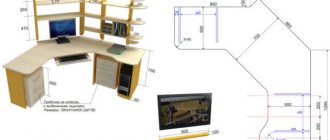
Preparation of the drawing
Surely, the diagram of the chair you like is freely available on the Internet. It specifies the exact dimensions, necessary materials, and tools for manufacturing. If you are not satisfied with the presented models, you can study several of the most attractive ones and model your own circuit.
By making a chair from plywood, you can not only create a high-quality piece of furniture, save money, but also get great pleasure from the work.
In order to make a drawing correctly, design your chair on paper, ideally from several angles. Visually divide it into main parts and draw them. You may need patterns, a pencil or marker, a ruler, a tape measure, a corner, and scissors. Select sizes based on your own needs.
A rocking chair made of plywood with your own hands is an excellent option for relaxing in the country, in a country house, or just in nature.
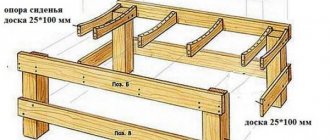
Step-by-step manufacturing instructions:
- Transfer your drawing from paper to a sheet of plywood;
- Saw the parts of your chair;
- Sand the cut areas;
- Pre-assemble your chair without using fastening parts. Use helpers. This is necessary to deliberately eliminate shortcomings.
- Glue the necessary parts;
- Drill holes for self-tapping screws.
- Connect all the parts together.
Don’t be afraid to experiment; as a result, you will get a comfortable, beautiful and original piece of furniture.
Operating rules
When using plywood interior items, you should remember the following.
- It is necessary to exclude exposure to moisture. Otherwise, the plywood will begin to delaminate and the furniture will become unusable.
- If the piece of furniture is made of thin material, you cannot place heavy things on it. This will lead to deflection of the loaded element, which in the future is almost impossible to straighten. And if the plywood is not of very high quality, it may even break.
- Place things on plywood products with the utmost care. Veneer is a sensitive material, so careless handling can cause dents. Of course, they can be sealed with wood putty, but it will not look nice.
How to make a rocking chair from plywood
Choose the model you like or draw your own. Most often, a rocking chair consists of two solid side parts, reinforcing slats and the lounger itself.
- First, we transfer your drawing to a sheet of plywood;
- We cut it out;
- Grinding;
- Next, cover the necessary elements with glue and wait for them to dry;
- May require sanding after gluing;
The creation stages begin with a drawing.
You can draw it yourself if you have knowledge of product design. Let's move on to the assembly:
- install one of the side parts on a flat surface;
- Lubricate the holes for the reinforcing slats (there are 3 of them) with glue and place the slats themselves there;
- cover the opposite edges of the slats with glue and connect them to the second side part;
- if your side parts require runners, then we install them. (For some models, runners are not required, since the shape of the side parts allows you to swing without them);
- we secure the back and seat with self-tapping screws;
- Mask the fastener heads using wood putty. After drying, sand it with sandpaper;
- Apply varnish to the resulting product.
Coat the finished product with an antiseptic solution and water-resistant varnish.
After complete drying, your rocking chair is completely suitable for its intended use.
Types of rocking chairs
| Illustrations | Types of design and their description |
| Models on skids . Essentially, this is an ordinary armchair or stool with skis attached to its supports. The advantage of this design is its simplicity and reliability. That is why such models are most often made by hand. | |
| Models on a pendulum mechanism . This design consists of two main elements - the base and the chair. The two elements are connected to each other by hangers through hinges. |
Which option is preferable if the assembly is done independently and for the first time?
The easiest way to assemble a chair is on runners, since it is enough to secure an ordinary chair on two curved slats. If you need a more original, but also simple option, I recommend a hanging chair. Of course, this option is suitable if the structure has somewhere to hang it.
About materials
| Illustrations | Materials and their description |
| Rocking chair made of wood . This is the most common type of furniture, for the assembly of which various lumber and untreated wood are used. |
Products made from rattan - the bark of the rattan palm - are becoming increasingly popular. The technology of weaving furniture from rattan is similar to weaving from willow, with the difference that finished furniture will cost more due to the exotic nature of the material.
Now that we know what furniture is made of, it remains to decide which material is preferable for assembling a chair yourself. If you are planning to assemble a chair for the first time, I recommend lumber, as it is easy to work with and carpentry tools are available in any home workshop.
Examples of rocking chairs
I offer an overview of the most interesting structures that can be found in summer cottages.
| Illustrations | Original designs and their descriptions |
| Vanka-vstanka . Here, a weight is attached to the lower part of the movable seat, serving as a counterweight. If you recline the seat, it will immediately return to its original position. The disadvantage of the design is the rapidly decaying inertia and, as a result, short-term swaying. | |
| Rocking bench . In essence, this is an ordinary but wide chair. There are options mounted on skids and options mounted on a hanging mechanism, as, for example, shown in the photo. Constructions of this type are less common than their single-seat counterparts, which is not surprising, since it is more difficult to swing a long bench. | |
| Sun lounger with awning . Loungers of this type can be either hanging, as in the photo, or mounted on runners. In both cases, rocking a massive lounger with the weight of your body is not easy. Therefore, it is preferable to choose a suspended structure, which is a little easier to move. | |
| Rocking chair . When planning the assembly of comfortable furniture, do not forget about the needs of children. Children's chairs are made according to the same instructions as their adult counterparts. The only significant difference is the smaller size of the child seats. |
How it swings
By tilting the structure to one side, we shift the center of gravity, which tends to return to its original position, repeating the action by inertia, but with a smaller amplitude
The principle of swinging is simple - there is a center of gravity that shifts during the first swing. Next, the center of gravity shifts by inertia, while the intensity of the rocking gradually shifts. When the structure swings on the runners, the inertia fades out faster, since more force is required to set the skis in motion on an imperfectly level floor base.
Seat displacement relative to the base in pendulum structures
The pendulum, as well as suspended models, swing by inertia longer, since there is no need to move the ski. On the other hand, it is easy to assemble a structure on skids, and therefore it is preferable to choose this option for the first experiments.
How to do it yourself
Drawing of the simplest rocking chair cut and assembled from plywood
After we have chosen the production materials, we decide on the drawing according to which we will assemble the furniture. As a drawing, you can use diagrams, which are full on the Internet, or you can sketch your own sketch with approximate dimensions by hand. The simpler the drawing you choose, the better.
The most complex and critical parts are the runners
| Illustrations | Manufacturing of solid wood runners |
| Making a template . On thick cardboard or plywood we draw the side perimeter of the ski. It is easy to mark the radius by bending a metal ruler and fixing it with self-tapping screws. Cut out the marked template. | |
| We transfer the perimeter to the workpiece . We attach the template to the board and outline the perimeter. Taking into account the load on the skis, we position the template so that the fibers of the board run strictly along the perimeter. | |
| Cut out the skis . Using a jigsaw we cut out the skis. Considering the specifics of the tool, do not try to make the workpieces perfectly even from the very beginning. The main thing is to try to guide the jigsaw blade without visible distortions - strictly perpendicular to the board. | |
| Ski processing . To make the rocking chair easy to set in motion, the surface of the skis must be processed to perfect smoothness. | |
| Installation of skis . The finished ski is placed on the front and rear supports and secured with self-tapping screws. We do the same with the second ski. |
It’s clear with wood, but how can you do the same with metal? It turns out that metal runners are even easier to make than wooden ones.
Skids from a profile pipe, bent using a pipe bender
For the manufacture of metal runners, it is preferable to use a profile pipe. In order to give the pipe the required radius, we run it through a pipe bender. Having received two metal parts with a suitable radius, we weld them to the metal chair.
Manufacturing of remaining elements and assembly
Sidewalls assembled and secured to runners
After the runners are ready, all that remains is to make the chair and assemble all the structural parts together. The easiest way to do this work is with metal, where the sidewalls are welded from finished skis and pieces of profile pipe, as shown in the photo. The main condition for the normal operation of furniture is the absolute identity of both parts.
Almost finished rocking frame
If both sidewalls are the same, it’s time to assemble a supporting frame from them. To do this, the sidewalls are connected by transverse bridges.
An important condition for the normal functioning of the chair is a right angle between the transverse crossbars and the longitudinal parts. If you do not maintain a right angle, the structure will turn out skewed. You can check the correct assembly by applying a square directly to the connection area.
At the same stage you need to weld the guides for the back. Of course, the guides must be parallel to each other and at the same angle of inclination relative to the seat.
Metal frame after painting
The final stage, after which the frame can be considered ready, is protective painting. This stage is very important in the manufacture of both metal and wooden chairs.
The wooden frame is impregnated with drying oil and then painted in several layers of weather-resistant paint. With metal structures everything is a little more complicated, since they need to be protected from corrosion. To do this, the metal surface is covered with a layer of acidic primer and only then painted.
If you don't want to bother with special primers, buy Hammerite paint that can be applied directly to rust.
Final balancing
How to make sure that a homemade frame is assembled correctly? Just try to rock it and watch how evenly it rolls. If the rocking occurs with jamming, the runners may not be perfectly level.
One more thing, look how level the chair frame is on the floor. If the frame initially leans forward or backward, compensate for the shift in the center of gravity by weighting the opposite part of the structure.
How to install overlays
Metal frame covered with wood
After the frame is assembled, all that remains is to cover it with wooden planks to get a result similar to what is shown in the photo. To fasten boards to metal, you can use metal screws by first drilling holes with a smaller diameter in the metal profile.
It is advisable to paint or varnish the boards in advance so as not to stain the already painted frame.
Converting an ordinary chair into a rocking chair
So, you can make a rocking chair yourself, and you will certainly cope with this task. But what to do if there is not enough time for a full assembly, and there are no materials for making furniture?
An example of transforming the simplest country chair into furniture for comfortable relaxation
The solution to this problem is to install ready-made furniture on the runners. That is, take an old unnecessary chair and screw its legs to improvised runners.
Fasteners for connecting to the runners are selected in accordance with the materials from which the chair and runners are made. The photo shows an example of assembling a rocking chair from a plastic chair, to which curved pieces of PVC pipe were screwed using self-tapping screws. Given the large diameter of the pipe, one can hope that this design will last a long time.
Three-legged chair model
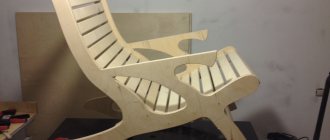
Recently, unusual models of chairs with only three legs have gained popularity. Often such chairs are called shells, due to their involuntary similarity.
The entire structure includes one piece with two legs, one piece with one rear support leg, armrests, and nine semicircular pieces from which the back and seat are assembled.
The model is distinguished by its original design and ease of execution.
Self-tapping screws or nails are rarely used to make such chairs. The main function of holding the entire structure together is performed by glue.
For the comfort of this type of chair, it is advisable to use pillows.
The drawing is redrawn on graph paper, then applied and traced along the contour.
A chair made from pallets is the best choice for a debut
If you are planning the first work of this kind, you need a little training. Furniture assembled from pallets will be a good addition to a country house interior, or will be a wonderful decoration for a loft-style apartment. The advantage is the absence of drawings and serious expenses.
To prepare the pallets, they are first disassembled and nails that look unpresentable are removed. Then all surfaces are thoroughly sanded. The products are assembled using new fasteners.
The standard seat height for chairs is 300-400 mm, so several pallets are connected. First add a backrest with a slight slope to them, the sides are secured with bolts. The procedure for creating a piece of furniture ends with painting the chair. If desired, foam rubber covered with upholstery fabric is fixed on the armrests, backs and seats. Bedspreads and pillows can perform the same function.
Regular stool
Before the invention of stools, people sat on the ground. It was the first piece of furniture that Homo Sapiens invented.
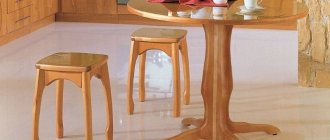
An ordinary stool has a simple structure. Consists of four legs of equal length and the seat itself. Sometimes, for reliability, closer to the bottom, the legs of the stool are connected to each other with wooden slats. The stool has no back and armrests. Includes seating for only one person.
If you rarely cut plywood, practice on an unnecessary piece, so you will not only get used to the jigsaw, but also decide on the cutting speed.
There are also stools with three legs. One of the most famous three-legged specimens is considered to be Alvar Aalto's stool.
In Moscow there is a museum dedicated to the history of furniture, in front of which there is a monument to a stool, which is considered the ancestor of all furniture art.
To make furniture with your own hands for the first time, you need to put in maximum effort, endurance and patience.
Features of the material
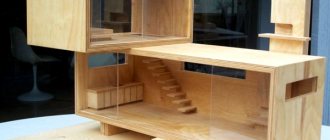
This may be designer furniture with unique solutions, or standard cabinet kitchen furniture, made according to all the canons and in strict accordance with popular factory models. The choice is yours.
The characteristics of the material allow you to create all kinds of designs of different configurations from ordinary or bent sheet plywood, beautiful compositions from Finnish plywood, decorate them with various materials, etc. Yes, plywood, as an independent material, cannot boast of an attractive appearance. But you have an excellent opportunity to decide how and with what to paint finished furniture structures.
In Moscow, St. Petersburg, Volgograd or Ufa you will find dozens of furniture stores that sell all kinds of products based on or with extensive use of plywood. Moreover, structurally there is nothing complicated about them. This allows you to make many designs yourself.
There is no need to be surprised, since the material itself encourages creativity, experimentation and truly original furniture projects.
Several features characteristic of plywood should be highlighted. Namely:
In order for the manufacture of furniture to be truly successful, and for the unusual design to turn out to be not just beautiful, but also of high quality, take a competent diagram and drawings as a basis.
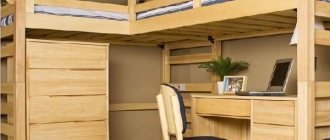
All the characteristic features of plywood allow it to be used in such areas as children's furniture, kitchen sets, bedroom solutions, including beds. The furniture can be folding and transformable if you wish. But I advise beginners to start with the simplest designs possible.
Tips and tricks for making
In order to produce any piece of furniture with high quality, you need to take responsibility for all stages of its production.
To begin with, carefully consider the choice of material from which you are going to make your furniture, be it a stool, chair or armchair. Prepare all the tools in advance and purchase the missing ones. Take all measurements accurately. Be sure to study the information on this issue. Take into account all the nuances, do not neglect the little things.
With a little practice, you can move on to heavier models.
Use helpers whenever possible, especially when assembling a three-legged chair.
Use the resulting product strictly for its intended purpose. If the furniture is for home use, then it may not withstand aggressive environmental influences (rain, sun, heat, cold, etc.).
Don't overload.
Having fulfilled all the conditions, you will gain significant experience, save your family budget and enjoy your holiday on a product of your own production.
Useful tips
In conclusion, I would like to give a few more useful tips that will definitely not interfere with those who plan to independently assemble and manufacture furniture structures from sheet plywood.
The recommendations are simple, but really important:
- a well-sharpened knife is suitable for cutting thin sheets;
- medium-thick sheets are processed with a hand jigsaw;
- for the thickest ones you will need a jigsaw;
- Before connecting elements with screws or nails, you need to make holes for fasteners;
- never cut plywood across the grain;
- Before gluing the sheets, it is necessary to carry out mandatory cleaning.
It's really nothing complicated. But home craftsmen often ignore some points. For example, cutting across the grain. This negatively affects the strength of the final product. You should also not screw in screws without making holes. This entails damage to the material.
Plywood is quite versatile and allows you to widely use its capabilities in furniture production. Due to their properties and characteristics, these sheets are perfect for home use and self-assembly of all kinds of furniture elements.
Thank you everyone for your attention! Subscribe, leave comments, ask questions and tell your friends about our project!
Watch this video on YouTube