Making a chair for your garden with your own hands is not difficult if you first familiarize yourself with the features of such a design and the manufacturing process. During design, you can use either ready-made drawings or come up with an exclusive model of a chair.
Features of the dacha option
First of all, a home craftsman who has decided to make a chair for the garden with his own hands needs to understand the structure of such a piece of furniture.
According to the rules, chairs are divided into dining and living room. The difference lies in the location of the seat . Dining chairs have a slightly higher seat and a narrower back.
A distinctive feature of living room chairs is that the legs are positioned slightly lower than in dining chairs. This configuration is determined by the requirements for the reliability and safety of furniture.
Despite the existing design features of chairs, each craftsman can make such a piece of furniture according to his own design. The main thing is that the chair is stable and comfortable for everyone in the household to use.
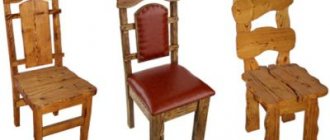
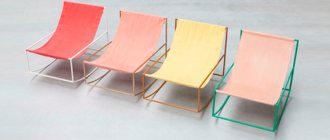
Examples of stylish design of garden furniture
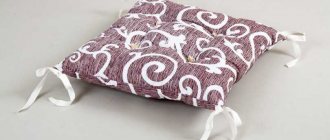
The dimensions of garden furniture are not so important, but in order for the items not only to perform their functions efficiently and for a long time, but also to be a decoration of the garden, they are often decorated with additional elements. One of the most striking examples for decoration is fresh flowers, and wildflowers will look especially bright. Another method to make garden furniture a real piece of art is to decorate it with a beautiful accessory, for example, pillows or a blanket. Decorating garden tables with plastic or glass tops looks no less beautiful.
By studying and carefully applying the recommendations from this article on creating country furniture from wood with your own hands, diagrams and assembly drawings should not be thrown away; they can come in handy in the future. If you also use the decorating techniques with additional accessories that are described in the text, the furniture can become a wonderful place to relax. With such pieces of furniture, spending time will be comfortable and enjoyable.
Wooden or metal?
The first stage of constructing a chair for a garden with your own hands is determining the most suitable material. You can choose from the following options:
Old furniture that is no longer in use. The wood from which it is made must be suitable for alteration and further use of the product.- Wood lumber of any species. Experienced craftsmen recommend giving preference to oak or beech .
It is worth considering that these types of wood are a little more difficult to process than pine or alder, but the products made from them are reliable and of higher quality. - Solid wood. Making a garden chair from this material is a little more difficult. A non-standard design is unlikely to be appropriate here, but an original and interesting piece of furniture will definitely turn out.
- Chipboard, plywood, chipboard, timber are some of the simplest materials that are used to make country furniture . The most popular materials, from which it is easy to create both a standard design and more complex and original products.
- Polypropylene and profile pipes. Used as a frame for a chair. It is better to make the seat from chipboard or plywood.
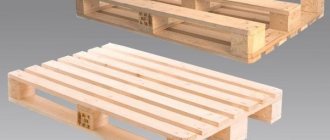
Pallets and tires are budget options for chairs, but no less original. Using pallets, you can make not only a chair, but also a chaise lounge.- Metal. To make a garden chair from metal, you need to have certain forging skills and welding equipment .
Having chosen this material for manufacturing, all work must be carried out professionally and accurately, since any deviation from the drawing and calculations will lead to unevenness in the structure. In such a situation, the chair will be impossible to use, and correcting an error in the product is quite difficult. - Glass. Making a glass piece of furniture yourself is also not easy, but it is ideal for a summer house with an interior in the Art Nouveau style or other modern design.
Tip : you can make a chair from any materials.
Just look at what you have available.
Let's start with the basics: making a stool
Fig.1. Samples of stools
Assembling a simple wooden stool is no more difficult than putting together a box. In Figure 1, position 1 shows the classic design, pos. 2 – the same, but artistically decorated. Pos. 3-8 are lightweight stools in which the legs are attached to sockets in a durable thickened seat or to sockets created by side gussets. The greatest strength and comfort for a seated person is achieved by using an X-shaped tie system (item 8).
Fig.2. Construction of a simple stool
Fig.3. The drawer is the main structural element, along with the legs and prongs. For its fastening, tenon joints, bolts and ties can be used. Serves to support the seat and connect the legs. The figure shows options for the design of the drawers. Position 1 shows a stool with legs in sockets.
To prevent the legs of a lightweight stool from breaking off, they must be slightly moved outward from the axis of symmetry (by 7-12°) or bent in an arc and expanded upward. To trim the heels and heads of the legs to the desired angle, the workpieces are tightly clamped and cut in 1 pass. It is very difficult to achieve the required accuracy with further adjustment.
Stool designs that are easy to manufacture
Positions 9 and 10 of Figure 1 show heavy, material-intensive, but very durable stool-pedestals. They are easy to make, so we pay attention to these designs for beginners.
Fig.4. Drawings of heavy stools
The picture above shows different types of heavy stools. On the right, the cabinet parts cut into half the tree (the groove for cutting is not shown). The shape of the seats is centrally symmetrical, fastening is on dowels. If you use soft covers on round stools, they will be indistinguishable from more labor-intensive poufs.
Fig.5. Drawings of panel stools made of 4 parts
Panel (box-shaped) stools are lighter in weight, more comfortable, and require the use of only 4 parts. Assembling them is not difficult, all connections are on dowels, the structures can be extended in length until they turn into a bench. The height of the stools, as can be seen from the drawings, can be different, depending on the needs: for children, for household needs, for the room.
Fig.6. Scheme of a reinforced utility stool. To give an attractive appearance, the sidewalls can be veneered, as shown in position c. The design is ideal for a country house and garden: simple, lightweight, inexpensive to manufacture, looks good, durable and convenient.
Other stool models
Positions 13-14 of Figure 1 show stools similar in appearance to box stools, but mounted on 4 wide flat legs. Similar designs are made with plank or cobblestone sides; the legs are fastened with one leg, located so as not to interfere with the legs.
Positions 15-16 represent step stools with X-shaped legs. To give them the required strength, 2 mutually perpendicular drawers and 2 prongs (item 15) or 4 drawer-beams are used, forming the upper frame, as well as a tie between the crosses (item 16).
Fig.7. Folding stool: drawing, folding method
Positions 17-20 present creative designs of stools in different styles. We recommend the execution of such structures after mastering the initial carpentry skills. The designs of the stools are quite flexible, tolerant of changes in the configuration of parts, and therefore provide scope for the implementation of original creative ideas.
Do not use soft, easily rotting wood for country furniture; avoid poplar, aspen, willow, and alder. To make the seat, it is permissible to use pine or spruce, but the entire structure can also be made from hardwood: birch, oak, maple, beech.
Methods for joining wooden parts
Making a chair for a summer house with your own hands from wood will require the ability to assemble elements:
- insert into half a tree;
- tongue-and-groove connection;
- tongue-and-groove connection;
- connection with dowels.
Fig.8. Inset into half a tree, 1 – closed connection (cross), 2 – open (corner), 3 – blind (half-closed) for insertion on the purlin, 4 – connection along the edge (support for a stool-cabinet).
The connection shown in the figure above is the simplest, but it is quite reliable with additional fastening with dowels, bolts, screws, nails (2-3 per connection). Strengthens the structure and sizing. The procedure for working with a hand tool is as follows: a cut is made along the edges of the recess (leaving 0.5-1 mm to the required depth), all excess is cleaned out with a chisel. Making deeper cuts to knock out an array with one blow is considered a manufacturing defect.
Fig.9. Tongue-and-tongue joints and tenon-groove: 1 – open single tongue-and-groove, 2 – open double, 3 – closed, 4 – tongue-and-groove
The tongue-and-groove joints shown in positions 1-3 are strong enough with one attachment point, or even without it, only with gluing. It is more difficult to make a closed connection (it will require a long period of careful gouging out of the array drilled along the edges), but it will be more reliable and durable.
The tongue-and-groove connection is mechanically similar to the tongue-and-groove connection; they are often mistaken for one another. However, the shoulder of the spike goes around it on all sides, which is radically different from the design of the ridge. Such a connection is permanent, very strong and does not require additional fastenings other than glue.
Fig. 10. Connection on dowels: 1 – marking the end, 2 – drilling holes in the end, 3 – marking, drilling holes in the face and connecting
Dowels are round or octagonal tenons made of hardwood, which are made separately from the elements being connected. Dowels that are wedged during assembly are called dowels; such connections are strong, reliable, and inseparable.
Drawing
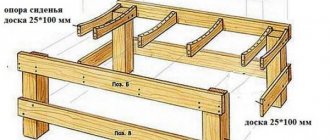
Before preparing all structural elements and assembling it, you will need to make a drawing. It will make the work easier and will not help determine the amount of material required for the product. A standard design chair for a summer cottage has the following parameters:
- height - 929 mm;
- seat width - 430X440 mm;
- length of front legs - 425 mm;
- length of side drawers - 396 mm;
- the length of the front drawers is 371 mm;
- backrest crossbar length ― 396 mm;
- the length of additional stops that are installed in the inner part of the structure to the side drawers is 385 mm.
Tip : you can design not only a standard product, but also any individual one. To do this, all structural elements need to be drawn on a drawing in a scale convenient for working, having thought through every detail. When drawing up a drawing, you should focus on the stability and reliability of the finished chair, which it should provide during operation.
Tools
To build and assemble a chair for a garden with your own hands, you need certain tools that are prepared in advance. During the work you will need to use:
electric saw;- plane;
- grinding machine;
- drill;
- hammer;
- jigsaw;
- self-tapping screws, bolts, screws;
- metal corners;
- glue;
- wood varnish;
- pencil;
- roulette.
For a standard garden chair you will need:
- timber - 4 pcs., with a section of 40×40 mm;
- timber - 8 pcs., with a section of 40×20 mm;
- material for seat and back - chipboard, plywood, boards.
Important : as for the main material that is used to make the chair, the craftsmen recommend purchasing wooden elements with a reserve. If a home craftsman makes a mistake during his work, he will not have to stop the process of purchasing a new beam or board.
Chair design options
The shape of the back and seat determines the complexity of the work that a novice mechanic will have to face. The simplest option is to make a straight model from solid wood with square legs and a back from a plywood sheet. Blanks for the future chair and fasteners can be purchased at a hardware store.
In the traditional design there are details:
- The frame consists of four legs and a frame, which combines the chair into a single whole and carries the main weight load. Additional elements are legs that are attached to the legs around the perimeter; their presence improves the stability and strength of the furniture.
- The seat can be straight - made of solid wood, which is sanded and polished, or a plywood sheet. The concave shape is produced in factories using machinery and can be made to order. Curved, made with a soft seat, covered with fabric or leather.
- The back can be lattice, through, when one wide element is mounted across. Also solid, made of solid wood, often decorated with carvings and upholstered, when the back element is covered with fabric or leather.
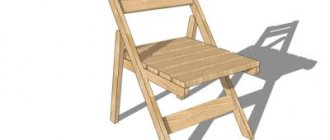
You can also make a folding version yourself, which is often installed in dachas and on the verandas of private houses, and in apartments such a chair will be convenient on the loggia.
The folding version is convenient for a summer house, veranda or loggia.
The most common method for self-production is carpentry, when furniture is made from solid wood by fastening and gluing individual parts.
Bent chairs are made from elements with a round cross-section, cut out according to a template and secured with screws. And bent-glued ones, when separate blanks are made from plywood and veneer and fixed together.
Chairs can also be made with bent elements.
How to make it from wood?
The first thing to start with when building a chair for a summer house is the manufacture of each individual structural element. Carry out work as follows:
Cut a seat of the appropriate size from chipboard or plywood.
On the short side of the seat, cutouts are marked and made, the size of which is 35x44 mm. Such cutouts are needed for further installation of the seat between the backrest supports .- The rear legs are made, turning into abutments.
In accordance with the size and shape in the drawing, parts are cut out. After this, markings are made for further installation of spikes, crossbars and drawers. Such recesses and holes are immediately drilled using a drill. Hole diameter 9.5 mm. - The legs are cut out, in which grooves are made for further attachment of the drawers. Their height is the same as that of the grooves for attaching the rear drawers.
- Particular attention is paid to the kings themselves. After cutting them out, you need to try on the elements to the legs and make sure that they easily fit into the grooves made.
- The side drawers are cut out in the same way. The difference between the elements is only in length.
- The next stage is designing the backrest. Depending on the design, the corresponding parts are cut out. The edges of the elements should also easily connect to the grooves in the abutments of the legs.
- The front legs are made of timber, taking into account the dimensions in the drawing. In the upper part of the finished elements, grooves are cut out (two on each leg) open at the top. It is worth remembering about the mirror arrangement of such recesses on two legs .
- The last element that needs to be prepared is the stops. They secure the seat and attach to the side drawers. On such stops, through holes are drilled (3 pcs.), through which the seat is subsequently attached.
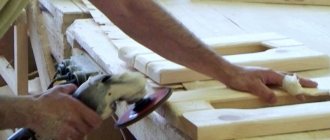
- All parts must be sanded, treated with an antiseptic or varnished.
- The last step is assembly, which starts from the back of the chair. The structural elements at the joints are pecked and tightened with clamps. The clamps should be removed only after the glue has completely dried . You can also use screws and other fasteners.
- After assembling the frame and the adhesive composition has dried, the drawers, stops and lastly the seat are attached.
- To complete the assembly process, you need to turn the chair over and screw self-tapping screws (length 35 mm) through the through holes made in the stops.
Tip : you can also make a sofa, a bed, a table and a transforming bench for your dacha.
And if you like active recreation, then add tennis and billiard tables to everything.
Option 1. DIY chair made from old tires
Used car tires can be found in your own garage, from neighboring car enthusiasts or from tire repair specialists. Tires are durable and strong, not afraid of precipitation and temperature changes.
You will need:
- 3 old car tires;
- dye;
- 8 wooden blocks 4x4 cm;
- large screws;
- screwdriver;
- drill;
- nylon rope - 10 m.
At the first stage, clean the tires from dirt using cleaning products and let them dry.
Make the frame of the chair from two tires placed on top of each other and connect them along the joining edges on the inside with self-tapping screws in 4-5 places.
To strengthen the base of the future chair, place spacers in the form of 4 bars inside each of the tires. They are installed vertically in the tire cavity and their length must correspond to their height. This will protect the tires from deformation and add rigidity to the structure. The bars must first be painted or coated with boat varnish.
We recommend making the chair seat from nylon rope. Such a product can be outdoors in any weather and is easy to wash. Drill holes in the top tire at a distance of 4 cm from each other around the entire circumference. Thread the nylon cord into one of the holes and tie a knot at the bottom. This is the starting point of weaving. Now you should tighten the rope, as if darning. First in one direction, threading it through the holes on the tire, then perpendicularly, passing the rope alternately from above and below each stretched row in a checkerboard pattern. In this case, some of the holes will be reused. The work must be done with force so that the tension of the cord prevents sagging. Secure the end of the rope and lower it inside the tire.
To final assemble the chair, make the backrest from the third tire. Cut the tire with a knife and separate the sidewalls. Cut the resulting ring - the middle part of the tire - with a grinder or an ax to get a ribbon. The use of such a tool is explained by the presence of a metal cord in the tire.
Attach the cut piece of tire tape to the base of the chair, giving it the shape of a backrest. Bend it around the circumference of two fastened tires and, turning the edges out, lower them down and secure with self-tapping screws. For these manipulations you will need the help of loved ones or available materials - a spacer beam, for example.
Now all that remains is to paint the garden chair or leave it in its original form. Such furniture is not afraid of the vagaries of the weather and does not need shelter. You can make a soft seat cushion from foam rubber or use an existing one.
Photo
Ideas for decorating the resulting furniture can be seen in the following photos: