Share on social media networks:
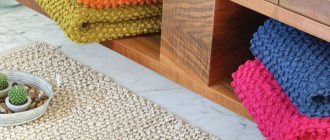
Surely, in every home there are many old and unnecessary magazines, newspapers and advertising brochures that can be used to light the stove or which can be disposed of. Or you can turn this raw material into wonderful furniture from newspaper tubes with your own hands. Yes, don’t be surprised, old newspapers can serve as a reliable and durable material for weaving useful household items. Probably everyone has come across products that are woven from wicker. They look very beautiful and airy, but they are not cheap. Therefore, we bring to your attention several simple options that will help you master the technique of wicker weaving using cheaper and more accessible material.
What is needed to create furniture from newspaper tubes?
The first step is to understand what you will need for the job, no matter what kind of decor or furniture you are going to make. The list of materials includes the following:
- Newspapers (brochures, magazines).
- Scissors.
- Sheets of cardboard.
- Knife for cutting paper.
- Scissors.
- Scotch.
- Paper glue.
- Varnish and stain for coating the finished product.
After the tools and materials are prepared, you should decide what kind of object you will make from newspaper tubes.
Important! For a simple vase model, you can use an ordinary plastic bottle as a mold. But for some more complex structures, various items may be required for the frame or temporary holder during work.
The first thing to do is to form paper tubes, which will serve as a vine for weaving. These paper tubes must be the same length and diameter, so it’s worth winding them onto a pencil to get the optimal shape, first coating the paper with glue. This will prevent the tube from falling apart after the pencil is removed.
Important! From the outside it may seem that paper is not the most reliable material for making massive objects for a specific purpose. However, in fact, furniture made from newspaper tubes with your own hands is quite strong, durable, and if you follow all the rules when making it, it will serve you for a long time.
Bookshelves made from nothing
In a sea of varied bookshelf designs, these pieces made from newspapers deserve to be noticed for a number of reasons. This is the cheapest project you can come up with, although it is quite complex and requires imagination and dexterity. The main property of newsprint is that it tears easily, so it is interesting to change this property, to make it the opposite. Newspaper tubes are a strong material, difficult to cut with scissors, and good enough to make great furniture. And creating your own, organic, cheap bookshelf project is incredibly easy!
Step 1. Making pipes from newspapers
For this project you will need:
- newspapers (about 60 sheets),
- scissors,
- glue,
- cardboard.
You need to start working by capturing the central page of the newspaper. Holding the paper by the corner, begin to turn it inward using your thumb and forefinger. Continuing to roll up the newspaper, apply a drop of glue to the paper and do not stop gluing layer by layer until the paper runs out. Surfaces coated with glue must be held for 2-3 seconds for the glue to set.
You can make about 60-70 of these pipes in an evening, while at the same time watching several episodes of your favorite movie.
Step 2. Cutting the tubes to the desired shelf length
10-12 tubes are grouped together. They will form the base and height of the bookshelf. It is necessary to shorten these tubes, having previously calculated their maximum possible length. To visualize the height of the structure, it is enough to cut just one tube. Then you can use this tube as a “ruler”. You can mark the length with a pencil or ballpoint pen, and then cut each subsequent tube to the desired size until all the parts are the same. The result should be 30 long tubes and 60 small tubes.
Step 3. Gluing
You need to take 10 long cut tubes and apply glue to their sides. On a flat surface, start placing them next to each other, side by side, so that they all stick together. You should end up with 2 surfaces formed from 10 long pipes. When the first layer is completed, make a second layer from the halves of the tubes, the shelf will rest on it. In total you need to make 3 layers, using all the short tubes.
The structure will take on a shape somewhat reminiscent of a pyramid. When one part is completed, the entire procedure is repeated with respect to the second side part. For strength, the structure can be reinforced with cardboard. The two finished parts are installed perpendicularly. They are placed on the base so that all the tops of the small tubes are visible. Glue is applied to these tops of the short tubes.
Step 4. Forming the shelf
Then take a piece of cardboard and place it on top of the short tubes. You need to press and hold it for 1-2 minutes to ensure setting. Anchoring is important for the strength of a bookshelf.
Step 5. Design
You need to take one of the 10 remaining long tubes and spread glue on one side. The tube is then placed in the center of the cardboard shelf. Press firmly and hold for 3-5 minutes. When the tube is completely glued, take 2 more long tubes and glue them in the same way, on either side of the central tube.
They do this until the entire shelf is decorated.
Step 6. Completion of work
The shelf should dry well. Now you can put the books on.
How to make tubes from newspapers correctly?
In order for your magazine and newspaper products to be durable, they must be made with the utmost care.
Important! For more complex structures that are designed to hold heavy objects, for example, shelves, armchairs, shelves, sofas, you will need higher density tubes.
Operating procedure:
- Take a sheet of newspaper and fold it lengthwise twice.
- Cut it so that you get four identical strips.
- To make the tube, take a knitting needle of the appropriate thickness and place it against the corner of the strip at a 30-degree angle.
- Holding the edge, twist the tube.
- Having reached the middle, remove the knitting needle and tighten the tube, gluing the edges with glue.
If during the weaving process you need to extend the tube, you should not use glue for this. It is better to leave a gap of 2-3 cm - it will be enough to hold the new link. For example, when rolling large sheets of newspaper, the tube expands upward, which is suitable for extensions.
Since paper is much softer than wicker, try, when tucking in the tubes at the end of weaving, to secure them with PVA to the product. Leave the work overnight to dry, and continue finishing in the morning.
Important! If you want nothing to distract you from weaving, prepare more paper vines in advance. Don’t be afraid that there will be extra left: weaving furniture from newspaper tubes with your own hands is so exciting that you will probably want to make a few more things later.
To begin with, you should practice on something simpler. For example, a small round tray will be an excellent opportunity to understand the intricacies of paper wicker weaving.
Panel
A woven picture from newspaper tubes can be made in absolutely any way. Depending on the idea, you first need to make a base from the vine; for this you can glue each twig together or intertwine them using any of the techniques presented above.
After which you need to figure out what will be depicted on the panel, it can be various lace weaves made of wicker, painted in different colors, as well as tubes twisted in a certain way, which then need to be glued to a ready-made base and painted.
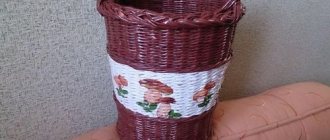
Beautiful panel made of paper tubes
Tray made of paper tubes
To make a tray, you need to prepare cardboard and newspaper tubes, as well as some form to support the structure during the weaving process.
Important! Also stock up on a decoupage napkin with the desired pattern and acrylic paint.
Operating procedure:
- Cut out three identical circles from cardboard.
- Paint one of these circles with white acrylic paint. After it has completely dried, decoupage it using a prepared napkin and set it aside for a while.
- Draw the second circle into sectors of equal size. For more accurate calculations, use a protractor. For example, if you take an angle of 8 degrees for breaking, you will get 45 rays. Glue tubes on top of them, which will serve as the basis of the product.
- Then glue another cardboard circle on top of the base tubes. This will give you the bottom of the tray.
- Take two tubes and weave the first row out of them, strictly adhering to the edge of the cardboard base so that the ends close well. Moving on to the second row, lift the base tubes vertically. In this case, a frame for braiding will not be needed, since the working tubes from which weaving began hold their shape well on their own.
- Continue weaving the tray either using a simple technique, or with a more complex pattern if this kind of work is not new to you and you have already mastered some patterns.
- Once your tray is completely woven, coat it with two or three coats of varnish and, after it is completely dry, attach a cardboard circle with decoupage to the bottom.
Thus, after trying to weave from newspaper tubes, you will be able to make a functional and attractive interior element. If you liked this process, you can proceed to more complex options, for example, making a chair from newspaper tubes with your own hands.
Frame
This product can be made using any weaving technique; it will look especially relevant using the rope or layer technique. As a rule, weaving occurs first horizontally, then vertically. To make the craft more neat, it is recommended to glue rows of newspaper tubes onto cardboard.
Photo frame made of paper tubes
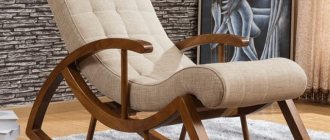
We weave a beautiful chair
This is exactly the version of decoupage of a simple plastic chair that we talked about just above. To do this you will need the following:
- Plastic chair.
- Tubes made of paper or newspapers.
- Sheets of cardboard.
- Glue.
Let's get to work. For convenience, you can place the workpiece on the table. If you prefer to work on the floor, then you should lay a soft blanket under your feet, since weaving a chair can take a lot of time:
- Place a cardboard sheet under the high chair and cut it to the required size, forming the bottom of the future frame. Glue paper tubes parallel to each other to each side of the resulting shape, at an angle of approximately 30 degrees on the folds.
- Place the chair level and raise the tubes - they will serve as stands. Now take four tubes, fix them on the base and braid the first row. Hide the extra two tubes inside, and weave two more rows with the remaining two.
- After the fourth row is completed, it is recommended to use two tubes at a time for weaving. Having weaved several rows in this way, you can return to weaving using the “rope” technique. So the stand and the bottom of the chair are ready.
- Let's start working on the seat. Weave it with one tube. For every fifth row, leave a working tube on the right side, and on the left, add a new one with a reserve. So form the side pillars.
- Braid the sides of the seat and base together using the “rope” technique from left to right. After this, hide the remaining tails from the seat inside, under the weaving. Proceed to the back: it is woven from new tubes. After several individual rows have been woven, braid the backrest around the chair. To narrow the armrest, take two posts at a time - then one of them can be cut off.
- Weave the back, starting from the left, gluing the ends of the tubes to it and cutting off the excess. From the inside it will be necessary to reduce the width strictly in shape. On the armrest, add two bent tubes and weave in a circle, bending the work post on the right side under the right post. Cut off the ends and glue them. To hide the arches of the back and armrests, weave the upper part until the lower and upper posts meet. Fold the edges and cut off the excess.
- The chair is almost ready, all that remains is to cover it with stain and varnish in several layers.
Important! In the same way, you can braid almost any piece of furniture from newspaper tubes with your own hands, which has lost its attractive appearance and would be a pity to throw away.
House for a cat made from newspaper tubes
If you love cats, then you probably own this fluffy and affectionate animal and take care of your pet. Why not make him a cute two-level house in which your cat will feel cozy? Moreover, for this you will need very little: newspaper tubes and cardboard.
First, pay attention to the size of your cat. The larger the animal, the denser the newspaper tubes should be and the wider the bottom. Let's look at the standard size: the oval bottom is 35-40 cm, and the height of the first level of the house is 23 cm.
Operating procedure:
- Glue the tubes to the bottom at equal distances in the shape of a sun. Lift them so that they form a wall and begin to braid. When weaving in each row, bring the warp tubes a little closer to each other so that the walls taper upward.
- Once the 23 cm is completed, make a few more rows to form a straight post of approximately 5 cm. This is where the crossbar between floors will be installed. It must be woven in advance in the form of a circle, and the base tubes must protrude well beyond the working fabric in order to connect well with the base tubes of the first tier.
- Then braid the resulting compacted base in a circle, forming a semicircular basket from the inside.
Important! Since cats are active creatures, the house will need reinforcement. A solution of PVA glue and water in a one to one ratio will help you with this. It will make the resulting structure heavier and more durable. After the house is completely dry, apply stain to it, and then open it with varnish.