The vast majority of people start a new day with a visit to the bathroom. Based on this, it is pleasant at a time when this room, with its appearance and equipment, can give a boost of energy until the evening. This is facilitated by overhead sinks, which look unique and discreet in the bathroom.
In most cases, they are installed in large rooms, and installation is carried out on a moisture-resistant base, often on a countertop.
Thanks to the variety of shapes, sizes and materials, they allow you to realize every design idea. Let's take a closer look at these products.
Installation of a built-in sink
Before installing the sink into the countertop, you need to make a recess for it.
To do this, use the template supplied with the sink, or trace the outline of the sides and bowl, turning the product over. When marking, you need to leave intact that part of the countertop that will be under the side, and cut out only the outline corresponding to the bowl of the sink. For sawing, a hole is drilled into which the jigsaw blade will be placed. It is advisable to drill inside the outline that will be removed. This way you can achieve an even cut along the entire contour of the recess. Place a jigsaw file into the hole and carefully cut out a recess for the bowl, trying to follow the contour as clearly as possible.
The edges of the hole for the sink need to be filed and sanded. Place the bowl and check the accuracy of the fit of the recess: if the cut is made correctly, the sides fit tightly to the tabletop. Carefully cover the cut with silicone sealant and dry the tabletop.
Install taps into the countertop and connect flexible hoses to them. Before installing a mortise sink, apply a layer of sealant to the edge of the recess. To seal the joint, you can use the gaskets that come with the sink. Place the sink on the countertop, tighten the fastening bolts from the bottom using the following algorithm:
- first those located diagonally on the product;
- after that - fastenings in the middle of its sides.
When tightening along the contour of the sides, excess sealant may be squeezed out. It must be wiped with a rag, and a gasket that is too wide can be cut off with a sharp knife.
Mounting a mortise sink
Let me remind you that a mortise sink is installed with a specially made hole in the countertop. The hole dimensions are made 12-14 mm smaller than the overall dimensions of the sink.
This indentation is made for a reason. There are special “ears” on the back side of the mortise sink, which serve to secure it.
Look at the photo for the appearance of the mounting of a mortise sink. In the photo I marked the purposes of the fastening elements:
- — clings to the “ear” at the sink;
- — Fastening screw;
Reliable fastening of a mortise sink
- clings to the countertop.
Important! The fastening clips are installed in the “ears” of the sink before it is installed.
- Turn the sink upside down;
- Install the fastener at the “ear”, observing the correct location of the catching “whiskers”;
- Bend the tightening part of the fastener so that it does not interfere with installation;
Follow all the rules for waterproofing: treat the cut of the sink with acrylic sealant, insert the sealant, which should be included, into the groove of the sink. Install a faucet on the sink.
- Install the assembled sink into the hole;
- Unfold the catching element of the fastener and hook it onto the back edge of the tabletop;
- Use a screwdriver to tighten the fastening screws.
Important! Tighten the fastening screws not immediately, but in a circle. It is even better to tighten the screws according to this pattern. With this tightening, there will be no distortions in the tabletop and it will be evenly attracted to the tabletop by the distorted seal.
How to install a sink on a countertop
We chose to choose, it’s not that difficult. But don’t forget that this beauty also needs to be installed.
In fact, there is nothing particularly difficult about this. If you have ever installed undermount sinks, then overhead sinks will seem like a piece of cake to you. So, as always, it all starts with preparing the tools. Everything is standard here:
- hacksaw or jigsaw;
- screwdriver or screwdriver;
- wrench;
- sealant and brush;
- pencil and ruler.
First, we make markings on the surface of the cabinet. Most sinks come with convenient stencils for this purpose. We cut out a hole for the drain and water pipes of a suitable size.
We assemble the sink separately. Attach the drain pipe. If the faucet is still connected to the sink, install it in the corresponding hole. We secure it tightly using the fasteners that come with it.
Be sure to use rubber gaskets (they are usually also included in the kit) to avoid damage to the surface. For reliability, lubricate the joints with sealant. We connect flexible pipes to the tap to supply cold and hot water. We will summarize the remaining communications later.
We install the sink on the countertop. It is most convenient to use construction adhesive, which is used to lubricate the drain hole, but in this case it will be difficult to dismantle the sink if the need arises. So you can use fastenings here too.
Now it's time to connect. Let's start with the drain. We screw the siphon to it and run the corrugated pipe to the sewer. Using a special cuff, we connect them to each other (not forgetting about the sealant). We connect the flexible tube coming from the mixer to the water supply.
Also, now many people like to complement overhead sinks with lighting. It is installed last. The most convenient way is to use an LED strip: it is attached under the sink (silicone glue is good for this) and connected to electricity.
After installing the sink, be sure to check it for leaks. Turn on the faucet for a while and check that there are no drips on the pipes. Otherwise, additionally treat them with sealant.
As you can see, there is nothing complicated. But if there is even the slightest doubt that you can handle this matter, it is better not to risk it and call a specialist. Because in case of an error, it will be much more expensive to redo it than to assemble everything from scratch. Good luck!
Installation technology
Overlay design
The instructions for installing an overhead sink will be the simplest, so let's start our review with that.
It should function according to this scheme:
- To begin with, we set the cabinet-underframe according to the level . The more stable this design is, the easier it will be for us in the future.
Note! In many cases, it is possible to install the sink on a movable cabinet, but it will still need to be secured and leveled before connecting the mixer.
Advice! The fastening for the overhead sink should be tightened manually, and not with a drill or screwdriver - this way we minimize the risk of deformation of the rather narrow metal.
- Instead of brackets, it is possible to take wooden blocks with attached iron corners . The sequence of actions in this case will be the same as when using standard fasteners: we install the sink on the screwed bars, which we then press with the corners.
Mortise design
In addition, it is possible to install a mortise structure with your own hands, but here you need to be more careful:
- We attach the template that comes with the bowl to the tabletop.
Note! If necessary, you can make your own template from thick cardboard.
- We draw marking lines according to the template, and then cut out a piece of wood or MDF along these lines using a jigsaw. To make the cuts more correct, it is possible to first make a couple of holes with a wood drill.
- We apply silicone sealant to the edges of the hole, and lay butyl tape around the perimeter.
- We install the part, carefully smooth it and press it to the lower plane of the tabletop, using iron brackets.
- In addition, if necessary, we drill an additional hole and fix the mount for the mixer to the sink, if its presence is provided for by the design. In most cases, the valve is located at the bottom with a clamping nut.
Characteristics of overhead sinks
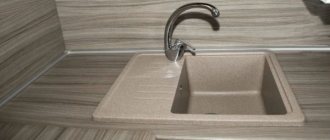
The stainless steel countertop kitchen sink is a tandem of a sink and a kitchen cabinet. The sink is made of sheet iron. Stainless steel is an ideal option, as it easily copes with an aggressive environment (a combination of constant moisture and household chemicals). The kitchen cabinet in this case is a special cabinet without a back wall and shelves. Despite the lack of shelves, the sink base has a practical application and is used for storing household equipment.
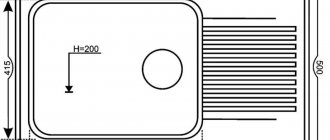
The countertop kitchen sink is most often square in shape. The dimensions of the side walls are standard - from 40 to 60 centimeters. Depth from 15 to 20 centimeters. Three side walls have rounded edges for ease of installation, the fourth - the back - is slightly higher to prevent moisture from penetrating between the sink and the wall.
Despite the apparent simplicity of the design, overhead kitchen sinks can have additional elements. For example, a second sink (smaller or the same size) is very convenient for rinsing dishes or food. A special ribbed surface for drying adds advantages to the countertop sink.
The product is sold both separately and as a set with a cabinet. It is better to prefer the second option. A sink with a base will eliminate the need to look for a cabinet that fits the size.
The surface can be matte or glossy. The matte version is more practical, as it hides cloudy stains and dirt is less noticeable.
The main advantage of the overhead option is ease of installation.
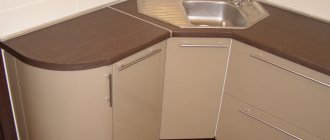
The sink looks like a single unit with the furniture
What types of overhead sinks are there?
Their shapes can be seen or seen, so you will definitely find an option that suits your design. For example, classic design implies smoothness, roundness and streamlining, smooth lines and laconicism in decor. But the high-tech style is associated with strict geometry and minimalism.
Forms, as already mentioned, can be almost any. The standard ones are, of course, an oval and a rectangle with rounded edges. An interesting option that is gaining popularity is the triangle.
In general, there are no restrictions for imagination. If you want, there will be a shell, if you want, there will be a flower, a cloud, a blot, a drop, anything, even a guitar (yes, this also happens). All this can be found in stores, and if you want something especially extraordinary, you can always order individual production.
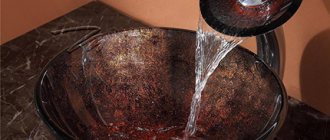
There can also be much more materials than we used to think. Of course, the first things that come to mind are ceramics, earthenware and porcelain. And this is no coincidence, because such sinks are easy to clean, they do not rust and look great. But they also have their drawbacks - ceramic sinks are not particularly durable and can become cracked during installation and operation.
A cheaper alternative is acrylic (a high-quality plastic). It is also lighter (for which we can thank him very much during installation) and looks nice in the interior. But it scratches easily and is also fragile.
If you want reliability and durability, buy a stone sink made of marble or granite. If you don’t want to spend so much money, artificial stone is also suitable.
In terms of materials, there are also original solutions. For example, for eco-style interiors, sinks began to be made from wood. But I warn you that you will have to carefully look after them. Non-standard materials also include glass and metal.
Fixing the sink with glue
Installation of an overhead sink is possible using glue. But this method is only suitable if the underframe almost perfectly matches the sink itself. It will be placed on top, and the ribs will “sit” on the cabinet.
Advice! Do not skimp on the sealant on the entire contacting surface. It plays the role of glue and will additionally protect the joints from moisture penetrating into them.
Installation using wooden blocks
You will have to think about how to attach an overhead sink to wooden blocks if you do not have fastening corners at hand or if defects are found on the surface of the cabinet frame. So what do we need?
- bars of suitable size;
- furniture corners;
- small nails or screws.
The first step is to build a mounting platform in the form of a rectangular frame. It will serve as the top frame of the stand. It is he who will smooth out all the unevenness. The assembled bars are sent to the box of the overhead sink and fixed there with steel corners around the perimeter. And we place the resulting structure directly on the stand. We will secure it using the same corners, but from the inside to the walls.
Washing
How to attach a sink to a cabinet if it is made of thin metal and has little weight? Obviously, in this case it is not enough to eliminate the possibility of lateral displacement: the sink must be fixed in both the horizontal and vertical planes.
Stainless steel sink
Plastic fasteners
The standard mount, which is often supplied by kitchen furniture manufacturers to the cabinet, is a set of plastic corners with oblique grooves in them. The groove is designed in such a way that it can be fixed in several positions. When displaced relative to the screw that secures it, the corner presses the edge of the sink to the ends of the walls.
Fastening with plastic corners is not particularly difficult:
- Having installed the corners on the edges of the walls, we drill holes for the screws with a thin (usually 3 mm) drill. The depth of the holes is no more than 12 millimeters, the location is in the middle of the oblique groove.
Tip: to avoid drilling through the walls, use any method to make a mark at the required distance from the tip of the drill. This is usually done using a piece of duct tape or lipstick.
- Tighten the corners with 4x16 mm screws so that they move relative to the walls with noticeable force.
- Lift the corners and place the edges of the sink under them, then move the fasteners to the side and down until they stop.
Plastic fasteners, however, have one unpleasant feature. It will prevent the sink from moving to the side or rising above the cabinet; however, forward displacement remains possible in most cabinet designs.
To prevent this, apply a small amount of sealant to the ends of the walls before installing the sink. It will securely fix the structural elements, and it will not interfere with removing the sink to replace the faucet or flexible hoses to it.
Marking of fasteners.
Corners
To attach the sink, you can also use a steel or aluminum corner cut into 5-8 centimeters. It is attached with two self-tapping screws and fixes the sink using a piece of rubber pressed to the edge of the sink on top - a plumbing gasket or a piece of a car inner tube folded in half.
Thanks to the elasticity of rubber and the high coefficient of friction characteristic of it, the sink will be clamped quite reliably. However, the force on the screws screwed into walls made of chipboard will be quite significant and sooner or later they can be torn out.
But for home-made structures, this solution is quite suitable: a do-it-yourself sink cabinet is often constructed not from chipboard, but from much more durable plywood 12-15 millimeters thick.
Bar
Finally, the most reliable fastening is using a bar and plates made of galvanized steel.
- A block is placed under the edges of the sink along the perimeter or only on the sides (depending on the configuration of the cabinet). It should be so thick that its surface and the inner surface of the walls of the cabinet are at the same level.
- Then the block and walls are tightened with overhead plates and 4x16 mm self-tapping screws. In laminated chipboard walls, it is better to pre-drill holes with a 3 mm drill.
Fastening on a block.
Final work
Important! If, after reading the instructions, the entire procedure is already clear to you, then you can proceed with installation, otherwise we recommend watching how to attach an overhead sink in the video tutorial. https://www.youtube.com/embed/035o9k38r4E
At the final stage, all that remains is to attach the siphon to the sewer pipe. And we connect flexible hoses from the mixer to a source of cold and hot water supply. Now you can safely open the shut-off valves and use the mounted device. For really lazy plumbers, there is another way out. Fasteners for an overhead sink may look like ordinary hooks for hanging it on the wall. But in this case, appropriate holes must be made on the back panel of the sink. And you can simply place the cabinet separately under the sink.
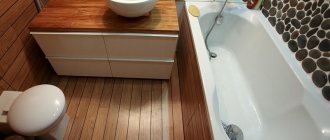
Features of a countertop bathroom sink
What is this anyway? In simple terms, this is an ordinary sink, which is not built into the cabinet, as we are used to, but proudly rises above it. It roughly looks like this:
There are many forms and varieties of them, but we will talk about this a little later. The only disadvantage of such a sink is that not all bathroom spaces can afford to accommodate such an elevation. The solution may be to install it not on a cabinet, but on a wall shelf, then you can place household supplies underneath.
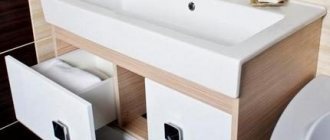
The same varieties that are installed on countertops are convenient because they do not depend on the strength of the wall and will not require work with it (which means you won’t have to spoil the finish if you have one). Unlike the pedestal model, which has very limited space for placing important small items, this option has more space thanks to the free surface of the cabinet. You can put toothbrushes, toothpaste, various creams on it, and there is even space for decorative elements.
Features of the sink cabinet
When choosing bathroom furniture, you need to take into account a number of factors. The main thing is the safety of things and their quality. In other words, all things must remain dry, and various vials and bottles must remain horizontal. The material of the cabinet must be resistant to moisture, the shelves are reliable, and the doors close well.
Any bathroom furniture should be as functional as possible, but not take up much space. For a small room, the best choice is a hanging cabinet. In addition to functionality, furniture should be in harmony with other objects, as well as with tiles.
A cabinet with a tabletop implies additional space. Materials require special attention. They must be impregnated with a composition that protects against the negative effects of moisture, steam, and also protects against chemicals, bacteria and fungi.
The criteria for choosing a cabinet can be reduced to the following:
- the material from which the cabinet is made;
- dimensions;
- product type;
- harmony with the interior.
Using mounting brackets
Installing an overhead sink requires a little less time and can be done using special metal corners. They usually come with it. In total, you will need at least 4 mounting plates, which will be fixed on the outside of the cabinet using self-tapping screws. Since the wall of the stand cabinet rarely exceeds a thickness of 18 mm, the screws in the set are 16 mm long.
The step-by-step process looks like this:
- We screw in the screws 5-6 mm.
- We hang a mounting bracket on them (with the inner corner part facing the cabinet).
- We tighten the screws, but not completely, leaving room for adjustment.
- We place the sink on the stand so that the powerful main fastening screw is fixed in the very depths of the metal corner.
- We tighten the screws all the way and make sure that they are securely fastened