If an office chair sags under you, then the so-called gas lift - a mechanism responsible for lifting and fixing the chair. A new part costs 600-800 rubles, plus something will need to be paid for the work of the master. But the gas lift doesn’t have to be changed, but simply fixed once and for all in one thing – convenient for us! - position.
The work really takes two minutes - you need to remove the cross with the gas lift, use the pedal to push it up all the way and put something on the rod that will prevent it from going down. A piece of rubber hose is best suited (the landing on the chair will feel softer), but it can easily be replaced with a metal, polypropylene tube, or even a set of washers.
Here is an excellent video with instructions, I made my chair using it, and everything worked out:
Features of gas lift operation
First of all, I note that the malfunction indicated in the title always indicates a breakdown of the gas lift - a unit that performs the following functions:
- Creates a cushioning effect when you sit down . This relieves stress from the spine and makes sitting on the chair more comfortable. The element dampens the impact effect that often occurs when landing on rigid structures.
- Raises or lowers the seat due to a special mechanism . This allows you to adapt the design to people of different heights and adapt it to different types of work. For example, writing requires a different position than working at a computer, and thanks to the gas lift, adjustments are made in literally a matter of seconds.
- Provides rotation of the chair around its axis . This function is also provided by a pneumatic cartridge (this is also the name of the mechanism in question). Thanks to this element, you can rotate 360 degrees in both directions without any restrictions.
Thanks to the gas lift, the chairs become much more comfortable and functional
The design is a steel cylinder, inside of which a rod with a piston moves. The cylinder is made in the form of a sealed element of a certain shape, divided into two chambers. A valve is installed in the partition between the chambers, due to which gas moves from one chamber to another.
The gas is located in two chambers - external and internal and moves depending on the opening of the valve
When the seat is fully lowered, the piston is in the up position. When you press the lever, the damper opens and the gas moves from one chamber to another, it presses on the piston, and then it goes down, while simultaneously lifting the seat up.
When the lever is lowered, the valve closes and the structure is locked in the required position. Everything is quite simple, but if you look at the system inside, you will see that it consists of many elements. The diagram below shows a cross-section of the product.
The system inside is quite complex, but this does not matter, since we will not disassemble it
Another important element is the support bearing; it is located at the end of the rod and ensures free rotation of the chair in both directions.
The support bearing allows the chair to rotate freely in both directions
All pneumatic chucks are divided into classes, which depend on the thickness of the steel used for the elements inside which there is gas under pressure:
- Class 1 - 1.2 mm.
- Class 2 - 1.5 mm.
- Class 3 - 2.0 mm (designed for loads up to 120 kg).
- Class 4 - 2.5 mm (used on chairs that can support up to 150 kg).
The higher the class, the stronger and more durable the gas lift, but also the more expensive its cost.
Another part of the mechanism is the gas lift casing. It does not perform any functions and serves for decorative purposes, covering the metal cylinder and giving the chair a more attractive appearance. Used only on plastic models; on metal ones the structure does not close.
The casing is a simple telescopic element of three plastic sections inserted into each other
Keep in mind that the gas in the housing is under very high pressure, and any damage to the integrity is dangerous to human life and health.
Required Tools
Before you begin disassembling the product, you need to prepare all the necessary tools. Any home craftsman has them. To dismantle the chair parts you will need:
- screwdriver;
- hammer;
- chisel;
- pliers.
If you need to replace the gas lift, you can add technical grease and a bolt with a minimum diameter of 10 mm (or a little more) to this list. Instead of a screwdriver, it is more convenient to use a screwdriver. Having unscrewed the fasteners, you need to immediately put all the fasteners in a box or tin can, since the loss of even one bolt will deprive the repair of any meaning.
Technical lubricant is needed to make the parts move away from each other more easily. If the chair has served for many years and has never been disassembled, the fastenings gradually become tighter, and then it is very difficult to separate them. Upon completion of the repair, remove greasy oil marks with a soft cloth (for example, a piece of flannel).
If the crosspiece is made of plastic, if a malfunction occurs, it is recommended to replace it with a new one. New rollers are usually installed at the metal base. Experts say that crosspieces made of high-strength aircraft aluminum are least susceptible to wear. However, they are found only in expensive models.
Tools
Accessories
Features of repair work
To begin with, I will tell you about the most typical causes of breakdowns, then you will find out what is needed for the work and how to properly organize the work process of replacing a failed element.
Causes of breakdowns
The gas lift does not fail so often, however, the problem occurs from time to time, and in order to reduce the likelihood of malfunctions, you need to know how they most often occur:
- Spruce trees often sit on the chair due to plaque . You cannot lower yourself into the seat very sharply, this creates overloads inside the gas cartridge, and over time the valve may fail - it will simply be squeezed out, and the system will lose its functionality. Sit down carefully and smoothly, and this problem will bypass you.
- Elements wear out from long-term use . Manufacturers recommend lubricating the elements with oil from time to time. This minimizes friction and significantly reduces wear, ensuring a long service life. To do this, the casing is lifted and lubricant is applied to the cylinder.
- The structure is subject to overload . If a person weighing 110 kg or more constantly sits on a chair designed for 100 kg, then the likelihood of system failure increases significantly. You need to select furniture with a margin of safety. You cannot sit together, as this also creates overload.
- Manufacturing defects . Products are produced in large quantities, and the company does not always have appropriate quality control. This is especially true for chairs from the budget segment, where the likelihood of defects is much higher.
If a malfunction occurs during the warranty period, the seller will replace the damaged part at his own expense.
How difficult is DIY repair?
If you know how to do minimal repairs with your own hands and are comfortable with a hammer, screwdrivers and other hand tools, then you can handle this job without any problems. You need to prepare the following:
| Illustration | Description |
| A chair with a failed gas lift . It is best to carry out work in a free room so that nothing interferes with your work. If you have a workshop, this will be the best solution that will ensure maximum ease of repair. | |
| Screwdriver Set . In general, it should be at hand for anyone who does at least some work with their own hands. This allows you not to worry that you will not have the tool of the required configuration in a given situation, because the shape and size of fasteners on different types of furniture vary significantly. As for chairs, the Phillips screwdriver PH2 is most often used. | |
| Rubber hammer . Used to knock elements out of their seats. It is best to have a medium-sized version on hand; a large mallet will not be very convenient to work with. |
If there is no rubber option, no problem, you can get by with an ordinary hammer, but you will have to work carefully so as not to damage the parts or spoil parts of the structure.
Gas lift replacement process
I'll tell you how to repair a chair and replace a gas lift with your own hands:
| Punch . It may be necessary when knocking out the gas cartridge from the crosspiece of the chair. It is not necessary to purchase a specialized option; you can adapt what you have at hand - a piece of pipe or a wooden stick of a suitable diameter will do just fine and will help you get the job done without any problems. |
| New gas lift . You can purchase this part at any furniture fittings store or in places where office chairs are sold. It doesn't cost much, so repairs won't cost you too much. |
| Bench vice . This item is not mandatory, but if it is available, the work process will be much easier, since you will be able to fix the parts to remove the old gas cartridge. |
| Illustration | Description |
| The chair is being prepared for repair. I recommend removing the armrests from it in advance so that they do not interfere with the repair of the structure. | |
| The chair turns over so that you have free access to the bottom of the cross . If the floor is dirty, cover it with cardboard or rags. | |
| Using a flathead screwdriver, carefully remove the retaining ring . It is located outside and will not be difficult to find. | |
| Carefully remove the lower part from the cross . After removing the retaining ring, this will not be difficult, just pull the element towards you. | |
| The gas lift housing remains on the bottom of the seat ; it should be removed first. | |
| Place the structure horizontally to ensure good access to the bottom . The easiest way is to place the seat on the table; it will be located at a comfortable height. | |
| Hold the gas lift with your left hand, and take a hammer with your right . You need to hit the body of the piastra as close as possible to the element being removed. It is held in place by a cone, so it can be removed easily. | |
| Gently but accurately hit the body once or twice . The gas lift will pop out and remain in your hand. | |
| Now we take the cross . The gas cartridge body remains on it, but first you need to remove the protective plastic casing, which simply snaps off. | |
| Remove the legs or wheels . They are held on by clips, so they are easy to remove: you need to pull forcefully towards yourself to pull the element out of its seat. | |
| Removes the plastic covers from the crosspiece so as not to damage them . To do this, use a flat screwdriver to unclip the latches near the center console and simply pull off the decorative elements. | |
| What remains is the metal frame . There is a housing inside, it protrudes 5 mm above the surface, and it will not be difficult for you to knock it out of its seat. | |
| Treat the joint between the gas cartridge and the cross body with WD-40 lubricant . Leave the part for a few minutes to allow the compound to penetrate deeper. | |
| The crosspiece is taken in the hand or placed so that the gas lift body does not rest . The hammer is taken flat and a clear and sharp blow is applied, usually this is enough for the elements to fall out. | |
| Decorative overlays are put on the crosspiece . They snap neatly into place. Then the legs or wheels are installed; they also just need to be pushed into the mounting hole until they click. | |
| The new gas lift is being unpacked . It is assembled, that is, the casing and the inner part are connected. First of all, the plastic casing is put on. | |
| The gas cartridge is inserted into the crosspiece . Since it is held in place by its conical shape, there is no need to fix it in any way; it will be fixed immediately after you sit in the chair. | |
| A seat is placed on the upper part. Align the mounting hole with the top of the gas lift and put it on, pressing it with your hand. Or you can just sit on a chair so that all the parts are tightly connected. | |
| The operation of the system must be checked . To do this, press the lever - the gas lift should raise the chair to the highest position. If everything is fine, the work is completed successfully. |
Product disassembly stages
If an office chair breaks, the first thing you need to do is disassemble the structure. To do this, you will need a rubber hammer, slotted and Phillips screwdrivers, and a ring drift. All actions are carried out in stages:
- First of all, remove the seat, turn the chair over, and remove the fasteners.
- Unscrew the bolts that secure the armrests and remove these parts along with the plates.
- Disconnect the fasteners holding the permanent contact.
- The crosspiece is separated from the pneumatic chuck by gently tapping the connection with a hammer.
- The wheels are removed from the mounting sockets, and the plugs located in the steel case are removed. The procedure is performed using a slotted screwdriver.
Stages of making a feeder chair with your own hands, finishing
All manipulations with the mechanisms are recommended to be done while holding the structure suspended so as not to break the fragile plastic parts. For the same reason, you should not use physical force when unscrewing fasteners. After completing the dismantling of the computer chair, you need to collect all the parts in one place so as not to lose anything.
Features of gas lift operation
First of all, I note that the malfunction indicated in the title always indicates a breakdown of the gas lift - a unit that performs the following functions:
- Creates a cushioning effect when you sit down . This relieves stress from the spine and makes sitting on the chair more comfortable. The element dampens the impact effect that often occurs when landing on rigid structures.
- Raises or lowers the seat due to a special mechanism . This allows you to adapt the design to people of different heights and adapt it to different types of work. For example, writing requires a different position than working at a computer, and thanks to the gas lift, adjustments are made in literally a matter of seconds.
- Provides rotation of the chair around its axis . This function is also provided by a pneumatic cartridge (this is also the name of the mechanism in question). Thanks to this element, you can rotate 360 degrees in both directions without any restrictions.
Thanks to the gas lift, the chairs become much more comfortable and functional
The design is a steel cylinder, inside of which a rod with a piston moves. The cylinder is made in the form of a sealed element of a certain shape, divided into two chambers. A valve is installed in the partition between the chambers, due to which gas moves from one chamber to another.
The gas is located in two chambers - external and internal and moves depending on the opening of the valve
When the seat is fully lowered, the piston is in the up position. When you press the lever, the damper opens and the gas moves from one chamber to another, it presses on the piston, and then it goes down, while simultaneously lifting the seat up.
When the lever is lowered, the valve closes and the structure is locked in the required position. Everything is quite simple, but if you look at the system inside, you will see that it consists of many elements. The diagram below shows a cross-section of the product.
The system inside is quite complex, but this does not matter, since we will not disassemble it
Another important element is the support bearing; it is located at the end of the rod and ensures free rotation of the chair in both directions.
The support bearing allows the chair to rotate freely in both directions
All pneumatic chucks are divided into classes, which depend on the thickness of the steel used for the elements inside which there is gas under pressure:
- Class 1 - 1.2 mm.
- Class 2 - 1.5 mm.
- Class 3 - 2.0 mm (designed for loads up to 120 kg).
- Class 4 - 2.5 mm (used on chairs that can support up to 150 kg).
The higher the class, the stronger and more durable the gas lift, but also the more expensive its cost.
Another part of the mechanism is the gas lift casing. It does not perform any functions and serves for decorative purposes, covering the metal cylinder and giving the chair a more attractive appearance. Used only on plastic models; on metal ones the structure does not close.
The casing is a simple telescopic element of three plastic sections inserted into each other
Keep in mind that the gas in the housing is under very high pressure, and any damage to the integrity is dangerous to human life and health.
Tools and materials needed to repair the chair
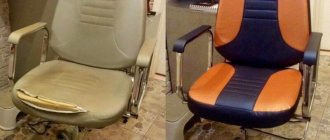
To repair or reupholster a chair, you will need, first of all, fabric, and not necessarily the same fabric that was on the chair. If you have a leather chair, we even recommend using woven material. For example, furniture tapestry fabric used for upholstering sofas. It is quite dense and drapes well (corners are laid). In addition, the price of such fabric is quite affordable, especially since the fabric only needs 70 cm and a width of 150 cm. At least this chair needed exactly that much fabric. But it should be taken into account that fabrics with a geometric pattern or stripes need to be “adjusted”, so their consumption will be higher. But in any case, a 1 meter long piece is enough for any standard office or computer chair.
From the tools you will need screwdrivers (flat and Phillips), a tape measure, wire cutters and, without fail, a stapler and staples for it, 6-8 mm long.
Features of repair work
To begin with, I will tell you about the most typical causes of breakdowns, then you will find out what is needed for the work and how to properly organize the work process of replacing a failed element.
Causes of breakdowns
The gas lift does not fail so often, however, the problem occurs from time to time, and in order to reduce the likelihood of malfunctions, you need to know how they most often occur:
- Spruce trees often sit on the chair due to plaque . You cannot lower yourself into the seat very sharply, this creates overloads inside the gas cartridge, and over time the valve may fail - it will simply be squeezed out, and the system will lose its functionality. Sit down carefully and smoothly, and this problem will bypass you.
- Elements wear out from long-term use . Manufacturers recommend lubricating the elements with oil from time to time. This minimizes friction and significantly reduces wear, ensuring a long service life. To do this, the casing is lifted and lubricant is applied to the cylinder.
- The structure is subject to overload . If a person weighing 110 kg or more constantly sits on a chair designed for 100 kg, then the likelihood of system failure increases significantly. You need to select furniture with a margin of safety. You cannot sit together, as this also creates overload.
- Manufacturing defects . Products are produced in large quantities, and the company does not always have appropriate quality control. This is especially true for chairs from the budget segment, where the likelihood of defects is much higher.
If a malfunction occurs during the warranty period, the seller will replace the damaged part at his own expense.
How difficult is DIY repair?
If you know how to do minimal repairs with your own hands and are comfortable with a hammer, screwdrivers and other hand tools, then you can handle this job without any problems. You need to prepare the following:
| Illustration | Description |
| A chair with a failed gas lift . It is best to carry out work in a free room so that nothing interferes with your work. If you have a workshop, this will be the best solution that will ensure maximum ease of repair. | |
| Screwdriver Set . In general, it should be at hand for anyone who does at least some work with their own hands. This allows you not to worry that you will not have the tool of the required configuration in a given situation, because the shape and size of fasteners on different types of furniture vary significantly. As for chairs, the Phillips screwdriver PH2 is most often used. | |
| Rubber hammer . Used to knock elements out of their seats. It is best to have a medium-sized version on hand; a large mallet will not be very convenient to work with. |
If there is no rubber option, no problem, you can get by with an ordinary hammer, but you will have to work carefully so as not to damage the parts or spoil parts of the structure.
Gas lift replacement process
I'll tell you how to repair a chair and replace a gas lift with your own hands:
| Punch . It may be necessary when knocking out the gas cartridge from the crosspiece of the chair. It is not necessary to purchase a specialized option; you can adapt what you have at hand - a piece of pipe or a wooden stick of a suitable diameter will do just fine and will help you get the job done without any problems. | |
| New gas lift . You can purchase this part at any furniture fittings store or in places where office chairs are sold. It doesn't cost much, so repairs won't cost you too much. | |
| Bench vice . This item is not mandatory, but if it is available, the work process will be much easier, since you will be able to fix the parts to remove the old gas cartridge. |
| Illustration | Description |
| The chair is being prepared for repair. I recommend removing the armrests from it in advance so that they do not interfere with the repair of the structure. | |
| The chair turns over so that you have free access to the bottom of the cross . If the floor is dirty, cover it with cardboard or rags. | |
| Using a flathead screwdriver, carefully remove the retaining ring . It is located outside and will not be difficult to find. | |
| Carefully remove the lower part from the cross . After removing the retaining ring, this will not be difficult, just pull the element towards you. | |
| The gas lift housing remains on the bottom of the seat ; it should be removed first. | |
| Place the structure horizontally to ensure good access to the bottom . The easiest way is to place the seat on the table; it will be located at a comfortable height. | |
| Hold the gas lift with your left hand, and take a hammer with your right . You need to hit the body of the piastra as close as possible to the element being removed. It is held in place by a cone, so it can be removed easily. | |
| Gently but accurately hit the body once or twice . The gas lift will pop out and remain in your hand. | |
| Now we take the cross . The gas cartridge body remains on it, but first you need to remove the protective plastic casing, which simply snaps off. | |
| Remove the legs or wheels . They are held on by clips, so they are easy to remove: you need to pull forcefully towards yourself to pull the element out of its seat. | |
| Removes the plastic covers from the crosspiece so as not to damage them . To do this, use a flat screwdriver to unclip the latches near the center console and simply pull off the decorative elements. | |
| What remains is the metal frame . There is a housing inside, it protrudes 5 mm above the surface, and it will not be difficult for you to knock it out of its seat. | |
| Treat the joint between the gas cartridge and the cross body with WD-40 lubricant . Leave the part for a few minutes to allow the compound to penetrate deeper. | |
| The crosspiece is taken in the hand or placed so that the gas lift body does not rest . The hammer is taken flat and a clear and sharp blow is applied, usually this is enough for the elements to fall out. | |
| Decorative overlays are put on the crosspiece . They snap neatly into place. Then the legs or wheels are installed; they also just need to be pushed into the mounting hole until they click. | |
| The new gas lift is being unpacked . It is assembled, that is, the casing and the inner part are connected. First of all, the plastic casing is put on. | |
| The gas cartridge is inserted into the crosspiece . Since it is held in place by its conical shape, there is no need to fix it in any way; it will be fixed immediately after you sit in the chair. | |
| A seat is placed on the upper part. Align the mounting hole with the top of the gas lift and put it on, pressing it with your hand. Or you can just sit on a chair so that all the parts are tightly connected. | |
| The operation of the system must be checked . To do this, press the lever - the gas lift should raise the chair to the highest position. If everything is fine, the work is completed successfully. |
Rules for using office chairs
In order for the chair to serve for a long time and not cause inconvenience due to breakdowns, it is recommended to follow the following simple rules:
- The chair should be located in a dry, well-ventilated area.
- If for some reason the chair was in a low temperature zone (for example, it was transported in winter), it cannot be used immediately; it must be given time to adapt. Minimum time is 24 hours.
- During the assembly process, be very careful and careful, especially with regard to screw-on parts - do not strip the threads.
- Make sure that the load on the cross is not excessive.
Handle your office chair with care.
Experts remind that one chair is designed for use by one person. If a huge number of people use it, it will have sad consequences. You need to sit down on an office chair very carefully, avoiding sudden movements.
If the damage is minor and does not require complete replacement, a welding machine is required for repairs.
The armrests also need to be treated with care. You should not press on them, much less sit down. For overweight people, it is better to purchase designs with metal elements.
In the event of a complete breakdown, you need to buy a ready-made part.
You can repair an office chair yourself without resorting to the services of a professional technician. And if you follow the operating requirements, it will serve you faithfully for many years.
Required Tools
Most often, the crosspiece breaks in the area of \u200b\u200bthe articulation of the beams. There is no point in gluing, welding or soldering the part, because the base bears the bulk of the load, and such repairs will not save the situation. It is advisable to replace the cross with a new part. To do this, you will need the simplest tools that any home craftsman has:
- flat screwdriver;
- hammer (mallet);
- circular punch (preferably);
- adjustable wrench (for gas lift repair);
- hex keys.
If the chair is used for a long period of time, then the gas lift sits quite firmly. A special lubricant for hard-to-remove fasteners will help make the repair process easier. If this is not available, it is recommended to use:
- vinegar essence;
- kerosene or VD40;
- soap solution.
Use any of the above products to lubricate the connection, wait about 10 minutes. If the crosspiece is made of plastic, and the repair is carried out in winter, the furniture can be taken outside to cool down. As a result, the part will shrink, this should help.
Kerosene
Preparation of soap solution
Circular punch
A set of keys
Vinegar essence
WD-40
Conclusion
Now you know about all the features of the gas lift in office chairs and, if necessary, you can easily replace it by following the detailed instructions from this article. The video will show the workflow clearly so that you understand it even better. If something is unclear, ask in the comments.
Not only in the office, almost every home has a computer chair. It is comfortable to sit at the computer on. But chairs often break down, because we use them every day. It happens that some last for many years, while others become unusable in just a few months. Its service life depends primarily on how carefully you treat it. Weight category plays an important role. This piece of furniture allows for a weight of up to 120 kg.
It happens that some chairs last for many years, while others become unusable in just a few months.
Thus, air stops flowing from the first chamber to the second.
If you are replacing a gas lift in the cold season, do not use it right away.
Such chairs consist of mechanical parts and hydraulic ones. If the chair goes down when you sit down, then most likely gas has escaped from the gas cartridge. This turns into a big problem and interferes with work. It is impossible to do business when sitting in a chair is uncomfortable. This can result in problems with the spine. It is possible that back pain will appear or scoliosis will develop. This is why it is important to keep the chair in order.
Weight category plays an important role.
You need to put something on the floor, for example, a newspaper, so as not to get it dirty.
It is necessary to make sure that the piaster and the swing mechanism are correctly fastened so that the lever could bend.
It is better not to repair it yourself, as this poses a threat to health, and maybe even life. It's better to buy a new gas cartridge. It's not that expensive. If you are skilled enough, you can easily carry out the replacement yourself. Everything you need for repairs can be purchased at a retail outlet that sells such chairs. Of course, home renovation will significantly save your home budget. If you doubt that you can cope with this work, it is better, of course, to turn to specialists. It is not necessary to take the chair to the address where the repair is being carried out, since many specialists visit your home.
Such chairs consist of mechanical parts and hydraulic ones.
Actually, it will not be difficult for skilled people to repair the chair themselves.
It is important to do everything carefully and not to rush, then the chair will last a long time.
Chairs often break down because we use them every day.
List of required materials and tools
| Necessary materials |
It is better not to repair it yourself, as this poses a threat to health, and maybe even life.
This piece of furniture allows for a weight of up to 120 kg.
If the chair goes down when you sit down, then most likely gas has escaped from the gas cartridge
Assembling a computer chair on wheels
After the box with the chair is unpacked, you should carefully examine all the parts contained in the package for cracks, chips or scratches.
The standard kit includes the following parts:
- Seat with backrest or solid monoblock.
- Two armrests.
- Rollers (5 pieces).
- Screws.
- Pneumatic cartridge.
- Crosspiece and linings on it (if necessary).
- Mechanism for connecting the seat with the backrest.
- Gas lift casing.
First of all, the rollers are inserted into the cross. In order for the pin to enter the beam of the cross, you need to press the wheel with a little force. To make this more convenient, place the crosspiece on the floor. If you cannot insert the roller manually, you can use a rubber hammer and gently tap it on the base between the spheres of the wheel. However, you should not hit the rollers themselves, as they are made of plastic and may break. After mounting the wheels, turn the crosspiece over with the rollers down and install a pneumatic cartridge in its center. Then a casing is put on it
At this stage, you need to pay attention to the top of the pneumatic cartridge: some manufacturers put a decorative cap on its button, which should be removed. If this is not done, the chair may not lower or rise during use.
Now you need to install the armrests. To do this, you need to turn the seat over and inspect the place where they should be installed. As a rule, armrests are attached with three screws. After carefully examining the armrest, you should determine where its front and back parts are. Next, the screws are inserted into the holes and tightened. In some models, the armrests are attached to the metal base of the chair and brackets are used for this.
After the seat is assembled, you should install it on the pneumatic chuck and press on top. You can also sit down in a chair to ensure that the air chuck fits tightly into the base of the chair. If the seat is not monolithic, but consists of a separate seat and backrest, then carefully insert the backrest into the seat. Now you should tighten the large fixing screw. Next, the backrest is placed on the corner and tightened with a short screw. At the last stage, you need to check the chair for functionality. To do this, you need to sit in it and pull the lever, which is located under the seat, down. If the chair goes down, you can stand up and pull the lever up. The chair should rise. The computer chair assembly is complete.
Video instructions on how to assemble a computer chair
How to assemble a computer chair
First of all, unpack the box with the chair. It is necessary to carefully inspect all parts for cracks, scratches or other defects. The standard set includes the following components:
- Seat and back (or one-piece monoblock).
- Armrests.
- Rollers (at least 5 pieces).
- Bolts, nuts and screws.
- Screws and air chuck.
- Cross.
- Casing.
- Mechanism for fastening the seat and backrest.
The back of a computer chair may differ from other models in upholstery and additional fastening for the headrest. Next, assembling a computer chair will not be difficult. Below are detailed instructions that will help you assemble the chair in a short time.
- The first thing to do is install the rollers on the cross. To do this, press the wheel pin into the beam of the cross. If that doesn't work, you can use a rubber hammer.
- After installing the wheels on the chair, the crosspiece should be placed on the rollers and the pneumatic chuck should be connected to its central part. It is worth noting that on some models, manufacturers install a decorative cap that hides the button on the pneumatic cartridge. Before installation, you need to disconnect it and only then proceed with installation. Otherwise, the chair may not lower or rise.
- Next we attach the armrests. Often, to install them, three screws are used, which need to be inserted into the hole in the seat and tightened tightly. Also, in addition to screw fastening, some models may use brackets.
- At the next stage, we install the assembled seat with backrest onto the pneumatic chuck. To ensure the tightest possible fit, you can press down on the seat of the chair or sit completely on it.
- After the computer chair is assembled, you need to check its functionality. The back should bend back without unnecessary crunches and return to its original position on its own. If the chair lowers and rises using the lever, then everything is installed correctly.
On average, it takes no more than 20 minutes to assemble a standard computer chair.
Replacing the cross
This is what a metal cross with plastic casings on the bottom looks like
A separate case worth noting is the breakage of the crosspiece. Although this part is made of particularly durable materials, its breakage is not excluded, especially if it is made of plastic.
Types of crosses: plastic, aluminum, metal with wooden overlays
Fortunately, replacing this part with a new one is quite simple. You will need:
To replace, follow the instructions: turn the computer chair upside down and remove the wheels from their mountings. Take pliers and use a circular motion to knock out the gas lift, making targeted blows along its edges
To remove the plastic cross from the gas lift, you need to hold onto the gas lift and lightly tap the cross with light blows of a hammer from above around the attachment point.
After disconnecting the crosspiece, install the wheels on the new one and insert the second part of the chair into the hole. You don’t have to worry about incompatibility, since the gas lift mount for all office chairs is standardized.
Height adjustment
We figured out how to disassemble a computer chair, but how to determine its height? If the seat height is not adjusted, problems in the lumbar region or pinched nerve endings may soon occur. To avoid this, you need to constantly check the seat height and adjust it correctly.
To lower the chair, you need to pull the lower lever. After which the computer seat will smoothly lower or rise. The optimal height is selected taking into account the individual characteristics of the chair and desk. It is recommended that the height of the armrests coincide with the height of the table.