A furniture lifting base is an excellent tool for efficient use of living space. Most residents of small apartments want to have a good, large bed on which they can rest comfortably. Bedroom space is usually very limited.
Often a large bed blocks access to closets or prevents the balcony door from opening. Then the only real option is to buy a model that can be lifted, providing easy access to the interior space.
This will make the bedroom feel spacious and comfortable during the day while maintaining its purpose at night. A bed with a lifting mechanism is practical, as you can store necessary things, bedding, seasonal items, etc. in it.
How to assemble it yourself: main steps
To assemble such a model, it is necessary to prepare all the structural components. This:
- the very basis of the structure;
- headboard;
- lifting mechanism;
- mattress.
Necessary steps:
- Preparation;
- assembly of parts from MDF;
- installing a free frame under the mattress;
- attaching a lift;
- frame assembly.
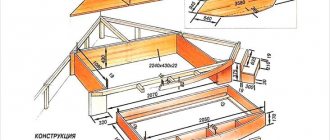
The frame consists of two side panels of 2 m each and two cross panels of 1.4 or 1.5 m. Two rows of support strips, usually consisting of a metal angle, are fastened with screws along the inner perimeter.
Important
Single and double models can be equipped with this transformation method. The configuration of the mounted lifting mechanism allows rational use of the empty area under the bed as a closet.
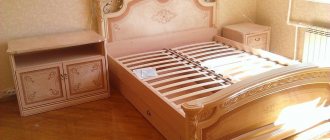
A key aspect of furniture design is its ergonomics. A reliable bed lifting mechanism makes it comfortable and multifunctional. Correct calculation of dimensions excludes all other related furniture. The bed will take on the functions of a wardrobe, chest of drawers, and bedside table.
Tools, materials, working diagram
Any assembly or manufacture of furniture starts with the preparation of the necessary drawings, as well as the selection of the necessary tools and materials. The choice of material begins at the base of the box. The most common and cheapest is chipboard sheets. But you can also use other materials: OSB, wood, etc. Much will depend on the preferences of the owner and his capabilities. The upholstery material is being prepared, the choice should match the design of the room.
You need to prepare the tools in advance:
- Required set of screwdrivers, screwdriver.
- Hexagon for tightening self-tapping screws.
- Level.
- Roulette.
- Pencil.
How to disassemble the bed base
You should always start dismantling the bed from the base and only then proceed to removing the frame. To access the base from it you need bed linen, a mattress and pillows. To disassemble the base of a wooden bed, you will need a special key for unscrewing screws and self-tapping screws.
Next you need to detach the side strips. This must be done carefully. This can be done by light tapping. At the end, the slats are removed and removed. Now you can start disassembling the frame.
Step-by-step instruction
- First, the side and transverse drawers are placed, the supporting corners are screwed onto them, first the lower ones.
- The box frame is then screwed in, ensuring that all angles are correct.
- The plywood parts of the lower part are located on the lower support frame and are fixed with bolts and nuts that pass through drilled holes in the corners.
- Then the upper row of supporting corners and the longitudinal division of the internal space are fixed using stiffening ribs.
- After this, the headboard is attached and fixed.
Let's look at everything in more detail - step by step.
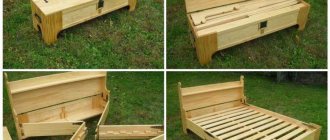
Installation of box and base
The very first stage is assembling the base on which the soft mattress will be directly located. The base of the bed is a box, the walls of which can be made of chipboard. They are fastened together using self-tapping screws with metal corners.
Usually, when you buy a prefabricated bed, the places for the holes are already marked, all that remains is to screw in the screws, and then tighten it all tightly with a special hexagon for furniture. But if you make the box yourself, you will need to make markings.
- On a sheet of MDF, using a simple pencil and a ruler or tape measure, mark the location of future parts.
- Cut the sheet according to the markings into the required parts.
- Secure the MDF sheet parts with corners.
- Using an electric hacksaw, shape the parts to assemble the body (approximately 1600x2000).
- Prepare a headboard (1664×772 mm), two side frames (2054×296 mm), a back wall (1664×296 mm) and a cross beam (150×1608×20 mm).
- On the outside, in the corner fasteners, make 2 holes for connection.
- Install the fastener using a hexagon.
- Cover the screw heads with plastic caps.
- Secure 4 joints inside with metal corners.
- To ensure the rigidity of the frame, install and secure a transverse board, connecting it on the sides with metal corners on screws.
- Along the perimeter of the bed, secure the sheet to the bottom of the chipboard with screws.
- From below, in the corners of the frame and in the middle, make holes for the legs.
A base for the future mattress is secured around the perimeter. The base itself can be made of rows of lamellas - curved panels that are sold separately or assembled.
Attention
The slats are responsible for the quality of the orthopedic characteristics of the bed; they evenly distribute the load that a lying person puts on the mattress.
Installation of legs, corner ties
To manufacture the main frame, its components are prepared: base, back, legs, lifting mechanism, fittings - all these nuances are reflected in a pre-selected design. The main requirements for manufacturing are reliability, strength, and quality of the material. Particular attention should be paid to the legs, because they will bear the entire main load.
Therefore, they must be durable, without visible defects. When making large double beds, it is necessary to install fittings and corner ties in the main box, passing through the longitudinal axis. If the structure has legs, they are mounted next.
The simplest option for making them is to assemble 2 beams (40×50) and then install two beam crowns at a depth. To strengthen the structure, you can center the leg. Having placed your feet in the desired position, you can begin processing, cleaning, and painting.
You will also need mounting guides for the plywood bottom to firmly fix the position of the legs at the desired level. The legs are installed inside the frame and are pre-adjusted in height. To avoid scratching the floor, you can glue pieces of linoleum to the ends of the legs.
Installation of the lifting device
The installation method depends on the type of device:
- The manual lift mechanism is the most practical and cheapest device, since it does not contain additional elements (for example, shock absorbers or springs).
All models with such a mechanism are most often used for adults, since significant effort is required to open the lifting drawer; children cannot cope with such a load. But, besides the disadvantages, the manual mechanism also has advantages - resistance, durability. - The spring option is convenient, but its uninterrupted service life is no more than 3 - maximum 5 years, then the spring will need to be completely replaced. The main cause of failure is wear and spring tension. The advantage of the spring mechanism is the price, which is relatively low.
- A gas shock absorber is the most convenient, reliable, durable mechanism. The device opens very smoothly, quietly, practically without the application of human force. The service life of this mechanism is 7–12 years (with constant use). The choice of shock absorber is made according to the size of the product and the weight of the sleeping frame. The design of gas shock absorbers is expensive, but fully justifies itself.
- Initially, you need to fix the metal frame with screws, attaching the orthopedic base to the left and right lifting devices installed on the side frames. To adjust the position, you need to use the longitudinal holes that are available in all lifts. Secure this position by tightening all screws tightly.
- Install two shock absorbers (left/right), observing the symmetry of the installation of the lifts. If the rules for installing shock absorbers are violated or the symmetry of the parts when fixing them is not observed, then any breakdown will not become a warranty case, i.e., it will involve the replacement of faulty parts at your expense.
AdviceUsing a bed without a special mattress pad at the head leads to failure of the shock absorbers.
- Check the operation of the lifting mechanisms assembled together with gas shock absorbers - raise and lower the orthopedic base several times. Make sure the base is oriented correctly around the perimeter of the enclosure; There should be no snagging or friction.
- If a discrepancy is found, make an adjustment.
Installation of the traverse
The traverse is necessary in order to screed the lower part of the frame base. In order for the furniture to be durable and functional, the traverse is installed along the base of the body parallel to the longitudinal tension elements.
The traverse will strengthen the structure, allowing you to securely fix small side elements that are most susceptible to failure. It is fastened with self-tapping screws, gaining stability and durability.
Fixing the frame and mattress holders
The main accessory for supporting a bed with a lift is a mattress holder. This is the metal bracket that the base is attached to. It is mounted on the frame and runs strictly in the center from the side of the headboard.
The mattress holder is necessary to hold the mattress and prevent it from moving when opening (raising the frame). If not for this element, then with each access to the internal linen compartment it was necessary to hold or remove the mattress altogether.
On wide models with dimensions 180/200, 200/200 cm, you can install two mattress holders at equal distances from the center. Sometimes manufacturers place them on a frame base on the leg side, and you can use it as a handle to easily open/close the mechanism.
Stages of work
The main reference point is the manufacturers' guidelines. With the right approach, work begins with studying it. It will also be useful to watch video instructions for assembling a bed with a lifting mechanism. For each specific model, the algorithm of actions may differ slightly.
Assembling the base and box
Work on the formation of the base box is carried out according to a simple scheme:
- The front and 2 sides are connected first.
- The central crossbar is fixed to the U-shaped structure (it also serves as the main support of the body).
- The backrest is attached to the sides.
- The bottom is fixed to the box.
For models with an additional drawstring belt, the bed assembly scheme is a little more complicated. In such cases, the drawers are connected separately and mounted on the inside of the body. The same applies to products with additional power elements, fixed with screws after assembly and checking the evenness of the body.
Assembly of the base is completed by fastening the bottom, checking or adjusting the angles and carefully tightening the screws without pressing.
Installation of legs and installation of corner ties
Not every model has free-standing supports; in a number of modern beds, these functions are performed by solid sidewalls. In other cases, the legs are connected to the base with screws and nuts. Experienced furniture makers carry out this stage, following the manufacturers' recommendations, namely, before installing corner ties (the most common option) or, conversely, as a last resort. The exact sequence of actions depends on the model and is specified in advance.
Corner ties that strengthen the bed structure are fixed with nuts with external and internal threads and countersunk bolts. In addition to screwdrivers, you will need an Allen wrench to assemble the bed. As a rule, these elements are mounted on 2 fasteners on each side; in order to avoid distortions of the ties, their installation is carried out after checking the evenness of the markings.
Causes of bed squeaking, how to fix it and what to do for prevention
Installation of the lifting mechanism
Lifting mechanisms are usually supplied assembled, requiring only proper fastening - with the cylinder facing up, taking into account the asymmetrical design of the parts and the inadmissibility of errors. For most models, they are first mounted on the bottom of the frame with screws, then the lower part of the lifting mechanism is screwed to the inside of the base body. To simplify this work, most manufacturers make special marks or pins on the boxes.
After this, the gas shock absorbers are inserted into the lifting mechanism and tightened with nuts. These elements are fixed using fluoroplastic washers and nuts with a locking mechanism. At this stage, any risk of backlash is eliminated - the fasteners are tightened all the way, loosening at the end by half a turn, no more.
The operation of the lifting mechanism is checked several times; the presence of gaps or distortions between the body and the bed frame is not allowed.
Attaching the frame and mattress supports
At the final stage of assembling a bed with a lifting mechanism, a central leg is attached to the correctly installed frame, which acts as a limiter, and handles that simplify the lifting process. Installing lamellas requires care and a considerable amount of time. The plates are driven into the holders with a hammer or by hand with sufficient flexibility. It is impossible to hammer both ends at the same time; with the correct approach, one edge of the plank is tightly inserted into the holders, after which the lamella is slightly bent upward and inserted with the other end (if necessary, knocking it out with a hammer). The process ends with laying the mattress, re-checking the work, and tightening the cover. Furniture may be put into operation if there are no distortions, creaks, wobbles or any similar defects.
For a bed with an orthopedic bottom or a large number of slats, it is worth purchasing a hard or semi-rigid mattress.
How to assemble a regular crib?
Regular models without a lift are quite simple. Bedroom furniture usually consists of support, side walls and 2 backs. It will be easy for the master to assemble the structure. It is important not to lose screws or damage fasteners when installing parts.
It is more difficult to install transformers or two-story models. Since the assembly of such options is specific, it is good if you have detailed assembly instructions.
Attention
After following all the instructions, you can complete the work of assembling the furniture in a few hours. But if you are not sure whether you can handle it, it is best to invite a furniture assembler. An experienced person will do the job much faster, saving you a lot of useful time.
Common mistakes
The most common mistakes:
- Ignoring manufacturer's instructions.
- Before drilling holes for fasteners, measurements were not taken or it was done very carelessly.
- The master did not prepare all the tools in advance.
- The workplace is not organized properly.
- Ignoring gaps in furniture. The parts must fit together perfectly.
Advice from the experts
Craftsmen with experience in furniture assembly recommend paying attention to the following nuances:
- Practicality. The box at the bottom of the base is a useful item for storing various items, including bedding, clothing, and other seasonal items.
- Easy to use. No special effort is required to move the lifting base.
- Force. Reliable transformation mechanisms and durable wooden supports allow the lifting system to be used daily.
- Convenience. The presence of a lift increases the comfort of the berth. Provides optimal conditions for healthy sleep.
- Multifunctionality. Furniture manufacturers offer a large selection of shapes and sizes of lifting bases. Double, one-and-a-half, single models are suitable for installation in the main bedroom, for guests, and children. You can also learn how to assemble a single, double and children's bed.
- Reasonable price. The presence of a spacious box under the bed eliminates the need to purchase related furniture (chests of drawers, wardrobes).
For those who do not want to purchase a new bed, but have decided to restore their favorite old bed, we have prepared articles on how to independently cover the headboard, strengthen, lengthen or decorate the sleeping place, as well as increase the dimensions in width, height and length, and seal the inflatable bed and eliminate the squeak. We also suggest learning about the assembly of such varieties as the “Dolphin” and the pendulum bed.
Detailed diagram for assembling a bed with a lifting mechanism
The desired bed has been purchased. How to assemble it? In fact, a berth with a lift folds up like a regular bed, only parts are added, in the form of a gas lift or a spring mechanism.
The first stage involves assembling the bed frame. The facing panels are connected to each other, a central crossbar is attached, on which sheets of chipboard, MDF or wooden panels are laid for further fastening (the bottom material is supplied depending on the furniture model and its price). Next, the headboard is attached, and the finished box is covered with a removable cover, most often soft (but again, it all depends on the chosen model; some budget options are not equipped with such a cover).
At the second stage, the lifting mechanism is installed. It is very important to do this correctly, because inaccuracies in placement, an error in determining the sides, can disrupt the operation of the lift and break the mechanism. Experienced craftsmen recommend ordering an already assembled lifting device, which must be attached one by one to the lower body. In this case, the lifting mechanism itself is mounted first, and gas shock absorbers are installed on it.
The third stage consists of assembling the upper part of the bed, most often an orthopedic base with slats. They are driven into special holders with a hammer. This takes a lot of time, because each slats need to be secured on both sides, and there are at least 15 of them for a single bed, twice as many for a double bed.
The fourth stage involves connecting the upper base to the lifting mechanism. The sequence is the same: first, the top of the bed is screwed to the lift, and then the gas shock absorber is attached to it. At the same time, all work is performed with the base raised and the mechanism folded back.
The main process is complete. If necessary, some parts are tightened, legs are installed (if they are included in the package), the mechanism is tested, and it is lubricated for silent operation.