A chair-bed is an alternative to a small sofa.
It can be placed in the nursery or in the living room. When folded, this furniture is used as an ergonomic and comfortable chair, and when unfolded, it is used for sleeping (for a child or a guest). Such a piece of furniture can be either bought in a store or made with your own hands. It is worth immediately noting that the process of making a compact sofa chair is an easy process and does not require special skills and experience .
Peculiarities
The chair-bed can be classified as classic and universal furniture. It will fit perfectly into a small apartment and will delight the owners with its aesthetics and original design. As for design features, the product can be:
- frame;
- frameless.
These models differ in form and transformation mechanism.
Making a frame product with your own hands is heavier than a frameless one, but it is quite possible. Frame furniture involves the manufacture of a folding mechanism. It should unfold easily, without distortions or other defects. It is easier to make a product with two folding legs than with four .
Which option to choose is up to you.
In this case, it is worth starting from the general interior of the room and personal preferences. Particular attention should be paid to the materials of its manufacture. For the frame, chipboard, plywood, fabric, foam rubber and textiles for upholstery are used. As for a product without a rigid base, the shape of the chair can be streamlined. Also, such a product will be smaller in size and light in weight. Attention: when making a chair-sofa, it is worth remembering that it should be comfortable when unfolded, since it is often used for sleeping. To make it comfortable to sleep on, the width of the sleeping place must be at least 60 cm.
Stages of making a chair-bed with your own hands
Having decided to make this furniture with your own hands, it is important to understand what stages the whole process consists of, what materials and tools may be needed, and also what you should pay special attention to. How to make a chair bed? First, you need to free up space for work so that nothing interferes or distracts you from your work.
The design and dimensions of such chairs can be any.
The following will follow:
- model selection;
- preparation of materials and tools;
- frame manufacturing;
- installation of mechanisms;
- sheathing;
- decoration.
So, having decided on the list and the order of the entire process, you can get down to business.
Thanks to the use of modern fittings and furniture textiles, there are no problems with the selection and implementation of design ideas.
Selection of materials and tools
There are many options for creating folding chair beds. There are frame and shapeless models. Having decided on a convenient option, it is important not to forget about the sizes that are suitable for a particular model and installation location. To make a standard size frame chair you will need the following materials:
- 8 boards of equal length (frame);
- 8 planks (corner reinforcement of the frame);
- slats (base for pillows);
- slats and two slats (the base of the second half of the chair);
- plywood (bottom of the base, sides of the armrests);
- foam rubber for furniture (10 – 20 cm thick);
- upholstery material;
- furniture screws or self-tapping screws, nails;
- metal one-piece hinges (large and smaller);
- means for coating wooden components.
You will need strong beams, plywood with a thickness of 10 mm, and slabs of wood materials.
The following tools will be needed:
- jigsaw;
- saw (miter saw);
- drill;
- screwdriver;
- drawing supplies (tape measure, pencil, square);
- sewing machine or stapler for furniture.
You will need tools for cutting and fastening parts, as well as a standard set of marking devices.
When everything is prepared, you can start drawing.
Drawing up a drawing
The correct drawing is the key to success. It must be clear. All details are carefully measured and thought out. It is recommended to use standard dimensions of the chair, suitable for an adult (about 2000 cm when unfolded, 90 cm wide, 45 cm backrest height). The drawing must show:
- frame in detail;
- chair legs;
- folding mechanism;
- armrests;
- loops;
- guides.
Ready-made drawings and diagrams can be found on various online services.
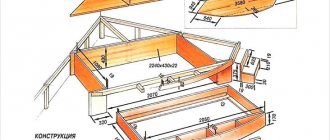
Patterns for future cladding are also drawn on the drawing. Below is an approximate schematic drawing of a frame chair-bed.
The dimensions of the chairs are selected taking into account the height of the owners and the size of the rooms.
Material
When choosing materials for making furniture, you should pay attention to them :
quality;- hypoallergenic and safe;
- strength;
- wear resistance;
- design.
For the frame you can use:
- Chipboard or laminated chipboard . These materials are distinguished by a variety of textures and colors. They do not emit toxins, are easy to process, are wear-resistant and durable;
- plywood _ This material is easy to cut and saw with various tools, has an attractive appearance, and has high technical characteristics;
- natural wood . It is safe, has an interesting texture and texture. To work with an array, you need to have certain skills. It is better for beginners to start making furniture items from laminated chipboard.
An important role should also be given to the choice of upholstery. For these purposes the following are most often used:
- chenille;
- jacquard;
- velours;
- velvet;
- tapestry;
- genuine leather.
Tip : a tapestry will look good as upholstery.
If you want to make a product that is soft and pleasant to the touch, give preference to artificial velvet.
Roll-out mechanism
When unfolding, the seat base is pulled towards itself, and additional sections are pulled out. The seat is turned over, resulting in a fairly flat sleeping area.
The main disadvantage is the presence of gaps between the individual parts of the mattress. Another feature is the low height of the bed, usually it does not exceed 25-30 cm, which can be inconvenient for tall people and the elderly.
Scheme and drawing
Before you start making a chair-bed, you need to make a preliminary drawing. It indicates the materials of manufacture, the exact dimensions of each individual element, and fasteners. Some people believe that such simple furniture can be made without a diagram. But, if you do not have much experience in making upholstered furniture, it is better to make a competent and thoughtful sketch of the future item . Then you will not make primitive mistakes when manufacturing individual parts and when assembling the product.
Step-by-step creation of upholstered furniture with a wooden base
- If you don’t know how to make a drawing for the base, then look for ready-made diagrams on the Internet. As a rule, they are transferred to a cardboard template with a pencil. Only after this they begin to perform the operations of the described algorithm. This will help you save on excess material, or vice versa – avoid purchasing missing parts.
- Using a cardboard template, future constituent elements are cut out from plywood sheets:
- banana-shaped sidewalls;
- cross bars.
- The next stage is surface treatment of wooden parts by stripping and grinding. The ends are worked with special care to improve the quality of the work done. These parts are first impregnated with heated drying oil and only then bends are formed with a hammer, if they are provided for in the sketch. Each component element is cut out with an electric jigsaw.
- The sidewalls are painted or treated with varnish-stain. The ends of the side parts are reinforced with metal rims.
- The further course of action is related to the covering of the frame. Using an electric drill, make the required holes. The rims are fixed with screws.
- First, the back part of the back is covered with artificial leather or fabric, then the remaining fragments of the structure, incl. and seats.
- The upholstery material is secured with wallpaper nails, which are characterized by large heads. In the back of the frame chair, the upholstery is fixed along the edge, along the transverse parts, to better cover the slats.
Tools
To make your own bed chair with frame, you will need to prepare the following materials :
chipboard;- Fiberboard;
- plywood;
- bars;
- foam;
- fittings and guides;
- furniture glue;
- upholstery fabric;
- sandpaper.
Tools that will be useful:
- drill or screwdriver;
- electric jigsaw;
- a simple pencil and ruler;
- furniture stapler with staples;
- wood hacksaw;
- scissors;
- sewing machine.
Tip : if you plan to decorate furniture with applique, a stencil cut from a thick file folder will come in handy.
Preparation
First you need to determine what material will be used. The chair can be upholstered with fabric or leather. Working with one and another material has its own characteristics.
There are several requirements for the skin:
- It should be elastic and thin. It will be better if its thickness is no more than 3 mm. Thicker material is very difficult to work with. This is especially true when you have to connect several separate pieces together.
- Also, the material must be dry. Wet skin first stretches, and then dries out and becomes smaller. You can wet this material if there is a need to tighten it more.
With fabric the situation is a little simpler. It is not necessary to buy special upholstery fabric. You can take the simplest tapestry. It has several advantages:
- Low price compared to upholstery fabrics.
- Almost complete lack of opportunity to take a puff. If it does appear, you can simply cut off the loop. In this case, the integrity of the fabric and the pattern will not be damaged.
After the material has been selected, you need to inspect the chair-bed. It is important to determine in advance which parts need to be replaced or updated. These can be foam pads, staples, tie straps and, in fact, the upholstery itself.
How to make a frame version yourself?
Making a chair or bed begins with cutting out the necessary parts. To make a wireframe model, work begins with:
Case manufacturing. We measure sheets of chipboard, fiberboard and plywood and apply markings on them. We cut out the parts with a jigsaw. We will make the back and sides from chipboard, the bottom from fiberboard, and the folding part from plywood.- We connect the supporting side parts with the bottom and back with self-tapping screws.
- Now let's start making the folding part. We make two frames from timber and attach sheets of plywood to them.
- For smooth and convenient unfolding of the chair, we use a metal transformation mechanism , which is attached to the sides with steel contours with through hinges.
- Now let's start upholstering the frame.
- We glue a cut piece of foam rubber to the top of the frame .
- We lay the upholstery material evenly on top and secure it with a furniture stapler.
- The sides are trimmed in the same way. Only the thickness of the foam rubber for this part can be made smaller.
- Now let's start making the legs . They will be located in the front and middle parts of the frame.
- Wide bars, previously cleaned and sanded with sandpaper, can be attached as armrests.
- If desired, such furniture can be supplemented with a spacious bottom drawer designed for storing linen.
- Separately, you can sew pillows to the product, inside of which you can fold foam rubber or cotton wool.
We looked at the frame model of the chair-bed.
What is a chair bed
A chair-bed is an ideal piece of furniture that combines practicality and ease of use on the one hand, and beauty on the other, and can become a design object. This furniture is usually relatively small. The ability to use it as a chair during the day and as a bed at night makes it indispensable.
When choosing a simple scheme, even beginners can cope with such work.
The mattress is usually made of flat pillows and a seat base. Often this furniture is equipped with a drawer for bedding or storing other things. A DIY wooden garden chair will be an ideal placement solution.
Difficulties can arise only when selecting the type of transformation mechanism or changing proven drawings.
Frameless option at home
This piece of furniture looks stylish and original. It will become a bright decoration for a children's room or living room. The main advantages of a frameless chair-bed include:
design mobility . It can be moved from place to place without any physical effort;- a light weight . Due to the absence of wooden elements, even a small child can easily and simply fold and unfold such furniture;
- practicality and reliability . If you make a separate cover for such a product, the chair will serve you for many years;
- safety . Due to the absence of metal and wooden elements, it is impossible to get injured or injured on this furniture. Therefore, it is often made for small children.
This piece of furniture consists of the following parts :
- backrests;
- straps;
- strips of fabric connecting pillows;
- the lower seat and its middle and upper parts.
For work we will need:
- foam;
- thick upholstery fabric;
- straps;
- sewing machine;
- lightning.
The manufacturing process will look like this:
We cut out the fabric according to the drawing and sew it on several sides, leaving an opening for filling with foam rubber. The standard dimensions of this furniture are 40 by 60 by 10 cm.- Sew a zipper into the space left for stuffing foam rubber .
- We prepare a strip of fabric that will hold the pillow structure together and sew it to the covers .
- We sew straps to the side pillows . They are necessary for fixing furniture when folded.
Since the frameless model does not have a rigid base, it is better to place the back of the chair against the wall.
How to unfold furniture for sleeping: unfasten the straps and pull the top pillow towards you. The length of the mattress will be 170 – 190 cm .
Advice : in order for a frameless chair-sofa to serve you as long as possible, it is recommended to make a removable cover for it, which will be easy to clean and wash, and if necessary, it can be replaced with a new one.
Original ideas
The world's leading designers embody their fantasies in everything, including the design of armchairs. In stores you can find a huge number of unusual products, which sometimes have intricate shapes.
For a small room, a mini-chair is best suited - a comfortable product, ideal for comfortable relaxation. It can complement any interior, which is why this model is very popular in the furniture market.
A nest chair, which can be suspended or placed on a durable stand, is in great demand. Also interesting are the models - cocoon, egg and ball, which belong to the same series of hanging chairs.
A modern small chair with curly legs, which can have any shape, can decorate the interior. Some models are equipped with legs in the form of animal paws, which makes the product even more interesting for the buyer.
Some people dream of a chair that rocks. There are quite a lot of such models. For example, a rocking chair or the same hanging nest. The most interesting thing is that they can be made of any material and have any design. This choice allows everyone to find decent furniture that will meet all their needs.
Finishing
After making a piece of furniture, it needs to be given a decorative appearance.
If the product was made from natural solid wood and beams, all elements are cleaned, covered with stain and paints . If you used laminated chipboard, the product does not need finishing.
But any chair-bed can be decorated to give it an original appearance. Prints and appliques are suitable for this. It is better to apply appliques to fabric before the furniture assembly process. To do this, you should prepare a stencil and the necessary pieces of fabric of different colors, matched to the main tone.
To prevent the product from collecting dust, you can sew a separate cover on it or cover it with a cape. A piece of faux fur draped over a chair also looks beautiful.
Advice : if you are serious about saving space in your apartment, try making a bed-wardrobe. You may also be interested in a wardrobe or beds made of timber, solid wood, chipboard, pallets and boards.
Pattern and step-by-step sewing instructions with photos
On the given pattern there are two options for cutting the lower circle of the chair. The first option involves sewing the bottom from two semicircular parts, and the second - from four. You will need to cut out 6 side wedges, 1 top piece (hexagon), 1 handle piece, 2 or 4 bottom pieces from fabric. We will sew the inner and outer covers at the same time.
Pattern for a bean bag chair in the shape of a pear with a handle on top, dimensions are given in millimeters
Sewing order
1. Transfer the pattern details onto paper and cut out. 2. Spread the fabric for sewing the inner cover on the floor (wrong side up). Attach the pattern pieces to the fabric, trace and cut out, leaving a seam allowance of about 1.5 cm.
3. Cut the fabric for the outer cover in the same way, leaving an allowance of 3.5 cm.
Place the pattern pieces for the product on the fabric and cut it out sparingly so that you have enough cut
4. Then you need to pin or baste the side seams on the gussets of the inner and outer products, all except the last one. You will end up with two flat pieces. 5. Sew the side seams of both covers using a machine and iron them using a steam iron. 6. Turn the outer cover over and topstitch all side seams to the right side.
Sew the side seams from the wrong side, and then on the outer cover, additionally stitch them from the front side
7. Now fold the outer wedges on both pieces and baste. On the outer cover, sew the last side seam 40 cm from the top and 40 cm from the bottom (there will be a little more than 40 cm left for sewing in the zipper). Repeat the operation for the inner cover, leaving approximately 35 cm on the zipper. Press the seams. 8. Baste or pin zippers to the remaining unstitched sections on the blanks. The center of the zipper should coincide with the center of the pressed seam; the excess length of the zippers can be freely located at the bottom of the future chair. Sew in zippers. Now, outwardly, both of our products resemble an irregularly shaped pipe, tapering upward.
Scheme for sewing a zipper to an ironed seam
9. Sew the arm of the chair. Fold the piece in half lengthwise, wrong side out, stitch along the long edge and then turn right side out. Iron. 10. Turn the cover blanks inside out and sew on the tops (hexagons). When basting the top to the outer “pipe”, do not forget to insert the handle. 11. Sew the bottom parts of both covers. Sew the resulting circles. Keep the zippers open to make it comfortable to work with. Turn the finished covers right side out.
The outer cover for a bean bag chair will differ from the inner one in that it has a longer zipper and the presence of a handle.
Filling the filler
- Place one product inside another, trying to match all the parts.
- Cut off the top and bottom of any plastic bottle to create a wide funnel.
- Cut off the corner of the bag with the filling and tape the top edge of the funnel to the resulting hole with tape.
- Place the lower part of the funnel in the slightly open inner case and pour polystyrene foam granules into it. Close both zippers.
The funnel method will allow you to quickly and accurately fill the chair with filler.
Let's get started
How to reupholster an old chair with your own hands step by step? We separate the back from the spring chair, carefully bending the staples. Now we begin to pull out the screws, get rid of the belts and fabric with which the products are covered. Once the contents of the casing are removed, the structure is thoroughly washed and dried. We assemble a frame from slings.
Don't forget to cut longer pieces so that they can be folded easily. All cuts are sealed with fire. To prevent the sling from dangling on the legs, it must be well tensioned.
We pull the fabric over the slings and securely fasten it with a stapler. We cut the foam rubber. Do not forget that the length made should not completely cover the frame and back. For those making a chair with fabric covered with a pattern, we remind you - make sure that the image does not move out after repair. We update two patterns for the back from the first meter of fabric, and for the seat from the second.
Tighten the parts in such a way as to press the foam rubber against the wood. Tuck the fabric, working with a stapler from the middle to the ends. It is necessary to restore the chair in such a way as not to crush the material, otherwise it will be impossible to sit on it. However, we do not sew it loosely, because the fabric may become covered with folds at the legs. After you have covered all the parts of the restored chair, connect the back and seat. Now you know how to remake a piece of furniture without much effort.
Removing the upholstery
The next step is removing the old upholstery. In most cases it is glued, so removing it will not be difficult. If you still have difficulties, you can use a stationery knife.
If the old material is in good condition, it will have a use. It can be used to secure a new foam gasket. The upholstery must be secured with tension. It should not sag or form wrinkles. Counter folds should only be at the corners. The staples are attached on both sides of them.
Disassembly
The next stage after preparation is dismantling the furniture. It requires the following tools:
- pliers;
- keys;
- screwdrivers (Phillips and regular);
- pliers.
Disassembly consists of several stages:
- Remove the back cover and the plywood that is located at the bottom of the chair. If the plywood is in good condition, you need to remove it as carefully as possible so as not to damage it.
- Remove the foam pad that is located at the bottom of the chair.
- Remove the upholstery and pull out the soft layer from the backrest. A flathead screwdriver and pliers will help you do this. With their help you need to pry and pull out the staples.
- Gradually remove all fasteners (brackets).
- Remove upholstery and foam from all parts of the chair. It is worth remembering that old foam rubber can crumble. Therefore, it is necessary to cover the floor with paper or film in advance.
Preparatory work
How to update an old chair with your own hands? First you need to stock up on tools and materials. It is recommended to give preference to a special fabric that is impregnated with a dirt-repellent composition and has increased wear resistance. Select the material you like based on photos or videos to imagine what the end result will be. Do not forget that very old chairs cannot be restored. Professionals should work with such furniture, since the seats may not hold up and fall apart. Before we remake one chair step by step, we will need:
- a piece of thick fabric;
- 10 cm foam for the seat and 6 cm for the back;
- textile sling;
- stapler for furniture;
- auxiliary tools - wire cutters, scissors.


