It is impossible to imagine a modern home without technology. About 20-25 years ago, televisions were already in almost all homes. Computers became modern “TVs” and all thanks to technological progress that paralleled the growth of the Internet.
Nowadays there are all kinds of computers, and most of them require a table. Some people still buy computer desks, but are they necessary?
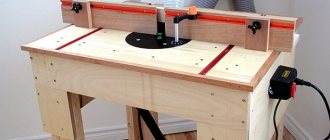
At the same time, you can make a computer desk with your own hands if you want to.
Today we will talk about computer desks, their role in a modern home, features of self-assembly and much more.
Computer desk in a modern home
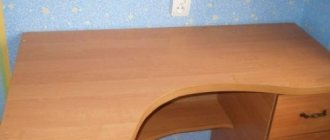
Just 15-20 years ago, a computer desk was a fairly large piece of furniture, which was equipped with a pull-out shelf for the keyboard and a special place for the system unit.
Since that time, a real revolution has occurred among computer technology. Let's start with the fact that at that time monitors were similar to old TVs with picture tubes, and therefore took up a lot of space. You can see this if you look at the photo of a computer desk made with your own hands in those years.
System units have also changed, because now a personal computer can be no larger than old video cassette players, which most modern children have never even seen.
All this results in the fact that massive computer desks in their traditional form are no longer needed, although many are still not ready for this fact.
An old-style computer desk takes up a lot of space, which is a serious problem in an apartment.
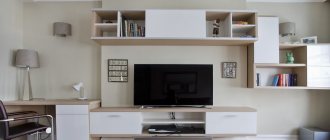
A modern computer can be freely placed on a simple table, including the entire system unit, monitor, keyboard, and mouse.
Considering the fact that keyboards without number pads are gaining popularity, they take up even less space.
Keyboards and mice become wireless, which means that removing them when necessary is not at all difficult, thereby making the table a universal workplace. But then how to make a computer desk with your own hands?
Upgrade your computer desk
NIX described my thoughts on wires, staples/ties, in the office supply (or hardware store, I forgot) you will find adhesive tape from the Tesa company, a black unsightly tape, one side of which is with thorns, and the other with fiber. Convenient thing. Reusable, like Velcro on clothes. Velcro from clothes can also be used successfully. Divide the wires into different bundles, most likely into two, based on “thicker” ones, such as network, monitor, LPT, and “thinner” ones, such as keyboard mice, etc. Come up with the correct fastening ABOVE the tabletop for the wire from the mouse (keyboard), because... It’s very annoying when, when you move the mouse, its wire creeps behind the table. When the mouse moves downwards, it returns with force from under the table. Similar to NIX , I will screw many small appliances to the countertop from below.
When the table simply turns its back to Ivan, and its front to the forest, simulating the wires is easy and pleasant. Change something too. Now another wire is lowered behind the table and... It's better not to look there. If it is a long wire, then it is rolled up to the required length and the roll is thrown over the table :unknw: This is the main thing you want to get rid of.
But Dimon Hell , not without pleasure, actually made the table himself. There are few original parts left, and probably none that have not been changed. :good: Cool!
IS , The direction is clear and generally correct, but I don’t want to farm the bars. It should also be taken into account that many wires go away from the place where they are located, and moving the entire table away is as impossible now as it will be in the future. By turning the table relative to the front right corner (for some it is the left corner, and for others it is the back corner), we open access to all the wires, and those that come to the table, if they are approached thoughtfully, are only twisted by a bundle at 90 degrees. In addition, if the front right corner is fixed, then the possibility of driving the corner of the table into a wall or battery and damaging the system unit, dropping the monitor, breaking through the wall, or something else is eliminated. We give the table one single rotation trajectory. This is the mechanism I'm trying to come up with. If I decide (and the advice here was undoubtedly correct) to weld a frame from a steel pipe, then there will be not 6 support points, as now, but only 4, and this will even simplify the task of turning.
PS: I have a kind of “set”, by chance I got THREE double rubber-coated gray wheels, it seems, with brakes, on a metal base and they are together with horizontal legs (like on a school desk, the bottom crossbar).
It may happen that this is so! :rolleyes: An almost perfect blank for a table is lying around in my basement. Modified on August 11, 2011 by young technician
Modern standard
At this point, we can confidently say that you don’t need DIY drawings of a computer desk. This is because now the concept of a table has become more universal than ever.
Traditional desks are losing their popularity due to impracticality, and the same story happened with their computer counterparts.
Nowadays the computer is installed on a regular table, most often rectangular.
The system units have also changed - now it is no longer a faceless box under the table, but a very beautiful interior detail, and therefore is often installed on the table.
- Do-it-yourself shoe racks: a review of the best ideas and a step-by-step description of how to build a shoe rack (85 photos and videos)
Do-it-yourself bag chair - a detailed master class on how to sew a properly comfortable chair (75 photos)
DIY chest - how to make a beautiful and stylish craft from a box, paper and wood (80 photos)
Do not forget that many people use laptops as a home computer, which take up very little space and therefore do not require a special position at all.
Master class – 6 steps on the path to a new life
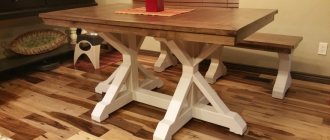
In this tutorial on how to easily restore a dining table with your own hands, we will update, repair and repaint an old veneer table with a moderate number of defects.
So, to update your kitchen table you will need:
- a sander or sandpaper of coarse, medium and fine grain, as well as glasses, a respirator and gloves;
- alkyd enamel paint of the desired color (or other desired coating, such as stain), as well as a flat, non-fading paint or art brush;
- wood primer and a small roller/brush for priming;
- wax paste or varnish.
Step 1. Inspect and repair parts
We carefully inspect all fasteners in the structure and defects of the tabletop - how much the veneer has delaminated or the wood has been damaged.
If the table is a little loose, you just need to tighten all the screws. If it requires a more serious restoration, then you need to completely disassemble the table, re-fasten all the parts, or clean and sand all the grooves and joints so that the new glue adheres better, fix the glued parts with clamps or self-tapping screws, and then remove them after 15 hours. when the glue is completely dry.
- Sometimes the base needs to be replaced, not only because its parts are very worn out, but also because the legs can completely transform your old table. For example, if previously the legs were simple, now you can replace them with beautiful carved balusters.
- When disassembling furniture, do not forget to mark the installation location of each of the parts, this way you will not get confused and will complete the task faster.
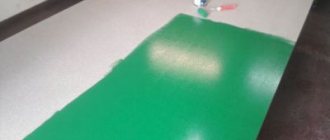
Step 2. Remove the old coating
Now put on safety glasses and prepare 2 types of sandpaper: coarse-grained for initial processing and fine-grained for smoothness. Get ready for long and labor-intensive work - removing old paint or varnish is not an easy task.
Step 3. Repair cracks and chips
After sanding, thoroughly clean the table from dust, inspect the tabletop and look for defects. Keep in mind that even the smallest damage will be visible after painting. All chips and cracks must be locally repaired with wood putty or polyester putty, and then the entire surface must be sanded again when the “patches” have dried.
Table shape
The different shapes of the table were preserved. A corner desk is usually used for two reasons - combining two workspaces and simply needing to use a corner space.
You can buy and assemble a corner computer desk with your own hands. The only way it will differ from the usual one is the shape of the tabletop and the number of legs.
Yes, you can make it yourself, but making a corner countertop is much more difficult than a regular one, so you need to be confident in your skills.
Corner computer desk: step-by-step manufacturing instructions
Corner models are suitable for those people who spend most of their time at the computer.
The advantages of such models include:
- require a small amount of material for their manufacture;
- the finished product occupies a small area;
- possibility of installation in unused parts of the room;
- the permissibility of placing add-ons and shelves, which will add greater comfort when working.
A huge disadvantage is the lack of chance to move them to another place.
Corner structures can be with or without superstructures.
When making such options, the recommended values must be observed. Exceeding the maximum permissible limits causes inconvenience in work.
Table 1. Recommended sizes of corner computer desks.
| Corner table element | Minimum width | Optimal width |
| Tabletop | 50 cm | 60 cm |
| Tray sections | 20 cm | 25 cm |
| Drawers | 45 cm | 60 cm |
| Overlaps | 5 cm | 5 cm |
The dimensions of the structure are calculated based on the parameters given in the table.
The depth of the corner should not exceed 50–60 cm. The total length of the product is 160–170 cm, compact models can be placed at 130 cm.
Manufacturing instructions
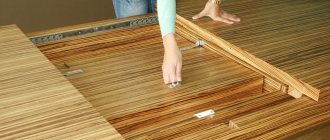
Step 1. Based on the selected drawing, all elements of the future product are drawn on the material and cut out. When using non-laminated raw materials, it should be pre-treated with a disinfecting solution.
Drawing of a corner computer desk
Step 2. Assemble the side posts. In the selected drawing, there is a large section on the right. If it is intended to accommodate drawers, then guides must be fixed on the inner side walls. They also install drawers to which guides are attached.
Step 3. Mount the corner support. A rectangular frame is installed on it, and space is provided for a retractable shelf where the keyboard will be located.
Step 4. Holes for dowels are made in the table top, on the side posts and on the corner support: 2 for each side panel and one on each side of the corner support.
Step 5. Glue is applied to the dowels and installed in the side posts and corner support.
Step 6. Mount the countertop. The sections at the back are covered with fiberboard walls.
Step 7. Make the drawers and install them in place. If there are shelves, they are hidden behind the door.
Step 8. Finishing. The finished computer table is coated with varnish or paint. In cases where laminated wood sheets are used, only processing of the outer ends is necessary. For this purpose, a special edge tape is used. It is made from various materials and is available in a wide range of colors.
The edge gives the product a finished and beautiful look and prevents the release of formaldehyde, which is dangerous to humans, from the chipboard.
The edge tape is glued to the sections of the product using a regular iron.
Design and appearance
Previously, when people thought about how to decorate a computer desk with their own hands, the first thing that came to mind was a cactus, which they once loved to place near the computer.
DIY bread box - step-by-step master class on making and tips on how to decorate a wooden model (105 photos + video)DIY high chair - interesting drawings and projects on how to make a comfortable and functional high chair (120 photo ideas)
DIY built-in wardrobe: 115 photos of original ideas and video tips for building built-in wardrobe models
Now the best decoration for a computer desk will be itself and its peripheral devices. Therefore, usually either a table is selected for a computer and peripherals, or devices are selected in the style and color scheme of the table.
Even now, computer desks are often decorated with LED strips, which can be purchased both locally and on Chinese trading platforms.
Choice of materials and sizes
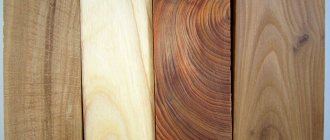
It is best to select materials for a computer desk that are durable and of high quality. This means that we do not make a computer desk from plywood with our own hands. Wood is best, always.
Regarding the legs, it’s up to you to decide - they can also be made of wood, or they can be made of metal. The second option looks fresher and more modern.
This choice was largely influenced by the tables that can be bought in popular stores. The same IKEA store offers you a separate selection of tabletops of different sizes, and separate legs for them.
- DIY corner cabinet: 80 photo ideas and video description of how and what to make a cabinet from. Main manufacturing stages and best design projects
Do-it-yourself wardrobe for the balcony - 80 photos of how to make a balcony wardrobe from various materials with your own hands
- Do-it-yourself wardrobe - a detailed description of how to make and assemble a wardrobe with your own hands at home (110 photos + video)
You can choose the color, material, size, both of the tabletop and legs. Next, you will only need to figure out how to assemble a computer desk with your own hands, but this is a common practice for this store.
The optimal height of a computer desk can be considered 75 cm. In case this height turns out to be too small or too high, it is better to equip the workplace with a chair with a telescopic mechanism.
Beginning of work
I started dismantling the table. To start, I removed the top piece of trim and then placed it on top of the bottom piece to make sure I could combine them into one dresser.
Knitted pullover - spring supertrend: review of fashion news
First eggs, then ducklings: the guy watched as the duck settled on the balcony
Apple pie with cream and raisins: a simple dessert with an exquisite taste
When everything seemed to fit together, I screwed the shaped legs to the bottom. First I drew circles around each of the four legs. The bottom and top of this cabinet consisted of MDF sheets left over from previous work. Drill four test holes inside each of the circles - this will make it easier for you to screw in the screws. To further secure the screws, you can use wood glue.
Special designs
Another important part of a workstation with a computer can be a printer, and with a scanner.
Many people often use them, mainly for work, because now you can receive a document by email, print it, sign it, scan it and then send it back.
This is especially convenient if the office is located very far from home. You can simply allocate space on the table for the printer, or you can make a small shelf for it.
Gamer desk
Many young people are interested in how to make a gaming computer desk themselves.
What makes a gaming table? First of all, the computer itself. Next comes the peripherals - monitor, keyboard, mouse, headphones or stereo system.
Added to this is a gaming surface under the mouse. The overall picture can be embellished a little with the help of LED strips, which we talked about earlier.
It's another matter if you think about a gaming desk, which acts as a system unit for computer parts, but this is a topic for a completely different conversation.
In modern realities, an ordinary table will be enough for both an ordinary user and a gamer.
DIY computer desk photo
Read here - Do-it-yourself ottoman - 110 photos and videos of step-by-step instructions on how to make a ottoman from scrap materials
Did you like the article?
0