Features and characteristics of the material
Furniture film is a special polymer coating. Its production begins with the gradual heating of special granules to a temperature of 180-240 degrees Celsius. You need to wait until they melt, turning into a homogeneous mass. Next, the calendering procedure is carried out. The artificially cooled mass of PVC passes between the rollers, which give it the desired thickness and width due to the size of the gap between them. Mineral components, stabilizers, plasticizers, and technical lubricants are also introduced there.
Coloring is done with an alcohol-based dye; it is applied evenly using a special brush and constantly mixed in a container, which helps to avoid the appearance of lumps. After drying, the PVC furniture film is cut into two smaller strips, then wound into rolls of a given size. If any scraps remain, they are sent for recycling. The finished rolls go into a packaging machine, where they are placed in bags to be sent for sale.
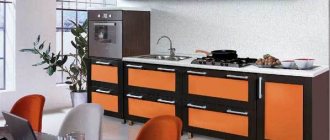
Film for furniture facades varies in its parameters depending on the purpose. Its average thickness is from 0.15 to 0.8 mm, its width is about one and a half meters, the length of each packaging unit is from 100 to 500 meters. The coating has three types: glossy, textured and matte. There are many decorative effects such as embossing, holograms, patina, even 3D. Sometimes the design imitates marble, stone or wood.
A huge variety of colors allows you to choose PVC film for any interior style.
Pros and cons of using
PVC film for furniture facades has a number of significant advantages:
- combination of strength with high elasticity, which prevents tearing of the material during use;
- water resistance;
- low thermal conductivity;
- resistance to many chemicals, deformation, heat and cold;
- there is no fading because the material is impervious to ultraviolet radiation, that is, even when exposed to direct sunlight it will not fade;
- favorable cost, especially in comparison with simulated materials - stone, wood, marble;
- high-quality drawings, interesting textures, impressive appearance of films.
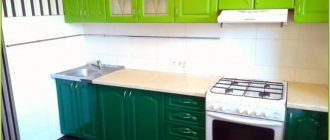
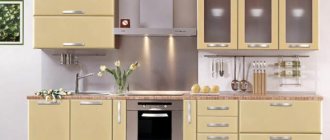
Due to its resistance to moisture and heat, PVC can even be used in the interior of a kitchen or bathroom, where other materials would quickly begin to deteriorate.
However, one cannot fail to note the possible disadvantages:
- self-adhesive PVC film may begin to peel off or bubble if it cannot withstand constant changes in temperature, humidity, and direct rays of the sun;
- sometimes it breaks or is accidentally cut with a knife, then the coating cannot be restored or a separate fragment can be replaced without losing aesthetic qualities, everything has to be re-glued.
In order not to spoil the self-adhesive PVC film, it is better not to clean it with abrasive materials (a sponge with soapy water is perfect), not to cut anything on it with sharp objects, and not to expose it to too much heat or cold, or sudden temperature changes. Despite the fact that it must withstand this, its service life will increase significantly if these simple rules are followed.
Take the survey
Varieties
PVC film for furniture facades made of chipboard and MDF, interior doors, window sills varies in texture and color:
- Texture – is a coating that imitates natural materials: different types of wood, stone, marble. The assortment includes designer prints - plant motifs, abstraction, geometry. Such options are often chosen for the design of countertops and facades of MDF kitchen units.
- Glossy – protects the surface of furniture from various mechanical damage and moisture. This film does not peel off after prolonged use. Colors can be very different; to decorate a room in a high-tech style, glossy film with a metallic effect is often chosen.
- Matte – technical qualities are no different from glossy. In terms of performance, matte film has some advantages. Due to the special texture on the surface, fingerprints and minor dirt are invisible. The cabinet fronts do not sparkle, which avoids glare from lighting fixtures.
- Self-adhesive - a separate group for home use, which includes glossy and matte textures. The self-adhesive type of PVC coating does not require special equipment for application. A large assortment of colors allows you to choose an option suitable for any interior style.
Additionally, the PVC coating can be decorated with embossing, holographic shine, and patination. It is possible to apply images in 3D format.
Glossy
Matte
Texture
Methods of application
Polymer materials are a very popular finishing option; they provide neat facade decor and protection from many external factors. According to the method of application, PVC coatings are divided into the following types:
- Membrane-vacuum. The equipment used is a vacuum press, most often used for countertops, doors between rooms, cabinets, chests of drawers, bookshelves. Thickness - from a quarter to half a millimeter.
- Laminating. The process of gluing or pressing together two surfaces is called laminating. It is carried out using special equipment. It is used for various surfaces made of fiberboard and MDF, including window sills. The thickness of the cladding usually does not exceed three tenths of a millimeter.
- For lamination. Cladding is done on a machine because work is usually carried out on fairly long elements made of metal, plastic or wood in order to protect them from water and give them strength. Two-layer PVC film provides more complete protection from influences, including sun rays.
- Transparent. This type of material is very thin, almost like food grade, it does not perform its functions for too long, but it stretches well, and it is convenient to completely cover the product. Usually it is chosen for transporting something, securing it to the surface of the cargo with glue that does not leave any traces behind.
- For chipboard and MDF. Intended for individual parts, for example, ends. A special machine is used to stretch it, so it is difficult for a beginner to achieve good quality at home, although some craftsmen try to do this, using, for example, a hair dryer.
Film can be applied to surfaces in different ways:
- Laminating. This process has several subspecies, differing in temperature. Smooth elements are processed using the cold method, glue is applied to them, and then the coating is rolled under pressure. During warm processing, the glue is preheated to melt off excess water. The hot type of finishing is carried out at a temperature of 120-160 degrees, using heated rolling rollers.
- Lamination. In this case, no glue is used; the fastening effect is exerted by heat and pressure, which make the substance plastic. The result is a solid, non-delaminating fabric. Waste material is subject to recycling and reuse.
- Post-formation. The most effective option. The layered coating is applied to a base coated with glue on a positioning machine. The press used has a relief that gives the finished product an interesting texture.
Glossy PVC film is usually applied using a vacuum method.
Every technology has its limitations. For example, when laminating, it is imperative that the object be smooth, without protruding fragments or nicks. During post-formation, it must withstand the load that the equipment will place on it.
PVC application technology
Today, there are three main methods of covering MDF parts with PVC films.
Lamination is the process of wrapping MDF blanks under high temperature and pressure, so-called paper-resin materials. When using this method, a uniform surface layer is obtained, and the products are highly durable and waterproof, and are also not afraid of high temperatures.
Laminating . When using this method, a layer of glue is applied to the part in advance, and then using a vacuum press, under temperature and pressure, it is tightly glued to the MDF facade.
Postformation . Here they use a layered laminate or plastic that can withstand certain loads. This method of cladding provides maximum protection and wear resistance to the furniture product.
Let's look at the whole process of laminating furniture facades step by step:
- Preparation of the workpiece. A rough MDF board is cut, then the specified pattern is milled on the product and the ends are processed, after which the facade is sanded and cleaned of dust.
- A layer of glue is applied to the workpiece and time is allowed to dry. Next, the part is placed on the machine on special supports; if there are several products, then the optimal technological gaps for cutting are selected.
- Next, the film is rolled out across the entire machine table and secured with a pressure bar.
- After this, the material over the entire area is heated to temperatures of 140-160 C degrees Celsius.
- Next, the air layer between the film and the table surface is removed, after which, after 2-3 minutes, it is tightly glued to the facade.
- After the product has completely cooled, all excess is cut off along the contour, and we can assume that the facade is ready.
To prevent this material from “peeling off” and “tearing” and from having sharp edges, they are rubbed down with fine-grained sandpaper.
Advantages of laminated boards
It’s hard to argue with the advantages of laminated chipboard for the production of kitchen furniture:
- low cost;
- neat appearance;
- good machinability with power tools;
- variety of colors, textures and patterns.
Unlike conventional wood-based products, laminated ones not only look more attractive, they are also much safer. A dense impermeable film on their surface does not allow harmful fumes of the composite to pass out. It also protects the structure of the material from swelling under the influence of moisture, to which kitchen furniture is exposed every day. Melamine film, which performs all these functions, can have a thickness of 0.2-0.4 mm, although thicker coating options are also available (up to 2 mm). In any case, it practically does not fade in the sun, so laminated chipboard furniture, even if it has stood near the windowsill for several years, will retain its original color.
The protective film also serves decorative purposes: with its help, chipboard panels can be given the desired color and texture. Matte surface or glossy shine with such a rich palette will allow you to choose inexpensive furniture for the kitchen in any style.
Types of coatings
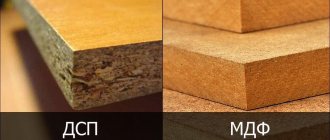
For the kitchen, the best choice would be MDF furniture. And the point is not even in its greater density, but in the high homogeneity of the composition. Unlike chipboard, the material does not crumble and holds fasteners well, even repeated ones, which is extremely important when replacing hinges, handles or other fittings. In addition, the manufacturing method itself is based on lignin, and not formaldehyde resins, which makes MDF facades more environmentally friendly.
The slab is decorated in a variety of ways.
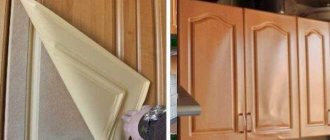
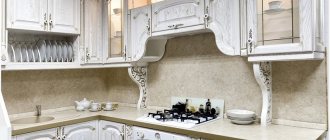
- Veneer is a section of natural wood glued to a slab. It requires exactly the same care as a real tree, is just as capricious and just as beautiful. If damaged, this coating cannot be restored with your own hands.
- PVC film is most often used for laminating chipboard, since this is the most budget option. The film can imitate any type of wood, although not entirely convincingly. The main disadvantage is that with prolonged exposure to moisture and temperature, the film peels off. Repair is partially possible.
- Melamine film - its basis is decorative paper impregnated with melamine resin. The advantage of such kitchen facades is their higher resistance to moisture.
- Acrylic film is a paper-laminated plastic, characterized by much higher strength, resistance to mechanical damage and dampness. This coating can have a matte, satin or glossy surface, and therefore extremely rarely imitates wood. Any colors are available - white, red, blue, black and all possible combinations.
As a result, it is possible to re-tighten PVC film with your own hands, but not melamine or acrylic film.
Repairs of this kind are possible only in small areas and only in cases where the film has only peeled off and has not become deformed, as happens from overheating. In the latter case, it is easier to remove the entire coating or order a new kitchen façade.
To remove the defect, put PVA, “Moment”, “Titan” glue into a medical syringe - without a needle - and carefully fill the cavity under the film. You can also use “liquid nails”. The film is stretched, smoothed so that no air bubbles remain, and secured with tape for 4 hours.
In case of extensive damage, restoration of kitchen facades is impossible.
Disadvantages of a laminate kitchen
Economy class furniture is quite tricky to care for, since the coating on it is very thin. It is easily scratched by abrasive cleaners or by careless handling of metal utensils. Also, during cleaning, you cannot use liquids containing acid - they will lead to a gradual darkening of the laminated surface.
Melamine coating is sensitive to high temperatures, so such furniture should be located at least 60 cm from hot zones (stove, oven, gas water heater). If for some reason this is not possible, you will have to order chipboard modules with aluminum overlays. They will protect the facades from thermal deformations, although they will slightly increase their cost.
The loose structure of the base itself is also considered a disadvantage of particle board panels. Because of this, the facades sag on the fasteners over time, since the mounting holes are destroyed under the weight of the doors - pressed shavings do not hold point loads well. Such problems arise especially often with large chipboard thicknesses. But for horizontal elements (window sills, countertops, shelves) this minus is not so significant.
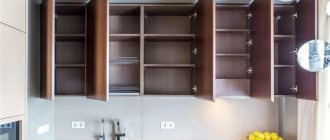
Kitchen facades made of chipboard
For the manufacture of cabinets, laminated panels with a thickness of 2-4 cm are used. During the pressing process, they can be given a fairly high density, which has a positive effect on the strength characteristics of the furniture itself. But for doors and kitchen drawer fronts, the optimal panel thickness is 16 mm. This is the ideal size for mounting fasteners and decorative fittings with sufficient resistance of the slab to mechanical loads.
Lamination technology has a significant impact on the durability of kitchen facades. The weakest point of laminated chipboard products is the edges. Once the coating on them is damaged, such furniture will only last for a year or two. So various methods of processing and protecting the ends of pressed panels are used:
- Acrylic or PVC furniture edging is the most short-lived option for the kitchen. However, you can regularly update it yourself. It is not difficult to find strips of the required width on sale, and they are glued using a regular iron.
- Postforming is a relatively new technology that involves wrapping facades with a solid sheet of plastic, without seams or joints. This solves the main problem of pressed slabs in the kitchen - moisture permeability from the edges. A similar technique is used in the manufacture of chipboards for window sills.
- Aluminum profile - under such overlays the chipboard can be sealed with the thinnest and most unreliable film. The metal frame will ensure its complete safety, and the headset will have an original appearance and a long service life.
The front parts of laminated chipboard are also decorated differently. Ideally, the film should literally be sintered under high pressure along with the pressed board. But today you can often find very low-cost options with so-called lamination - simple pasting with multi-layer paper impregnated with polymer resin.
Kitchen painting
You can paint MDF facades with everything, with the exception of options with an acrylic panel. This kind of repair requires great care and some experience. Especially if you need to paint a complex surface - milled or radius.
The renovation consists of three stages: choosing paint, preparing and painting.
Selection of paints and varnishes
To paint MDF boards, ordinary acrylic or oil paints can be used. Alkyd compounds are better in quality and more durable. The ideal option for the kitchen are polyurethane paints and our own polyurethane primer.
1. Water-based polyurethane primer is absorbed by the top layer of the material, shrinks the loose surface, imparting sufficient strength and smoothness. This coating is easy to sand and significantly reduces the consumption of paint and varnish.
If fairly old kitchen facades are being repaired, it is highly recommended to apply a second layer of filler primer.
2. Polyurethane enamels are distinguished by a rich range of colors and provide varying degrees of gloss. The following paints are produced:
- matte – with a minimal degree of light reflection;
- semi-matte;
- semi-gloss – this coating is recommended for pastel colors;
- glossy - the most popular;
- high-gloss – suitable for very pure and bright colors, as they provide an almost mirror-like shine. The white gloss will be simply dazzling.
3. Varnish. Acrylic and polyurethane varnishes are used. The former are transparent and do not turn yellow over time, but are inferior in mechanical strength to polyurethane ones.
Preparation of material
If the facades are really old, the surface includes not only peeling of film and paint, but also chips and cracks.
If the dimensions of the sash have changed, for example due to constant dampness, then it is advisable to abandon the restoration. It will be much faster and cheaper to completely renovate the kitchen.
If you decide to radically change the design of the kitchen, then do-it-yourself renovation is quite possible.
- The hinges and handles are removed from the sash.
- Get rid of the film coating. Since PVC film and melamine film are not resistant to heat, the facades are simply heated with a hairdryer and the film is removed. This cannot be done with an acrylic panel.
- The old layer of enamel is removed with a solvent.
- The surface is polished using sanding sponges, brushes or a sander. The treatment removes glue and paint residues, minor scratches and chips. Grinding is carried out in three stages using abrasive materials with coarse grains - P180, medium and fine.
- Then the part is cleaned of dust and primed. This is best done with a spray, but you can use a roller or even a brush. The primer dries in about 8–10 hours.
- After drying, the surface must be cleaned again with the finest grain abrasive.
The process of preparing the material is covered in detail in the video.
Horizontal surfaces
In the kitchen, not only furniture modules and facades can be made from laminated panels. Laminated chipboard with a thickness of 32-40 mm makes good countertops, consoles and window sills. Such parameters provide the pressed plates with high rigidity, so that they can be loaded without fear.
The big advantage of laminated boards is that elements of almost any shape can be cut from them (of course, without fine detailing). This allows you to create, for example, a multifunctional window sill-tabletop, which will save a lot of free space in the kitchen. A laminated work area worktop will look good. True, at the ends the panel will have to be covered with aluminum corners from the side of the sink and stove. Without them, the protective edge of the chipboard will quickly become unusable, and the compact will begin to rapidly collapse.
For horizontal structures, such as window sills and countertops, it is better to take slabs of the highest quality, for example, products from European manufacturers Egger and Werzalit. Their main difference is a plastic film that can withstand moisture, high temperatures and even aggressive household chemicals.
Bar counters and tables made from such chipboard can easily withstand constant contact with heat sources up to +90 °C and short-term contact with dishes heated to +180 °C. Window sills of the same quality do not lose their original color under the sun's rays and can withstand even negative temperatures perfectly.
What is chipboard lamination and how to laminate furniture at home: Review + Video
Furniture lamination is the process of applying a special film or paper to the material, after which its appearance becomes more expensive and elegant.
Furniture made from chipboard is subject to lamination - a cheap and therefore in-demand building material that is quite durable, but does not look very presentable. It allows you to make repairs economically, and laminating furniture at home will smooth out all the shortcomings of the slab and will be a practical, non-wasteful solution.
Why is lamination needed?
Cheap and fairly durable chipboard is the most popular material for the manufacture of inexpensive furniture. In their natural form, pressed slabs made from shavings and sawdust do not look very decorative, so manufacturers finish their surface and edges with films of plastic or paper impregnated with synthetic resins. Lamination involves the process of pressing and gluing films onto a board.
The coating not only makes the material more decorative. Laminated chipboard is characterized by higher moisture resistance compared to the original material. This makes it possible to use laminated chipboard for the manufacture of kitchen units and other cabinet furniture that has to come into contact with a humid environment.
Main questions
What is "chipboard"?
Chipboard stands for “chipboard.” From the name you can understand that this is not a separate type of wood, but a mixture of wood shavings, held together with glue and placed under a press. This material is inexpensive and is used instead of scarce wood, it is easy to work with and durable, which is what arouses interest. Thanks to modern decorating techniques, chipboard will become a worthy replacement for expensive wood, the extraction of which, moreover, causes enormous harm to our environment.
ADVICE! Laminated chipboard can be immediately purchased at the factory, it can be made to order, but you can independently process a regular pressed board using laminating agents.
Why laminate chipboard?
Looking at a product made from chipboard, it becomes clear why it is recommended to laminate the raw material. Firstly, it does not look very beautiful, its decorative qualities leave much to be desired. Secondly, lamination will smooth the surface, make it more pleasant to the touch and help avoid the danger of splinters, scratches or snags on thin fabric. Thirdly, the procedure will significantly improve the quality of the product, making it more moisture resistant, which is very useful for kitchen furniture.
How to laminate chipboard with your own hands
Process
Laminating chipboard at home involves applying a special film to the surface.
ATTENTION! It is impossible to reproduce the perfect finishing of furniture at home. Factories immediately produce furniture made from laminated chipboard (chipboard), the quality of which will be better and the service life will be longer, with the remaining savings.
There are several ways to laminate furniture at home:
- — Application of self-adhesive film to the surface. Simply remove the layer of protective paper and carefully apply it to the furniture. After the film has stuck, remove air bubbles with a plastic spatula or cloth.
- — Gluing the film with glue. Universal adhesive is applied to the slab and left for a while, after which a film is applied to it. For high-quality gluing, it is recommended to roll it over and hold it under pressure.
BE CAREFUL! When applying the film, carefully measure the shape and surface area, because if you apply the laminate material crookedly, it will be impossible to reuse it - re-glue it.
Which laminating film should I choose?
For lamination of chipboards, several types of films have been developed, which differ in their properties, composition and cost:
- — Phenolic film. Its properties include increasing the wear resistance of materials in terms of mechanical damage, but also having a low moisture resistance.
- — PVC (Polyvinyl chloride). The functionality of this film is aimed at improving the water resistance of furniture.
- — Melamine film. Its properties include wear resistance and moisture resistance, however, the membrane contains formaldehyde resin, which can cause some damage to health when heated. This product should be used outdoors. Cooled material is not hazardous.
Preparation for lamination
Before applying film to furniture, you need to prepare it for the procedure:
1) First we sand the product. This can also be done with sandpaper - if it is not large in size, or, if it is large in size - with a grinder. Sand until the furniture walls are smooth.
2) Then it is recommended to putty the chipboard, dry it and go over it again with less sandpaper.
IMPORTANT! The smoother the surface, the more accurately the film will sit.
3) Next, the workpiece is treated with a wood primer and dried.
4) It is necessary to cut the film, adjusting it according to the details - take into account the height, width, shape and corners of the furniture.
5) Next, proceed to gluing the film: having freed part of the protective layer, apply it to the surface of the furniture and gradually move along it.
Do-it-yourself furniture lamination
So, laminating furniture is quite easy. The main thing is to buy a suitable film for the occasion. In order for it to stick well, you must first wash and dry the surface well. Sometimes you can go over it with fine sandpaper, but this is not at all necessary. If the surface is clean and dry, there are no unreliable areas in the form of cracked varnish or paint, you can start laminating.
Laminating furniture with film is no more difficult than gluing a sticker on it with glue. It’s just that in this case the sticker will cover the entire surface of the furniture. The film, as you might guess, has a protective layer on the other side. If you detach this layer, underneath you will find that the main, decorative layer has enough glue, with the help of which the film is glued to the surface of the furniture. In other words, there is no need to use foreign adhesives, which is very convenient.
Other methods of processing furniture
In addition to simply applying film to glue or gluing self-adhesive tape, there are several other methods for processing chipboard furniture:
- — Laminating. In this method, glue is applied to the product, and then a thermal film of a polymer composition is applied.
- — Veneering. Veneer is a very thin layer of high-quality wood, if natural, if synthetic - paper canvas with imitation of wood patterns. Using molten resins, such material is welded to the base under the influence of high temperatures.
Thus, laminating furniture at home is quite easy and the quality depends solely on your efforts.
Features of chipboard lamination
In industrial settings, belt or conveyor presses are used to bond the base and coating. They not only press the laminate tightly to the base, but also heat it up greatly. As a result, the impregnation melts and spreads, and the coating is connected to the base as tightly and evenly as possible. Laminated chipboard is made by gluing the cladding to the surface. Pasting films at home is partially similar to both of these methods, but due to the lack of special conditions, the applied coating is not as durable as an industrial one.
It’s easy to laminate countertops or kitchen doors at home:
- Preparation of the slab begins with grinding. For large volumes of work, it is more convenient to use sanders with wood attachments. A small product (shelf, door, etc.) can also be cleaned manually using sandpaper stretched over a wooden block or a special holder. Grinding is continued until the surface becomes smooth, without protruding chips.
- After the initial treatment, it is recommended to putty the surface, dry it, and treat it again with fine sandpaper. Such thoroughness of processing is dictated by the properties of membranes for pasting: a thin film will not lie flat if even minimal defects remain on the surface of the board.
- The leveled workpiece is treated with any wood primer. Impregnation will increase the ability of the film or glue to form a strong connection between the cladding and the base. The primer is applied according to the instructions and dried.
- Pasting begins with cutting the film according to the size of the parts. If a mesh is applied to the back of the self-adhesive, then you can use it for cutting without resorting to additional measuring tools. But most often markings are carried out using rulers and squares. Any type of film should be cut with a sharp knife (breadboard cutter, office cutter). The edge will turn out straight and even if the cut is carried out along a ruler (it is better to take a metal one).
- The pattern is partially freed from the protective layer, the adhesive side is pressed against the edge of the part and gradually moved along the surface, trying to glue the membrane evenly and without bubbles. If there is still air left under the film, you can expel it with a rubber spatula towards the nearest edge.
How to glue films without an adhesive layer?
If the material chosen for lamination does not have an adhesive layer, different technologies are used:
- When choosing PVC or other cladding, buy glue for it. This composition must be applied to the prepared slab according to the instructions. Most often, you need to coat the surface with glue in 1 layer and dry it slightly (10-20 minutes). The cut film is applied and leveled with a hard roller or spatula. If it is possible to carry out the work with an assistant, it is recommended to slightly warm the film with a household hairdryer when gluing. It will be easier to level and lay without wrinkles. Smoothing is done from the center to the edge, trying to remove air bubbles.
- Melamine materials require heating during the gluing process. At home, the most accessible heating device is an iron. It must be turned on in advance and warmed up in the mode for ironing cotton or linen. Melamine is most often used to make edges. You need to cut the tape to the required length, attach it to the cut of the slab and iron it with an iron. After cooling, melamine forms an even layer on the surface. The tape for the edges is taken wider than the edge, and after gluing, the excess is cut off with a breadboard knife, moving it parallel to the edge. Then the edge of the material is treated with sandpaper.
The technologies used make it possible to obtain a chipboard coating that is not very durable, but reliably protects against water.