by Alexey | Tools | Monday, April 26, 2021
| Follow Make-Self.net on Facebook and be the first to read our articles. |
A router is a very useful tool in woodworking. It can be used for shaping wood, drilling various holes, cutting grooves, finishing edges and much more. It's hard to imagine any complex project without it.
A router table may be the most important tool a carpenter can use.
Most people use routers as portable tools. While this is a viable option, a table-mounted router is safer to use and can perform its functions on a whole different level. If you're looking to build your own router table yourself, you've come to the right place. We've rounded up 13 of the best DIY table designs.
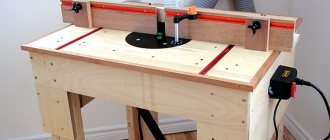
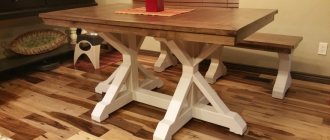
Folding milling table
This briefcase-sized design transforms into a fully functional router in minutes and folds up for storage just as quickly.
A full-size router table can be a great solution—if you have the space. But if you only use the router occasionally or need a mobile solution, this might be a good solution. This benchtop tool provides all the precision and stability you'd expect from a full-size router table.
How to make it yourself, with your own hands?
Preparations for the manufacture of a milling table should begin by creating a sketch of it. The following dimensions must be taken into account:
- table height for convenient use, taking into account the owner’s height;
- Dimensions – availability of free space and length of workpieces;
- intensity of use;
- operations performed;
- installation of additional devices;
- availability of materials for table construction.
Based on the sketch, the number of materials and fittings to create the table is calculated.
All the necessary parts are made according to the sketch and then assembled.
- Assemble the frame - the frame for the table top and legs.
- Strengthen the structure with additional cross bars.
- Sheath on all sides.
- Install guides under drawers and shelves.
- Hang the doors.
- Place the table top with the milling plate on top and secure it;
- Install an elevator.
- Bring the vacuum cleaner.
In bench-type models, cladding and other operations are not performed, only the countertop and elevator are installed.
Important!
A short table top is suitable for making furniture shaped planks. Construction skirting boards require a large supporting plane along their length.
Spacious milling table on wheels
If you're a fan of Ana White, then you know that she has everything you could ever want to build.
It's no surprise that she has a great plan for helping you build a great router table. It has ample storage and work space. I hope you enjoy it as much as we do.
Professional milling table at half the price
This table includes all the best features found in store bought router tables at half the price! We have had the opportunity to study and use most of the router tables available on the market. Based on this experience, we developed our own fully functional and easy to assemble desk. The detailed project can be viewed here.
Step-by-step manufacturing instructions
To make milling tables, you can use old furniture and workbenches or make the entire structure yourself.
Manual workbench with plate
The simplest device for working with a router. The workbench has durable legs and a frame on which a tabletop with a milling plate is placed. Making your own is simple.
- Cut a hole in the workbench with a protrusion around the perimeter, the size of the milling plate.
- Attach the router to the plate and fix it in the tabletop.
- Mill the ends and make guides out of them for moving the stop ruler.
- Cut a ruler out of plywood. Attach strips to its ends, hanging down and sliding along the ends.
- Cut a hole in the center of the ruler and install the pipe under the vacuum cleaner.
The machine is ready for the production of simple parts, milling of side surfaces, and figured trimming.
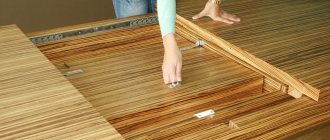
Based on written wood
A milling plate is outlined in the table top. A round hole is cut in the center into which the router body fits. The remaining surface of the rectangle is milled and understated. Places for adjusting and fastening screws are marked along the plate, and holes with a diameter of 2 mm are made.
The guide ruler is cut out. Brackets are installed on it, sliding along the side ends. Additional stops are made at the back. In the center there is a hole for the vacuum cleaner pipe. A T-shaped guide for a transverse ruler is attached to the front end. The router, mounted on a milling plate, is installed through a hole in the tabletop - lowered down. For the elevator, a support board is placed between the pedestals.
Homemade from plywood
To make the table itself, multi-layer plywood 16 mm thick is suitable. It is better to make the tabletop thicker, 22 mm. The lower part consists of legs and a lid with a hole in the center. Plywood gussets are placed on the corners of the milling tabletop. Their internal dimensions should be 2 mm larger than the perimeter of the base. The table top fits onto a frame with legs and is secured with 8 screws around the perimeter.
Portable
A small low table made of plywood has:
- 2 side planes-legs;
- a longitudinal strip between them for rigidity;
- a small tabletop with a plate for fastening;
- thrust bar.
The height of the table is determined by the parameters: it is convenient to work when it stands on a workbench and a router is placed underneath. The advantages of the model are its compactness and low weight. The portable milling table can be removed from the workbench at any time and placed on a shelf, freeing up space for other work.
Functional
A table on which you can make curved edges, mill baseboards and planks, and work with templates. It consists:
- base made of profiled pipe;
- table top;
- parallel stop;
- perpendicular stop;
- pressing combs;
- replaceable rings.
You can additionally install a vice and other devices on the table. Drawers are built into the base, shelves and doors are made to close them. In the center of the parallel stop on the reverse side there is a pipe for connecting a vacuum cleaner.
The tabletop is made of thick textolite 20 mm thick. A milling plate with adjusting screws is installed in the middle. In front, an aluminum tire with T-shaped slots of different widths runs along the entire length. A perpendicular stop and pressure combs move along it.
For hand router and jigsaw
On a combination table you can mill on one side. The other is designed for sawing boards and plywood. The table frame is made from corners or profile pipes. It must withstand heavy loads and dampen vibration. A hole is made on one side of the tabletop for the router tool exit and a plate is attached. A rectangular plate with a slot for a disk cutter is installed on the other, and a jigsaw or lamellar router is mounted underneath. Guides are mounted on the side of the frame. A stop ruler moves along them. It is used when both devices operate.
For mini CNC router
The table for a mini CNC router is structurally different from its counterparts. The unit is located on top and works independently, according to the program. There is no need to make an elevator for it. The table is made of silumin. T-shaped grooves are cut on the working surface to secure the part. Guides are attached to the sides of the bed, along which the milling cutter moves longitudinally, which is controlled by an electric drive through the shaft.
There is a portal between the posts for the transverse movement of the tool. In the vertical direction, the cutter moves along with the spindle when the cross screw rotates. It is better to buy ready-made guides or make them from wood, but they will quickly wear out. Cut the side posts out of plywood, attach a round guide and a lead screw to them.
Wall
The wall-mounted table is ideal for workshops with a small area. When folded, it looks like a hanging cabinet. In working condition, the lid turns into a work table for the router. Tools are stored on shelves inside the wall part.
- Make a wall cabinet with a hinged door from boards or thick plywood. A smooth pin is used for rotation. Near the side end, a latch is installed on the outside to hold the door in a horizontal position.
- Make holes in the lid and secure it on top - the inner side, the table top of the milling machine with a stop, a plate for attaching the router and other devices.
- Make a hole in the side of the cabinet for the vacuum cleaner hose.
The disadvantage of a wall-mounted table is the need to remove the router every time. When work ends. When you close the countertop door, it sticks out along with the wires.
Mini table
The compact model takes up little work space, approximately 1 square meter. The base and legs are welded from corners and covered on all sides with thin sheet steel. There is a door on the side for access to the router. On the front wall there are start buttons and handwheels for the elevator and router. A small tabletop with a ruler located on top ensures comfortable work.
Reference! A compact table is the most popular option for installing a router. For mobility, wheels are attached to the legs.
For milling machine
The table is made of both aluminum and its alloys. Ready-made guides and rulers are used.
- The base is cut out from the plate.
- Longitudinal guides and a screw between them in the center are attached to it.
- A sled made of the same sheet is placed on top. At the bottom there is a nut mounted on a screw.
- A similar design, only in the transverse direction, is mounted on a skid.
- The table is installed on top. A transverse screw is passed through it.
For mechanical movement, drives are installed on the free ends of the screws. The coordinate table is used with a milling head stably mounted on the frame, and is installed as an additional device on the machine.
Coordinate
A manual coordinate table is made from chipboard, cylindrical wooden posts with pulleys and small pieces of beams. From the finished parts you will need 6 round guides with a diameter of 10 mm.
- Cut a base from thick plywood. Attach 2 strips to it from below at a distance of 10 mm from the side ends instead of legs.
- Make 10 wooden cylinders with a height of 60 and 80 mm (5 of each type). Drill through holes with a diameter of 8 mm in them.
- In the corners, closer to the edge of the table, drill holes and install 2 cylinders of different heights. Each standard size should form a rectangle. Install a pulley on top of them.
- Bolt the pulleys with their stands to the base.
- Place the remaining cylindrical workpieces on the right and left on the front of the machine. Attach handles to the pulleys on top and bolt them together so that they rotate together.
- Make pillows for the guides from wooden cubes.
- Before installing the transverse and longitudinal guides, place cushions on them with a blind hole for the ends of the shafts.
The result should be a rectangle of external guides and shafts with a carriage for the router arranged crosswise inside. To complete the work, pull 2 thin cords, each around the perimeter and handle of the same height. Fix one of them on the movable cushion for longitudinal movement, and attach the second to the lateral movement. Pull the cord around the perimeter through the pulleys. When the handles rotate, the cord will move the router in the longitudinal or transverse direction. The cutter will select the material by moving along the coordinates.
Wall cabinet for router
This compact storage cabinet does double duty as a top-notch router table while also holding all your accessories.
With plenty of storage and a built-in desk, this cabinet allows you to knock two important items off your list. And here's what's interesting: it takes up very little space. The secret to its compactness is that it folds out when you need it and retracts when you're done.