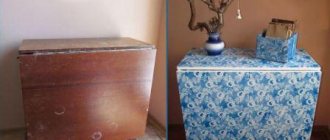
Crochet stool seats: review of models
Let's get started and start with the stool. So, the venerable stools come in round and square shapes. Accordingly, capes can be in the shape of a circle or square. And there are so many patterns for these capes. From the usual “granny square” to the fabulous openwork. Additionally, there may be sides that secure the product.
Review of knitted chair covers
The abundance of new models of chairs, the presence of clear frames, magnificent wood carvings and other delights of civilization do not exclude the need for an accessory.
Remember the best English films - there is not a single event where the chairs are not dressed up. And how cozy a cafe in your city would be if you were greeted by such elegant chairs. Of all the existing models of crocheted chairs, only two types can be distinguished:
Which hook is suitable for knitting stool covers?
The furniture will not require a special hook. But the size should in any case be greater than 3.
It is better to knit in several threads, so any product will be stronger. Yes, and you need to keep in shape. The main thing is that the hook should be convenient for the master.
Important! When knitting accessories for furniture, the hook should be selected strictly according to size. It should fit the thread. Loose knitting should not be allowed. If the hook is chosen correctly, then the fabric from it will always be strong. Ideally, the thinnest part of the hook should be strictly half the thickness of the thread.
Knitting seats for stools: patterns with descriptions
A small selection of models with the most interesting ideas for home comfort. Basic models in different presentations. A convenient description, diagrams and list of necessary materials will help everyone cope with this “difficult craft”.
Square cover for stool
Another revival of the “granny square”. Looks very charming on a wooden stool. The ease of knitting this pattern, its endless compositions - all this is very flattering to the craftsmen.
To work you will need:
- yarn of different colors, 50 g each;
- hook number 3.
This product is created from small motifs. Each element should be completed separately. Make squares according to the given diagram. Start in the center of the square. You can easily adjust the size of one square.
Important!
All motifs must be square and strictly the same size.
The final touch to the work will be assembly. The connection occurs with a contrasting thread. The hook is inserted into the symmetrical loops of the edge of the squares and a connecting post is made.
Important!
In order for the squares to fit more tightly to each other and to prevent waves from forming, it is better to make the connection with a crochet one size smaller (than the one used to knit such motifs themselves).
Round cover with sides for a stool
It is most convenient to create a round cover using single crochets. In addition, with this pattern the weaving is much denser and thicker. For variety, you can combine several colors.
To work you will need:
Knitting a lovely circle starts from the center.
- It is advisable to make the first loop like an amigurumi toy (it’s called an amigurumi loop). This will create a very dense center without a hole.
- Next, knit the required number of single crochets into the loop according to the pattern.
- Lifting loop and then knit single crochets with additions.
- According to the diagram, make so many rows so that the diameter matches the stool model.
- Next, several rows (depending on the thickness of the stool) without changes.
Important! It is better to make the diameter of the cape one cm smaller so that the product wraps more tightly around the seat. When the cape is ready and knitted, you can use an elastic thread to pass simple connecting posts along the edge of the side. With this approach, nothing will fly off the seat, along with the person getting up.
How to crochet a square rug for a stool
A square rug can be knitted by knitting in the round, no matter how ridiculous it may sound. This model will tell you more about this.
To work you will need:
The diagram clearly shows how all the symbols fit together and formed a square. But the technique itself is knitting in the round.
- The product begins with several air loops. You can cheat and avoid a “hole” in the product. So, you will need to start not with a ring of air loops, but with an amigurumi loop.
- Next, knitting occurs strictly according to the pattern.
- Additions occur at four points - these are the corners of the square. This is why the shape is a square and not a circle.
Interesting shaped rug for a stool
Capes with impossible weaves have always attracted attention. If you study the diagram more closely, it is immediately clear that there is practically nothing complicated here. The colors of the rings were chosen in a very original way, compatible, but with outright contrast.
To work you will need:
- yarn in black, gray and white colors;
- hook number 4.
The yarn for such a cape should be of good quality; natural fibers can be used. It is important that the black yarn is dark without scuffs and other defects.
According to the pattern, you need to knit three white, three black and three gray rings. Moreover, you need to knit in alternations: first white, then black, then gray. One important point - each new ring, its first chain of air loops (33 loops) must close the previous ring. The ring itself has only two rows of double crochets. Separately knit the base for the rings according to the pattern. Assembly consists of stitching two parts together.
Important! The base is not round, so when sewing, you should pay attention to the bends of the rings and the base.
Sewed on, ironed, slightly moistened and dried. These are the last verbs that will prepare the cape for the first exit and covering the chair.
Options that are easy to use
It's amazing how a simple covering of furniture can radically change the appearance of the entire room, hide a boring color or defects in the upholstery, and add a bright accent to a boring interior. The use of these accessories on chairs in a children's room, kitchen or dining room is especially popular. Sewing covers is much cheaper than changing upholstery or furniture. You can’t do without them during special events, for example, when decorating interiors during holidays and wedding ceremonies.
These covers will decorate your interior
DIY cases
Today you can find furniture covers of various colors and styles in many stores, and order the tailoring of the desired model in any studio. But it’s much more interesting to make them yourself, choosing the right fabric and deciding on the style of the future product. This will also help save money, especially if you are decorating several pieces of furniture at once.
The cases are distinguished by their beauty and possibilities of use, as well as ease of manufacture. Even a not very experienced craftsman can sew such an accessory on his own.
The ability to radically change the appearance of the entire room
Let's consider all the options that you can easily do with your own hands. All the nuances and step-by-step implementation are below.
- After we have measured the height of the back, legs, and width of the chair, we make a pattern of three elements: rectangles covering the sides and the back with the seat. Don't forget to add a couple of centimeters to the seams.
- Transfer the pattern to the fabric. Since we are dealing with rectangular parts, you can use a ruler for greater accuracy.
- Carefully cut out all the details, taking into account the shared thread.
- First of all, we sew the side edges.
- Then we move on to the side and bottom sections of the back of the back. They should be folded and then stitched.
- Sew the side parts to the seat.
- We tuck and stitch the sections of the side and front parts of the product.
- Ready-made covers can be decorated with a bow or other decor on the back of the chair.
Advice Are you sewing for the first time and doubt your abilities? Try making a test piece first from inexpensive fabric, or at least basting it by hand.
Jeans option
The easiest option, which is suitable even for beginners, is a regular stool seat. It's fairly quick to sew.
Step-by-step instruction
- We make a template from cardboard or other material according to the shape of the stool seat;
- using the resulting pattern, we cut out three parts of the same shape and size from the fabric (for the front and back sides of the padding polyester);
- We place the padding polyester between two pieces of fabric and secure it with pins;
- to quilt the future seat, you need to sew even lines parallel to each other;
- we baste the pre-prepared bias tape for edging, leaving the ends as future ties;
- We carefully fold the ties in half and stitch them on a typewriter;
- We sew bias tape on the sides of the product using a machine.
Advice If you plan to sew several identical covers at once, you should cut them all at once. This will save fabric.
Easy to do it yourself
Such an accessory can be sewn even from a small piece of fabric.
Step-by-step instruction
- First, as usual, we make a pattern. In order not to bother with measuring instruments when calculating the diameter, you can simply attach a sheet of cardboard or newspaper to the surface of the stool, then cut it along the contour.
- We transfer the drawing to a new sheet of paper, adding a few centimeters along the contour.
- Based on the resulting template, we cut out the piece from the fabric.
- We put an elastic band on the edge of the fabric, fold the fabric, and stitch it.
- Our cover is ready - all that remains is to put it on the stool.
READ MORE: Installing an LED strip in the kitchen 26 photos of how to install, attach and connect the LED strip to a kitchen set with your own hands
Tip To add softness, you can sew foam rubber or padding polyester into the seat.
Provence style
A knitted cover can be an interesting option for decorating a room. Crocheting will take more time than sewing a simple pattern, but the result will be a special and original item. Crocheted furniture will look especially cozy in winter, as it creates an atmosphere of comfort and warmth.
- We make the upper part from rows of lush columns, separated by short chains of air loops.
- We make the hem by knitting several rows in stitches without adding. This way they will form an even side (for greater stability we make the side higher).
- In the last row we knit air loops - at the end you can insert a fixing elastic band or cord into them to secure the product to the stool.
An interesting option for decorating a room
Using various knitting patterns, you can knit absolutely any model with your own hands. For example, the so-called flower cover or models crocheted from motifs (they can also be decorated with crocheted flower appliqués).
Advice There is no need to be shy in choosing bright, rich colors. Multi-colored knitting threads can add originality and enliven the interior.
If knitting is not your thing, but the beauty and comfort of knitted covers haunt you, try making them from an old sweater. Any item of the desired size and color, knitted with knitting needles, large or medium knit, is suitable for this.
The edges of the sweater must be carefully processed so that the resulting item does not unravel in the future.
The pillow will add comfort when sitting
Depending on the size of the sweater, you can sew a cape only on the seat or on the back, or you can get a whole accessory, for example, by using several old products. Large volumetric patterns in delicate bed colors look especially atmospheric.
Tip Knitted items can stretch, so it is better to make them 1-2 cm smaller in width or diameter.
You can also sew models not only from knitwear, but also from other old things in good condition. For example, from jeans or coats that have become too small. The main thing is that the style of the resulting product matches the interior of the room.
On a children's chair
Chair covers in a children's room are more relevant than anywhere else. Bright, elegant fabrics can decorate the interior of a nursery and interest little fidgets. In addition, they are indispensable in protecting furniture from dirty handprints, spilled drinks or traces of children's creativity.
When sewing such accessories for the nursery, you can give free rein to your imagination: images of cartoon characters, funny animals, flowers, cars, princesses - everything that the child will be incredibly happy about.
The product is sewn according to a standard pattern, as for a regular stool. All measurements are taken in advance. Very often, for children's furniture, capes are sewn only on the back: two rectangular pieces are cut out and sewn in three places. At the end, you can apply a design or decorate it with fabric, sew on “bunny ears” or, for example, design it in the shape of a snowman.
In the interior of a children's room
Tip From the inside out, so that the cover does not slip, you can sew decorative laces that will be tied behind the legs of the stool. You can also use buttons, ribbons or elastic.
Covers made of easily washable fabric on children's high chairs are irreplaceable. They can make life much easier for young parents, since keeping a baby’s chair clean is almost impossible. In addition, the cover will provide additional protection for the child from slipping and, as a result, bruises.
If you decide to sew yourself, you need to carefully choose the fabric: it should not cause irritation to the baby. The best choice is thick cotton for the inner part, softer cotton or lawn for the outer part and padding polyester as a small layer.
READ MORE: How to make a bed with your own hands: make a bed at home by studying the drawings and instructions
For the bride and groom
- The pattern can be made by removing the pattern from the old cover, or use a ready-made pattern for a standard high chair.
- Having cut out all three parts of the product according to the pattern, we put it together (wrong side to each other), make a basting, and then sew it on a typewriter.
- Turn it right side out, fold the unstitched edges inward, then stitch again. We also sew on pockets, ties or straps, if necessary.
On an office chair
A computer chair can very quickly lose its appearance due to scuffs on the seat. Using a cover, you can update a worn-out chair, make it more convenient, comfortable, or simply liven up your office by decorating an inconspicuous chair with bright decor.
Products with buttons
- We apply transparent tracing paper to the parts of the chair (seat and back), and trace along the outline with a pencil.
- Add seam allowances to the resulting patterns (2 cm for the back, 5 cm for the seat to hem the edge and insert elastic there), cut out and cut the fabric.
- For the back, we cut 2 identical parts, which are then sewn on three sides (except for the bottom).
- For sitting, you can sew a cover with a skirt that will cover the legs. Or with an elastic band that will fit the seat tightly. This model is suitable for an office chair on wheels.
Simple and stylish option
Patchwork style
Patchwork (or sewing from scraps) can be a great idea when you need to sew a chair cover and have a large amount of small scraps of fabric collected at home. In this case, it does not matter at all what color they are or how similar the pattern is. The peculiarity of this type of needlework is that you can combine pieces of fabric of different texture and color.
To make a patchwork style accessory, you will need to prepare blocks - squares or rectangles of the same size cut out of fabric. Their size and quantity will depend on the size of our future product.
You can use decorative pillows
- Before sewing all the parts together, you need to lay them out to create the desired composition. Here everything depends only on our imagination; for example, we can try to convey a gradient or simply leave a haphazard drawing.
- Then the parts are folded right side inward and stitched together on a typewriter. The fabric is carefully ironed.
This way you can sew a stylish cover for the stool seat. To make it softer and more comfortable, you can add padding polyester inside.
Accessories in the patchwork style will suit the interior in country, Provence, boho styles, and will also decorate a children's bedroom or playroom.
Foot covers
We crochet chair covers: diagrams and descriptions
Handicrafts and chairs did not escape attention. How beautiful they are with the capes. It's just a holiday and why doesn't every home decorate its chairs with such exquisite knitted items. Even old wooden models with such wonderful capes can shine again. Several models for chairs that a craftsman can make for himself and his loved ones. Descriptions and diagrams accompany each product.
Crochet chair back cover
Charming and such bright chairs. This flower is just something. Lace adds tenderness. You immediately see a happy family in this house, rich in children's laughter. No one will refuse to have breakfast next to such a flower garden.
To work you will need:
The base is the colored fabric of the cape. It is made with pattern number 1. These are openwork elements. It is necessary to measure the back of the chair and the height. Knit the fabric along the width of the back and 2 heights. Fold the product and sew with side seams. Make the flowers according to the given pattern in white.
Then, along the edge of the fabric, without pulling it too far, knit lace.
There is little left: moisten and dry, smooth the product. You can decorate the chairs and drink tea.
Crochet chair seat cover
Elegant seat covers. Capes with tassels. Each tassel adds weight to the product, and it does not slide off the chair.
To work you will need:
- red cotton yarn;
- hook No. 3.
Attractive models become even more attractive after studying the pattern. This is an ordinary fillet mesh, on which lush columns are then created (bumps along the diagonal of the figure). Two flowers, one in the center with rather lush leaves and a large flower. These flowers are created using single crochets. Therefore, they have practically no holes. Separately create flowers and mesh, then sew them on and decorate with tassels.
Important!
The brushes should be heavy. You can put metal balls at the base of the brush.
One-piece chair cover
The case is in dark blue with a common pattern. A very convenient product. Knitting it is quite simple. And you can easily be convinced of this after reading the description.
To work you will need:
- It is necessary to measure the width of the seat and backrest. In this chair model, these indicators are the same.
- You need to cast on air loops of the required width.
- Next, knit according to the pattern - these are simple double crochets.
- It is necessary to knit the length from the hem along the seat, then through the seat, across the back and to the hem at the back. That is, the canvas should spread across the entire chair.
- Separately, cast on air loops equal to the width of the hem and knit three sides of the hem using the same pattern.
- Sew along the sides and back. So the one-piece chair cover is ready. Two parts and one long seam and the product is ready.
For the ornament, you can choose any design you like.
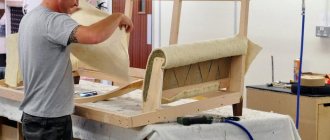
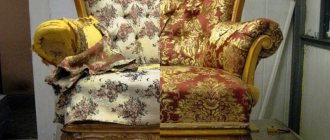
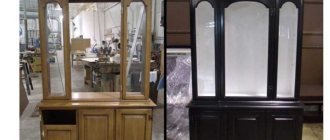
Old chair
No matter how old the chair is, this is still not a reason to throw it away, especially if the problem is only in the upholstery. If the body of the chair is strong, then you just need to buy foam rubber, upholstery fabric and repaint the wooden legs with handles. This way you save on buying a new chair and turn your old one into a work of art.
Keep in mind that interior designers charge a decent fee for such experiments with furniture. And in a modern interior, a repurposed chair looks unique and very stylish. And if you keep the upholstered chairs clean after remodeling, they will last at least another ten years.
© Depositphotos
Loading...
You will need
- gloves
- respirator
- furniture stapler
- upholstery fabric
- pliers
- stationery knife
- thick foam rubber
- scissors
- glue
- dye
- furniture tape
- hammer
- nails
- drill
- screwdriver
- self-tapping screws
- sandpaper
- Remove old upholstery and foam from the chair. Take it completely apart. Remove all excess staples with pliers. Be sure to wear a protective mask and gloves to avoid inhaling dust and getting splinters into your hands.
- Clean the wooden legs and armrests of old varnish and paint. This can be done with a knife and sandpaper.
- Glue the wooden parts of the chair with wood glue and let them dry.
- Paint the armrests and legs of the chair with spray paint (it dries the fastest).
- It is better to tighten all parts of the chair with new screws and nails. Therefore, carefully disassemble the seat with pliers and throw away the rusty nails.
- To make the seat last longer, first glue its parts with wood glue, and then fasten them with nails and screws.
- Staple the new furniture strip to the seat. If the original tape is in good condition, you can return it to its place and strengthen it with a new one, as a master does. Do the same with the back of the chair.
- Using a furniture stapler, sew up the bottom and back of the chair with thick black fabric.
- Cut a large piece of foam rubber to the size of the seat and back. Glue it in two layers to make the chair as soft and comfortable as possible.
- The master sews a custom-made cover in a patchwork style, for this he sews together different patches. The work is labor-intensive, but stylish. You can simply cover the back and seat with furniture fabric.
- Screw the legs to the chair. That's all, admire this beauty: a downright luxurious designer chair.
The process of transforming your grandmother's chair is fascinating, but the best part is that, if you wish, you can do the restoration of the old chair or armchair yourself. Who knows, maybe in a few years old-style furniture will become a real rarity. The master on his channel simultaneously remakes old Soviet armchairs and shows in detail each stage of his work.
Old armchairs with wooden armrests are a classic of Soviet interior design, as well as a side table; every family had them, but not everyone decided to give a second life to the old ones. It's amazing how designers create absolutely amazing things from unnecessary trash. Did you like the master’s work?
Loading...
Author of the article
Veronica Zhmurko Veronica was born into a family of teachers and admires painting and instrumental music. He loves all animals: the fragile editor has a dog, a guinea pig and a turtle at home. He dreams of one day getting into a car with his dog and traveling around the world. Favorite book: Brave New World by Aldous Huxley.
Previous article Next article
How to decorate a knitted cover for a chair and stool
The decoration for the cover can also be a pattern from the canvas itself, various flowers, lace and other borders (for example, tassels).
Pompoms are often used. You can use embroidery, but not with beads and not voluminous. Everything that is beautiful and soft is suitable for decoration.
Leggings have become very fashionable and popular for decorating chairs and stools - these are socks on the legs of a chair. They will greatly complement the picture of a knitted fabric for a seat if they are also crocheted.
Not only the fringe around the perimeter of the cape is charming, but also the various hanging knitted things.
Beads and large beads can be used, as an exception, and only for the back of the back. It serves as a great canvas for creativity. After all, the body practically does not come into contact with this part. This could be a huge bow. Moreover, the bow itself can be made of a plain fabric, or the color simply matches the knitted item. The most interesting thing is that you can tie the bow yourself using the same crochet hook. Such a small instrument, but ready to do big things and big things. Do not forget about the limits, or you can spoil the canvas with unnecessary details. Everything should be in the same style. There is no need to fashion each style into a fashionable item.
Perhaps someone likes bows or something made from ribbons. Why not. After all, this is a matter of taste and the designer here is the creator himself.
If you are familiar with knitting, then you can practice your skills in chair covers. Crocheting here is more relevant than knitting, since the patterns created will not be so original.
A crocheted chair seat can not only significantly decorate the interior, but also protect the surface of the furniture from dirt and preserve its original appearance longer.
Crocheting for beginners is very interesting. This can quickly become a good hobby for many mothers who want to update their home decor.
Before you start crocheting rugs for chairs, you need to select suitable threads.
Here are some tips:
- Experts advise choosing a yarn called “Iris” for the rug. They have a rich mass of colors, are easy to hook and are not too thick.
- If you decide to knit a cape with your own hands to insulate the surface of a chair, then it is better to turn your attention to wool yarn.
- Will your crochet chair seats consist of several shades? Choose the same type of yarn so that they are the same size both in appearance and feel, this will simplify the work.
These simple lessons will help you decide on the right yarn. Fortunately, now you can find anything on store shelves and the selection process will not take much time.
Measurements and pattern
In order for the pattern to be accurate and the product to fit well, you must first take measurements.
1Take measurements. Depending on the model of the cover, you need to measure the height and width of the seat and back, as well as the estimated length of the product. Pay special attention to the measurements of the chair legs, as in some models they may widen downwards. In this case, you need to take several measurements at the top and then at the base of the chair. We mark the widest and narrowest areas in our drawing.
2Drawing. Before transferring the measurements taken to the pattern, we draw a drawing on
READ MORE: Window grilles: what you can do with your own hands, selection, production, installation, about ordering ready-made ones
paper
, we note all the measurements taken there. The simplest pattern is for a one-piece cover: it simplifies sewing, but requires a little more fabric than cutting all the parts separately.
3Pattern. After that, we proceed directly to the full-size pattern. It can be built on tracing paper, newspaper or scraps
wallpaper
, having repeated the schematic drawing.
4Checking the pattern. To be completely sure that the pattern is correct, apply it to the chair and secure it with tape. This way we can see all possible inaccuracies made when constructing the drawing and correct them before sewing begins.
5Final option. Then we build the final version of the pattern - with seam allowances (about 2 cm on each side).
Before sewing, you should first take measurements
Round cape
Cover on a round chair
Standard knitted capes are made round, because this greatly simplifies the work. The crocheted chair seat should be small in size, and therefore one product can be made within a day. The mats for the stools will look more beautiful if you use several shades to make them. To crochet, you need to remember a simple procedure:
- It all starts with picking up air loops, which are finally connected into a ring.
- It is advisable to make the first column with single crochet loops wrapped around the ring.
- Next, the chair cover can be crocheted using any pattern, the main thing is to carefully monitor the number of stitches.
Circle first, second and third Circle fourth and fifth Circle seventh Circle eighth Circle ninth Circle tenth Circle eleventh Circle twelfth Circle thirteen Other options for round covers
Knitted chair rugs are ready for use immediately after completing the last round of stitches. Knowing how to knit can create stunning patterns and uniquely decorate any space.
Knitting methods
Knitting pattern for a square of cones Pattern for a square cape Another pattern for a square cape
A crocheted chair cover will look original if you use several ways to make it. There are many videos and various diagrams on the Internet that will help you make your choice. The main ones are the following types of loops:
- single crochet;
- double crochet, double crochet, stirrup, and so on;
- double crochet artesanal;
- pico;
- brushes;
- ring.
Chain loop (v.p.) Single crochet (st. b/n) Half double crochet (half crochet. s/n) Double crochet (dc. s/n) Double crochet (st. art. s/n) ) Picot Connecting post (connecting post) Brushes Ring
Square cape
Knitting a square cape
Crocheting chair covers is not limited to round options. Square ones can also surprise with their attractiveness, and their production can be carried out in an economical mode. A square crocheted chair rug is made in the form of knitting strips on which you can use the remains of any yarn. The order of operations can be as follows:
- Before knitting the rug, measure the seat of the chair, because the length of the strips should be equal to it.
- Knit as many strips as are expected for the same stool size.
- After this, they are folded into one sheet and tied to the edge with cap loops.
- A knitted chair cover can be decorated with a border, which in turn will prevent it from sliding across the surface.
- You can also diversify the napkin with small tassels running along the edge.
We will weave our cover from multi-colored stripes. The stripes are knitted like a double crochet (dc). This cape required 22 strips. We collect 11 strips into a single fabric. We tie them along the narrow edge. We knit RLS (single crochet). This is what the tied edge of the work should look like. We also tie the other 11 strips. Then we intertwine the strips in a checkerboard pattern so that we get squares. We tie these squares along the contour and connect them into one fabric. We tie the resulting fabric along the edge with a sc (single crochet). Next, we knit 2 VP (chain loops) lifting, knit the next row with a dc. We tie the edge and finish the work with a series of arches from 3 VPs, repeat after 4 columns. We make a fringe like this
Knitted seats last a long time and do not require special care. They are washable in a washing machine only at low temperatures - the only condition for their use. A crocheted chair cover would be a good gift for a resident of any country.
Sewing stages
Having prepared a sketch, all the necessary materials and tools, you can begin manufacturing. The whole process consists of several stages:
- creating a pattern;
- cut;
- fitting of parts;
- sewing.
If you have no experience, you should initially try to sew a cover for a chair from cheap “rough” fabric. In this way, you can protect yourself from possible mistakes and not spoil expensive material.
Pattern creation and cutting
Before making patterns for cutting, it is necessary to take measurements of all elements of the chair - more accurate than those taken to calculate fabric consumption. A pattern is made of the cover for the chair, taking into account all its configurations. It is necessary to decide in advance where all the seams will be located. For large parts, if they are of simple shape, you can only take measurements and make a drawing directly on the fabric. Complex shaped elements should first be marked on paper - secure it with pins and trace along the outline with a pencil. Then, using this pattern, draw lines on the fabric with chalk. All details of the future cape, after tracing along the contour on the fabric, are cut out with seam allowances.
It is recommended to iron all cut parts in the direction of the grain thread.
Fit
In order for the finished product to look perfect, you must first adjust the parts. All elements (interior, back and armrests) are secured with pins to a chair with armrests. This allows you to immediately see all the inaccuracies that were made during cutting. When all the cut details are adjusted to size, the product is basted by hand and tried on the chair again. If any discrepancies remain, they can be corrected using folds or darts.
Stages of making a feeder chair with your own hands, finishing
There is also a very easy way to adjust - trimming the fabric. In this case, the material must be cut in a strictly defined order (along the sides of the platform). However, experience is required here, as there is a high probability of making mistakes. Another method is cord finishing. It needs to be pinned to the future upholstery, and then cut in those places where the fabric will need to be adjusted to different recesses and corners.
Characteristic differences of loft style chairs, main types of products
Sewing
When the product “sits” well on the furniture, you can begin sewing on the sewing machine. All sour cream details are ground down, seams are overcast, edges are processed, a zipper (or Velcro, laces) is installed. The cape is then decorated with decorative elements. This could be fringe or decorative cord. All stages of tailoring are individual and depend on the model.
The flounces at the bottom of the cover often serve not only as decoration - they can be used to hide any flaws in the legs of old furniture.
Sewing a chair cover with your own hands is a fun and profitable activity. In addition to the fact that this allows you to gain experience in a new type of activity, such a hobby will undoubtedly give you pleasure from the creative process. Moreover, in this way you can save money and get an original piece of furniture that will delight you for many years.
What are they needed for?
We knit blankets more for personal enjoyment or design updates than for practicality. Descriptions of each bedspread can be viewed online, so there are no obstacles to starting work. Every Russian person should have such beauty in their home.
Good afternoon dear friends!
Today we have butterflies again, but knitted using the fillet technique. This time not napkins, but crocheted chair covers. There has never been such a topic on the blog before, except for various knitted blankets, which can also be used as throws on an armchair and sofa.
But the small knitted capes that will be discussed have a slightly different purpose; they do not cover the entire chair, but only the headboard.
Choosing the right design
The choice options largely depend on the shape of the chair. If owners of standard furniture can still buy a ready-made cover, then for a chair with an original shape, all that remains is to make an individual model. Self-tailoring allows you to create an interesting, creative design even for an ordinary chair. You can choose any fabric, select additional finishing materials and decorations. The main thing is that the finished product fits organically in color and style into the interior of the room.
| Style | Peculiarities |
| Patchwork | Such products are created using patchwork sewing techniques. You can sew very impressive capes from multi-colored pieces of fabric. The choice of colors is individual. For example, bright, contrasting covers with colorful patterns are suitable for boho or country style. They create a light, relaxed, festive atmosphere. For a romantic Scandinavian style with deliberate simplicity, you need to choose a combination of light pastel shades. For beginners, this sewing method may seem difficult due to the fact that many fragments need to be combined and assembled. |
| Loft | For this style, with its laconicism, rough simplicity, upholstered furniture with upholstery or covers made of natural or artificial leather, tapestry, coarse non-woven fabric, a bedspread made of natural or artificial fur is suitable |
| Shabby chic | This style is characterized by a combination of warm, homely, expensive antiques. Satin or silk fabrics are best for covers. They should be muted shades with floral patterns. Bright colors or geometric prints will be out of place. Frills and tassels are used as decoration |
| Baroque | This Italian style is distinguished by luxury and grace. Chair covers are made from expensive bright fabrics and decorated with flounces and frills. |
Instructions on how to properly remove a gas lift from an office chair for replacement
Patchwork
Loft
Shabby chic
Baroque
Crocheted chair covers
Such elegant crocheted capes are suitable for leather upholstered furniture or other beautiful upholstery.
I have selected several patterns of beautiful chair covers made using the fillet knitting technique. I will make a small explanation about them.
Fillet knitting is such a simple and beautiful creativity, you just need to know some nuances and rules that you can see.
I just like such counting schemes, just like , the principle of reading schemes in them is the same.
The fillet technique produces especially elegant and delicate products, and so are the crocheted chair covers.
It is better to use cotton or linen as a material. Hook No. 1.5.
Chair cover with roses and butterfly
This cape pattern is quite simple.
A small empty cell in it: 1С1Н, 2ВП, 1С1Н.
Long empty cell: 1С1Н, 5ВП, 1С1Н.
Filled cell: 3C1H.
Knitting a cape starts from top to bottom, if you read the pattern. The first 34 rows are knitted straight, and in the next rows, decreases are made on both sides according to the pattern.
The two toes in the last two rows are knitted separately.
You can even knit such a napkin; it will turn out to be a very interesting napkin with an unusual shape.
Crochet butterfly cover for a chair
A very original cape: a butterfly knitted with a fillet pattern, in it by itself, without an additional background.
The pattern is designed for knitting napkins with this pattern. For a chair cover, it will be enough to knit one half, and for a napkin, naturally, two identical parts.
The diagram is quite large, you can open it by clicking on.
First, we knit the two lower wings separately (18 rows each).
In the 19th row we combine the knitting into one fabric. To do this, we connect the wings with 15 chain stitches and continue crocheting the chair cover according to the pattern.
From the 65th row we decrease 6 stitches in every 6th row.
Round chair cover
DIY knitted chair covers can be different: square, rectangular or, as in this case, round. This openwork cape is suitable for a chair, stool and even an armchair. You should choose yarn for it taking into account the interior of your home.
In general, to work you will need:
- 20 grams of yarn in three colors;
- Hook No. 5;
- Cardboard.
The work progress is as follows:
1. Cast on the required number of air loops. We connect them into a ring. After this we move on to knitting circles.
For the first circle, we tie the ring with 16 single crochets, and the hook must be inserted into the hole of the circle.
We perform the second circle as follows: 2 air loops for lifting, then 4 s/n through the first loop of the previous row, after which we perform 2 ch. and continue knitting, knitting 4 stitches through the same loop of the bottom row.
Next, we change the color of the yarn and begin to knit the third circle: 3 loops for lifting, and then 4 stitches in the loop of the previous row, which is intended for lifting. The last chain stitch is attached to the first double crochet of this circle. You get 16 fragments of the pattern, 4 columns each.
Now we take a cardboard and wind 6 turns of thread on it. We insert the hook under the threads, grab the working thread and pull it under the threads.
Next, without releasing the loop from the hook, we grab the working thread over the rings of yarn and pull the loop on the hook using a chain loop. The hook should remain in the loop, and the threads should be carefully removed from the cardboard. We tie half of the ring with 12 single crochets, inserting the hook into the hole of the circle.
Next, the cardboard is again wrapped with threads in 6 turns, and the loop threads are attached in the same way. We knit half of the ring with 12 single crochets. Without tearing the threads from the last one, we sequentially tie all the rings on the other side with single crochets. We perform 12 columns on each half.
Using the same principle, you should make a track of 14 rings from the color of a different yarn.
The cape is ready.
New thing for a stool
Stools are an excellent solution for cottages and country houses. They are light, portable and do not take up much space, and paired with a beautiful cape, they are also a great addition to the interior. For beginners, the technique may seem complicated, but everything comes with experience, and for needlewomen who have dealt with crocheting, everything will be easy.
To get started, you will need the following materials: black, gray and blue yarn, take two skeins of 100 g, hook No. 3.5, scissors and the stool itself.
Start knitting with blue yarn, according to the pattern:
On the third row you can switch to gray. Do not knit the square completely, but only on both sides.
From the fifth to the ninth row, knit them in black, similar to the previous technique.
Alternate rows and colors according to the pattern.
When you reach the twelfth row, only a “three” of double crochets will be tied in the corners. This means it's time to start knitting the border.
Weave arches from air loops according to the pattern in two rows.
If desired, you can further decorate the cape with tassels, which we will make from blue yarn. Cut pieces of equal length from a skein of thread.
Now we fix the brush into the arch of the cape, as shown in the photo.
That's all. Your ottoman is fresh, beautiful and ready to use. In this way you can make capes on any surface, the main thing is to correctly calculate the required number of loops.
Bright seats
For this work you will need multi-colored yarn, choose the color at your discretion, a hook No. 3.5, scissors and a stool.
Tie a circle according to the pattern:
See the photo below for how to knit step by step.
We connect the elements together like this.
If you are familiar with the art of knitting, then you can try to diversify your skills and crochet exclusive and beautiful “seats” on chairs with your own hands; you can come up with patterns yourself or use ready-made ones.
Bright colors
Having knitting practice and the ability to work with basic loops, you can try knitting a cape for the seat of a stool. To do this, you should carefully follow the instructions below:
1. First you need to select multi-colored threads of the same thickness. This is necessary to ensure that the canvas is the same across the entire width.
2. Knit many multi-colored strips and join them together, knitting the loops in columns.
As a result, you will get this beauty.